<ul class="pager">
<li class="next">
<a href="/page/2/">Next <span aria-hidden="true">→</span></a>
</li>
</ul>
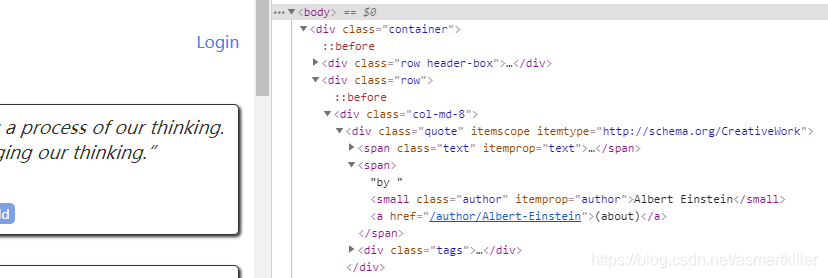
Scrapy支持CSS扩展,可让您选择属性内容


import scrapy


class QuotesSpider(scrapy.Spider):
    name = "quotes"
    start_urls = [
        'http://quotes.toscrape.com/page/1/',
    ]

    def parse(self, response):
        for quote in response.css('div.quote'):
            yield {
                'text': quote.css('span.text::text').get(),
                'author': quote.css('small.author::text').get(),
                'tags': quote.css('div.tags a.tag::text').getall(),
            }

        next_page = response.css('li.next a::attr(href)').get()
        if next_page is not None:
            next_page = response.urljoin(next_page)
            yield scrapy.Request(next_page, callback=self.parse)
现在,在提取数据之后,parse方法将查找到下一页的链接,使用urljoin方法构建完整的绝对URL(因为链接可以是相对的),并产生对下一页的新请求, 将其自身注册为回调,以处理下一页的数据提取并保持所有页面的爬网。您在这里看到的是Scrapy的以下链接机制:当您在回调方法中产生请求时,Scrapy将安排该请求的发送并在该请求完成时注册要执行的回调方法。使用此工具,您可以构建复杂的搜寻器,并根据定义的规则跟踪链接,并根据其访问的页面提取不同类型的数据。在我们的示例中,它创建了一个循环,将其链接到下一页的所有链接,直到找不到该链接为止-便于通过分页方式爬网博客,论坛和其他网站。
作为创建请求对象的快捷方式,您可以使用response.follow:
import scrapy

class QuotesSpider(scrapy.Spider):
    name = "quotes"
    start_urls = [
        'http://quotes.toscrape.com/page/1/',
    ]

    def parse(self, response):
        for quote in response.css('div.quote'):
            yield {
                'text': quote.css('span.text::text').get(),
                'author': quote.css('span small::text').get(),
                'tags': quote.css('div.tags a.tag::text').getall(),
            }

        next_page = response.css('li.next a::attr(href)').get()
        if next_page is not None:
            yield response.follow(next_page, callback=self.parse)
与scrapy.Request不同,response.follow直接支持相对URL-无需调用urljoin。 注意response.follow仅返回一个Request实例; 您仍然必须产生此请求。
您还可以将选择器传递给response.follow而不是字符串。 该选择器应提取必要的属性:

对于<a>元素,有一个快捷方式:response.follow自动使用其href属性。 因此,代码可以进一步缩短:

要从一个可迭代对象创建多个请求,可以改用response.follow_all:


import scrapy

class AuthorSpider(scrapy.Spider):
    name = 'author'

    start_urls = ['http://quotes.toscrape.com/']

    def parse(self, response):
        author_page_links = response.css('.author + a')
        # 发出请求本页中的作者的about所链接的页面的response
        yield from response.follow_all(author_page_links, self.parse_author)

        pagination_links = response.css('li.next a')
        # 发出请求本页的下一页的response
        yield from response.follow_all(pagination_links, self.parse)

    def parse_author(self, response):
        def extract_with_css(query):
            return response.css(query).get(default='').strip()

        yield {
            'name': extract_with_css('h3.author-title::text'),
            'birthdate': extract_with_css('.author-born-date::text'),
            'bio': extract_with_css('.author-description::text'),
        }
response.css(’.author + a’) 指的是class="author"的small标签的下一个兄弟标签a
response.css(‘li.next a’)指的是class="next"的li标签下的子标签a。


您可以在运行蜘蛛时使用-a选项来为蜘蛛提供命令行参数:scrapy crawl quotes -o quotes-humor.json -a tag=humor
这些参数会传递给Spider的__init__方法,并默认成为蜘蛛属性。在此示例中,为tag参数提供的值可通过self.tag获得。 您可以使用它使您的Spider只获取带有特定标记的引号,并根据以下参数构建URL:
class QuotesSpider(scrapy.Spider):
    name = "quotes"

    def start_requests(self):
        url = 'http://quotes.toscrape.com/'
        tag = getattr(self, 'tag', None)
        if tag is not None:
            url = url + 'tag/' + tag
        yield scrapy.Request(url, self.parse)

    def parse(self, response):
        for quote in response.css('div.quote'):
            yield {
                'text': quote.css('span.text::text').get(),
                'author': quote.css('small.author::text').get(),
            }

        next_page = response.css('li.next a::attr(href)').get()
        if next_page is not None:
            yield response.follow(next_page, self.parse)
案例
处理上一节博客所提到的分页问题。
处理博客列表页


这里的列表目前不太会处理,使用css获取不太行,下次博客中再处理。我直接使用硬编码来试试。

处理博客页
代码:

import scrapy
class QuotesSpider(scrapy.Spider):
name = "quotes"
start_urls = [
'https://blog.csdn.net/asmartkiller'
]
def parse(self, response):
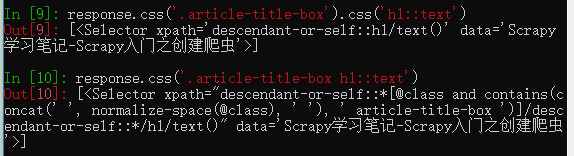
# 处理本页的文章列表
blog_links = response.css('.article-item-box').css('h4').css('a')
yield from response.follow_all(blog_links, self.parse_page)
# 请求下一页
#response.css('li.focus + li::text')
#if ++self.index <= int(self.num):
if response.url == self.start_urls[0]:
pagination_link = self.start_urls[0]+'/article/list/'
for i in range(2,int(self.num)+1):
print('---->生成的链接地址'+pagination_link+str(i))
yield response.follow(pagination_link+str(i), self.parse)
def parse_page(self, response):
print(response.css('.article-title-box').css('h1::text'))
总结
创建请求对象:scrapy.Request(next_page, callback=self.parse)或response.follow(next_page, callback=self.parse)
下面的博客将分析IP代理池框架:https://github.com/jhao104/proxy_pool/blob/master/doc/introduce.md
https://github.com/SpiderClub/haipproxy/blob/master/README.md