所用Spring Boot源码版本为2.2.6
0x01.默认访问首页
- 达到没有具体制定资源的情况下,默认访问首页。
1.Spring MVC方式:
- 在控制器类中,做一个资源映射:
@RequestMapping({"/","/index.html"})
public String index(){
    return "login";
}
2.Spring Boot方式:
- 在自定义的配置类中,增加一个视图解析器。
- 细节:在2.x版本的Spring Boot中mvc的配置类去实现
WebMvcConfigurer接口,Spring Boot会自动将其中的解析器加入到容器中。
@Configuration
public class MyMvcConfig implements WebMvcConfigurer {
    @Override
    public void addViewControllers(ViewControllerRegistry registry){
        registry.addViewController("/").setViewName("login");
        registry.addViewController("/login.html").setViewName("login");
    }
}
0x02.引用jar包中的静态资源
- 使用thymeleaf表达式中的
@{}修改相应标签的href属性,指向webjars中相应的资源。
<link th:href="@{/webjars/bootstrap/4.0.0/css/bootstrap.css}">
- 也可以使用
static文件夹中的静态资源。
<img class="mb" src="../asserts/img/bootstrap-solid.svg"
th:href="@{/asserts/img/bootstrap-solid.svg}" >

0x03.实现国际化
1.国际化配置文件:
- 抽取页面中需要使用国际化的信息,写在配置文件中。


2.使用ResourceBundleMessageSource管理国际化资源文件:
- SpringBoot自动配置好了管理国际化资源文件的组件。
- 差看国际化组件的自动配置类
MessageSourceAutoConfiguration源码:


- 说明,国际化配置文件的基础名是
messages,如果我们的配置文件直接放在类路径下叫messages.properties,那么Spring Boot就会自动帮我们配置,不需要自己进行配置。 - 如果自己进行配置,只需要Spring Boot的配置文件中指明就可以了。

3.页面获取国际化信息的值:
- 使用thymeleaf中的
#{}语法获取国际化的值。
Message Expressions: #{...}

- input输入框不能使用th:text取值,text是标签里面的内容,input输入框是字节数,没有标签体,需要使用 thymeleaf的行内表达式,双中括号里面写表达式。
<p>Hello, [[${session.user.name}]]!</p>

- 这样浏览器会根据语言信息进行解析。
4.解决乱码:
- 全局设置默认自动转码。

5.点击链接实现国际化:
- Spring Boot默认的是根据请求头带来的区域信息获取Locale进行国际化。
- 如果需要达到点击链接实现国际化,那么我们不能使用Spring Boot的默认配置,需要自己进行配置,我们可以自定义一个区域信息解析器,并实现
LocaleResolver接口。 - 在按钮处添加请求:
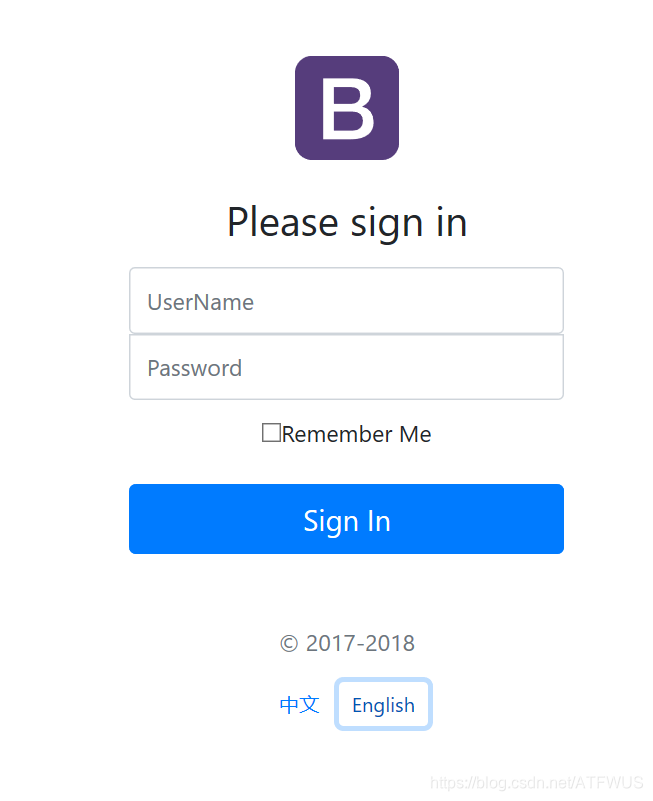
<a class="btn btn-sm" th:href="@{/(l='zh_CN')}">中文</a>
<a class="btn btn-sm" th:href="@{/(l='en_US')}">English</a>
//可以在链接上面携带区域信息
public class MyLocaleResolver implements LocaleResolver {
    @Override
    public Locale resolveLocale(HttpServletRequest httpServletRequest) {
        String l = httpServletRequest.getParameter("l");
        // 获取系统默认的区域信息
        Locale locale = Locale.getDefault();
        // 如果参数带了区域信息,则使用参数的
        if (!StringUtils.isEmpty(l)) {
            String[] s = l.split("_");
            locale = new Locale(s[0], s[1]);
        }
        return locale;
    }

    @Override
    public void setLocale(HttpServletRequest httpServletRequest, HttpServletResponse httpServletResponse, Locale locale) {

    }
}
- 在mvc的配置类里面添加一个组件:
@Bean
public LocaleResolver localeResolver() {
	return new MyLocaleResolver();
}
- 查看一下效果:


0x04.登录拦截器
1.登录Controller:
- 如果登录成功,将用户信息存入session。
@Controller
public class LoginController {
    @PostMapping(value = "/user/login")
    public String login(@RequestParam("username") String username,
                        @RequestParam("password") String password,
                        Map<String,Object> map, HttpSession session){
        if(!StringUtils.isEmpty(username)&&"atfwus".equals(password)){
            //登录成功,信息存入session
            session.setAttribute("loginUser", username);
            return "redirect:/main.html";
        }else{
            //登录失败
            map.put("msg","用户名或密码错误!!!");
            return "login";
        }
    }
}
2.编写一个拦截器类:
- 编写一个普通类实现HandlerInterceptor接口。
- 我们需要在接口调用之前拦截请求判断用户是否登陆,所以这里需要使用 preHandle 方法,在里面编写写验证逻辑,最后返回 true 或者 false,确定请求是否合法。
public class LoginHandlerInterceptor implements HandlerInterceptor {
    @Override
    public boolean preHandle(HttpServletRequest request, HttpServletResponse response, Object handler) throws Exception {
        Object user = request.getSession().getAttribute("loginUser");
        if(user == null) {
            // 未登录,返回登录页面
            request.setAttribute("msg","请先登录!!!");
            request.getRequestDispatcher("/login.html").forward(request,response);
        } else {
            // 如果session里有user,表示该用户已经登陆,放行请求
            return true;
        }
        return false;
    }

    @Override
    public void postHandle(HttpServletRequest request, HttpServletResponse response, Object handler, ModelAndView modelAndView) throws Exception {

    }

    @Override
    public void afterCompletion(HttpServletRequest request, HttpServletResponse response, Object handler, Exception ex) throws Exception {

    }
}
3.配置拦截器类:
- 在mvc配置类中注册自定义拦截器,添加拦截路径和排除拦截路径。
addPathPatterns("/**")拦截所有的请求excludePathPatterns(“xxx”)排除不需要拦截的请求。
//注册拦截器
@Override
public void addInterceptors(InterceptorRegistry registry) {
    registry.addInterceptor(new LoginHandlerInterceptor()).addPathPatterns("/**")
        .excludePathPatterns("/login.html","/","/asserts/**","/webjars/**","/user/login");
}
- 在这里,拦截了除了登录页面
login.html,默认页面/,静态资源/asserts/**,/webjars/**的所有页面。 - 我们可以测试到,在没有登录的情况下,直接访问其它页面会被拦截。

0x05.公共页面元素抽取
- 利用thymeleaf对页面的公共进行抽取。
1.抽取公共页面:
- 使用
th:fragment=""声明被抽取的部分。
<div th:fragment="headr">
	<div>//...
</div>
2.引入公共片段
-
th:insert:将公共片段整个插入到声明引入的元素中。
~{templatename::fragmentname}:模板名::片段名。~{templatename::selector}:模板名::选择器。- insert的公共片段在div标签中,如果使用th:insert等属性进行引入,可以不用写
~{},行内写法可以加上:[[~{}]];[(~{})]。
-
th:replace:将声明引入的元素替换为公共片段。
-
th:include:将被引入的片段的内容包含进这个标签中。
<footer th:fragment="headr">
ATFWUS
</footer>

引入方式
<div th:insert="footer :: headr"></div>
<div th:replace="footer :: headr"></div>
<div th:include="footer :: headr"></div>

效果1
<div>
    <footer>
    ATFWUS
    </footer>
</div>

效果2
<footer>
ATFWUS
</footer>

效果3
<div>
ATFWUS
</div>
0x06.错误处理
1.Spring Boot 默认处理错误的机制
- Spring Boot遇到错误时返回一个默认的错误页面,这个页面包含了这些信息:

-
在
ErrorMvcAutoConfiguration类中,进行了错误的自动配置,往容器中添加了以下组件。DefaultErrorAttributes组件:帮我们在页面共享信息;BasicErrorController组件:处理默认/error请求;- E
rrorPageCustomizer组件:出现错误以后来到error请求进行处理; DefaultErrorViewResolver组件:一但系统出现4xx或者5xx之类的错误;ErrorPageCustomizer就会生效(定制错误的响应规则);就会来到/error请求;就会被BasicErrorController处理;响应页面,具体去哪个页面是由DefaultErrorViewResolver解析得到的;
2.定制错误页面:
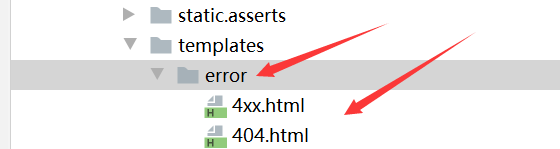
- 有模板引擎的情况下;error/状态码; 【将错误页面命名为 错误状态码.html 放在模板引擎文件夹里面的 error文件夹下】,发生此状态码的错误就会来到 对应的页面;
-
我们可以使用4xx和5xx作为错误页面的文件名来匹配这种类型的所有错误,精确优先(优先寻找精确的状态码.html);
-
页面能获取的信息;
- timestamp:时间戳
- status:状态码
- error:错误提示
- exception:异常对象
- message:异常消息
- errors:JSR303数据校验的错误都在这里
-
- 没有模板引擎(模板引擎找不到这个错误页面),静态资源文件夹下找;
- 以上都没有错误页面,就是默认来到SpringBoot默认的错误提示页面;
3.定制错误的json数据:
- 将数据转发到/error进行自适应响应效果处理。
    @ExceptionHandler(UserNotExistException.class)//自定义异常
    public String handleException(Exception e, HttpServletRequest request){
        Map<String,Object> map = new HashMap<>();
        //传入我们自己的错误状态码  4xx 5xx
        request.setAttribute("javax.servlet.error.status_code",500);
        map.put("code","user.notexist");
        map.put("message","出错了!!!");

        request.setAttribute("ext",map);
        //转发到/error
        return "forward:/error";
    }
- 出现错误以后,会来到/error请求,会被
BasicErrorController处理,响应出去可以获取的数据是由getErrorAttributes得到的(是AbstractErrorController(ErrorController)规定的方法); - 如果我们要将数据携带出去,可以编写一个ErrorController的实现类(或者编写AbstractErrorController的子类),放到容器中,页面上能用的数据,或者是json返回能用的数据都是通过errorAttributes.getErrorAttributes得到;容器中DefaultErrorAttributes.getErrorAttributes();默认进行数据处理的;
//给容器中加入我们自己定义的ErrorAttributes
@Component
public class MyErrorAttributes extends DefaultErrorAttributes {

    @Override
    public Map<String, Object> getErrorAttributes(RequestAttributes requestAttributes, boolean includeStackTrace) {
        Map<String, Object> map = super.getErrorAttributes(requestAttributes, includeStackTrace);
        map.put("msg2","信息");
        return map;
    }
}
ATFWUS --Writing By 2020–04-28
