在OAuth2.0里面有以下这几种认证方式。
- authorization_code 授权码认证
- client_credentials 客户端认证
- password 密码认证
- implicit 隐式授权认证
- refresh_token 刷新密钥
一般我们会在认证请求的grant_type参数中指定采用何种方式去进行认证。比如下面的一个链接,通过grant_type=authorization_code指定采用授权码认证。
http://localhost:8080/oauth/token?grant_type=authorization_code&client_id=client&client_secret=123456&code=jRvetc&redirect_uri=http://www.baidu.com
spring-oauth2 (bearer)是基于spring-security的验证机制,
对于第三方访问受限资源时通过token机制来验证
验证steps:
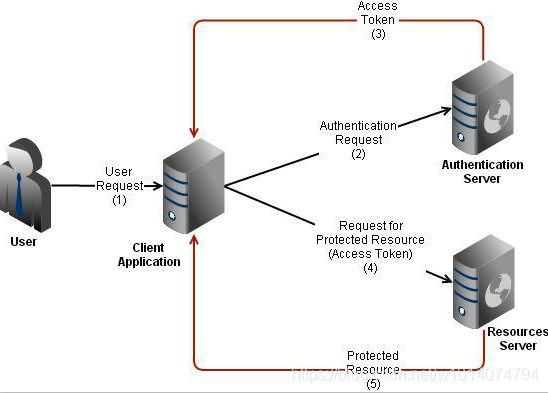
通过时序图来看一下,验证方式:
1、发送username, password, client_id, client_secret, grant_type到server
2、server返回包括access_token, token_type, refresh_token, expires_in
3、客户端向资源服务器发起请求后,资源服务器会首先拿接受的token去权限服务器验证,如果验证通过,才继续执行请求。
下面是一些默认的端点 URL:
/oauth/authorize:授权端点
/oauth/token:令牌端点
/oauth/confirm_access:用户确认授权提交端点
/oauth/error:授权服务错误信息端点
/oauth/check_token:用于资源服务访问的令牌解析端点
/oauth/token_key:提供公有密匙的端点,如果你使用JWT令牌的话
授权端点的 URL 应该被 Spring Security 保护起来只供授权用户访问
下面看看具体的项目案例:
一、创建auth2_server工程

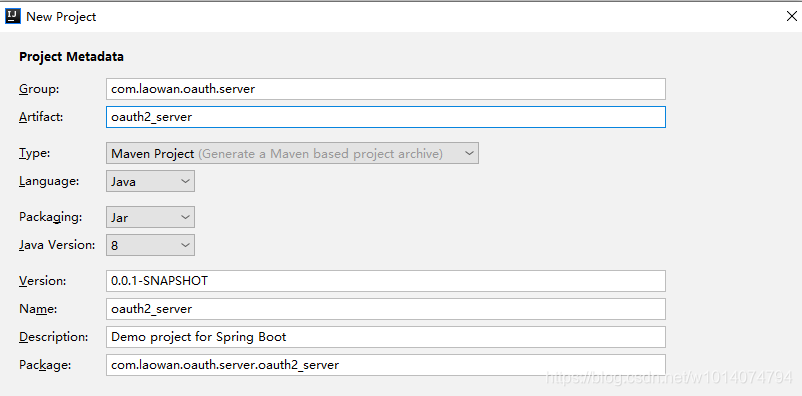
注意:名称中不能有大写字母
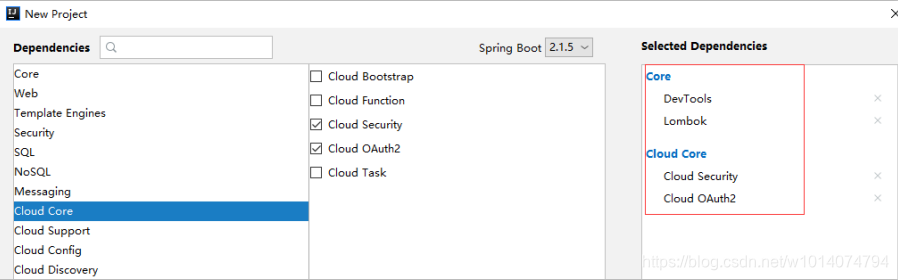
选择依赖:
选择创建工程的名称和保存的目录:

项目新建完成。
二、配置认证中心AuthorizationServer
核心是继承AuthorizationServerConfigurerAdapter
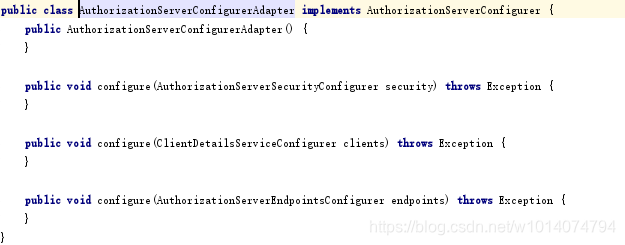
主要是实现三个配置方法:
1、配置认证相关属性
configure(AuthorizationServerSecurityConfigurer security)
2.配置客户端详情
configure(ClientDetailsServiceConfigurer clients)
3、配置认证服务的端点Endpoints相关属性
configure(AuthorizationServerEndpointsConfigurer endpoints)
实现如下:
在实现的AuthorizationServerConfig配置类上加上@EnableAuthorizationServer注解,说明该工程作为认证中心。
/**
 * @program: oauth2_server
 * @description: AuthorizationServer配置
 * @author: wanli
 * @create: 2019-05-22 16:00
 **/
@EnableAuthorizationServer
@Configuration
public class AuthorizationServerConfig extends AuthorizationServerConfigurerAdapter {
    // accessToken有效期
    private int accessTokenValiditySeconds = 7200; // 两小时
    private int refreshTokenValiditySeconds = 7200; // 两小时

    /**
     * 配置认证客户端ClientDetailsService
     * @param clients
     * @throws Exception
     */
    @Override
    public void configure( ClientDetailsServiceConfigurer clients ) throws Exception {
        //这里主要配置的是客户端的信息,而不是认证用户的信息
        //添加客户端信息
        clients.inMemory()                  // 使用in-memory存储客户端信息
                .withClient("client")       // client_id
                .secret("{noop}123456")                   // client_secret
                .redirectUris("http://www.baidu.com")
                 .authorizedGrantTypes("authorization_code","password","client_credentials","refresh_token","implicit")// 该client允许的授权类型
                .scopes("app")                                   // 允许的授权范围
                .accessTokenValiditySeconds(accessTokenValiditySeconds)  //有效期时间
                .refreshTokenValiditySeconds(refreshTokenValiditySeconds)
        ;
    }

    /**
     * 配置认证服务  oauthServer
     * @param oauthServer
     */
    @Override
    public void configure(AuthorizationServerSecurityConfigurer oauthServer) {
        // 允许表单认证
        oauthServer.allowFormAuthenticationForClients();
        // 允许check_token访问
        oauthServer.checkTokenAccess("permitAll()");
    }

    /**
     * 配置访问端口endpoints
     * @param endpoints
     */
    @Override
    public void configure(AuthorizationServerEndpointsConfigurer endpoints) {
        endpoints.authenticationManager(authenticationManager())
                //允许get,post方法访问 (默认获取token只能post方法)
               // .allowedTokenEndpointRequestMethods(HttpMethod.GET,HttpMethod.POST)
        ;
    }

    @Bean
    AuthenticationManager authenticationManager() {
        AuthenticationManager authenticationManager = new AuthenticationManager() {
            @Override
            public Authentication authenticate(Authentication authentication) throws AuthenticationException {
                return daoAuhthenticationProvider().authenticate(authentication);
            }
        };
        return authenticationManager;
    }


    @Bean
    public AuthenticationProvider daoAuhthenticationProvider() {
        DaoAuthenticationProvider daoAuthenticationProvider = new DaoAuthenticationProvider();
        daoAuthenticationProvider.setUserDetailsService(userDetailsService());
        daoAuthenticationProvider.setHideUserNotFoundExceptions(false);
        daoAuthenticationProvider.setPasswordEncoder(PasswordEncoderFactories.createDelegatingPasswordEncoder());
        return daoAuthenticationProvider;
    }

    // 设置添加用户信息,正常应该从数据库中读取
    @Bean
    UserDetailsService userDetailsService() {
        InMemoryUserDetailsManager userDetailsService = new InMemoryUserDetailsManager();
        userDetailsService.createUser(User.withUsername("user1").password("{noop}123456")
                .authorities("ROLE_USER").build());
        userDetailsService.createUser(User.withUsername("user2").password("{noop}123456")
                .authorities("ROLE_USER").build());
        return userDetailsService;
    }
}
启动报错:
'authorizationEndpoint' threw exception; nested exception is java.lang.NoClassDefFoundError: javax/servlet/ServletException
原因:
没有加入spring-boot-starter-web依赖。
<dependency>
    <groupId>org.springframework.boot</groupId>
    <artifactId>spring-boot-starter-web</artifactId>
</dependency>
启动成功,默认端口8080
授权码认证 authorization_code
出现如下异常:
User must be authenticated with Spring Security before authorization can be completed.

原因是:
进行oauth2认证前,必须先经过Spring Security的认证。
添加 Spring Security认证
@Configuration
public class WebSecurityConfig extends WebSecurityConfigurerAdapter {
    // 拦截所有请求,使用httpBasic方式登陆
    @Override
    protected void configure(HttpSecurity http) throws Exception {
       //拦截所有请求 通过httpBasic进行认证
        http.authorizeRequests().antMatchers("/**").fullyAuthenticated().and().httpBasic();
    }
}
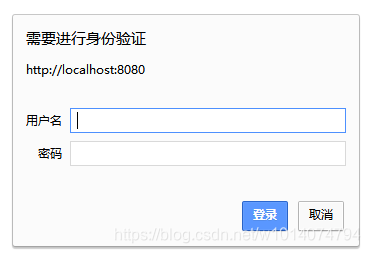
用户名,密码是在UserDetailsService 中配置:
user1
123456
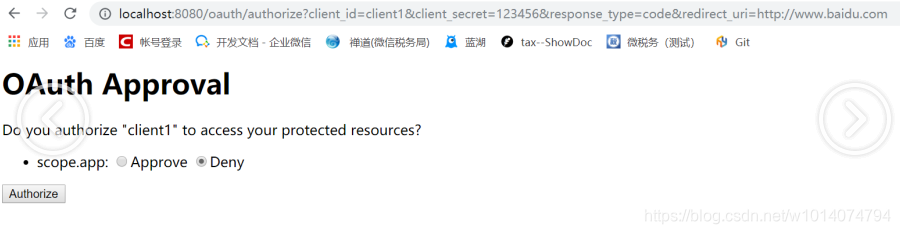
登录成功,出现授权页面:
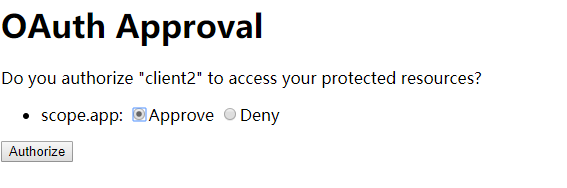
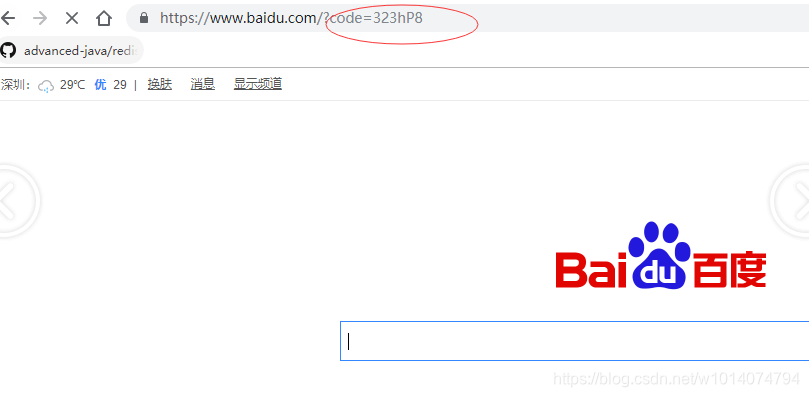
选择授权,重定向到百度,并在链接后面加上了授权码:
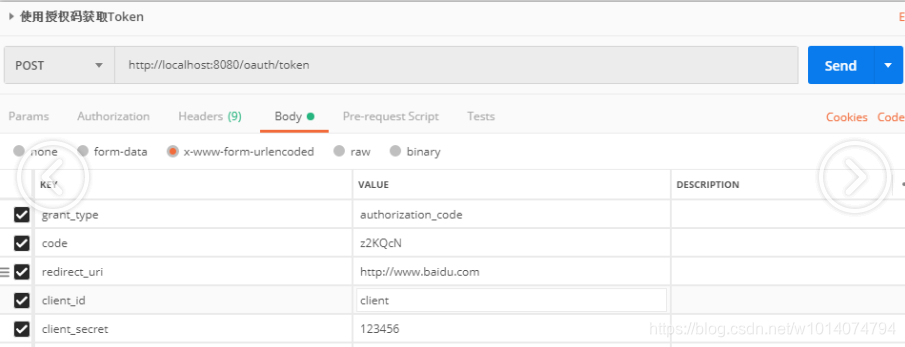
使用授权码去获取token
使用postman发起请求:
http://localhost:8080/oauth/token?grant_type=authorization_code&client_id=client&client_secret=123456&code=jRvetc&redirect_uri=http://www.baidu.com
返回结果:
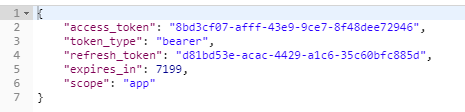
客户端认证client_credentials

密码认证password
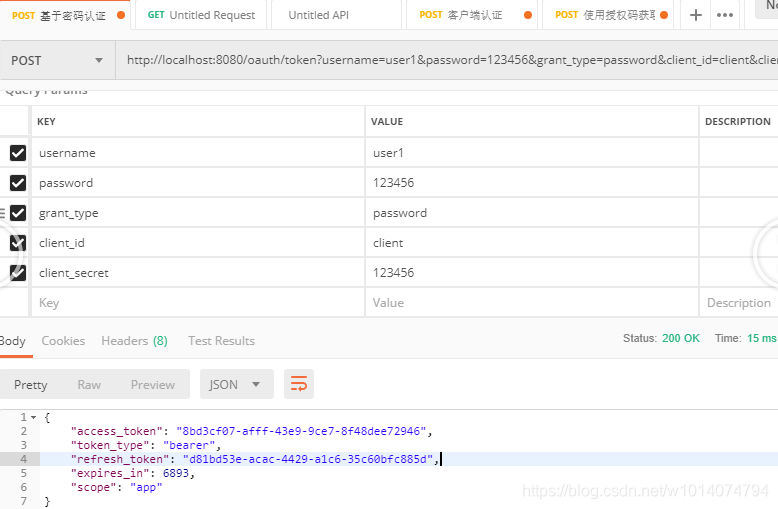
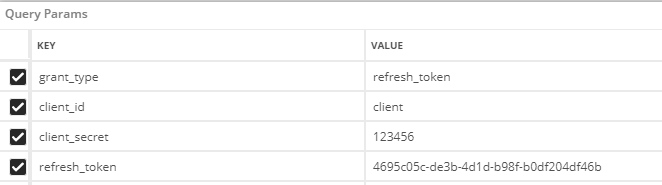
刷新秘钥refresh_token
post请求
http://localhost:8080/oauth/token?grant_type=refresh_token&client_id=client&client_secret=123456&refresh_token=4695c05c-de3b-4d1d-b98f-b0df204df46b
一直出现如下异常:

后台的异常信息为:
Handling error: IllegalStateException, UserDetailsService is required.
解决:
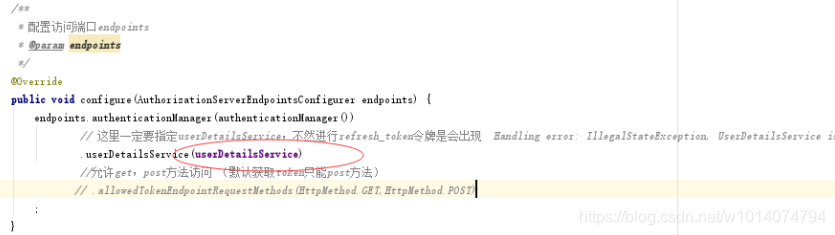
刷新秘钥refresh_token 的认证必须在AuthorizationServerEndpointsConfigurer配置中指定UserDetailsService 。不指定,对其他四种认证获取token是没有影响的。
隐式授权类型 implicit
适合直接在前端应用获取token的应用
注意:implicit和authorization_code授权请求的区别主要是
implicit的response_type=token
authorization_code的response_type = code
指定然后类型是token,请求成功后,直接将token信息链接到重定向地址后面。所以这个认证方式的安全级别相对较低。
一、get请求:
http://localhost:8080/oauth/authorize?client_id=client2&client_secret=123456&response_type=token&redirect_uri=http://www.baidu.com
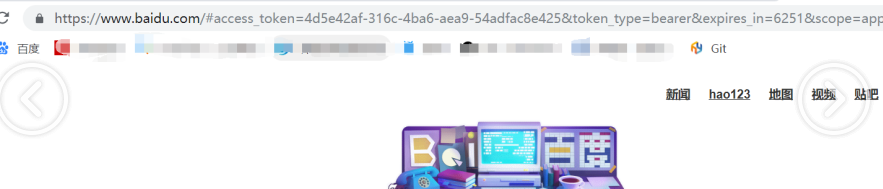
二、在界面上,授权允许访问
三、根据配置的redirect_uri进行重定向,并在链接后面直接返回access_token
请求结果:
https://www.baidu.com/#access_token=d2addcfb-e29a-44ec-95c3-e4d5f2e80663&token_type=bearer&expires_in=6967&scope=app
OAuth客户端运行在浏览器中(Javascript、Flash等)
浏览器绝对可信,因为该类型可能会将访问令牌泄露给恶意用户或应用程序。
流程剖析: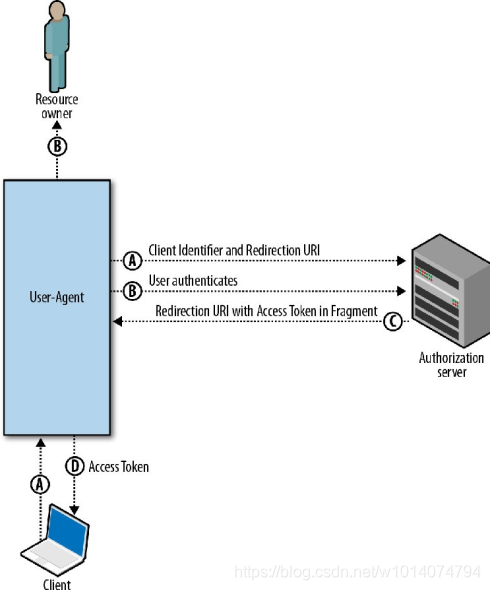
其他说明:
1、如果添加spring-cloud-starter-security的依赖后,什么都不配置,默认拦截所有请求
示例,添加/hello测试方法
@SpringBootApplication
@RestController
public class Oauth2ServerApplication {

    public static void main(String[] args) {
        SpringApplication.run(Oauth2ServerApplication.class, args);
    }

    @ResponseBody
    @RequestMapping("hello")
    public  String hello(){
        return  "hello";
    }
}
请求http://localhost:8080/hello,会自动重定向到http://localhost:8080/login
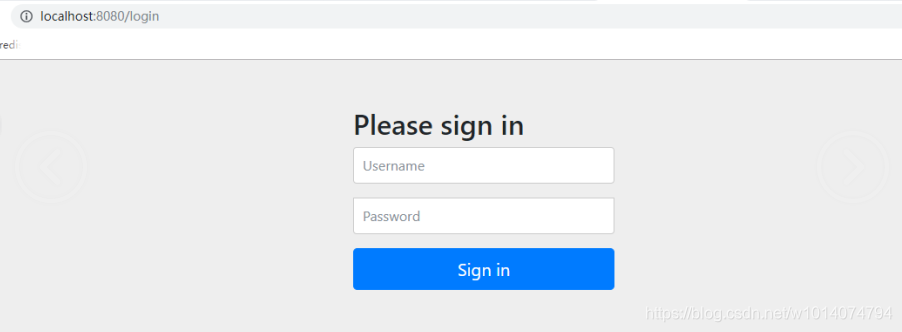
默认用户是:user
密码是项目启动随机生成的。
Using generated security password: bd661305-b0bb-44d8-95ae-9655a649a5f0

2、如果在属性文件中配置security的用户属性,那么就不会生成默认用户user信息
spring.security.user.name=admin
spring.security.user.password=123456
3、在WebSecurityConfig配置类中添加默认用户
@Override
protected void configure(AuthenticationManagerBuilder auth) throws Exception{
auth.inMemoryAuthentication()
.withUser(“user”).password("{noop}123456").roles(“USER”)
.and()
.withUser(“admin”).password("{noop}123456").roles(“USER”,“ADMIN”);
}
(1)注意密码的加密方式,这里采用的{noop},不加密
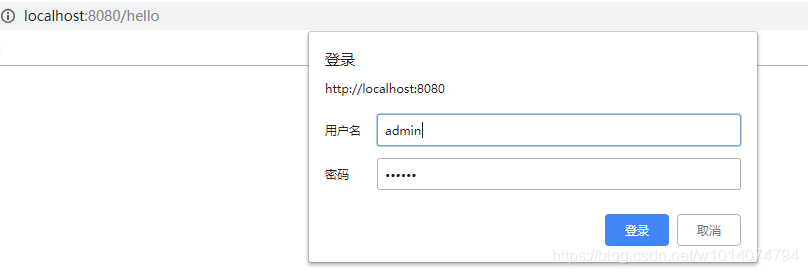
(2)只要配置了WebSecurityConfig配置类,那么认证失败重定向就会从页面,变成小弹窗
(3)在AuthorizationServerConfig和WebSecurityConfig两个配置类中,不要出现重复的配置属性,
比如,针对http是否拦截的配置,针对AuthenticationManager 的Bean的配置
github源码:
https://github.com/StarlightWANLI/oauth2.git
如果你还有其他OAuth2.0认证方面的想了解的内容,可以在底下评论留言。我会尽力抽空调研下。
最后,如果我写的文章对您能有些许帮助,请帮忙点赞、关注。
下面是我的微信公众号,也会不定期更新一些java方面的内容,欢迎大家来撩。

