一、前言
本章是本游戏基础功能实现的最后一章。
涉及的内容比较多,希望能够耐心看完,然后用心去理解。
本章内容(实现的功能):
1、地图数据的类
2、地图的绘制(ListView选择不同关卡加载不同的地图)
3、人物上下左右的移动(对移动事件的处理逻辑)
二、实现代码
任务一:地图的数据类
前面讲到地图的数据是一个二维数组的类型,我们暂时新建一个类,定义一个二维数组来放置地图的数据,代码如下:
public class MapData {
//    新建二维数组
    ArrayList<int[][]> mapDataList = new ArrayList<>();

    MapData(){

        int[][] LV1 = {
                        {0,0,0,0,0,0,0,0,0,0,0,0,0,0,0},
                        {0,0,0,0,0,0,0,0,0,0,0,0,0,0,0},
                        {0,0,0,0,0,0,0,0,0,0,0,0,0,0,0},
                        {0,0,0,0,0,0,0,0,0,0,0,0,0,0,0},
                        {0,0,0,0,0,0,0,0,0,0,0,0,0,0,0},
                        {0,0,0,0,0,0,5,0,0,0,0,0,0,0,0},
                        {0,0,0,0,0,0,1,0,0,0,0,0,0,0,0},
                        {0,0,0,0,0,0,3,1,3,5,0,0,0,0,0},
                        {0,0,0,0,5,3,2,1,0,0,0,0,0,0,0},
                        {0,0,0,0,0,0,0,3,0,0,0,0,0,0,0},
                        {0,0,0,0,0,0,0,5,0,0,0,0,0,0,0},
                        {0,0,0,0,0,0,0,0,0,0,0,0,0,0,0},
                        {0,0,0,0,0,0,0,0,0,0,0,0,0,0,0},
                        {0,0,0,0,0,0,0,0,0,0,0,0,0,0,0},
                        {0,0,0,0,0,0,0,0,0,0,0,0,0,0,0}
                };
        mapDataList .add(LV1);

        int[][] LV_2 = {
                {0, 0, 0, 0, 0, 0, 0, 0, 0, 0, 0, 0, 0, 0, 0},
                {0, 0, 0, 0, 0, 0, 0, 0, 0, 0, 0, 0, 0, 0, 0},
                {0, 0, 0, 0, 0, 0, 0, 0, 0, 0, 0, 0, 0, 0, 0},
                {0, 0, 0, 0, 0, 0, 0, 0, 0, 0, 0, 0, 0, 0, 0},
                {0, 0, 0, 0, 2, 1, 1, 0, 0, 0, 0, 0, 0, 0, 0},
                {0, 0, 0, 0, 1, 3, 3, 0, 0, 0, 0, 0, 0, 0, 0},
                {0, 0, 0, 0, 1, 3, 1, 0, 0, 0, 5, 0, 0, 0, 0},
                {0, 0, 0, 0, 0, 0, 1, 0, 0, 0, 5, 0, 0, 0, 0},
                {0, 0, 0, 0, 0, 0, 1, 1, 1, 1, 5, 0, 0, 0, 0},
                {0, 0, 0, 0, 0, 1, 1, 1, 0, 1, 1, 0, 0, 0, 0},
                {0, 0, 0, 0, 0, 1, 1, 1, 0, 0, 0, 0, 0, 0, 0},
                {0, 0, 0, 0, 0, 0, 0, 0, 0, 0, 0, 0, 0, 0, 0},
                {0, 0, 0, 0, 0, 0, 0, 0, 0, 0, 0, 0, 0, 0, 0},
                {0, 0, 0, 0, 0, 0, 0, 0, 0, 0, 0, 0, 0, 0, 0},
                {0, 0, 0, 0, 0, 0, 0, 0, 0, 0, 0, 0, 0, 0, 0}
            };
        mapDataList .add(LV_2);

        int[][] LV_3 = {
                {0, 0, 0, 0, 0, 0, 0, 0, 0, 0, 0, 0, 0, 0, 0},
                {0, 0, 0, 0, 0, 0, 0, 0, 0, 0, 0, 0, 0, 0, 0},
                {0, 0, 0, 0, 0, 0, 0, 0, 0, 0, 0, 0, 0, 0, 0},
                {0, 0, 0, 0, 0, 0, 0, 0, 0, 0, 0, 0, 0, 0, 0},
                {0, 0, 0, 0, 0, 0, 0, 0, 0, 0, 0, 0, 0, 0, 0},
                {0, 0, 0, 0, 0, 1, 1, 1, 1, 1, 0, 0, 0, 0, 0},
                {0, 0, 0, 0, 0, 3, 0, 0, 0, 1, 1, 1, 0, 0, 0},
                {0, 0, 0, 0, 1, 2, 1, 3, 1, 1, 3, 1, 0, 0, 0},
                {0, 0, 0, 0, 1, 5, 5, 0, 1, 3, 1, 0, 0, 0, 0},
                {0, 0, 0, 0, 0, 5, 5, 0, 1, 1, 1, 0, 0, 0, 0},
                {0, 0, 0, 0, 0, 0, 0, 0, 0, 0, 0, 0, 0, 0, 0},
                {0, 0, 0, 0, 0, 0, 0, 0, 0, 0, 0, 0, 0, 0, 0},
                {0, 0, 0, 0, 0, 0, 0, 0, 0, 0, 0, 0, 0, 0, 0},
                {0, 0, 0, 0, 0, 0, 0, 0, 0, 0, 0, 0, 0, 0, 0},
                {0, 0, 0, 0, 0, 0, 0, 0, 0, 0, 0, 0, 0, 0, 0}
            };
        mapDataList .add(LV_3);

        int[][] LV_4 = {
                {0, 0, 0, 0, 0, 0, 0, 0, 0, 0, 0, 0, 0, 0, 0},
                {0, 0, 0, 0, 0, 0, 0, 0, 0, 0, 0, 0, 0, 0, 0},
                {0, 0, 0, 0, 0, 0, 0, 0, 0, 0, 0, 0, 0, 0, 0},
                {0, 0, 0, 0, 0, 0, 0, 0, 0, 0, 0, 0, 0, 0, 0},
                {0, 0, 0, 0, 0, 0, 1, 1, 0, 0, 0, 0, 0, 0, 0},
                {0, 0, 0, 0, 0, 2, 3, 1, 0, 0, 0, 0, 0, 0, 0},
                {0, 0, 0, 0, 0, 0, 3, 1, 0, 0, 0, 0, 0, 0, 0},
                {0, 0, 0, 0, 0, 0, 1, 3, 1, 0, 0, 0, 0, 0, 0},
                {0, 0, 0, 0, 0, 5, 3, 1, 1, 0, 0, 0, 0, 0, 0},
                {0, 0, 0, 0, 0, 5, 5, 4, 5, 0, 0, 0, 0, 0, 0},
                {0, 0, 0, 0, 0, 0, 0, 0, 0, 0, 0, 0, 0, 0, 0},
                {0, 0, 0, 0, 0, 0, 0, 0, 0, 0, 0, 0, 0, 0, 0},
                {0, 0, 0, 0, 0, 0, 0, 0, 0, 0, 0, 0, 0, 0, 0},
                {0, 0, 0, 0, 0, 0, 0, 0, 0, 0, 0, 0, 0, 0, 0},
                {0, 0, 0, 0, 0, 0, 0, 0, 0, 0, 0, 0, 0, 0, 0}
            };
        mapDataList .add(LV_4);
    }
}
由于篇幅问题,目前只添加四关作为测试用,更多的关卡可以自行上网百度,又或者尝试使用算法自动生成,相信是一个非常有意思的算法实践,如果有机会,我也会在后续的更新中将使用算法自动生成地图的功能加进来。
任务二:绘制地图
新建一个java.class文件(地图绘制类)
这个类专门负责绘制地图,包括上下左右移动的逻辑,本质上是地图上加载的数据变了,并不是移动了,这个原理我在前序中已经说明,希望大家能够理解。
直接上代码:
public class GameView extends View{

    final int MAP_H = 15;  // 地图的行数
    final int MAP_L = 15;  // 地图的列数

    private int width; // view的宽
    private int height; // view的高
//     当前坐标的属性值
    final int WALL = 0; //墙
    final int EMPTY = 1; // 空
    final int GAME_MAN = 2; // 玩家
    final int BOX_NOT = 3; // 空箱子(待移动)
    final int BOX_FILL = 4; // 满箱子
    final int FLOWER = 5; // 花(目的地)
    final int FLOWER_MAN = 6; // 花和人重叠在一起

    /*
    * 图片资源赋值
    * */
    Bitmap bitmap_wall = BitmapFactory.decodeResource(getResources(),R.drawable.wall);
    Bitmap bitmap_empty = BitmapFactory.decodeResource(getResources(),R.drawable.empty);
    Bitmap bitmap_gameMan = BitmapFactory.decodeResource(getResources(),R.drawable.gameman);
    Bitmap bitmap_boxNot = BitmapFactory.decodeResource(getResources(),R.drawable.box_not);
    Bitmap bitmap_boxFill = BitmapFactory.decodeResource(getResources(),R.drawable.box_fill);
    Bitmap bitmap_flower = BitmapFactory.decodeResource(getResources(),R.drawable.flower);
    Bitmap bitmap_flowerAndMan = BitmapFactory.decodeResource(getResources(),R.drawable.flowerandman);
    //二维地图数据
    int[][] gameMap =  {
            {0,0,0,0,0,0,0,0,0,0,0,0,0,0,0},
            {0,0,0,0,0,0,0,0,0,0,0,0,0,0,0},
            {0,0,0,0,0,0,0,0,0,0,0,0,0,0,0},
            {0,0,0,0,0,0,0,0,0,0,0,0,0,0,0},
            {0,0,0,0,0,0,0,0,0,0,0,0,0,0,0},
            {0,0,0,0,0,0,5,0,0,0,0,0,0,0,0},
            {0,0,0,0,0,0,1,0,0,0,0,0,0,0,0},
            {0,0,0,0,0,0,3,1,3,5,0,0,0,0,0},
            {0,0,0,0,5,3,2,1,0,0,0,0,0,0,0},
            {0,0,0,0,0,0,0,3,0,0,0,0,0,0,0},
            {0,0,0,0,0,0,0,5,0,0,0,0,0,0,0},
            {0,0,0,0,0,0,0,0,0,0,0,0,0,0,0},
            {0,0,0,0,0,0,0,0,0,0,0,0,0,0,0},
            {0,0,0,0,0,0,0,0,0,0,0,0,0,0,0},
            {0,0,0,0,0,0,0,0,0,0,0,0,0,0,0}
    };
//    参数1:上下文环境  参数2:引用布局时在layout中的参数
    public GameView(Context context, AttributeSet attrs) { super(context, attrs); }
//    获取View的大小
    protected void onMeasure(int widthMeasureSpec, int heightMeasureSper){
        super.onMeasure(widthMeasureSpec, heightMeasureSper);
        int specWidthSize = MeasureSpec.getSize(widthMeasureSpec);
        int specHeightSize = MeasureSpec.getSize(heightMeasureSper);
        width = specWidthSize;
        height = specHeightSize;
        setMeasuredDimension(specWidthSize, specHeightSize);
    }

    Paint mPaint;
    Canvas mCanvas;
    protected void onDraw(Canvas canvas){
        super.onDraw(canvas);
        mPaint = new Paint();
        mCanvas = new Canvas();
        mPaint.setColor(Color.BLACK);
        mPaint.setStyle(Paint.Style.STROKE);
        this.mCanvas = canvas;
        paintMap();
    }

    protected void paintMap(){
        for (int h=0; h<MAP_H; h++){
            for (int l=0; l<MAP_L; l++){
//                二维数组的下标 --> 相当于地图上的一个点
                int bitmap_point = gameMap[h][l];
                /*
                 * Left相当于X,Top相当于Y
                 *Right - X :长方形的长
                 *Bottom - Y:长方形的宽
                 * */
                Rect rect = new Rect
                        ((width/MAP_L)*l, (height/MAP_H)*h,(width/MAP_L)*(l+1),(height/MAP_H)*(h+1));
//                根据二维数组中的值绘制相应的图
                switch (bitmap_point){
                    case WALL:
                        mCanvas.drawBitmap(bitmap_wall,null,rect,mPaint);
                        break;
                    case EMPTY:
                        mCanvas.drawBitmap(bitmap_empty,null,rect,mPaint);
                        break;
                    case GAME_MAN:
                        mCanvas.drawBitmap(bitmap_gameMan,null,rect,mPaint);
                        break;
                    case BOX_NOT:
                        mCanvas.drawBitmap(bitmap_boxNot,null,rect,mPaint);
                        break;
                    case BOX_FULL:
                        mCanvas.drawBitmap(bitmap_boxFill,null,rect,mPaint);
                        break;
                    case FLOWER:
                        mCanvas.drawBitmap(bitmap_flower,null,rect,mPaint);
                        break;
                    case FLOWER_MAN:
                        mCanvas.drawBitmap(bitmap_flowerAndMan,null,rect,mPaint);
                        break;
                    default:
                        Toast.makeText(getContext(), "地图数据有误:"+bitmap_point, Toast.LENGTH_SHORT).show();
                        break;
                }
            }
        }
    }
/*
*      设置地图方法
* */
    public void setMap(int[][] mapData){

        for (int h=0; h<MAP_L; h++){
            for (int l=0; l<MAP_H; l++){
                gameMap[h][l] = mapData[h][l];
            }
        }
        invalidate();  // 刷新画布
    }

//    移动方法
    public void moveUp(){

    }

    public void moveDown(){

    }

    public void moveLeft(){

    }

    public void moveRight(){

    }
}
这里先不写移动的业务代码,因为涉及的逻辑比较多,等下单独拿出来讲。
接下来把这个地图的View放到游戏界面去,并且在游戏界面放上下左右移动的按钮,以作备用。
XML布局代码:
<?xml version="1.0" encoding="utf-8"?>
<LinearLayout
    xmlns:android="http://schemas.android.com/apk/res/android"
    xmlns:app="http://schemas.android.com/apk/res-auto"
    xmlns:tools="http://schemas.android.com/tools"
    android:layout_width="match_parent"
    android:layout_height="match_parent"
    tools:context=".GameActivity"
    android:orientation="vertical"
    android:background="@drawable/bg">

    <!-- 引用刚刚创建的绘制地图类 -->
    <com.example.myboxgame.GameView
    	android:id="@+id/gameView"
        android:layout_marginTop="10dp"
        android:layout_width="match_parent"
        android:layout_height="0dp"
        android:layout_weight="5"/>

    <!-- 相对布局放置上下左右移动的按钮 -->
    <RelativeLayout
        android:layout_width="match_parent"
        android:layout_height="0dp"
        android:layout_weight="2">
        <Button
            android:id="@+id/btn_up"
            android:layout_width="wrap_content"
            android:layout_height="wrap_content"
            android:background="@drawable/up_2"
            android:layout_centerHorizontal="true"/>
        <Button
            android:id="@+id/btn_down"
            android:layout_width="wrap_content"
            android:layout_height="wrap_content"
            android:layout_centerHorizontal="true"
            android:background="@drawable/down_2"
            android:layout_below="@+id/btn_left"/>
        <Button
            android:id="@+id/btn_left"
            android:layout_width="wrap_content"
            android:layout_height="wrap_content"
            android:background="@drawable/left_2"
            android:layout_centerVertical="true"
            android:layout_toLeftOf="@+id/btn_up" />
        <Button
            android:id="@+id/btn_right"
            android:layout_width="wrap_content"
            android:layout_height="wrap_content"
            android:background="@drawable/right_2"
            android:layout_toRightOf="@+id/btn_up"
            android:layout_centerVertical="true"/>
    </RelativeLayout>
</LinearLayout>
接下来是GameActivity的业务业务代码
public class GameActivity extends AppCompatActivity implements View.OnClickListener {
    Button btn_up, btn_down, btn_left, btn_right;
    GameView gameView;
    MapData mapData;
    @Override
    protected void onCreate(Bundle savedInstanceState) {
        super.onCreate(savedInstanceState);
        setContentView(R.layout.activity_game);
        setViewID();
        getMapCode();
    }

    /*
    * 设置控件绑定、监听
    * */
    public void setViewID(){
        gameView = findViewById(R.id.gameView);
        btn_up = findViewById(R.id.btn_up);
        btn_down = findViewById(R.id.btn_down);
        btn_left = findViewById(R.id.btn_left);
        btn_right = findViewById(R.id.btn_right);
        btn_up.setOnClickListener(this);
        btn_down.setOnClickListener(this);
        btn_left.setOnClickListener(this);
        btn_right.setOnClickListener(this);
        mapData = new MapData();
    }

    /*
    * 点击监听
    * */
    @Override
    public void onClick(View v) {
        switch (v.getId()){
            case R.id.btn_up:
                gameView.moveUp();
                break;
            case R.id.btn_down:
                gameView.moveDown();
                break;
            case R.id.btn_left:
                gameView.moveLeft();
                break;
            case R.id.btn_right:
                gameView.moveRight();
                break;
        }
    }
    /*
    * 接收ChoiceActivity传送过来的数据
    * */
    int mapCode;
    public void getMapCode(){
//        参数1:键值; 参数2:默认值,即没有数据传过来时的值
        mapCode = getIntent().getIntExtra("mapCode",-1);
        if(mapCode == -1){
            Toast.makeText(this, "mapCode为空", Toast.LENGTH_SHORT).show();
            return;
        }else {
            gameView.setMap(mapData.mapDataList.get(mapCode));
        }
    }
}
为了适应当前的业务逻辑,之前ChoiceActivity的测试用代码也需要做一点点小的改动:
1、条目跳转的position不需要再加一,因为数组下标由零开始。
            @Override
            public void onItemClick(AdapterView<?> parent, View view, int position, long id) {
//                点击条目后携带数据跳转
                intent_mapCode.putExtra("mapCode",position);
                startActivity(intent_mapCode);
            }
2、循环放入List数据的循环次数我们也先暂且改为地图数据数组的数组长度
    /*
    * 利用循环放入数据
    * */
    MapData mapData = new MapData();
    public void initChoiceMapDate(){
        for (int i=0; i<mapData.mapDataList.size(); i++){
            ChoiceMapData choiceMapData = new ChoiceMapData("推箱子第" + (i+1) + "关");
            choiceMapDataList.add(choiceMapData);
        }
    }
当我们走到这一步的时候,应该实现了以下的效果:
任务三:移动逻辑代码
实际上所有的东西并没有真正的移动,看到的动本质上都是二维数组中的数据的变化,程序根据这些数据的变化,再将新的图画出来。
那么我们在做所谓的移动之前,我们需要对移动过去后的点做一个判断,根据这个判断,去改变或者不改变数据
举个栗子:
第一关的地图是这样的
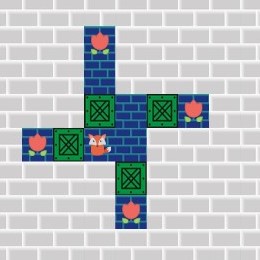
那么,当我想要上移的之前(注意是上移之前),我需要判断三件事,一是地图上有这么多的数据,我得判断出哪一个数据是可以移动的也就是判断出那个是人物,二是判断出人物的上一个位置现在放了个什么东西,三是判断人物当前状态是否处于人加花状态。OK,我们来列举一下情况(以人物上移为基准)。
一共就两种大情况:一可以上移,二不可以上移。
那么,可以上移中又有几种情况:
a、人物上方是空:没啥好说的,直接互换数据
b、人物上方是花:移动后进入人加花状态
c、人物上方是箱子:这种情况下就还得加一个判断,箱子上面是否还有箱子或者是墙或者是空,是空则可以推动箱子,其余情况则保持当前状态不变。
d、…
对于不可以上移的情况也是类似的,例如人物的上面是墙又或者人无上面是箱子但是箱子上面是墙或者箱子…
总而言之,我们移动前就需要判断移动后的情况状态,来进行相应的处理。
理解差不多了就上代码了(这里我用上移的代码逻辑来讲解)
   //    移动方法
   private int nowWhat = -1;   // 当前遍历位置值
    private int nextWhat = -1;  // 当前遍历位置值上一行的值
    private int nextWhat2 = -1;  // 上两个值
    public void moveUp() {
        for (int h = 0; h < MAP_H; h++) {
            for (int l = 0; l < MAP_L; l++) {
                nowWhat = gameMap[h][l]; // 遍历地图,不断地取值赋值
//                当值为人物或者人加花时才可移动
                if (nowWhat == GAME_MAN || nowWhat == FLOWER_MAN) {
                    nextWhat = gameMap[h-1][l];
                    nextWhat2 = gameMap[h-2][l];
                    switch (nextWhat){
//                        人物上面是墙
                        case WALL:
                            Toast.makeText(getContext(), "人物上面是墙", Toast.LENGTH_SHORT).show();
                            break;
//                            人物上面是空
                        case EMPTY:
//                            判断当前是否为人物加花的状态
                            if (nowWhat == FLOWER_MAN){
                                nowWhat = FLOWER;
                            }else {
                                nowWhat = EMPTY;
                            }
                            nextWhat = GAME_MAN;
                            gameMap[h][l] = nowWhat;
                            gameMap[h-1][l] = nextWhat;
                            break;
//                            上面是空箱
                        case BOX_NOT:
                            // 判断当前是否为人物加花的状态
                            if (nowWhat == FLOWER_MAN){
                                nowWhat = FLOWER;
                            }else {
                                nowWhat = EMPTY;
                            }
//                            箱子的上面是花
                            if (nextWhat2 == FLOWER){
                                nextWhat = GAME_MAN;
                                nextWhat2 = BOX_FULL;
                            }
//                            箱子上面是箱子或者墙
                            else if (nextWhat2 == WALL || nextWhat2 == BOX_NOT || nextWhat2 == BOX_FULL){
                                Toast.makeText(getContext(), "箱子上面被堵了", Toast.LENGTH_SHORT).show();
                                break;
                            }
//                            箱子上面是空的
                           else if (nextWhat2 == EMPTY){
                                nextWhat = GAME_MAN;
                                nextWhat2 = BOX_NOT;
                            }
                            gameMap[h][l] = nowWhat;
                            gameMap[h-1][l] = nextWhat;
                            gameMap[h-2][l] = nextWhat2;
                            Log.i("nextWhat2",""+gameMap[h-2][l]);
                            break;
//                            上面是满箱子
                        case BOX_FULL:
                            // 判断当前是否为人物加花的状态
                            if (nowWhat == FLOWER_MAN){
                                nowWhat = FLOWER;
                            }else {
                                nowWhat = EMPTY;
                            }
//                            满箱子上面是花
                            if (nextWhat2 == FLOWER){
                                nextWhat2 = BOX_FULL;
                                nextWhat = FLOWER_MAN;
                            }
//                            满箱子上面是墙、箱子
                            else if (nextWhat2 == WALL || nextWhat2 == BOX_NOT || nextWhat2 == BOX_FULL){
                                Toast.makeText(getContext(), "箱子上面被堵了", Toast.LENGTH_SHORT).show();
                                break;
                            }
//                            满箱子上面是空
                            else if (nextWhat2 == EMPTY){
                                nextWhat = FLOWER_MAN;
                                nextWhat2 = BOX_NOT;
                        }
                            gameMap[h][l] = nowWhat;
                            gameMap[h-1][l] = nextWhat;
                            gameMap[h-2][l] = nextWhat2;
                            break;
//                            人物上面是花
                        case FLOWER:
                            // 判断当前是否为人物加花的状态
                            if (nowWhat == FLOWER_MAN){
                                nowWhat = FLOWER;
                            }else {
                                nowWhat = EMPTY;
                            }
                            nextWhat = FLOWER_MAN;
                            gameMap[h][l] = nowWhat;
                            gameMap[h-1][l] = nextWhat;
                            break;
                        default:
                            break;
                    }
                }
            }
        }
        invalidate(); // 刷新
    }
注释非常的详细。总的来说就是考虑在该移动方向的后一步以及后两步的情况判断,本段代码可能会有BUG的存在,遇到了还请评论跟我说一声。
还有关于下、左、右移动的代码就不贴出来了,需要的就自己去写,当是一个自主的理解。逻辑都一样,只是循环中行列变化了的而已。
例如:
在下移动的时候,代码中的gameMap[h-1][l]就应该是gameMap[h+1][l];
而左移动就是gameMap[h][l-1],右移就是gameMap[h][l+1]。
其中 h 代表循环的行数,l 代表循环的列数。
下面是向上移动的运行代码:
三、结语
到这里,推箱子的基本逻辑代码就结束了,还有很多其他的功能可以添加进去,发挥自己的思维去思考。
例如:过关监听、游戏模式(经典、计时、计步等)、操作的撤回、地图复原等、在高级点,甚至可以做一个数据库去保存数据、做一个局域网两人对战、做一个算法自动生成地图、做一个算法自动通关等等等等。
最后,祝大家鼠年大吉,编程水平节节高。谢谢。
