1.软件准备
mqtt.fx下载:www.jensd.de/apps/mqttfx
MQTT(消息队列遥测传输)是ISO 标准(ISO/IEC PRF 20922)下基于发布/订阅范式的消息协议。它工作在 TCP/IP协议族上,是为硬件性能低下的远程设备以及网络状况糟糕的情况下而设计的发布/订阅型消息协议。
MQTT.fx 是目前主流的mqtt客户端,可以快速验证是否可以与IoT Hub 服务交流发布或订阅消息。
2.使用模式
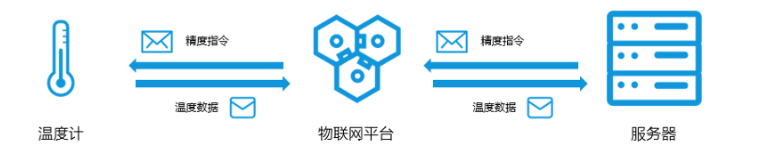
mqtt.fx相当于温度计,作为终端设备模拟通信,测试状态联通。
物联网平台为阿里云物联网平台,解析协议关系,分别连接终端设备和服务器平台,设备上云远程运维。
服务器作为管理终端,远程发送指令,并从云平台获取终端设备相关状态信息。
3.联通步骤
3.2 mqtt.fx连接云平台设置
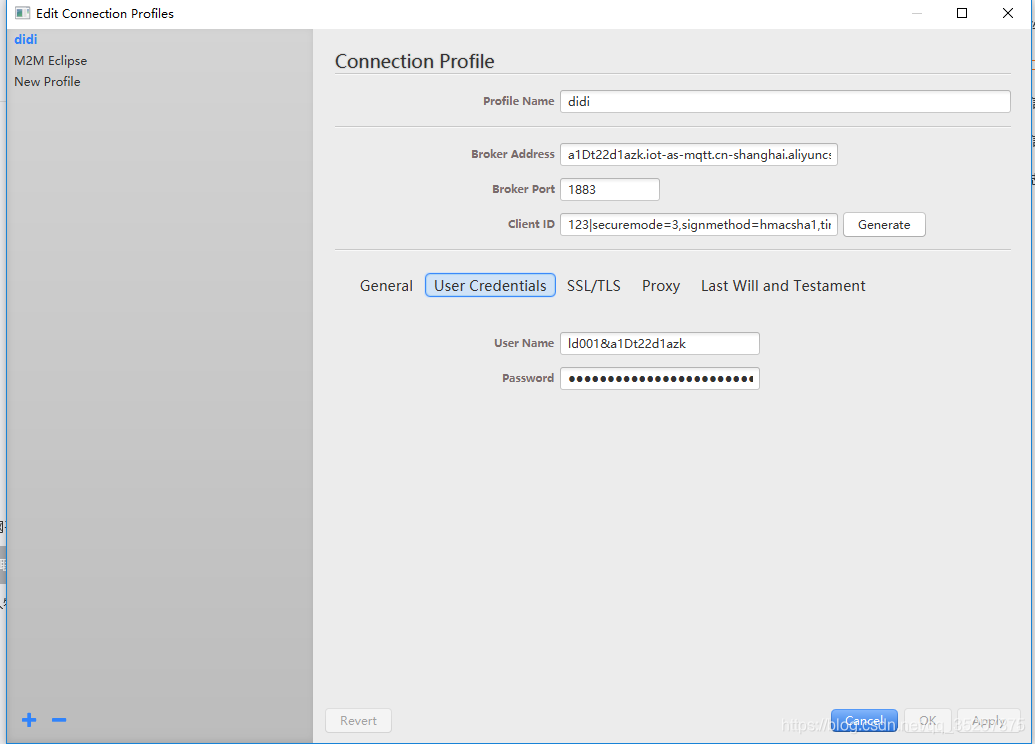
连接属性详解
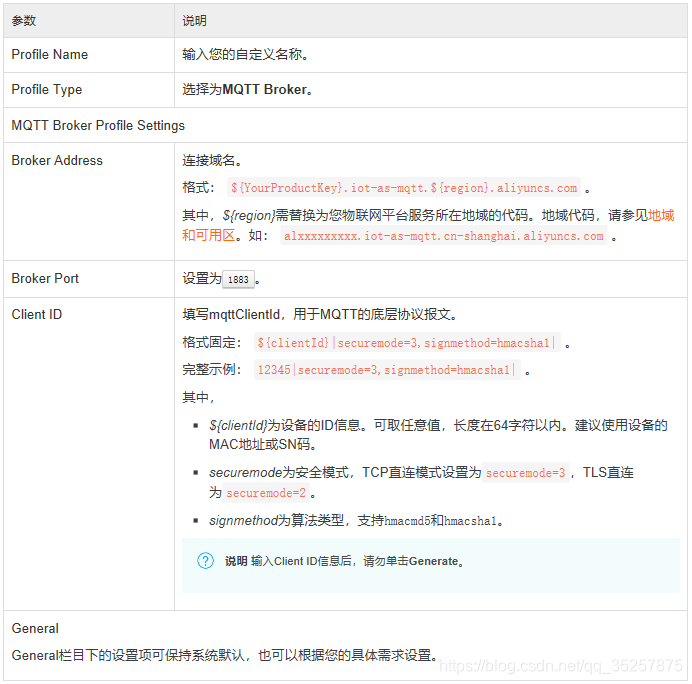
mqtt模拟设备联通测试
实际设备上云需在设备安装sdk接入云平台,详情官网。
3.3 服务端连接云平台(java)
maven依赖
		<dependency>
            <groupId>org.apache.qpid</groupId>
            <artifactId>qpid-jms-client</artifactId>
            <version>0.31.0</version>
        </dependency>
        <!-- util for base64-->
        <dependency>
            <groupId>commons-codec</groupId>
            <artifactId>commons-codec</artifactId>
            <version>1.12</version>
        </dependency>
        <dependency>
            <groupId>com.aliyun</groupId>
            <artifactId>aliyun-java-sdk-core</artifactId>
            <version>4.1.2</version>
        </dependency>
        <dependency>
            <groupId>com.aliyun</groupId>
            <artifactId>aliyun-java-sdk-iot</artifactId>
            <version>6.3.1</version>
        </dependency>
        <dependency>
            <groupId>com.aliyun.openservices</groupId>
            <artifactId>iot-client-message</artifactId>
            <version>1.1.2</version>
        </dependency>
服务端代码
//1. 接收消息
package com.WulianwangTest;
import java.net.URI;
import java.util.Hashtable;
import java.util.concurrent.ExecutorService;
import java.util.concurrent.LinkedBlockingQueue;
import java.util.concurrent.ThreadPoolExecutor;
import java.util.concurrent.TimeUnit;
import javax.crypto.Mac;
import javax.crypto.spec.SecretKeySpec;
import javax.jms.Connection;
import javax.jms.ConnectionFactory;
import javax.jms.Destination;
import javax.jms.Message;
import javax.jms.MessageConsumer;
import javax.jms.MessageListener;
import javax.jms.MessageProducer;
import javax.jms.Session;
import javax.naming.Context;
import javax.naming.InitialContext;
import com.aliyuncs.DefaultAcsClient;
import com.aliyuncs.IAcsClient;
import com.aliyuncs.iot.model.v20180120.PubRequest;
import com.aliyuncs.iot.model.v20180120.PubResponse;
import com.aliyuncs.profile.DefaultProfile;
import org.apache.commons.codec.EncoderException;
import org.apache.qpid.jms.JmsConnection;
import org.apache.qpid.jms.JmsConnectionListener;
import org.apache.qpid.jms.message.JmsInboundMessageDispatch;
import org.slf4j.Logger;
import org.slf4j.LoggerFactory;
import org.apache.commons.codec.binary.Base64;
public class AmqpJavaClientDemo {
private final static Logger logger = LoggerFactory.getLogger(AmqpJavaClientDemo.class);
//业务处理异步线程池,线程池参数可以根据您的业务特点调整;或者您也可以用其他异步方式处理接收到的消息
private final static ExecutorService executorService = new ThreadPoolExecutor(
Runtime.getRuntime().availableProcessors(),
Runtime.getRuntime().availableProcessors() * 2, 60, TimeUnit.SECONDS,
new LinkedBlockingQueue<>(50000));
public static void main(String[] args) throws Exception {
//参数说明,请参见文档:AMQP客户端接入说明。
String accessKey = "${YourAccessKeyID}";
String accessSecret = "${YourAccessKeySecret}";
String consumerGroupId = "${YourConsumerGroupId}";
//iotInstanceId:购买的实例请填写实例ID,公共实例请填空字符串""。
String iotInstanceId = "";
long timeStamp = System.currentTimeMillis();
//签名方法:支持hmacmd5,hmacsha1和hmacsha256
String signMethod = "hmacsha1";
//控制台服务端订阅中消费组状态页客户端ID一栏将显示clientId参数。
//建议使用机器UUID、MAC地址、IP等唯一标识等作为clientId。便于您区分识别不同的客户端。
String clientId = "ecs_"+System.currentTimeMillis();
//UserName组装方法,请参见文档:AMQP客户端接入说明。
String userName = clientId + "|authMode=aksign"
+ ",signMethod=" + signMethod
+ ",timestamp=" + timeStamp
+ ",authId=" + accessKey
+ ",iotInstanceId=" + iotInstanceId
+ ",consumerGroupId=" + consumerGroupId
+ "|";
//password组装方法,请参见文档:AMQP客户端接入说明。
String signContent = "authId=" + accessKey + "×tamp=" + timeStamp;
String password = doSign(signContent,accessSecret, signMethod);
//按照qpid-jms的规范,组装连接URL。
// String connectionUrl = "failover:(amqps://${uid}.iot-amqp.${regionId}.aliyuncs.com:5671?amqp.idleTimeout=80000)"
// + "?failover.reconnectDelay=30";
String connectionUrl = "failover:(amqps://1402577367912554.iot-amqp.cn-shanghai.aliyuncs.com:5671?amqp.idleTimeout=80000)"
+ "?failover.reconnectDelay=30";
Hashtable<String, String> hashtable = new Hashtable<>();
hashtable.put("connectionfactory.SBCF",connectionUrl);
hashtable.put("queue.QUEUE", "default");
hashtable.put(Context.INITIAL_CONTEXT_FACTORY, "org.apache.qpid.jms.jndi.JmsInitialContextFactory");
Context context = new InitialContext(hashtable);
ConnectionFactory cf = (ConnectionFactory)context.lookup("SBCF");
Destination queue = (Destination)context.lookup("QUEUE");
// Create Connection
Connection connection = cf.createConnection(userName, password);
((JmsConnection) connection).addConnectionListener(myJmsConnectionListener);
// Create Session
// Session.CLIENT_ACKNOWLEDGE: 收到消息后,需要手动调用message.acknowledge()
// Session.AUTO_ACKNOWLEDGE: SDK自动ACK(推荐)
Session session = connection.createSession(false, Session.AUTO_ACKNOWLEDGE);
connection.start();
// Create Receiver Link
MessageConsumer consumer = session.createConsumer(queue);
consumer.setMessageListener(messageListener);
}
private static MessageListener messageListener = new MessageListener() {
@Override
public void onMessage(Message message) {
try {
//1.收到消息之后一定要ACK
// 推荐做法:创建Session选择Session.AUTO_ACKNOWLEDGE,这里会自动ACK。
// 其他做法:创建Session选择Session.CLIENT_ACKNOWLEDGE,这里一定要调message.acknowledge()来ACK。
// message.acknowledge();
//2.建议异步处理收到的消息,确保onMessage函数里没有耗时逻辑。
// 如果业务处理耗时过程过长阻塞住线程,可能会影响SDK收到消息后的正常回调。
executorService.submit(() -> processMessage(message));
} catch (Exception e) {
logger.error("submit task occurs exception ", e);
}
}
};
/**
* 在这里处理您收到消息后的具体业务逻辑。
*/
private static void processMessage(Message message) {
try {
byte[] body = message.getBody(byte[].class);
String content = new String(body);
String topic = message.getStringProperty("topic");
String messageId = message.getStringProperty("messageId");
logger.info("receive message"
+ ", topic = " + topic
+ ", messageId = " + messageId
+ ", content = " + content);
} catch (Exception e) {
logger.error("processMessage occurs error ", e);
}
}
private static JmsConnectionListener myJmsConnectionListener = new JmsConnectionListener() {
/**
* 连接成功建立
*/
@Override
public void onConnectionEstablished(URI remoteURI) {
logger.info("onConnectionEstablished, remoteUri:{}", remoteURI);
}
/**
* 尝试过最大重试次数之后,最终连接失败。
*/
@Override
public void onConnectionFailure(Throwable error) {
logger.error("onConnectionFailure, {}", error.getMessage());
}
/**
* 连接中断。
*/
@Override
public void onConnectionInterrupted(URI remoteURI) {
logger.info("onConnectionInterrupted, remoteUri:{}", remoteURI);
}
/**
* 连接中断后又自动重连上。
*/
@Override
public void onConnectionRestored(URI remoteURI) {
logger.info("onConnectionRestored, remoteUri:{}", remoteURI);
}
@Override
public void onInboundMessage(JmsInboundMessageDispatch envelope) {}
@Override
public void onSessionClosed(Session session, Throwable cause) {}
@Override
public void onConsumerClosed(MessageConsumer consumer, Throwable cause) {}
@Override
public void onProducerClosed(MessageProducer producer, Throwable cause) {}
};
/**
* password签名计算方法,请参见文档:AMQP客户端接入说明。
*/
private static String doSign(String toSignString, String secret, String signMethod) throws Exception {
SecretKeySpec signingKey = new SecretKeySpec(secret.getBytes(), signMethod);
Mac mac = Mac.getInstance(signMethod);
mac.init(signingKey);
byte[] rawHmac = mac.doFinal(toSignString.getBytes());
return Base64.encodeBase64String(rawHmac);
}
}
//2. 发送消息
package com.WulianwangTest;

import com.aliyuncs.DefaultAcsClient;
import com.aliyuncs.IAcsClient;
import com.aliyuncs.exceptions.ClientException;
import com.aliyuncs.iot.model.v20180120.PubRequest;
import com.aliyuncs.iot.model.v20180120.PubResponse;
import com.aliyuncs.profile.DefaultProfile;

import java.io.UnsupportedEncodingException;
import java.util.Base64;

public class Demo2 {
    public static void main(String[] args) throws ClientException, UnsupportedEncodingException {


        String regionId = "您设备所处区域regionId";
		String accessKey = "您的阿里云账号accessKey";
 		String accessSecret = "您的阿里云账号accessSecret";
		final String productKey = "您的产品productKey";
        String deviceName = "您的设备名";

        //设置client的参数
        DefaultProfile profile = DefaultProfile.getProfile(regionId, accessKey, accessSecret);
        IAcsClient client = new DefaultAcsClient(profile);

        PubRequest request = new PubRequest();
        request.setQos(0);
        //设置发布消息的topic   /user/double改成自己的topic
        request.setTopicFullName("/" + productKey + "/" + deviceName + "/user/double");
        request.setProductKey(productKey);
        //设置消息的内容,一定要用base64编码,否则乱码

        String encode = Base64.getEncoder().encodeToString("xxooxxoo".getBytes("UTF-8"));


        request.setMessageContent(encode);


        PubResponse response = client.getAcsResponse(request);
        System.out.println("pub success?:" + response.getSuccess());

    }
}
mqtt.fx接入物联网平台光官方详细介绍:
https://www.alibabacloud.com/help/zh/doc-detail/86706.htm
官方教程:https://help.aliyun.com/document_detail/120986.html?spm=a2c4g.11186623.6.928.7ac47848x05eGi
区域字段分类:
https://help.aliyun.com/document_detail/40654.html?spm=a2c6h.13066369.0.0.c85c7eec5V3gbz
