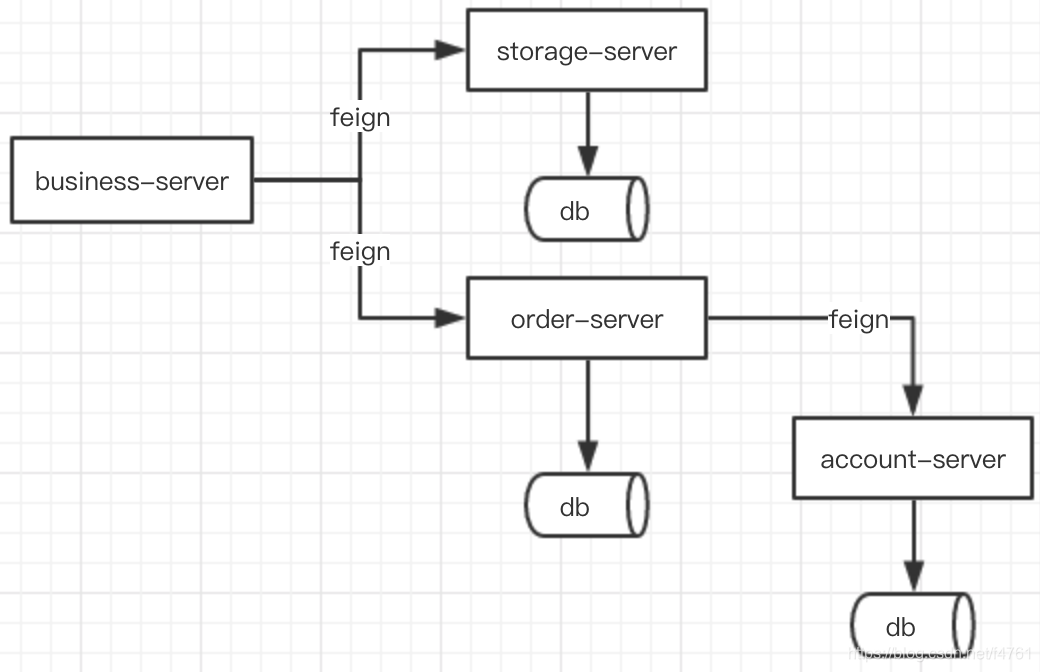
首先还是来看看下面这张图:
Transaction Coordinator (TC): 事务协调器,它是独立的中间件,需要独立部署运行,它维护全局事务的运行状态,接收TM指令发起全局事务的提交与回滚,负责与RM通信协调各各分支事务的提交或回滚。
Transaction Manager ™: 事务管理器,TM需要嵌入应用程序中工作,它负责开启一个全局事务,并最终向TC发起全局提交或全局回滚的指令。
Resource Manager (RM): 控制分支事务,负责分支注册、状态汇报,并接收事务协调器TC的指令,驱动分支(本地)事务的提交和回滚。
接下来根据dubbo + SpringBoot + seata例子来讲解流程:
首先通常项目里会写:
@Configuration
public class SeataConfig {
    @Bean
    public GlobalTransactionScanner globalTransactionScanner() {
        return new GlobalTransactionScanner("seata-business", "my_test_tx_group");
    }
}
GlobalTransactionScanner:
public class GlobalTransactionScanner extends AbstractAutoProxyCreator implements InitializingBean,ApplicationContextAware,
DisposableBean上面代码是类的定义,首先它继承了AbstractAutoProxyCreator实现了wrapIfNecessary方法实现我们的方法的切面代理,实现了InitializingBean接口用于初始化我们的客户端,实现了ApplicationContextAware用于保存我们的spring容器,实现了DisposableBean用于优雅关闭。
其中:AbstractAutoProxyCreator
public abstract class AbstractAutoProxyCreator extends ProxyProcessorSupport implements SmartInstantiationAwareBeanPostProcessor, BeanFactoryAware {
SmartInstantiationAwareBeanPostProcessor又是BeanPostProcessor子接口,而BeanPostProcessor --- 又被称为 :统一处理器 的作用,实现了BeanPostProcessor接口,在spring 容器中注册bean后,会自动应用在容器中。在所有Bean实例化之后进行前后作用。因此看AbstractAutoProxyCreator中的方法postProcessAfterInitialization:
    public Object postProcessAfterInitialization(@Nullable Object bean, String beanName) {
        if (bean != null) {
            Object cacheKey = this.getCacheKey(bean.getClass(), beanName);
            if (this.earlyProxyReferences.remove(cacheKey) != bean) {
                return this.wrapIfNecessary(bean, beanName, cacheKey);
            }
        }

        return bean;
    }
wrapIfNecessary又进入到子类GlobalTransactionScanner 的wrapIfNecessary方法:protected Object wrapIfNecessary(Object bean, String beanName, Object cacheKey) {
if (this.disableGlobalTransaction) {
return bean;
} else {
try {
synchronized(PROXYED_SET) {
if (PROXYED_SET.contains(beanName)) {
return bean;
} else {
this.interceptor = null;
if (TCCBeanParserUtils.isTccAutoProxy(bean, beanName, this.applicationContext)) {
this.interceptor = new TccActionInterceptor(TCCBeanParserUtils.getRemotingDesc(beanName));
} else {
Class<?> serviceInterface = SpringProxyUtils.findTargetClass(bean);
Class<?>[] interfacesIfJdk = SpringProxyUtils.findInterfaces(bean);
if (!this.existsAnnotation(new Class[]{serviceInterface}) && !this.existsAnnotation(interfacesIfJdk)) {
return bean;
}
if (this.interceptor == null) {
this.interceptor = new GlobalTransactionalInterceptor(this.failureHandlerHook);
}
}
LOGGER.info("Bean[" + bean.getClass().getName() + "] with name [" + beanName + "] would use interceptor [" + this.interceptor.getClass().getName() + "]");
if (!AopUtils.isAopProxy(bean)) {
bean = super.wrapIfNecessary(bean, beanName, cacheKey);
} else {
AdvisedSupport advised = SpringProxyUtils.getAdvisedSupport(bean);
Advisor[] advisor = this.buildAdvisors(beanName, this.getAdvicesAndAdvisorsForBean((Class)null, (String)null, (TargetSource)null));
Advisor[] var7 = advisor;
int var8 = advisor.length;
for(int var9 = 0; var9 < var8; ++var9) {
Advisor avr = var7[var9];
advised.addAdvisor(0, avr);
}
}
PROXYED_SET.add(beanName);
return bean;
}
}
} catch (Exception var13) {
throw new RuntimeException(var13);
}
}
}-
Step1:检查当前
beanName是否已经处理过 如果处理过本次就不处理。 -
Step2:根据注解,找到对应模式的
Inteceptor,这里有三种情况第一个TCC,第二个是全局事务管理TM的拦截器,第三个是没有注解,如果没有那么直接返回即可。 -
Step3:将对应的
interceptor添加进入当前Bean。
然后再看从InitializingBean中实现的afterPropertiesSet,也就是对Seata的初始化:
public void afterPropertiesSet() {
        initClient();

    }
    private void initClient() {

        //init TM
        TMClient.init(applicationId, txServiceGroup);
        //init RM
        RMClient.init(applicationId, txServiceGroup);
        registerSpringShutdownHook();
    }
    private void registerSpringShutdownHook() {
        if (applicationContext instanceof ConfigurableApplicationContext) {
            ((ConfigurableApplicationContext) applicationContext).registerShutdownHook();
            ShutdownHook.removeRuntimeShutdownHook();
        }
        ShutdownHook.getInstance().addDisposable(TmRpcClient.getInstance(applicationId, txServiceGroup));
        ShutdownHook.getInstance().addDisposable(RmRpcClient.getInstance(applicationId, txServiceGroup));
    }
上面的代码逻辑比较清楚:
-
Step1:初始化
TM客户端,这里会向Server注册该TM。 -
Step2:初始化
RM客户端,这里会向Server注册该RM。 -
Step3:注册
ShutdownHook,后续将TM和RM优雅关闭。
注意这里初始化的时候会初始化两个客户端,分别是TM客户端和RM客户端,很多人认为TM和RM是用的同一个客户端,这里需要注意一下。
2.1 Interceptor
再上面的第一部分逻辑中我们看到我们有两个业务核心Interceptor,一个是GlobalTransactionalInterceptor用来处理全局事务的管理(开启,提交,回滚),另外一个是TccActionInterceptor用来处理TCC模式。熟悉Seata的朋友会问AT模式呢,为什么只有TCC模式,这里AT模式代表着就是自动处理事务,我们不需要有切面
2.1.1 GlobalTransactionalInterceptor
首先来看看GlobalTransactionalInterceptor#invoke:
    public Object invoke(final MethodInvocation methodInvocation) throws Throwable {
        Class<?> targetClass = (methodInvocation.getThis() != null ? AopUtils.getTargetClass(methodInvocation.getThis()) : null);
        Method specificMethod = ClassUtils.getMostSpecificMethod(methodInvocation.getMethod(), targetClass);
        final Method method = BridgeMethodResolver.findBridgedMethod(specificMethod);

        final GlobalTransactional globalTransactionalAnnotation = getAnnotation(method, GlobalTransactional.class);
        final GlobalLock globalLockAnnotation = getAnnotation(method, GlobalLock.class);
        if (globalTransactionalAnnotation != null) {
            return handleGlobalTransaction(methodInvocation, globalTransactionalAnnotation);
        } else if (globalLockAnnotation != null) {
            return handleGlobalLock(methodInvocation);
        } else {
            return methodInvocation.proceed();
        }
}-
Step1:从代理类中获取到原始的
Method -
Step2: 获取
Method中的注解 -
Step3: 如果有
@GlobalTransactional注解执行handleGlobalTransaction切面逻辑,这个也是我们全局事务的逻辑。 -
Step4: 如果有
@GlobalLock注解,则执行handleGlobalLock切面逻辑,这个注解是用于一些非AT模式的数据库加锁,加上这个注解之后再执行Sql语句之前会查询对应的数据是否加锁,但是他不会加入全局事务。
handleGlobalTransaction逻辑如下:
private Object handleGlobalTransaction(final MethodInvocation methodInvocation,
                                           final GlobalTransactional globalTrxAnno) throws Throwable {

        return transactionalTemplate.execute(new TransactionalExecutor() {

            @Override
            public Object execute() throws Throwable {
                return methodInvocation.proceed();
            }

        });
    }
   //TransactionalTemplate定义了TM对全局事务处理的标准步骤
    TransactionalTemplate#execute
        public Object execute(TransactionalExecutor business) throws Throwable {
        // 1. get or create a transaction
        GlobalTransaction tx = GlobalTransactionContext.getCurrentOrCreate();
        // 1.1 get transactionInfo
        TransactionInfo txInfo = business.getTransactionInfo();
        if (txInfo == null) {
            throw new ShouldNeverHappenException("transactionInfo does not exist");
        }
        try {
            // 2. begin transaction
            beginTransaction(txInfo, tx);
            Object rs = null;
            try {
                // Do Your Business
                rs = business.execute();

            } catch (Throwable ex) {
                // 3.the needed business exception to rollback.
                completeTransactionAfterThrowing(txInfo,tx,ex);
                throw ex;
            }
            // 4. everything is fine, commit.
            commitTransaction(tx);
            return rs;
        } finally {
            //5. clear
            triggerAfterCompletion();
            cleanUp();
        }
}在handleGlobalTransaction中将具体的实现交给了TransactionalTemplate#execute去做了,其中具体的步骤如下:
-
Step1:获取当前的全局事务,如果没有则创建。
-
Step2:获取业务中的事务信息包含超时时间等。
-
Step3:开启全局事务
-
Step4:如果有异常抛出处理异常,rollback。
-
Step5:如果没有异常那么commit全局事务。
-
Step6:清除当前事务上下文信息。
看一下其中的beginTransaction方法:
private void beginTransaction(TransactionInfo txInfo, GlobalTransaction tx) throws ExecutionException {
        try {
            this.triggerBeforeBegin();
            tx.begin(txInfo.getTimeOut(), txInfo.getName());
            this.triggerAfterBegin();
        } catch (TransactionException var4) {
            throw new ExecutionException(tx, var4, Code.BeginFailure);
        }
}然后到DefaultGlobalTransaction的begin方法就是开启全局事务
 public void begin(int timeout, String name) throws TransactionException {
    //此处的角色判断有关键的作用
    //表明当前是全局事务的发起者(Launcher)还是参与者(Participant)
    //如果在分布式事务的下游系统方法中也加上GlobalTransactional注解
    //那么它的角色就是Participant,即会忽略后面的begin就退出了
    //而判断是发起者(Launcher)还是参与者(Participant)是根据当前上下文是否已存在XID来判断
    //没有XID的就是Launcher,已经存在XID的就是Participant

        if (this.role != GlobalTransactionRole.Launcher) {
            this.check();
            if (LOGGER.isDebugEnabled()) {
                LOGGER.debug("Ignore Begin(): just involved in global transaction [" + this.xid + "]");
            }

        } else if (this.xid != null) {
            throw new IllegalStateException();
        } else if (RootContext.getXID() != null) {
            throw new IllegalStateException();
        } else {
            this.xid = this.transactionManager.begin((String)null, (String)null, name, timeout);
            this.status = GlobalStatus.Begin;
            RootContext.bind(this.xid);
            if (LOGGER.isInfoEnabled()) {
                LOGGER.info("Begin new global transaction [" + this.xid + "]");
            }

        }
    }
DefaultTransactionManager负责TM与TC通讯,发送begin、commit、rollback指令
    public String begin(String applicationId, String transactionServiceGroup, String name, int timeout) throws TransactionException {
        GlobalBeginRequest request = new GlobalBeginRequest();
        request.setTransactionName(name);
        request.setTimeout(timeout);
        GlobalBeginResponse response = (GlobalBeginResponse)this.syncCall(request);
        return response.getXid();
    }
至此拿到TC返回的XID一个全局事务就开启了
RM 资源管理器
在Seata中目前管理RM有两种模式:一种是AT模式,需要事务性数据库支持,会自动记录修改前快照和修改后的快照,用于提交和回滚;还有一种是TCC模式,也可以看作是MT模式,用于AT模式不支持的情况,手动进行提交和回滚。
我们主要看AT模式,其整体实现逻辑如下图所示:
在我们的程序中执行一个sql语句,无论你是使用mybatis,还是直接使用jdbcTemplate,都会遵循下面的步骤:
-
Step 1:从数据源中获取数据库连接。
-
Step 2: 从连接中获取
Statement。 -
Step 3: 通过Statement执行我们的
sql语句
所以我们可以将DataSource,Connection,Statement代理起来然后执行我们的一些特殊的逻辑,完成我们的AT模式。
DataSourceProxy
在DataSourceProxy中没有太多的业务逻辑,只是简单的将获取Connection用我们的ConnectionProxy代理类进行了封装,代码如下
    public ConnectionProxy getConnection() throws SQLException {
        Connection targetConnection = this.targetDataSource.getConnection();
        return new ConnectionProxy(this, targetConnection);
}首先通过我们代理之前的DataSource获取连接,然后用ConnectionProxy将其代理起来。
ConnectionProxy主要做三件事,第一个是生成代理的Statement,第二个是保存我们的连接上下文:加锁的Key,undoLog等,第三个是代理执行我们的本地事务的commit和rollback。
首先来看看代理生成的Statement:
@Override
    public Statement createStatement() throws SQLException {
        Statement targetStatement = getTargetConnection().createStatement();
        return new StatementProxy(this, targetStatement);
    }

    @Override
    public PreparedStatement prepareStatement(String sql) throws SQLException {
        PreparedStatement targetPreparedStatement = getTargetConnection().prepareStatement(sql);
        return new PreparedStatementProxy(this, targetPreparedStatement, sql);
}这里也是通过我们原来的连接直接生成Statement,然后将其进行代理。
接下来看看对我们上下文的管理,大家都知道我们的一个事务其实对应的是一个数据库连接,在这个事务中的所有sql的undolog和lockKey都会在连接的上下文中记录。如下面代码所示:
* append sqlUndoLog
     *
     * @param sqlUndoLog the sql undo log
     */
    public void appendUndoLog(SQLUndoLog sqlUndoLog) {
        context.appendUndoItem(sqlUndoLog);
    }

    /**
     * append lockKey
     *
     * @param lockKey the lock key
     */
    public void appendLockKey(String lockKey) {
        context.appendLockKey(lockKey);
}这里的代码很简单,lockKey和undolog都是用list保存,直接add即可。
当我们的本地事务完成的时候,需要调用Connection的commit或rollback来进行事务的提交或回滚。这里我们也需要代理这两个方法来完成我们对分支事务的处理,先来看看commit方法。
public class ConnectionProxy extends AbstractConnectionProxy {
	@Override
    public void commit() throws SQLException {
    	//如果当前是全局事务,则执行全局事务的提交
    	//判断是不是全局事务,就是看当前上下文是否存在XID
        if (context.inGlobalTransaction()) {
            processGlobalTransactionCommit();
        } else if (context.isGlobalLockRequire()) {
            processLocalCommitWithGlobalLocks();
        } else {
            targetConnection.commit();
        }
    }

	private void processGlobalTransactionCommit() throws SQLException {
        try {
        	//首先是向TC注册RM,拿到TC分配的branchId
            register();
        } catch (TransactionException e) {
            recognizeLockKeyConflictException(e);
        }

        try {
            if (context.hasUndoLog()) {
            	//写入undolog
                UndoLogManager.flushUndoLogs(this);
            }

			//提交本地事务,可以看到写入undolog和业务数据是在同一个本地事务中
            targetConnection.commit();
        } catch (Throwable ex) {
        	//向TC发送rm的事务处理失败的通知
            report(false);
            if (ex instanceof SQLException) {
                throw new SQLException(ex);
            }
        }
		//向TC发送rm的事务处理成功的通知
        report(true);
        context.reset();
    }

    //注册RM,构建request通过netty向TC发送指令
    //将返回的branchId存在上下文中
	private void register() throws TransactionException {
        Long branchId = DefaultResourceManager.get().branchRegister(BranchType.AT, getDataSourceProxy().getResourceId(),
                null, context.getXid(), null, context.buildLockKeys());
        context.setBranchId(branchId);
    }
}
获取business-service传来的XID
绑定XID到当前上下文中
执行业务逻辑sql
向TC创建本次RM的Netty连接
向TC发送分支事务的相关信息
获得TC返回的branchId
记录Undo Log数据
向TC发送本次事务PhaseOne阶段的处理结果
从当前上下文中解绑XID
是在FescarHandlerInterceptor中完成的,该类并不属于seata,而是spring-cloud-alibaba-fescar中对feign、rest支持的实现。bind和unbind XID到上下文中。到这里RM完成了PhaseOne阶段的工作,接着看PhaseTwo阶段的处理逻辑。
事务提交
由于这次请求是正常流程无异常的,所以分支事务会正常commit。
在storage-service启动时创建了与TC通讯的Netty连接,TC在获取各RM的汇报结果后,就会给各RM发送commit或rollback的指令
具体看下执行commit的过程,在AbstractRMHandler类的doBranchCommit方法之前是接收TC消息包装处理路由的过程
//拿到通知的xid、branchId等关键参数
//然后调用RM的branchCommit
protected void doBranchCommit(BranchCommitRequest request, BranchCommitResponse response) throws TransactionException {
    String xid = request.getXid();
    long branchId = request.getBranchId();
    String resourceId = request.getResourceId();
    String applicationData = request.getApplicationData();
    LOGGER.info("Branch committing: " + xid + " " + branchId + " " + resourceId + " " + applicationData);
    BranchStatus status = getResourceManager().branchCommit(request.getBranchType(), xid, branchId, resourceId, applicationData);
    response.setBranchStatus(status);
    LOGGER.info("Branch commit result: " + status);
}
最终会将branceCommit的请求调用到AsyncWorker的branchCommit方法。AsyncWorker的处理方式是seata架构的一个关键部分,大部分事务都是会正常提交的,所以在PhaseOne阶段就已经结束了,这样就可以将锁最快的释放。PhaseTwo阶段接收commit的指令后,异步处理即可。将PhaseTwo的时间消耗排除在一次分布式事务之外。
//部分代码
public class AsyncWorker implements ResourceManagerInbound {

	private static final List<Phase2Context> ASYNC_COMMIT_BUFFER = Collections.synchronizedList(
        new ArrayList<Phase2Context>());

    //将需要提交的XID加入list
	@Override
    public BranchStatus branchCommit(BranchType branchType, String xid, long branchId, String resourceId, String applicationData) throws TransactionException {
        if (ASYNC_COMMIT_BUFFER.size() < ASYNC_COMMIT_BUFFER_LIMIT) {
            ASYNC_COMMIT_BUFFER.add(new Phase2Context(branchType, xid, branchId, resourceId, applicationData));
        } else {
            LOGGER.warn("Async commit buffer is FULL. Rejected branch [" + branchId + "/" + xid + "] will be handled by housekeeping later.");
        }
        return BranchStatus.PhaseTwo_Committed;
    }

	//通过一个定时任务消费list中的待提交XID
	public synchronized void init() {
        LOGGER.info("Async Commit Buffer Limit: " + ASYNC_COMMIT_BUFFER_LIMIT);
        timerExecutor = new ScheduledThreadPoolExecutor(1,
            new NamedThreadFactory("AsyncWorker", 1, true));
        timerExecutor.scheduleAtFixedRate(new Runnable() {
            @Override
            public void run() {
                try {
                    doBranchCommits();
                } catch (Throwable e) {
                    LOGGER.info("Failed at async committing ... " + e.getMessage());
                }
            }
        }, 10, 1000 * 1, TimeUnit.MILLISECONDS);
    }

	private void doBranchCommits() {
        if (ASYNC_COMMIT_BUFFER.size() == 0) {
            return;
        }
        Map<String, List<Phase2Context>> mappedContexts = new HashMap<>();
        Iterator<Phase2Context> iterator = ASYNC_COMMIT_BUFFER.iterator();

        //一次定时任务取出ASYNC_COMMIT_BUFFER中的所有待办数据
        //以resourceId作为key分组待办数据,resourceId就是一个数据库的连接url
        //在前面的日志中可以看到,目的是为了覆盖应用的多数据源问题
        while (iterator.hasNext()) {
            Phase2Context commitContext = iterator.next();
            List<Phase2Context> contextsGroupedByResourceId = mappedContexts.get(commitContext.resourceId);
            if (contextsGroupedByResourceId == null) {
                contextsGroupedByResourceId = new ArrayList<>();
                mappedContexts.put(commitContext.resourceId, contextsGroupedByResourceId);
            }
            contextsGroupedByResourceId.add(commitContext);

            iterator.remove();

        }

        for (Map.Entry<String, List<Phase2Context>> entry : mappedContexts.entrySet()) {
            Connection conn = null;
            try {
                try {
                	//根据resourceId获取数据源以及连接
                    DataSourceProxy dataSourceProxy = DataSourceManager.get().get(entry.getKey());
                    conn = dataSourceProxy.getPlainConnection();
                } catch (SQLException sqle) {
                    LOGGER.warn("Failed to get connection for async committing on " + entry.getKey(), sqle);
                    continue;
                }
                List<Phase2Context> contextsGroupedByResourceId = entry.getValue();
                for (Phase2Context commitContext : contextsGroupedByResourceId) {
                    try {
                    	//执行undolog的处理,即删除xid、branchId对应的记录
                        UndoLogManager.deleteUndoLog(commitContext.xid, commitContext.branchId, conn);
                    } catch (Exception ex) {
                        LOGGER.warn(
                            "Failed to delete undo log [" + commitContext.branchId + "/" + commitContext.xid + "]", ex);
                    }
                }

            } finally {
                if (conn != null) {
                    try {
                        conn.close();
                    } catch (SQLException closeEx) {
                        LOGGER.warn("Failed to close JDBC resource while deleting undo_log ", closeEx);
                    }
                }
            }
        }
    }
}
所以对于commit动作的处理,RM只需删除xid、branchId对应的undolog既可
事务回滚
对于rollback场景的触发有两种情况,
分支事务处理异常,即ConnectionProxy中report(false)的情况
TM捕获到下游系统上抛的异常,即发起全局事务标有@GlobalTransactional注解的方法捕获到的异常。在前面TransactionalTemplate类的execute模版方法中,对business.execute()的调用进行了catch,catch后会调用rollback,由TM通知TC对应XID需要回滚事务
public void rollback() throws TransactionException {
   //只有Launcher能发起这个rollback
   if (role == GlobalTransactionRole.Participant) {
       // Participant has no responsibility of committing
       if (LOGGER.isDebugEnabled()) {
           LOGGER.debug("Ignore Rollback(): just involved in global transaction [" + xid + "]");
       }
       return;
   }
   if (xid == null) {
       throw new IllegalStateException();
   }

   status = transactionManager.rollback(xid);
   if (RootContext.getXID() != null) {
       if (xid.equals(RootContext.getXID())) {
           RootContext.unbind();
       }
   }

}
TC汇总后向参与者发送rollback指令,RM在AbstractRMHandler类的doBranchRollback方法中接收这个rollback的通知
protected void doBranchRollback(BranchRollbackRequest request, BranchRollbackResponse response) throws TransactionException {
    String xid = request.getXid();
    long branchId = request.getBranchId();
    String resourceId = request.getResourceId();
    String applicationData = request.getApplicationData();
    LOGGER.info("Branch rolling back: " + xid + " " + branchId + " " + resourceId);
    BranchStatus status = getResourceManager().branchRollback(request.getBranchType(), xid, branchId, resourceId, applicationData);
    response.setBranchStatus(status);
    LOGGER.info("Branch rollback result: " + status);
}
然后将rollback请求传递到DataSourceManager类的branchRollback方法
public BranchStatus branchRollback(BranchType branchType, String xid, long branchId, String resourceId, String applicationData) throws TransactionException {
    //根据resourceId获取对应的数据源
    DataSourceProxy dataSourceProxy = get(resourceId);
    if (dataSourceProxy == null) {
        throw new ShouldNeverHappenException();
    }
    try {
        UndoLogManager.undo(dataSourceProxy, xid, branchId);
    } catch (TransactionException te) {
        if (te.getCode() == TransactionExceptionCode.BranchRollbackFailed_Unretriable) {
            return BranchStatus.PhaseTwo_RollbackFailed_Unretryable;
        } else {
            return BranchStatus.PhaseTwo_RollbackFailed_Retryable;
        }
    }
    return BranchStatus.PhaseTwo_Rollbacked;

}
最终会执行UndoLogManager类的undo方法,因为是纯jdbc操作代码比较长就不贴出来了,可以通过连接到github查看,说一下undo的具体流程
根据xid和branchId查找PhaseOne阶段提交的undolog
如果找到了就根据undolog中记录的数据生成回放sql并执行,即还原PhaseOne阶段修改的数据
第2步处理完后,删除该条undolog数据
如果第1步没有找到对应的undolog,就插入一条状态为GlobalFinished的undolog.
出现没找到的原因可能是PhaseOne阶段的本地事务异常了,导致没有正常写入。因为xid和branchId是唯一索引,所以第4步的插入,可以防止PhaseOne阶段后续又写入成功,那么PhaseOne阶段就会异常,这样业务数据也是没有提交成功的,数据最终是回滚了的效果

 博客专家
博客专家