示例:项目结构以及运行结果日志 简单的模拟实现大佬勿喷
分为7个小步骤:
- 1:协议
- 2:序列化
- 3:编解码器
- 4:Netty客户端
- 5:Netty服务端
- 6:客户端代理
- 7:远程调用测试
pom依赖:
<dependencies>
        <!--######################### 定义 spring starter 版本 #########################-->
        <dependency>
            <groupId>org.springframework.boot</groupId>
            <artifactId>spring-boot-starter</artifactId>
        </dependency>
        <!--######################### 定义 netty 版本 #########################-->
        <dependency>
            <groupId>io.netty</groupId>
            <artifactId>netty-all</artifactId>
        </dependency>
        <!--######################### 定义 log4j 版本 #########################-->
        <!-- 支持log4j2的模块,注意把spring-boot-starter和spring-boot-starter-web包中的logging去掉 -->
        <dependency>
            <groupId>org.springframework.boot</groupId>
            <artifactId>spring-boot-starter-log4j2</artifactId>
        </dependency>
        <dependency>
            <groupId>com.alibaba</groupId>
            <artifactId>fastjson</artifactId>
            <version>1.2.47</version>
        </dependency>
    </dependencies>
协议:(定义请求,响应)
package cn.lsr.rpc.protocol;

import java.util.Arrays;

/**
 * @Description: 请求DTO
 * @Package: lsr-microservice
 * @email: [email protected]
 * @author: lishirui
 **/
public class RpcRequest {
    /**
     * 请求对象的ID
     */
    private String requestId;
    /**
     * 类名
     */
    private String className;
    /**
     * 方法名
     */
    private String methodName;
    /**
     * 参数类型
     */
    private Class<?>[] parameterTypes;
    /**
     * 入参
     */
    private Object[] parameters;
//get set toString
}
package cn.lsr.rpc.protocol;

/**
 * @Description: 响应DTO
 * @Package: lsr-microservice
 * @email: [email protected]
 * @author: lishirui
 **/
public class RpcResponse {
    /**
     * 响应ID
     */
    private String requestId;
    /**
     * 错误信息
     */
    private String error;
    /**
     * 返回的结果
     */
    private Object result;

    //get set toString
}
序列化:
市面上序列化协议很多,比如jdk自带的,Google的protobuf,kyro、Hessian等,只要不选择jdk自带的序列化方法,(因为其性能太差,序列化后产生的码流太大),其他方式其实都可以,这里为了方便起见,选用JSON作为序列化协议,使用fastjson作为JSON框架
定义序列化接口
package cn.lsr.rpc.serializer;

import java.io.IOException;

/**
 * @Description: 序列化接口
 * @Package: lsr-microservice
 * @email: [email protected]
 * @author: lishirui
 **/
public interface Serializer {
    /**
     * java对象转换为二进制
     *
     * @param object
     * @return
     */
    byte[] serialize(Object object) throws IOException;

    /**
     * 二进制转换成java对象
     *
     * @param clazz
     * @param bytes
     * @param <T>
     * @return
     */
    <T> T deserialize(Class<T> clazz, byte[] bytes) throws IOException;
}
fastjson序列化实现
package cn.lsr.rpc.serializer;

import com.alibaba.fastjson.JSON;

import java.io.IOException;

/**
 * @Description: json方式序列化
 * @Package: lsr-microservice
 * @email: [email protected]
 * @author: lishirui
 **/
public class JSONSerializer implements Serializer{
    @Override
    public byte[] serialize(Object object) throws IOException {
        return JSON.toJSONBytes(object);
    }

    @Override
    public <T> T deserialize(Class<T> clazz, byte[] bytes) throws IOException {
        return JSON.parseObject(bytes,clazz);
    }
}
编解码器
约定好协议格式和序列化方式之后,我们还需要编解码器,编码器将请求对象转换为适合于传输的格式(一般来说是字节流),而对应的解码器是将网络字节流转换回应用程序的消息格式。
编码器
package cn.lsr.rpc.encoder;

import cn.lsr.rpc.serializer.Serializer;
import io.netty.buffer.ByteBuf;
import io.netty.channel.ChannelHandlerContext;
import io.netty.handler.codec.MessageToByteEncoder;

/**
 * @Description: 编码器
 * @Package: lsr-microservice
 * @email: [email protected]
 * @author: lishirui
 **/
public class RpcEncoder extends MessageToByteEncoder {
    private Class<?> clazz;
    private Serializer serializer;

    public RpcEncoder(Class<?> clazz, Serializer serializer) {
        this.clazz = clazz;
        this.serializer = serializer;
    }
    @Override
    protected void encode(ChannelHandlerContext channelHandlerContext, Object msg, ByteBuf byteBuf) throws Exception {
        if (clazz != null && clazz.isInstance(msg)) {
            byte[] bytes = serializer.serialize(msg);
            byteBuf.writeInt(bytes.length);
            byteBuf.writeBytes(bytes);
        }
    }
}
解码器
package cn.lsr.rpc.encoder;

import cn.lsr.rpc.serializer.Serializer;
import io.netty.buffer.ByteBuf;
import io.netty.channel.ChannelHandlerContext;
import io.netty.handler.codec.ByteToMessageDecoder;

import java.util.List;

/**
 * @Description: 解码器
 * @Package: lsr-microservice
 * @email: [email protected]
 * @author: lishirui
 **/
public class RpcDecoder extends ByteToMessageDecoder {
    private Class<?> clazz;
    private Serializer serializer;

    public RpcDecoder(Class<?> clazz, Serializer serializer) {
        this.clazz = clazz;
        this.serializer = serializer;
    }
    @Override
    protected void decode(ChannelHandlerContext channelHandlerContext, ByteBuf byteBuf, List<Object> list) throws Exception {
        //因为之前编码的时候写入一个Int型,4个字节来表示长度
        if (byteBuf.readableBytes() < 4) {
            return;
        }
        //标记当前读的位置
        byteBuf.markReaderIndex();
        int dataLength = byteBuf.readInt();
        if (byteBuf.readableBytes() < dataLength) {
            byteBuf.resetReaderIndex();
            return;
        }
        byte[] data = new byte[dataLength];
        //将byteBuf中的数据读入data字节数组
        byteBuf.readBytes(data);
        Object obj = serializer.deserialize(clazz, data);
        list.add(obj);
    }
}
Netty客户端
编写步骤:
- 编写启动方法,指定传输使用Channel
- 指定ChannelHandler,对网络传输中的数据进行读写处理
- 添加编解码器
- 添加失败重试机制
- 添加发送请求消息的方法
package cn.lsr.rpc;

import cn.lsr.rpc.encoder.RpcDecoder;
import cn.lsr.rpc.encoder.RpcEncoder;
import cn.lsr.rpc.handler.ClientHandler;
import cn.lsr.rpc.protocol.RpcRequest;
import cn.lsr.rpc.protocol.RpcResponse;
import cn.lsr.rpc.serializer.JSONSerializer;
import io.netty.bootstrap.Bootstrap;
import io.netty.channel.*;
import io.netty.channel.nio.NioEventLoopGroup;
import io.netty.channel.socket.SocketChannel;
import io.netty.channel.socket.nio.NioSocketChannel;
import org.slf4j.Logger;
import org.slf4j.LoggerFactory;
import org.springframework.beans.factory.annotation.Autowired;

import javax.annotation.PreDestroy;
import java.util.Date;
import java.util.concurrent.TimeUnit;

/**
 * @Description: netty客户端
 * @Package: lsr-microservice
 * @email: [email protected]
 * @author: lishirui
 **/

public class NettyClient {
    private Logger log = LoggerFactory.getLogger(NettyClient.class);
    private EventLoopGroup eventLoopGroup;
    @Autowired
    private Channel channel;
    private ClientHandler clientHandler;
    private String host;
    private Integer port;
    private static final int MAX_RETRY = 5;
    public NettyClient(String host, Integer port) {
        this.host = host;
        this.port = port;
    }
    public void connect() {
        clientHandler = new ClientHandler();
        eventLoopGroup = new NioEventLoopGroup();
        //启动类
        Bootstrap bootstrap = new Bootstrap();
        bootstrap.group(eventLoopGroup)
                //指定传输使用的Channel
                .channel(NioSocketChannel.class)
                .option(ChannelOption.SO_KEEPALIVE, true)
                .option(ChannelOption.TCP_NODELAY, true)
                .option(ChannelOption.CONNECT_TIMEOUT_MILLIS,5000)
                .handler(new ChannelInitializer<SocketChannel>() {
                    @Override
                    protected void initChannel(SocketChannel ch) throws Exception {
                        ChannelPipeline pipeline = ch.pipeline();
                        //添加编码器
                        pipeline.addLast(new RpcEncoder(RpcRequest.class, new JSONSerializer()));
                        //添加解码器
                        pipeline.addLast(new RpcDecoder(RpcResponse.class, new JSONSerializer()));
                        //请求处理类
                        pipeline.addLast(clientHandler);
                    }
                });
        connect(bootstrap, host, port, MAX_RETRY);
    }

    /**
     * 失败重连机制,参考Netty入门实战掘金小册
     *
     * @param bootstrap
     * @param host
     * @param port
     * @param retry
     */
    private void connect(Bootstrap bootstrap, String host, int port, int retry) {
        ChannelFuture channelFuture = bootstrap.connect(host, port).addListener(future -> {
            if (future.isSuccess()) {
                log.info("连接服务端成功");
            } else if (retry == 0) {
                log.error("重试次数已用完,放弃连接");
            } else {
                //第几次重连:
                int order = (MAX_RETRY - retry) + 1;
                //本次重连的间隔
                int delay = 1 << order;
                log.error("{} : 连接失败,第 {} 重连....", new Date(), order);
                bootstrap.config().group().schedule(() -> connect(bootstrap, host, port, retry - 1), delay, TimeUnit.SECONDS);
            }
        });
        channel = channelFuture.channel();
    }

    /**
     * 发送消息
     *
     * @param request
     * @return
     */
    public RpcResponse send(final RpcRequest request) {
        try {
            channel.writeAndFlush(request).await();
        } catch (InterruptedException e) {
            e.printStackTrace();
        }
        return clientHandler.getRpcResponse(request.getRequestId());
    }

    @PreDestroy
    public void close() {
        eventLoopGroup.shutdownGracefully();
        channel.closeFuture().syncUninterruptibly();
    }
}
我们对于数据的处理重点在于ClientHandler类上,它继承了ChannelDuplexHandler类,可以对出站和入站的数据进行处理
package cn.lsr.rpc.handler;

import cn.lsr.rpc.asyn.DefaultFuture;
import cn.lsr.rpc.protocol.RpcRequest;
import cn.lsr.rpc.protocol.RpcResponse;
import io.netty.channel.ChannelDuplexHandler;
import io.netty.channel.ChannelHandlerContext;
import io.netty.channel.ChannelPromise;

import java.util.Map;
import java.util.concurrent.ConcurrentHashMap;

/**
 * @Description: 客户端handler
 * @Package: lsr-microservice
 * @email: [email protected]
 * @author: lishirui
 **/
public class ClientHandler extends ChannelDuplexHandler {
    /**
     * 使用Map维护请求对象ID与响应结果Future的映射关系
     */
    private final Map<String, DefaultFuture> futureMap = new ConcurrentHashMap<>();
    @Override
    public void channelRead(ChannelHandlerContext ctx, Object msg) throws Exception {
        if (msg instanceof RpcResponse) {
            //获取响应对象
            RpcResponse response = (RpcResponse) msg;
            DefaultFuture defaultFuture =
                    futureMap.get(response.getRequestId());
            //将结果写入DefaultFuture
            defaultFuture.setResponse(response);
        }
        super.channelRead(ctx,msg);
    }
    @Override
    public void write(ChannelHandlerContext ctx, Object msg, ChannelPromise promise) throws Exception {
        if (msg instanceof RpcRequest) {
            RpcRequest request = (RpcRequest) msg;
            //发送请求对象之前,先把请求ID保存下来,并构建一个与响应Future的映射关系
            futureMap.putIfAbsent(request.getRequestId(), new DefaultFuture());
        }
        super.write(ctx, msg, promise);
    }

    /**
     * 获取响应结果
     *
     * @param requsetId
     * @return
     */
    public RpcResponse getRpcResponse(String requsetId) {
        try {
            DefaultFuture future = futureMap.get(requsetId);
            return future.getRpcResponse(500000);
        } finally {
            //获取成功以后,从map中移除
            futureMap.remove(requsetId);
        }
    }
}
从上面实现可以看出,我们定义了一个Map,维护请求ID与响应结果的映射关系,目的是为了客户端用来验证服务端响应是否与请求相匹配,因为Netty的channel可能被多个线程使用,当结果返回时,你不知道是从哪个线程返回的,所以需要一个映射关系。
而我们的结果是封装在DefaultFuture中的,因为Netty是异步框架,所有的返回都是基于Future和Callback机制的,我们这里自定义Future来实现客户端"异步调用"
package cn.lsr.rpc.asyn;

import cn.lsr.rpc.protocol.RpcResponse;

/**
 * @Description: 模拟异步调用 因为Netty是异步框架,所有的返回都是基于Future和Callback机制的,我们这里自定义Future来实现客户端"异步调用"
 * @Package: lsr-microservice
 * @email: [email protected]
 * @author: lishirui
 **/
public class DefaultFuture {
    private RpcResponse rpcResponse;
    //实际上用了wait和notify机制,同时使用一个boolean变量做辅助
    private volatile boolean isSucceed = false;
    private final Object object = new Object();

    public RpcResponse getRpcResponse(int timeout) {
        synchronized (object) {
            while (!isSucceed) {
                try {
                    object.wait(timeout);
                } catch (InterruptedException e) {
                    e.printStackTrace();
                }
            }
            return rpcResponse;
        }
    }

    public void setResponse(RpcResponse response) {
        if (isSucceed) {
            return;
        }
        synchronized (object) {
            this.rpcResponse = response;
            this.isSucceed = true;
            object.notify();
        }
    }
}
Netty服务端
Netty服务端的实现跟客户端的实现差不多,只不过要注意的是,当对请求进行解码过后,需要通过代理的方式调用本地函数。下面是Server端代码:
package cn.lsr.rpc;

import cn.lsr.rpc.encoder.RpcDecoder;
import cn.lsr.rpc.encoder.RpcEncoder;
import cn.lsr.rpc.handler.ServerHandler;
import cn.lsr.rpc.protocol.RpcRequest;
import cn.lsr.rpc.protocol.RpcResponse;
import cn.lsr.rpc.serializer.JSONSerializer;
import io.netty.bootstrap.ServerBootstrap;
import io.netty.channel.ChannelInitializer;
import io.netty.channel.ChannelOption;
import io.netty.channel.ChannelPipeline;
import io.netty.channel.EventLoopGroup;
import io.netty.channel.nio.NioEventLoopGroup;
import io.netty.channel.socket.SocketChannel;
import io.netty.channel.socket.nio.NioServerSocketChannel;
import org.slf4j.Logger;
import org.slf4j.LoggerFactory;
import org.springframework.beans.factory.InitializingBean;
import org.springframework.beans.factory.annotation.Autowired;
import org.springframework.stereotype.Component;

import javax.annotation.PreDestroy;
import javax.imageio.spi.ServiceRegistry;

/**
 * @Description: netty服务端
 * @Package: lsr-microservice
 * @email: [email protected]
 * @author: lishirui
 **/
@Component
public class NettyServer implements InitializingBean {
    private Logger log = LoggerFactory.getLogger(NettyServer.class);
    private EventLoopGroup boss = null;
    private EventLoopGroup worker = null;
    @Autowired
    private ServerHandler serverHandler;
    @Override
    public void afterPropertiesSet() throws Exception {
        //此处使用了zookeeper做注册中心,本文不涉及,可忽略
        //ServiceRegistry registry = new ZkServiceRegistry("127.0.0.1:2181");
        //start(registry);
        start();
    }
    public void start(){
        //负责处理客户端连接的线程池
        boss = new NioEventLoopGroup();
        //负责处理读写操作的线程池
        worker = new NioEventLoopGroup();
        ServerBootstrap serverBootstrap = new ServerBootstrap();
        serverBootstrap.group(boss, worker)
                .channel(NioServerSocketChannel.class)
                .option(ChannelOption.SO_BACKLOG, 1024) //重试次数
                .childHandler(new ChannelInitializer<SocketChannel>() {
                    @Override
                    protected void initChannel(SocketChannel ch) throws Exception {
                        ChannelPipeline pipeline = ch.pipeline();
                        //添加解码器
                        pipeline.addLast(new RpcEncoder(RpcResponse.class, new JSONSerializer()));
                        //添加编码器
                        pipeline.addLast(new RpcDecoder(RpcRequest.class, new JSONSerializer()));
                        //添加请求处理器
                        pipeline.addLast(serverHandler);

                    }
                });
        bind(serverBootstrap, 8080);
    }

    /**
     * 如果端口绑定失败,端口数+1,重新绑定
     *
     * @param serverBootstrap
     * @param port
     */
    public void bind(final ServerBootstrap serverBootstrap, int port) {
        serverBootstrap.bind(port).addListener(future -> {
            if (future.isSuccess()) {
                log.info("端口[ {} ] 绑定成功",port);
            } else {
                log.error("端口[ {} ] 绑定失败", port);
                bind(serverBootstrap, port + 1);
            }
        });
    }

    @PreDestroy
    public void destory() throws InterruptedException {
        boss.shutdownGracefully().sync();
        worker.shutdownGracefully().sync();
        log.info("关闭Netty");
    }
}
下面是处理读写操作的Handler类:
package cn.lsr.rpc.handler;

import cn.lsr.rpc.protocol.RpcRequest;
import cn.lsr.rpc.protocol.RpcResponse;
import io.netty.channel.ChannelHandler;
import io.netty.channel.ChannelHandlerContext;
import io.netty.channel.SimpleChannelInboundHandler;
import org.slf4j.Logger;
import org.slf4j.LoggerFactory;
import org.springframework.beans.BeansException;
import org.springframework.cglib.reflect.FastClass;
import org.springframework.cglib.reflect.FastMethod;
import org.springframework.context.ApplicationContext;
import org.springframework.context.ApplicationContextAware;
import org.springframework.stereotype.Component;

import java.lang.reflect.InvocationTargetException;

/**
 * @Description: 服务handler
 * @Package: lsr-microservice
 * @email: [email protected]
 * @author: lishirui
 **/
@Component
@ChannelHandler.Sharable
public class ServerHandler extends SimpleChannelInboundHandler<RpcRequest> implements ApplicationContextAware {
    private Logger log = LoggerFactory.getLogger(ServerHandler.class);
    private ApplicationContext applicationContext;
    @Override
    protected void channelRead0(ChannelHandlerContext channelHandlerContext, RpcRequest rpcRequest) throws Exception {
        RpcResponse rpcResponse = new RpcResponse();
        rpcResponse.setRequestId(rpcRequest.getRequestId());
        try {
            Object handler = handler(rpcRequest);
            log.info("获取返回结果: {} ", handler);
            rpcResponse.setResult(handler);
        } catch (Throwable throwable) {
            rpcResponse.setError(throwable.toString());
            throwable.printStackTrace();
        }
        channelHandlerContext.writeAndFlush(rpcResponse);
    }

    @Override
    public void setApplicationContext(ApplicationContext applicationContext) throws BeansException {
        this.applicationContext = applicationContext;
    }
    /**
     * 服务端使用代理处理请求
     *
     * @param request
     * @return
     */
    private Object handler(RpcRequest request) throws ClassNotFoundException, InvocationTargetException {
        //使用Class.forName进行加载Class文件
        Class<?> clazz = Class.forName(request.getClassName());
        Object serviceBean = applicationContext.getBean(clazz);
        log.info("serviceBean: {}",serviceBean);
        Class<?> serviceClass = serviceBean.getClass();
        log.info("serverClass:{}",serviceClass);
        String methodName = request.getMethodName();

        Class<?>[] parameterTypes = request.getParameterTypes();
        Object[] parameters = request.getParameters();

        //使用CGLIB Reflect
        FastClass fastClass = FastClass.create(serviceClass);
        FastMethod fastMethod = fastClass.getMethod(methodName, parameterTypes);
        log.info("开始调用CGLIB动态代理执行服务端方法...");
        return fastMethod.invoke(serviceBean, parameters);
    }
}
客户端代理
客户端使用Java动态代理,在代理类中实现通信细节,众所众知,Java动态代理需要实现InvocationHandler接口
package cn.lsr.rpc.provider;

import cn.lsr.rpc.NettyClient;
import cn.lsr.rpc.protocol.RpcRequest;
import cn.lsr.rpc.protocol.RpcResponse;
import org.slf4j.Logger;
import org.slf4j.LoggerFactory;

import java.lang.reflect.InvocationHandler;
import java.lang.reflect.Method;
import java.util.Date;
import java.util.UUID;

/**
 * @Description: 客户端动态代理
 * @Package: lsr-microservice
 * @email: [email protected]
 * @author: lishirui
 **/
public class RpcClientDynamicProxy<T> implements InvocationHandler {
    private Logger log = LoggerFactory.getLogger(RpcClientDynamicProxy.class);
    private Class<T> clazz;
    public RpcClientDynamicProxy(Class<T> clazz) throws Exception {
        this.clazz = clazz;
    }

    /**
     * 在invoke方法中封装请求对象,构建NettyClient对象,并开启客户端,发送请求消息
     * @param proxy
     * @param method
     * @param args
     * @return
     * @throws Throwable
     */
    @Override
    public Object invoke(Object proxy, Method method, Object[] args) throws Throwable {
        RpcRequest request = new RpcRequest();
        String requestId = UUID.randomUUID().toString();
        String className = method.getDeclaringClass().getName();
        String methodName = method.getName();
        Class<?>[] parameterTypes = method.getParameterTypes();
        request.setRequestId(requestId);
        request.setClassName(className);
        request.setMethodName(methodName);
        request.setParameterTypes(parameterTypes);
        request.setParameters(args);
        log.info("请求内容: {}",request);
        //开启Netty 客户端,直连
        NettyClient nettyClient = new NettyClient("127.0.0.1", 8080);
        log.info("开始连接服务端:{}",new Date());
        nettyClient.connect();
        RpcResponse send = nettyClient.send(request);
        log.info("请求调用返回结果:{}", send.getResult());
        return send.getResult();
    }
}
在invoke方法中封装请求对象,构建NettyClient对象,并开启客户端,发送请求消息
代理工厂类如下:
package cn.lsr.rpc.factory;

import cn.lsr.rpc.provider.RpcClientDynamicProxy;

import java.lang.reflect.Proxy;

/**
 * @Description: 代理工厂
 * @Package: lsr-microservice
 * @email: [email protected]
 * @author: lishirui
 **/
public class ProxyFactory {
    public static <T> T create(Class<T> interfaceClass) throws Exception {
        return (T) Proxy.newProxyInstance(interfaceClass.getClassLoader(),new Class<?>[] {interfaceClass}, new RpcClientDynamicProxy<T>(interfaceClass));
    }
}
通过Proxy.newProxyInstance创建接口的代理类
远程调用测试
因为是使用boot启动方式,NettyServer实现了InitializingBean ,启动会加载。自动启动服务,
测试接口
package cn.lsr.rpc.demo;

/**
 * @Description: 测试接口
 * @Package: lsr-microservice
 * @email: [email protected]
 * @author: lishirui
 **/
public interface HelloService {
    String hello(String name);
}
接口实现
package cn.lsr.rpc.demo;

import org.springframework.stereotype.Service;

/**
 * @Description: 测试服务实现
 * @Package: lsr-microservice
 * @email: [email protected]
 * @author: lishirui
 **/
@Service
public class HelloServiceImp implements HelloService {
    @Override
    public String hello(String name) {
        return "我是服务hello:"+name;
    }
}
启动类
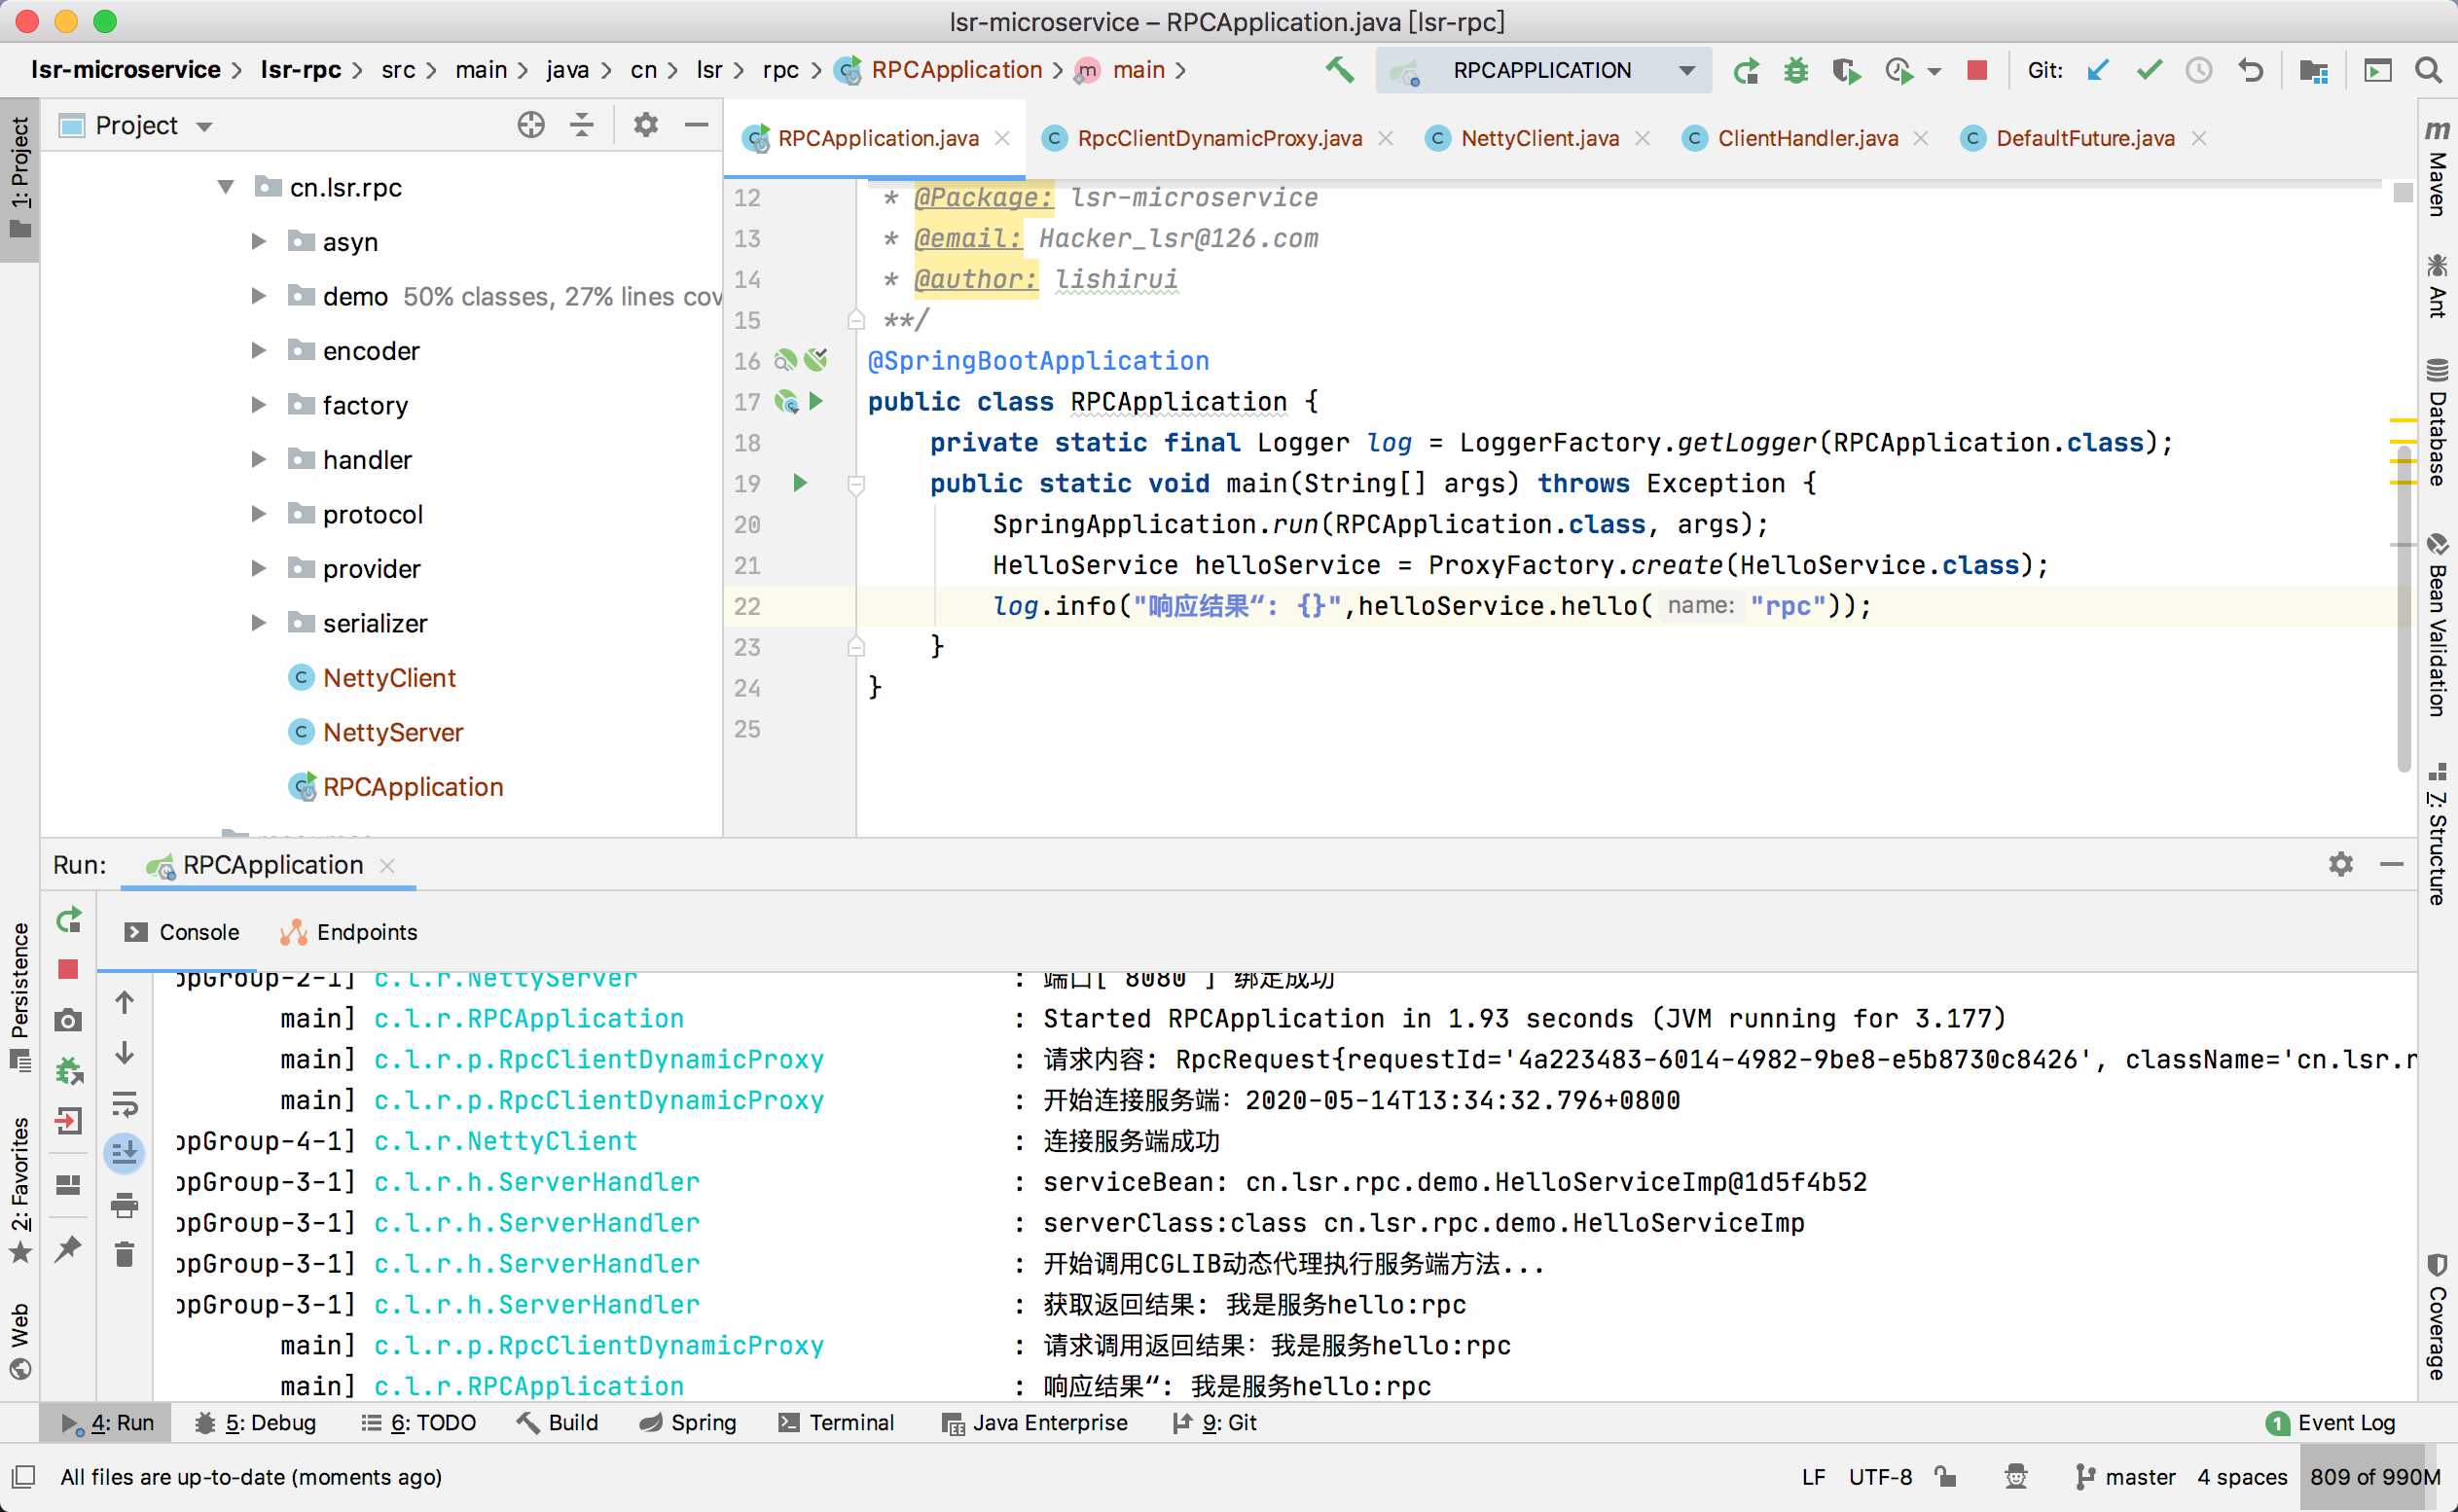
package cn.lsr.rpc;

import cn.lsr.rpc.demo.HelloService;
import cn.lsr.rpc.factory.ProxyFactory;
import org.slf4j.Logger;
import org.slf4j.LoggerFactory;
import org.springframework.boot.SpringApplication;
import org.springframework.boot.autoconfigure.SpringBootApplication;

/**
 * @Description: 启动类
 * @Package: lsr-microservice
 * @email: [email protected]
 * @author: lishirui
 **/
@SpringBootApplication
public class RPCApplication {
    private static final Logger log = LoggerFactory.getLogger(RPCApplication.class);
    public static void main(String[] args) throws Exception {
        SpringApplication.run(RPCApplication.class, args);
        HelloService helloService = ProxyFactory.create(HelloService.class);
        log.info("响应结果“: {}",helloService.hello("rpc"));
    }
}
运行启动类,会启动服务端,并在main方法进行调用。