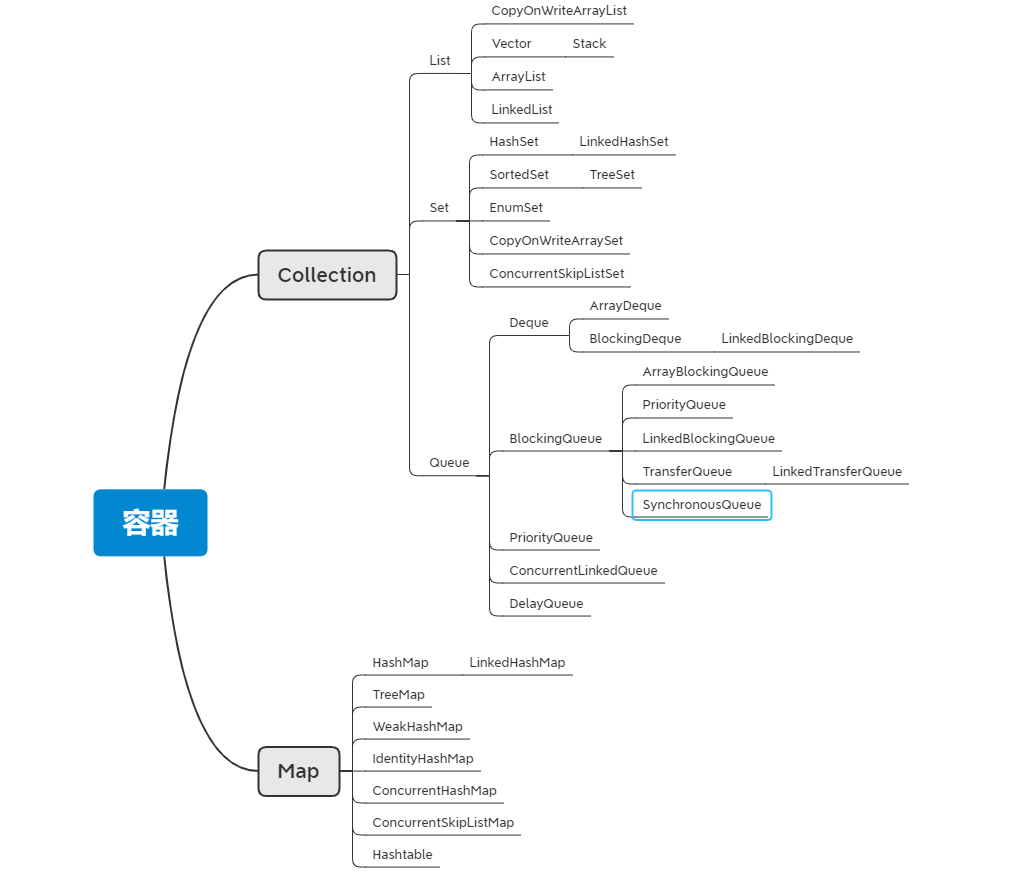
一,基础概念
    什么是线程
        进程里最小的执行单元,程序里不通的执行路径
    线程实现
        继承thread
        实现runnable
        实现callable
        用过线程池创建
        ExecutorServices=Executors.newCachedThreadPool();
        s.execute(()->{System.out.println(Thread.currentThread().getName());});
    常用方法
        yield 指让出一下CPU
        sleep 指休眠固定时间
        join   只让固定线程插队执行
    线程状态
        new
        runnable包含两个状态ready running
        timedWaiting
            t.sleep(500);
            o.wait(500);
            t.join(500);
            LockSupport.parkNanos(500);
            LockSupport.parkUntil(200);
        waiting
            o.wait();
            o.notify();
            o.notifyAll();
            t.join(t1);
            LockSupport.park();
            LockSupport.unpark(t1);
        blocked
    线程同步
        synchronized,保证数据一致性
        方法
            锁一个方法
            public class T{
            privateint count=10;
            public synchronized void m(){
                count--;
                System.out.println(Thread.currentThread().getName()+"count="+count);
                }
            }
        对象加锁
            synchronized(this)锁当前对象
            public class T{
            private int count=10;
            private Object o=new Object();
            public void m(){
            synchronized(o){
                count--;
                System.out.println(Thread.currentThread().getName()+"count="+count);
                    }
                }
            }
    synchronized锁升级
        偏向锁,对象为32位,前两位记录线程id,有线程进来的话进行判断,有过线程id相同,就继续执行
        自旋锁,如果线程id不同就等待,自旋10圈
        重量级锁,自旋10圈之后直接请求操作系统
        执行时间短,线程数少用自旋锁
        执行时间长,线程数多,用系统锁
    synchronized同步方法与非同步方法
        可以相互调用
    synchronized锁重入
        都是可重入的,sleep,yield,join
    异常与锁
        异常发生后释放锁,不影响其他线程
    volatile
        保证线程间可见,MESI缓存一致性协议
        防止指令重排序
    AtomicXXX
        本身是线程安全的,针对加锁专门设计的
    wait notify(面试高频)
        等待,唤醒
        可以替代为LockSupport的park和unpark
二,JUC同步工具
    cas自旋原理
        AtomicInteger底层是调用的UnSafe调用的是CompareAndSetI方法
    ReentrantLock可重入锁
        和syncronized一样的功能,只是在需要加锁的代码前写lock.lock()在finally里面释放锁lock.unlock()
        public class T01_ReentrantLock2 {
            Lock lock= new ReentrantLock();
            void m1(){
                try {
                    lock.lock();//synchronized (this)
                    for (int i = 0; i < 10; i++) {
                        SleepUtil.sleepSecond(1);
                        System.out.println(i);
                    }
                }finally {
                    lock.unlock();
                }
            }
            void m2(){
                try {
                    lock.lock();
                    System.out.println("m2...");
                }finally {
                    lock.unlock();
                }
            }
            public static void main(String[] args) {
                T01_ReentrantLock2 r1= new T01_ReentrantLock2();
                new Thread(r1::m1).start();
                SleepUtil.sleepSecond(1);
                new Thread(r1::m2).start();
            }
        }
        ReentrantLock有tryLock()方法进行尝试锁定,用返回值判断是否锁定,不管锁定与否,方法继续执行
        public class T01_ReentrantLock3 {
            Lock lock= new ReentrantLock();
            void m1(){
                try {
                    //加锁
                    lock.lock();//synchronized (this)
                    for (int i = 0; i < 10; i++) {
                        SleepUtil.sleepSecond(1);
                        System.out.println(i);
                    }
                }finally {
                    //finally解锁
                    lock.unlock();
                }
            }
            /**
             * ReentrantLock比较强大,可以使用tryLock进行尝试锁定,不管锁定与否,方法继续执行,
             * 可以根据ReentrantLock返回值来判断是否锁定
             * 也可以指定truLock的时间
             */
            void m2(){
                        boolean locked =false;
                try {
                    //尝试获取锁
                    locked = this.lock.tryLock(5, TimeUnit.SECONDS);
                    System.out.println("m2..."+locked);
            //lock.lockInterruptibly();//可以对interrupt方法做出响应
                } catch (InterruptedException e) {
                    e.printStackTrace();
                } finally {
                    //finally解锁
                    if (locked)lock.unlock();
                }
            }
            public static void main(String[] args) {
                T01_ReentrantLock3 r1= new T01_ReentrantLock3();
                new Thread(r1::m1).start();
                SleepUtil.sleepSecond(1);
                new Thread(r1::m2).start();
              //t2.interrupt();//打断线程2的等待
            }
        }
    condition条件等待与通知
    一个condition等待与通知,与wait(),notify类似
        private Lock lock=new ReentrantLock();
        private Condition condition=lock.newCondition();
        condition.await();
        condition.signalAll();
    多个condition等待与通知和生产者消费者类似
        /**
         * 写一个固定容量同步容器,拥有put()get()方法,以及getCount方法,
         * 能够支持两个生产者线程以及10个消费者线程阻塞调用
         * @param <T>
         */
        public class MyContainer2<T> {
            final private LinkedList<T> lists= new LinkedList<>(); //初始化容器
            final private int MAX=10;//最大容量
            private int count=0;//表示当前容量
            private Lock lock= new ReentrantLock();
            private Condition producer=lock.newCondition();
            private Condition consumer=lock.newCondition();

            /**
             * 生产者
             * @param t
             */
             public void put(T t){
                    try {
                        lock.lock();
                        while (lists.size()==MAX){//用while的目的是要保证list的size不能为负数
                            producer.await();//生产者等待
                        }
                        lists.add(t);
                        ++count;
                        consumer.signalAll();//通知消费者线程进行消费
                    } catch (InterruptedException e) {
                        e.printStackTrace();
                    }finally {
                        lock.unlock();
                    }
             }
            /**
             * 消费者
             * @return
             */
             public T get(){
                T t= null;
                    try {
                        lock.lock();
                        while (lists.size()==0) {//用while的目的是要保证list的size不能为负数
                            consumer.await();
                        }
                        t=lists.removeFirst();//消费第一个
                        count--;
                        producer.signalAll();//通知生产者线程进行生产
                    } catch (InterruptedException e) {
                        e.printStackTrace();
                    }finally {
                        lock.unlock();
                    }
                return t;
            }
            public static void main(String[] args) {
                MyContainer2<String> c= new MyContainer2();
                //启动消费者线程
                for (int i = 0; i < 10; i++) {
                    new Thread(()->{
                        for (int j = 0; j < 5; j++) {
                            System.out.println(c.get());
                        }
                    },"c"+i).start();
                }
                SleepUtil.sleepSecond(2);
                //启动生产者线程
                for (int i = 0; i < 2; i++) {
                    new Thread(()->{
                        for (int j = 0; j < 25; j++) {
                            c.put(Thread.currentThread().getName()+" "+j);
                        }
                    },"p"+i).start();
                }
            }
        }
    CountDownLatch门闩
        latch.countDown();主要用于线程间倒数
        public class T05_CountDownLatch {
            volatile List list = new ArrayList();
        //    volatile List list = Collections.synchronizedList(new ArrayList<>());
            public void add (Object o){
                list.add(o);
            }
            public int size(){
                return list.size();
            }
            public static void main(String[] args) {
                T05_CountDownLatch c= new T05_CountDownLatch();
                CountDownLatch latch= new CountDownLatch(1);
                new Thread(()->{
                        System.out.println("t2 启动");
                            if (c.size()!=5){
                                try {
                                    latch.await();
                                } catch (InterruptedException e) {
                                    e.printStackTrace();
                                }
                            }
                            System.out.println("t2 结束");
                },"t2").start();
                SleepUtil.sleepSecond(1);
                new Thread(()->{
                        for (int i = 0; i < 10; i++) {
                            c.add(new Object());
                            System.out.println("add "+i);
                            if (c.size()==5){
                                latch.countDown();
                                //释放锁,让t2执行
                                try {
                                    latch.await();
                                } catch (InterruptedException e) {
                                    e.printStackTrace();
                                }
                            }
                            SleepUtil.sleepMillis(100);
                        }
                },"t1").start();

            }
        }
    CyclicBarrier分批执行,每一批执行一次
        /**
         * 一个栅栏,循环使用,什么时候人满了,栅栏打开,放大家过关
         * CyclicBarrier循环栅栏,一直监听,到达指定容量,就放行
         * barrier.await();监听是否到达设置的容量20,够20人就发一次车,不到就一直等着
         */
        public class T07_TestCyclicBarrier {
            public static void main(String[] args) {
                CyclicBarrier barrier = new CyclicBarrier(20, () -> System.out.println("满人发车"));
                for (int i = 0; i < 105; i++) {
                    new Thread(()->{
                        try {
                            barrier.await();
                        } catch (InterruptedException e) {
                            e.printStackTrace();
                        } catch (BrokenBarrierException e) {
                            e.printStackTrace();
                        }
                    }).start();
                }
            }
        }
三,同步容器
    各个容器的特性
        list可以按索引位置取数据
        set去重
        map键值对存取数据
        让容器变得安全(加锁工具类)
Collections.synchronizedList(list);
        Collections.synchronizedSet(set);
        Collections.synchronizedMap(map);
        Queue为高并发设计
四,线程池
    线程池7个参数介绍
    ThreadPoolExecutor tpe=new ThreadPoolExecutor(
                        2,//核心线程数
              4,//最大线程数
                        60,//生存时间
                        TimeUnit.SECONDS,//生存时间的单位
                        new ArrayBlockingQueue<Runnable>(4),//任务队列,最多可以装4个任务
                        Executors.defaultThreadFactory(),//线程工厂,可以指定线程名称
                        new ThreadPoolExecutor.CallerRunsPolicy()
            /**拒绝策略,四种:
            *abort,抛异常
            *discard,扔掉,不抛异常
            *discardOldest,扔掉排队时间最久的
            *callerRuns调用者处理服务
            */

    );
    for (int i = 0; i < 8; i++) {
                tpe.execute(new Task(i));
            }
    //缓存线程池,没有核心线程数,最大线程数可以有好多,60秒没有调用就回收线程,使用默认工厂和拒绝策略,来一个任务我给你启动一个线程,
    ExecutorService service = Executors.newCachedThreadPool();
    Future<String> submit = service.submit(call);
    //单线程线程池,保证扔进去的任务按顺序执行
    ExecutorService s = Executors.newSingleThreadExecutor();
    s.execute(()->{System.out.println(j+Thread.currentThread().getName());})
    //固定大小线程池,可以并行计算,把计算任务分成多个小段执行
    ExecutorService service = Executors.newFixedThreadPool(4);
    MyTask t1 = new MyTask(1, 80000); //MyTask实现了Callable
    Future<List<Integer>> f1 = service.submit(t1);
    //定时任务线程池
    scheduleAtFixedRate间隔多长时间在一定的频率上来执行这个任务
    第一个参数是delay
    第二个参数是间隔多长时间period
    第三个参数是时间单位timeunit
    ScheduledExecutorService service = Executors.newScheduledThreadPool(4);
    service.scheduleAtFixedRate(()->{System.out.println(Thread.currentThread().getName());},0,500, TimeUnit.MILLISECONDS);
    MyTask t1 = new MyTask(1, 80000);
    Future<List<Integer>> f1 = service.submit(t1);

    ExecutorService service = Executors.newWorkStealingPool();
    service.execute(new R(1000));
    ForkJoinPool
    public class T12_ForkJoinPool {
        static int[] nums = new int[1000000];
        static final int MAX_NUM = 50000;
        static Random r = new Random();
        static {
            for(int i=0; i<nums.length; i++) {
                nums[i] = r.nextInt(100);
            }
            System.out.println("---" + Arrays.stream(nums).sum()); //stream api
        }
        static class AddTask extends RecursiveAction {
            int start, end;

            public AddTask(int start, int end) {
                this.start = start;
                this.end = end;
            }
            @Override
            protected void compute() {
                if (end-start<=MAX_NUM){
                    long sum=0L;
                    for (int i = start ; i <end ; i++) {
                        sum+=nums[i];
                    }
                    System.out.println("from "+start+" to: "+end+" = "+sum);
                }else {
                    int middle = start+(end-start)/2;

                    AddTask addTask1= new AddTask(start, middle);
                    AddTask addTask2= new AddTask(middle, end);
                    addTask1.fork();
                    addTask2.fork();
                }
            }
        }
        static class AddTaskRet extends RecursiveTask<Long> {
            private static final long serialVersionUID = 1L;
            int start, end;

            public AddTaskRet(int start, int end) {
                this.start = start;
                this.end = end;
            }
            @Override
            protected Long compute() {
                if (end-start<=MAX_NUM){
                    long sum=0L;
                    for (int i = start ; i <end ; i++) {
                        sum+=nums[i];
                    }
                    return sum;
                }
                    int middle = start+(end-start)/2;
                    AddTaskRet addTask1= new AddTaskRet(start, middle);
                    AddTaskRet addTask2= new AddTaskRet(middle, end);
                    addTask1.fork();
                    addTask2.fork();
                return addTask1.join()+addTask2.join();
            }
        }
        public static void main(String[] args) {
            T12_ForkJoinPool temp = new T12_ForkJoinPool();
            ForkJoinPool fjp = new ForkJoinPool();
            AddTaskRet task= new AddTaskRet(0, nums.length);
            fjp.execute(task);
            Long result = task.join();
            System.out.println(result);

        }
    }
    线程池execute和submit用法
    1.execute提交的是Runnable类型的任务,而submit提交的是Callable或者Runnable类型的任务
    2.execute的提交没有返回值,而submit的提交会返回一个Future类型的对象
    3.execute提交的时候,如果有异常,就会直接抛出异常,而submit在遇到异常的时候,通常不会立马抛出异常,而是会将异常暂时存储起来,等待你调用Future.get()方法的时候,才会抛出异常


五,JMH(Java Microbenchmark Harness)
    创建JMH测试
        新建maven项目,引入依赖
            <dependencies>
                <!-- https://mvnrepository.com/artifact/org.openjdk.jmh/jmh-core -->
                <dependency>
                    <groupId>org.openjdk.jmh</groupId>
                    <artifactId>jmh-core</artifactId>
                    <version>1.21</version>
                </dependency>

                <!-- https://mvnrepository.com/artifact/org.openjdk.jmh/jmh-generator-annprocess -->
                <dependency>
                    <groupId>org.openjdk.jmh</groupId>
                    <artifactId>jmh-generator-annprocess</artifactId>
                    <version>1.21</version>
                    <scope>test</scope>
                </dependency>
            </dependencies>
        idea安装JMH插件 JMH plugin v1.0.3
        由于用到了注解,打开运行程序注解配置:compiler -> Annotation Processors -> Enable Annotation Processing
        定义需要测试类PS (ParallelStream)
        public class PS {
            static List<Integer> nums = new ArrayList<>();
            static {
                Random r = new Random();
                for (int i = 0; i < 10000; i++) nums.add(1000000 + r.nextInt(1000000));
            }
            static void foreach() {
                nums.forEach(v->isPrime(v));
            }
            static void parallel() {
                nums.parallelStream().forEach(PS::isPrime);
            }
                static boolean isPrime(int num) {
                for(int i=2; i<=num/2; i++) {
                    if(num % i == 0) return false;
                }
                return true;
            }
        }
        写单元测试(在test下,与ps类同路径)
        public class PSTest {
         @Benchmark
         public void testForEach() {
             PS.foreach();
         }
        }
        运行测试类,如果遇到下面的错误: Exception while trying to acquire the JMH lock (C:\WINDOWS\/jmh.lock): C:\WINDOWS\jmh.lock (拒绝访问。), exiting. Use -Djmh.ignoreLock=true to forcefully continue.
        这个错误是因为JMH运行需要访问系统的TMP目录,解决办法是:
        打开RunConfiguration -> Environment Variables -> include system environment viables
        阅读测试报告
        1. Warmup 预热,由于JVM中对于特定代码会存在优化(本地化),预热对于测试结果很重要
        2. Mesurement 总共执行多少次测试
        3. Timeout
        4. Threads 线程数,由fork指定
        5. Benchmark mode 基准测试的模式
        6. Benchmark 测试哪一段代码
六,Disruptor
    Disruptor的特点
        对比ConcurrentLinkedQueue : 链表实现
        JDK中没有ConcurrentArrayQueue
        Disruptor是数组实现的
        无锁,高并发,使用环形Buffer,直接覆盖(不用清除)旧的数据,降低GC频率
        实现了基于事件的生产者消费者模式(观察者模式)
    RingBuffer
        环形队列
        RingBuffer的序号,指向下一个可用的元素
        采用数组实现,没有首尾指针
        对比ConcurrentLinkedQueue,用数组实现的速度更快
            假如长度为8,当添加到第12个元素的时候在哪个序号上呢?用12%8决定
            当Buffer被填满的时候到底是覆盖还是等待,由Producer决定
            长度设为2的n次幂,利于二进制计算,例如:12%8 = 12 & (8 - 1) pos = num & (size -1)
    Disruptor开发步骤
        1. 定义Event - 队列中需要处理的元素
        2. 定义Event工厂,用于填充队列
这里牵扯到效率问题:disruptor初始化的时候,会调用Event工厂,对ringBuffer进行内存的提前分配
GC产频率会降低
        3. 定义EventHandler(消费者),处理容器中的元素
源码地址:
    https://github.com/koukay/JUC.git
    https://github.com/koukay/TestJMH.git