首先把源码下载下来,上传后解压:
tar -zxvf mysql-5.7.25-linux-glibc2.12-x86_64.tar.gz这里我创建了一个目录,把解压的东西放到了/u01/mysql3306
如下:

这里有几个新创建的文件夹:
tmp,run,log,data,
随后创建一个文件夹:/etc/my.cnf
内容如下:
[client]
port=3306
socket=/u01/mysql3306/run/mysql.sock

[mysql]

[mysqld]
autocommit=1
general_log=off
explicit_defaults_for_timestamp=true

# system
basedir=/u01/mysql3306
datadir=/u01/mysql3306/data
max_allowed_packet=1g
max_connections=3000
max_user_connections=2800
open_files_limit=65535
port=3306
server_id=101
skip_name_resolve=ON
socket=/u01/mysql3306/run/mysql.sock
tmpdir=/u01/mysql3306/tmp

#binlog
log_bin=/u01/mysql3306/log/binlog/binlog
binlog_cache_size=32768
binlog_format=row
expire_logs_days=7
log_slave_updates=ON
max_binlog_cache_size=2147483648
max_binlog_size=524288000
sync_binlog=100

#logging
log_error=/u01/mysql3306/log/error.log
slow_query_log_file=/u01/mysql3306/log/slow.log
log_queries_not_using_indexes=0
slow_query_log=1
log_slave_updates=ON
log_slow_admin_statements=1
long_query_time=1

#relay
relay_log=/u01/mysql3306/log/relaylog
relay_log_index=/u01/mysql3306/log/relay.index
relay_log_info_file=/u01/mysql3306/log/relay-log.info

#slave
slave_load_tmpdir=/u01/mysql3306/tmp
slave_skip_errors=OFF


#innodb
innodb_data_home_dir=/u01/mysql3306/log/iblog
innodb_log_group_home_dir=/u01/mysql3306/log/iblog
innodb_adaptive_flushing=ON
innodb_adaptive_hash_index=ON
innodb_autoinc_lock_mode=1
innodb_buffer_pool_instances=8

#default
innodb_change_buffering=inserts
innodb_checksums=ON
innodb_buffer_pool_size= 128M
innodb_data_file_path=ibdata1:32M;ibdata2:16M:autoextend
innodb_doublewrite=ON
innodb_file_format=Barracuda
innodb_file_per_table=ON
innodb_flush_log_at_trx_commit=1
innodb_flush_method=O_DIRECT
innodb_io_capacity=1000
innodb_lock_wait_timeout=10
innodb_log_buffer_size=67108864
innodb_log_file_size=1048576000
innodb_log_files_in_group=4
innodb_max_dirty_pages_pct=60
innodb_open_files=60000
innodb_purge_threads=1
innodb_read_io_threads=4
innodb_stats_on_metadata=OFF
innodb_support_xa=ON
innodb_use_native_aio=OFF
innodb_write_io_threads=10
#skip-grant-tables

[mysqld_safe]
datadir=/u01/mysql3306/data
添加系统用户
groupadd mysql
useradd -r -g mysql mysql
设置环境变量
vim /etc/profile在末尾添加
export PATH=$PATH:/u01/mysql3306/bin初始化mysqld
mysqld --initialize --user=mysql --basedir=/u01/mysql3306 --datadir=/u01/mysql3306/data/设置开机启动
复制启动脚本到资源目录:
cp ./support-files/mysql.server /etc/rc.d/init.d/mysqld增加 mysqld 服务控制脚本执行权限:
chmod +x /etc/rc.d/init.d/mysqld将 mysqld 服务加入到系统服务
chkconfig --add mysqld检查mysqld服务是否已经生效
chkconfig --list mysqld这里如果出现问题记得查log下的error.log

随后启动关闭即可:
servcie mysqld start
servcie mysqld stop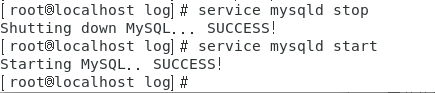
这里就搭建好了,但估计mysql登录不进去
放开上面的skip-grant-tables(my.cnf)然后重启mysql,再使用mysql -uroot -p进行登录
use mysql;
update user set authentication_string=password('root') where user='root';
然后把my.cnf中的skip-grant-tables注释,在重启mysql。
即可用root登录了!就可以添加远程及其他用户了。

