| 版本号 | 作者 | 版本号 | 备注 | |
|---|---|---|---|---|
| v0.0.1 | 飞豺 | 8416837 | openresty 1.15.8.2; apisix 0.8; etcd bitnami/etcd:3.3.13-r80 | 网关 |
转载请注明出处https://blog.csdn.net/cc007cc009/article/details/105640264
安装
openresty
Ubuntu
Docker式
新建需要的目录:config/example/logs
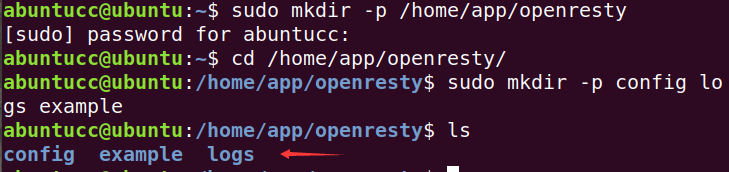
执行
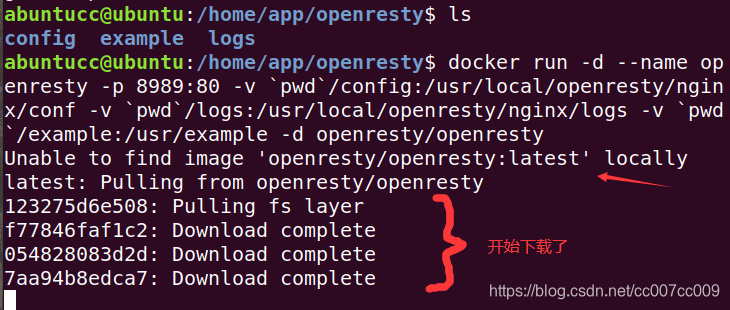
cd openresty根目录
sudo docker run -d --name openresty -p 8989:80 -v `pwd`/config:/usr/local/openresty/nginx/conf -v `pwd`/logs:/usr/local/openresty/nginx/logs -v `pwd`/example:/usr/example -d openresty/openresty
检查
sudo docker ps
sudo docker images
下载成功了,但是没有自动运行

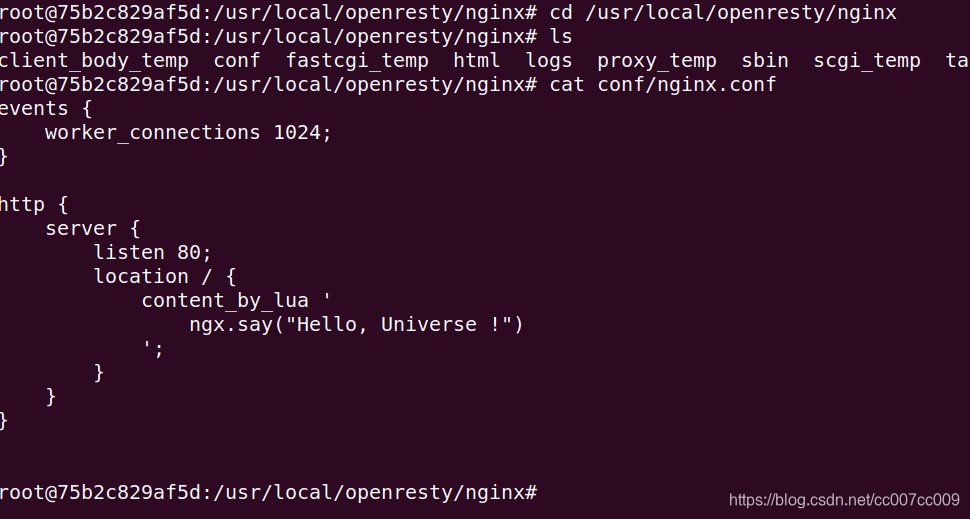
# 在宿主机写配置
cd /home/app/openresty/config
sudo gedit nginx.conf
nginx.conf
events {
    worker_connections 1024;
}

http {
    server {
        listen 80;
        location / {
            content_by_lua '
                ngx.say("Hello, Universe !")
            ';
        }
    }
}
配置文件在宿主机了,再次执行:
cd openresty根目录
sudo docker run -d --name openresty -p 8989:80 -v `pwd`/config:/usr/local/openresty/nginx/conf -v `pwd`/logs:/usr/local/openresty/nginx/logs -v `pwd`/example:/usr/example -d openresty/openresty
执行成功:
docker ps
docker exec -it id /bin/bash
apt-get
你可以在你的 Ubuntu 系统中添加APT 仓库,这样就可以便于未来安装或更新我们的软件包(通过 apt-get update 命令)。 运行下面的命令就可以添加仓库(每个系统只需要运行一次):
# 安装导入 GPG 公钥时所需的几个依赖包(整个安装过程完成后可以随时删除它们):
sudo apt-get -y install --no-install-recommends wget gnupg ca-certificates

# 导入我们的 GPG 密钥:
wget -O - https://openresty.org/package/pubkey.gpg | sudo apt-key add -

# 安装 add-apt-repository 命令
# (之后你可以删除这个包以及对应的关联包)
sudo apt-get -y install --no-install-recommends software-properties-common

# 添加我们官方 official APT 仓库:
sudo add-apt-repository -y "deb http://openresty.org/package/ubuntu $(lsb_release -sc) main"

# 更新 APT 索引:
sudo apt-get update
# 然后就可以像下面这样安装软件包,比如 openresty:

sudo apt-get -y install openresty
# 这个包同时也推荐安装 openresty-opm 和 openresty-restydoc 包,所以后面两个包会缺省安装上。 如果你不想自动关联安装,可以用下面方法关闭自动关联安装:

sudo apt-get -y install --no-install-recommends openresty
# 参阅 OpenResty Deb 包 页面获取这个仓库里头更多可用包的信息。


CentOS 8
CentOS
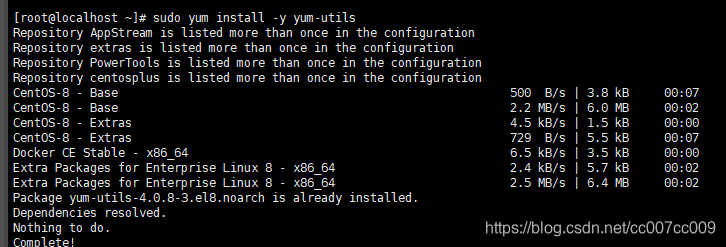
你可以在你的 CentOS 系统中添加 openresty 仓库,这样就可以便于未来安装或更新我们的软件包(通过 yum check-update 命令)。运行下面的命令就可以添加我们的仓库:
sudo yum install -y yum-utils
sudo yum-config-manager --add-repo https://openresty.org/package/centos/openresty.repo

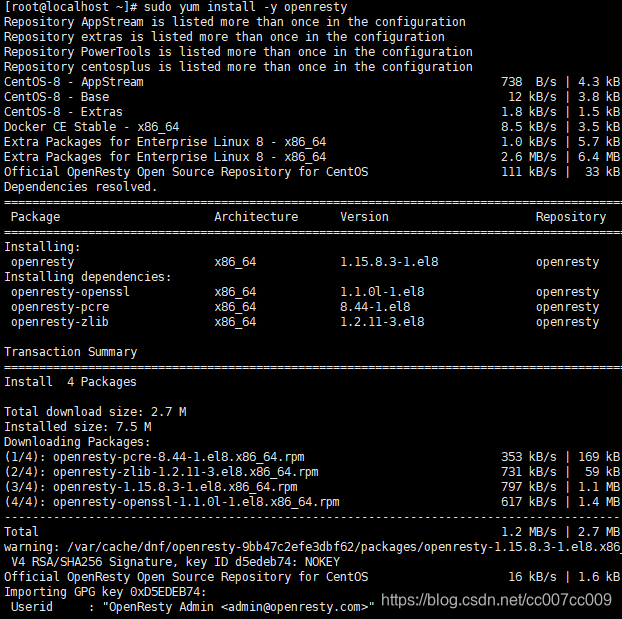
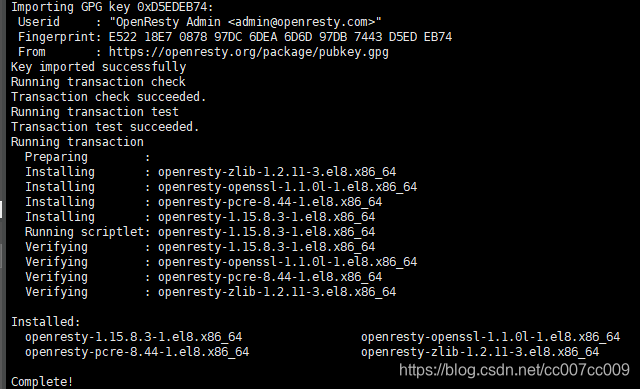
然后就可以像下面这样安装软件包,比如 openresty:

sudo yum install -y openresty
如果你想安装命令行工具 resty,那么可以像下面这样安装 openresty-resty 包:
sudo yum install -y openresty-resty
命令行工具 opm 在 openresty-opm 包里,而 restydoc 工具在 openresty-doc 包里头。
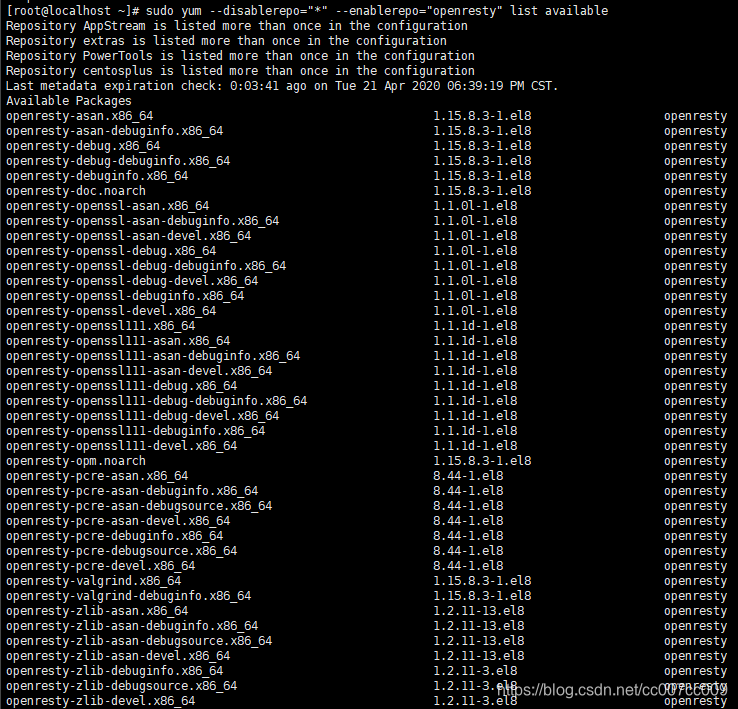
列出所有 openresty 仓库里头的软件包:
sudo yum --disablerepo="*" --enablerepo="openresty" list available
参考 OpenResty RPM 包页面获取这些包更多的细节。
列出所有包:
Hello World
Prepare directory layout
We first create a separate directory for our experiments. You can use an arbitrary directory. Here for simplicity, we just use ~/work:
mkdir ~/work
cd ~/work
mkdir logs/ conf/
Note that we've also created the logs/ directory for logging files and conf/ for our config files.

Prepare the nginx.conf config file
Create a simple plain text file named conf/nginx.conf with the following contents in it:

worker_processes  1;
error_log logs/error.log;
events {
    worker_connections 1024;
}
http {
    server {
        listen 8080;
        location / {
            default_type text/html;
            content_by_lua_block {
                ngx.say("<p>hello, world</p>")
            }
        }
    }
}
If you’re familiar with Nginx configuration, it should look very familiar to you. OpenResty is just an enhanced version of Nginx by means of addon modules anyway. You can take advantage of all the exisitng goodies in the Nginx world.
Start the Nginx server
Assuming you have installed OpenResty into /usr/local/openresty (this is the default), we make our nginx executable of our OpenResty installation available in our PATH environment:
PATH=/usr/local/openresty/nginx/sbin:$PATH
export PATH
Then we start the nginx server with our config file this way:

nginx -p `pwd`/ -c /home/app/openresty/work/conf/nginx.conf
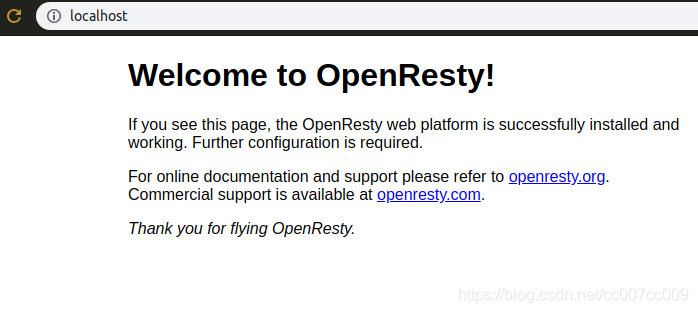
执行启动命令后,什么日志都没输出,基本上是启动成功了:

Error messages will go to the stderr device or the default error log files logs/error.log in the current working directory.
netstat -tlnp
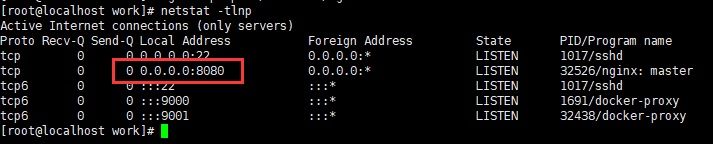
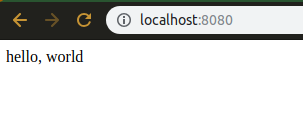
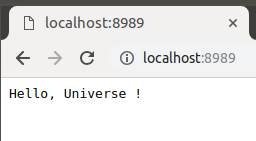
Demo,成功了。
常用命令
nginx
- 启动自带的nginx
/usr/local/openresty/nginx/sbin/nginx
- 停止自带的nginx
/usr/local/openresty/nginx/sbin/nginx -s stop
- 通过自定义的配置文件启动
nginx -p `pwd`/ -c conf/nginx.conf
如果服务已经存在,则报端口已被占用错误,可以换个端口。
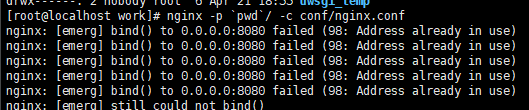
- 更新配置文件
更新后,执行:
nginx -s reload
页面并没有更新。

退出这个进程,重新执行:
nginx -p `pwd`/ -c conf/nginx.conf -s quit
nginx -p `pwd`/ -c conf/nginx.conf
有没直接重启的命令?当然有,和nginx一样
nginx -p `pwd`/ -c conf/nginx.conf -s reload
配置生效了。

基于openresty的Apache APISIX
- 科普 什么是 APISIX
Apache APISIX 当做流量入口,来处理所有的业务数据,包括动态路由、动态上游、动态证书、 A/B 测试、金丝雀发布(灰度发布)、蓝绿部署、限流限速、抵御恶意攻击、监控报警、服务可观测性、服务治理等。
Docker式部署
该操作自动安装openresty
也可以观看下文,使用另一个镜像docker pull iresty/apisix:latest
# 查找镜像
docker search apisix
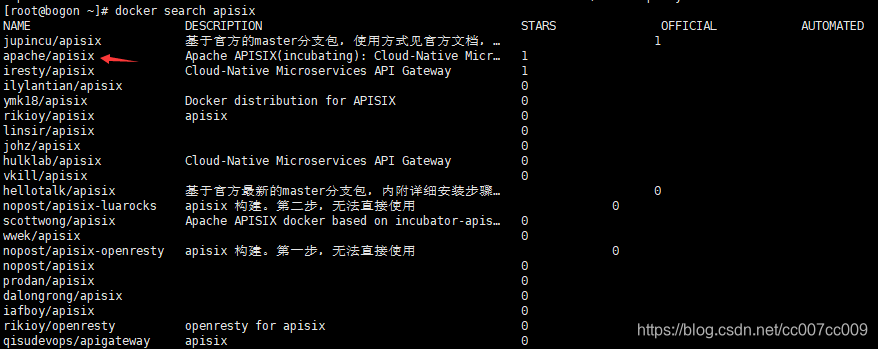
# 拉取镜像
docker pull apache/apisix

或者自己构建镜像 不推荐,请看下文教程
# 安装发布版,发布版从0.9开始
# 或者自己构建镜像 不推荐,请看下文教程
docker build -t apisix:1.1-alpine --build-arg APISIX_VERSION=1.1 -f alpine/Dockerfile alpine
继续安装apisix - 上文缺少步骤,因此另起一个标题述说
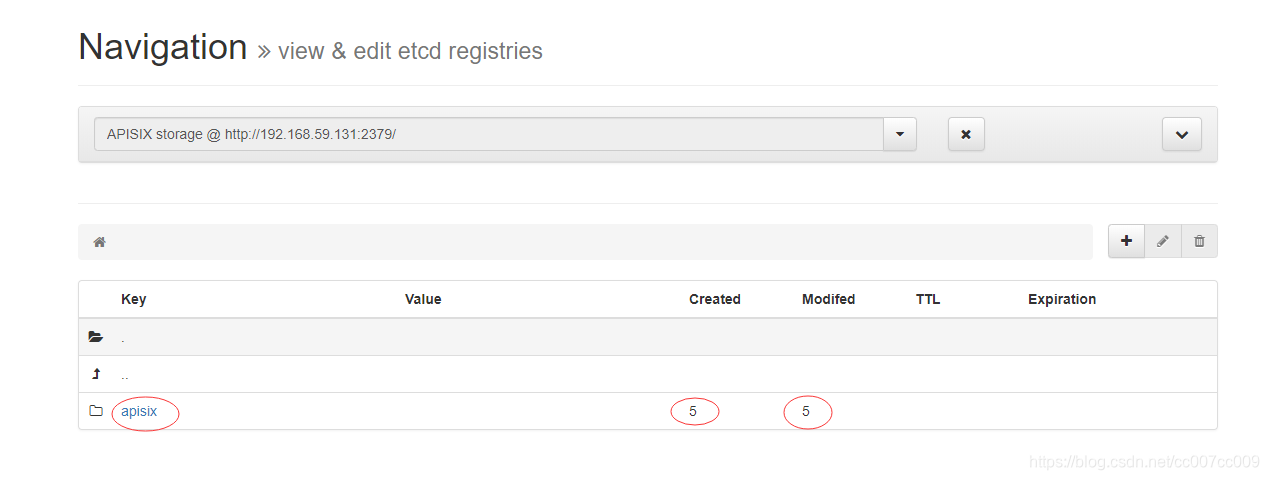
- 科普 什么是etcd?
etcd是CoreOS团队于2013年6月发起的开源项目,它的目标是构建一个高可用的分布式键值(key-value)数据库。etcd内部采用raft协议作为一致性算法,etcd基于Go语言实现。

etcd作为服务发现系统,有以下的特点:

简单:安装配置简单,而且提供了HTTP API进行交互,使用也很简单
安全:支持SSL证书验证
快速:根据官方提供的benchmark数据,单实例支持每秒2k+读操作
可靠:采用raft算法,实现分布式系统数据的可用性和一致性
etcd项目地址:https://github.com/coreos/etcd/

etcd应用场景

etcd比较多的应用场景是用于服务发现,服务发现(Service Discovery)要解决的是分布式系统中最常见的问题之一,即在同一个分布式集群中的进程或服务如何才能找到对方并建立连接。

从本质上说,服务发现就是要了解集群中是否有进程在监听upd或者tcp端口,并且通过名字就可以进行查找和链接。
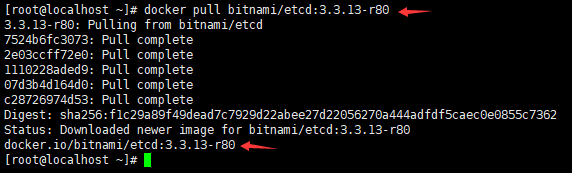
拉取镜像 拉取时可能卡住,按Ctrl+C重新拉取;
# 拉取etcd - kv数据库
docker pull bitnami/etcd:3.3.13-r80
# 拉取最新版本的apisix
docker pull iresty/apisix:latest
下载中:

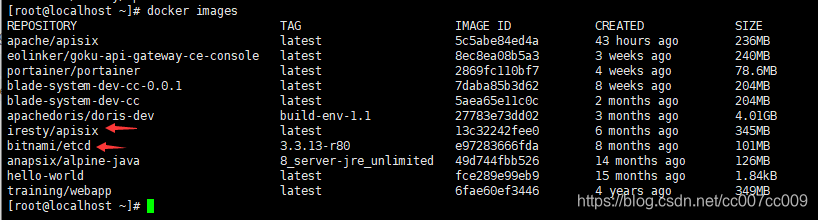
# 查看是否拉取成功
docker images
也可以重新构建镜像,基于源码构建:
docker build -t apisix:master-alpine -f alpine/Dockerfile alpine
或者基于发布版本构建
docker build -t apisix:0.8-alpine --build-arg APISIX_VERSION=0.8 -f alpine/Dockerfile alpine
运行
- 运行etcd
- 克隆代码到硬盘
git clone https://gitee.com/Tinywan/incubator-apisix-docker
cd incubator-apisix-docker
- 执行run
docker run -it --name etcd-server \
-v `pwd`/example/etcd_conf/etcd.conf.yml:/opt/bitnami/etcd/conf/etcd.conf.yml \
-p 2379:2379 \
-p 2380:2380  \
--env ALLOW_NONE_AUTHENTICATION=yes bitnami/etcd:3.3.13-r80
run使用了源码example里的配置文件,CENTOS8须是绝对路径,否则会报错。
检测etcd已经启动:
# 更新远程地址便于访问
sudo vim example/apisix_conf/config.yaml

- 运行apisix
同样,基于源码的配置文件运行:
docker run --name chengchong-api-gateway -v `pwd`/example/apisix_conf/config.yaml:/usr/local/apisix/conf/config.yaml -v `pwd`/example/apisix_log:/usr/local/apisix/logs -p 8080:9080 -p 8083:9443 -d iresty/apisix
docker run --name test-api-gateway \
 -v `pwd`/example/apisix_conf/config.yaml:/usr/local/apisix/conf/config.yaml \
 -v `pwd`/example/apisix_log:/usr/local/apisix/logs \
 -p 8080:9080 \
 -p 8083:9443 \
 -d iresty/apisix
启动操作完毕,生成了id:

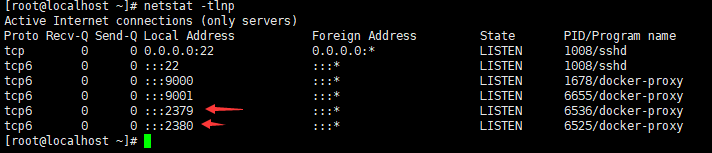
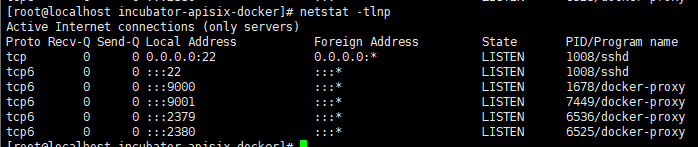
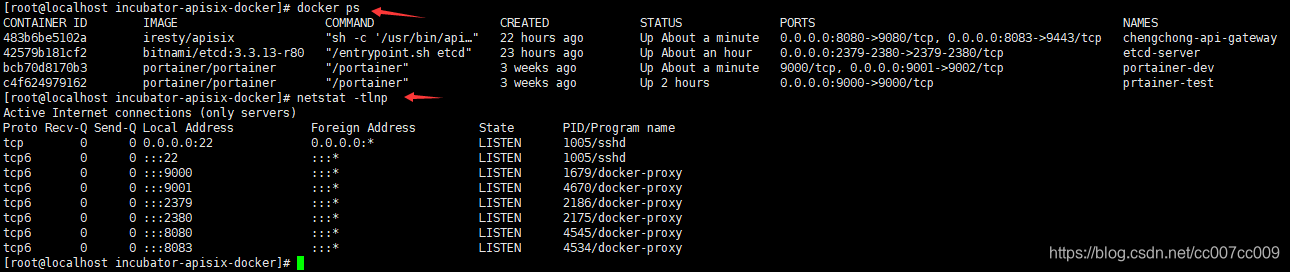
检查端口,发现没有启动:
查看日志:
使用Docker可视化工具Portainer查看日志:
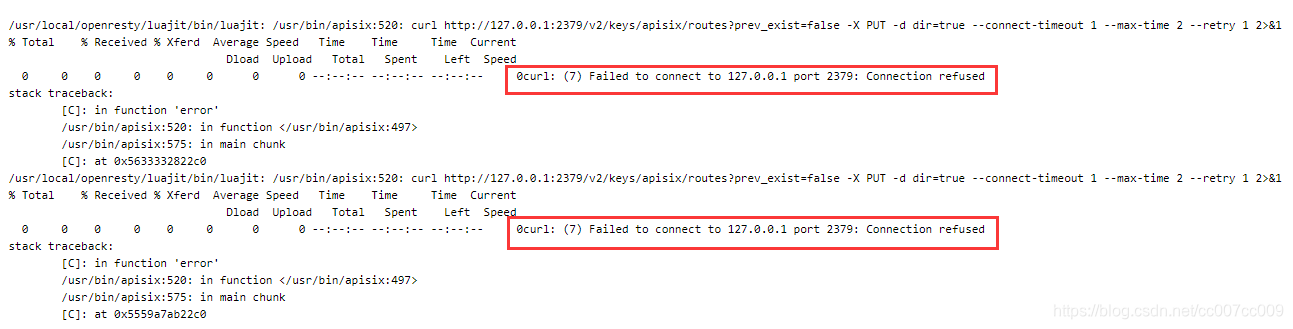
找到错误原因,连接etcd失败,iresty/apisix配置的etcd的ip不对:
- 修改apisix的配置文件
sudo vim example/apisix_conf/config.yaml
将etcd地址由127.0.0.1改为当前主机的ip,使用命令ifconfig查看,修改后,启动成功,端口已被占用(本地ip不行,应该是因为Docker容器调用跨机了):
访问http://192.168.59.131:8080/apisix/dashboard/成功,注意,不要输错地址,否则报404,url末尾有斜杠,少了斜杠会跳转到9080端口(lll¬ω¬):
Getting Started 新手入门
准备
- 首先,找到一个可以回显传参的接口,比如:
https://httpbin.org/get?foo1=bar1&foo2=bar2
使用自研的http工具访问这个接口:
private HttpConsumer httpConsumer;

    //    初始化
    {
        Map requestHeaders = new HashMap();
        requestHeaders.put("Accept-Encoding", "identity");

        String url = "https://httpbin.org/";

        this.httpConsumer = (HttpConsumer) JxbdFactory.getConsumerInstance(HttpCommonConfig.builder().requestUrl(url)
                .customHeader(CustomHeader.builder()
                        .requestHeaders(requestHeaders)
                        .build())
                .timeoutSeconds(240L)
                .requiredAuthen(false)
                .build());
    }

    //    单服务测试
    @Test
    public void invokeService() {
        Map params = new HashMap();
        params.put("foo1", "bar1");
        params.put("foo2", "bar2");

        HttpRequestConfig httpRequestConfig = HttpRequestConfig.builder()
                .parameters(params)
                .serviceName("get")
                .build();

        Object response = httpConsumer.requestService(httpRequestConfig);
    }
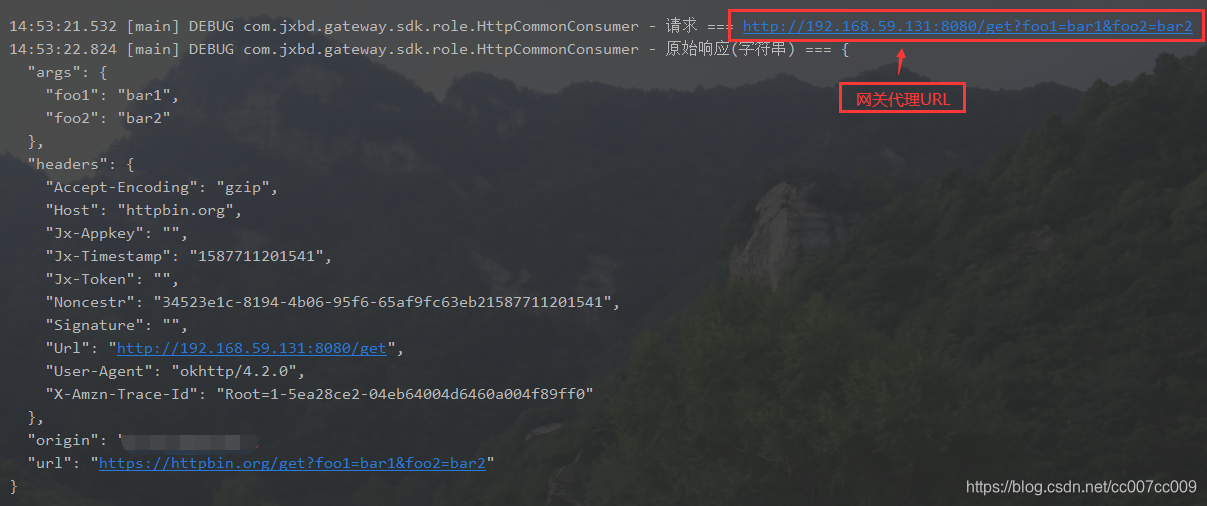
执行请求,获得响应,即回显参数:
{
  "args": {
    "foo1": "bar1",
    "foo2": "bar2"
  },
  "headers": {
    "Accept-Encoding": "identity",
    "Host": "httpbin.org",
    "Jx-Appkey": "",
    "Jx-Timestamp": "1587699301823",
    "Jx-Token": "",
    "Noncestr": "51af025a-cc64-4276-9cfb-396963762bc11587699301823",
    "Signature": "",
    "Url": "https://httpbin.org/get",
    "User-Agent": "okhttp/4.2.0",
    "X-Amzn-Trace-Id": "Root=1-5ea25e67-beebdf7d5a0cb15f30a1c698"
  },
  "origin": "ip地址",
  "url": "https://httpbin.org/get?foo1=bar1&foo2=bar2"
}
- 进入apisix容器,命令是:
# 找到容器id
docker ps
sudo docker exec -it 483b6be5102a /bin/bash

- 在容器内部调用apisix提供的管理接口:
curl "http://127.0.0.1:9080/apisix/admin/services/" -H 'X-API-KEY: edd1c9f034335f136f87ad84b625c8f1'
获取响应:
{
	"node": {
		"createdIndex": 7,
		"modifiedIndex": 7,
		"key": "\/apisix\/services",
		"dir": true
	},
	"action": "get"
}
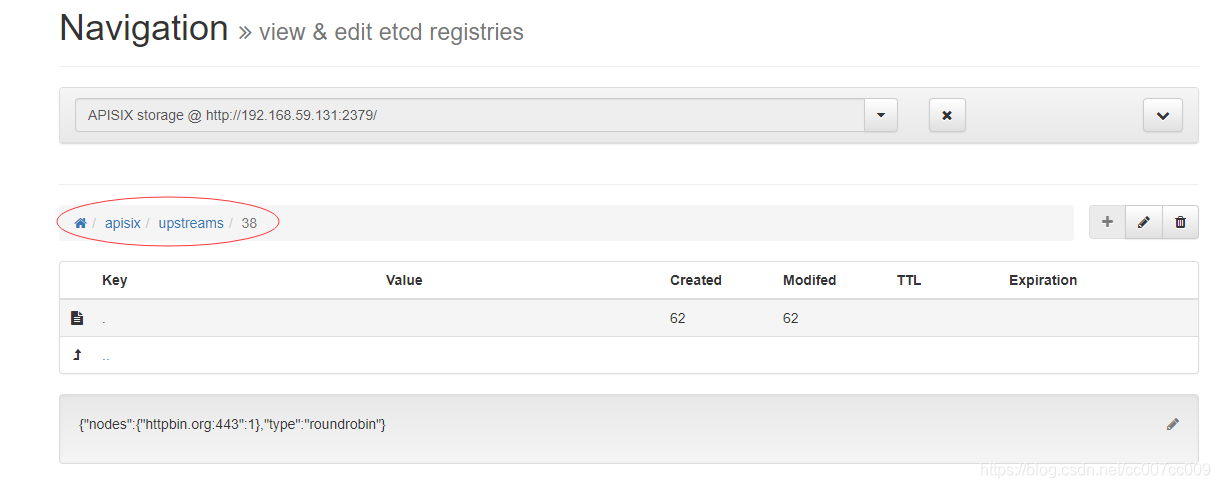
一个完整配置例子
- 添加上游
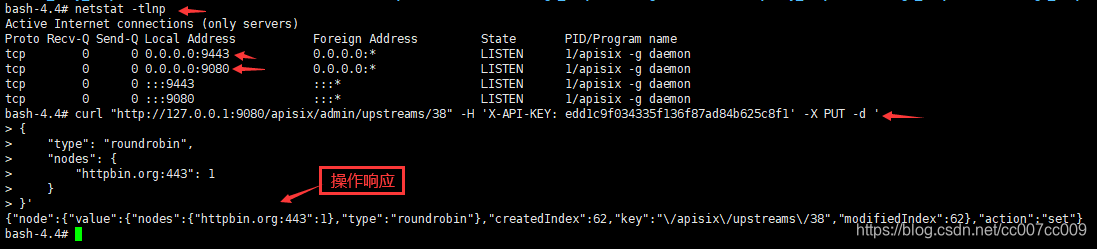
上游id为38,只有一个节点.在容器里面执行操作:
curl "http://127.0.0.1:9080/apisix/admin/upstreams/38" -H 'X-API-KEY: edd1c9f034335f136f87ad84b625c8f1' -X PUT -d '
{
    "type": "roundrobin",
    "nodes": {
        "httpbin.org:443": 1
    }
}'
- 为上游添加路由
添加路由,id为8,路由的断言路径是get/断言主机是httpbin.org,而且使用插件重写了协议头,因为上游是https,指明了上游id:38,也就是上文创建的上游。
curl "http://127.0.0.1:9080/apisix/admin/routes/8" -H 'X-API-KEY: edd1c9f034335f136f87ad84b625c8f1' -X PUT -d '
{
    "uri": "/get",
    "host": "httpbin.org",
    "plugins": {
        "proxy-rewrite": {
          "scheme": "https"
        }
    },
    "upstream_id": 38
}'

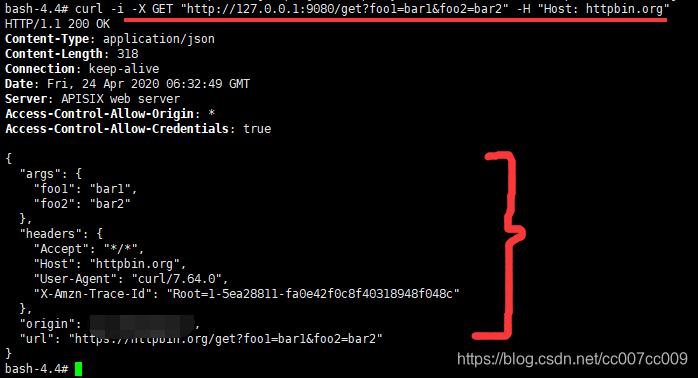
- 既然路由添加成功,那么可以进行测试了:
curl -i -X GET "http://127.0.0.1:9080/get?foo1=bar1&foo2=bar2" -H "Host: httpbin.org"
当通过网关url加上路径路由get和Host访问时,网关会代理此次请求到预置好的上游
执行,很顺利,一次完整的调用成功了:
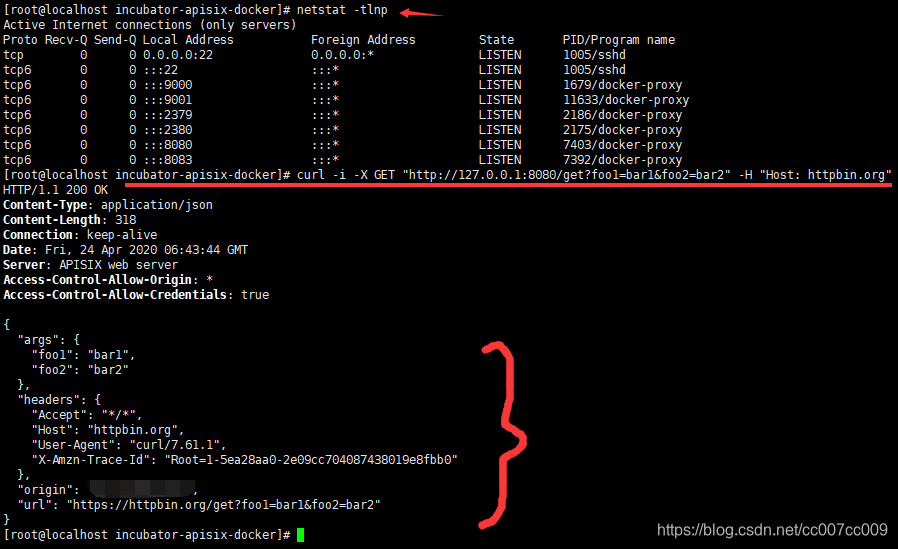
同样在宿主机调用亦可,将url换成宿主机的即可:
curl -i -X GET "http://127.0.0.1:8080/get?foo1=bar1&foo2=bar2" -H "Host: httpbin.org"
使用浏览器调用,返回404

这是因为请求头参数没有传:-H “Host: httpbin.org”
因此,使用自研的HTTP工具请求即可:
private HttpConsumer httpConsumer;

    //    初始化
    {
        Map requestHeaders = new HashMap();
        requestHeaders.put("Host", "httpbin.org");

        String url = "http://192.168.59.131:8080";

        this.httpConsumer = (HttpConsumer) JxbdFactory.getConsumerInstance(HttpCommonConfig.builder().requestUrl(url)
                .customHeader(CustomHeader.builder()
                        .requestHeaders(requestHeaders) // 请求头参数
                        .build())
                .timeoutSeconds(240L)
                .requiredAuthen(false)
                .build());
    }

    //    单服务测试
    @Test
    public void invokeService() {
        Map params = new HashMap();
        params.put("foo1", "bar1");
        params.put("foo2", "bar2");

        HttpRequestConfig httpRequestConfig = HttpRequestConfig.builder()
                .parameters(params) // 业务参数
                .serviceName("get") // 对应APISIX的路由的URI
                .build();

        Object response = httpConsumer.requestService(httpRequestConfig);
    }
成功获得响应:
基于界面配置
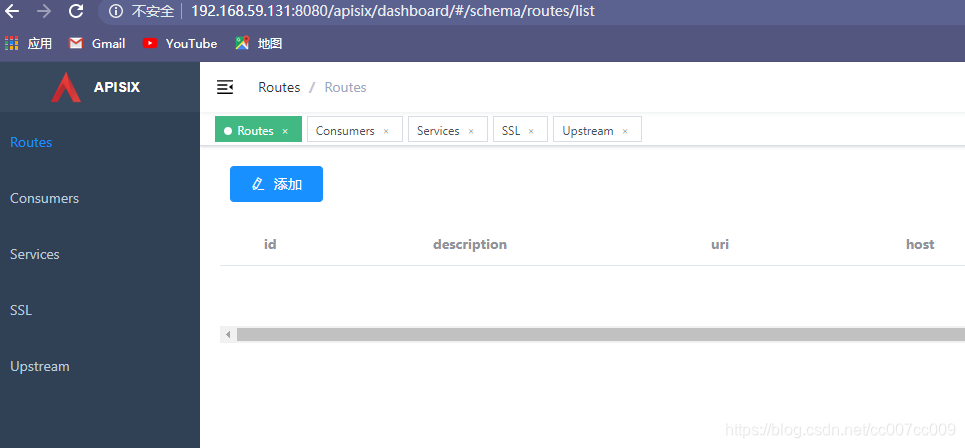
上文已经提到过Dashboard,它是一个web界面,可以方便配置路由。而它的地址是:http://192.168.59.131:8080/apisix/dashboard/
etcd数据库数据预览
因为是基于etcd存储和服务发现,因此需要etcd-viewer。
部署etcd-viewer:
# 克隆源码
git clone https://github.com/nikfoundas/etcd-viewer
# 搜索 搜不到,下文直接运行
docker search nikfoundas/etcd-viewer
# 直接运行
docker run -d -p 8080:8080 nikfoundas/etcd-viewer
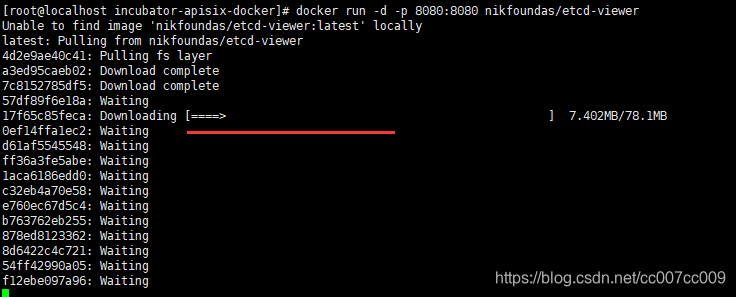
Bind for 0.0.0.0:8080 failed: port is already allocated
端口号已被占用,换一个:8084。
启动完毕:
http://192.168.59.131:8084/home
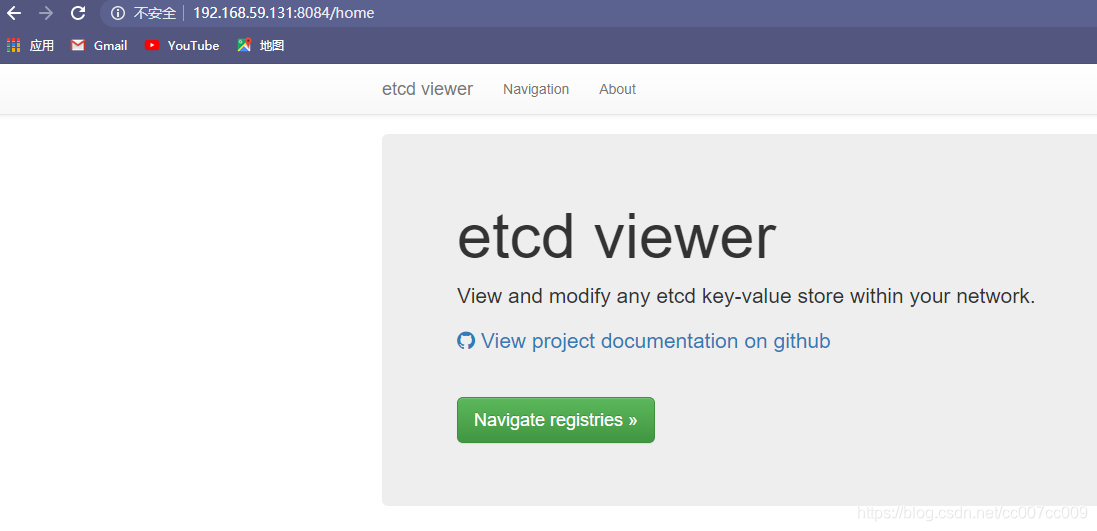
新建库
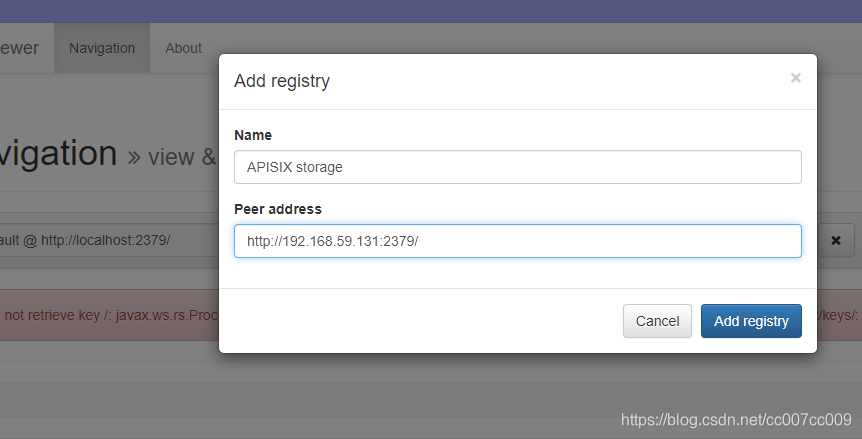
很顺利,成功了:
随便查找一个值看看:
api-aggregator RESTFUL API 聚合
启动
假设已经安装了openresty
git clone https://github.com/solso/api-aggregator
cd api-aggregator
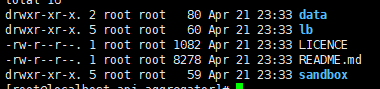
可以看到lb和sandbox目录,即负载均衡和沙箱。
以负载均衡方式调试
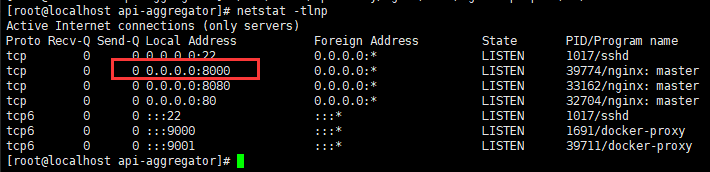
/usr/local/openresty/nginx/sbin/nginx -p `pwd`/lb/
端口8000的进程启动成功:
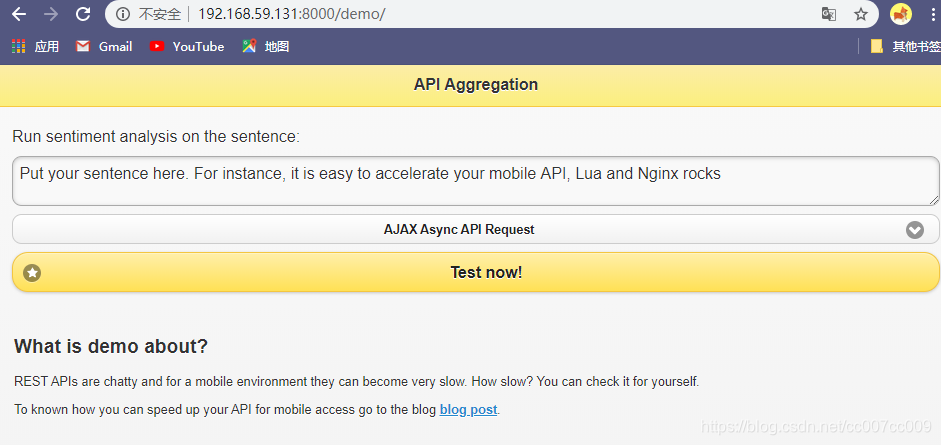
访问:http://192.168.59.131:8000/demo/
以沙箱方式调试
set $lua_user_scripts_path "/home/app/api-aggregator/api-aggregator/sandbox/lua/user_scripts/"; # 官网
lua_user_scripts_path=/home/app/api-aggregator/api-aggregator/sandbox/lua/user_scripts/
echo $lua_user_scripts_path
# 启动沙箱
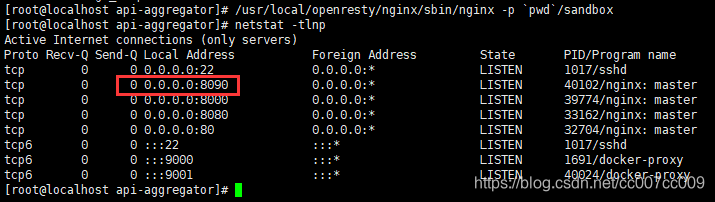
/usr/local/openresty/nginx/sbin/nginx -p `pwd`/sandbox
设置变量成功

API例子
需要编写lua脚本
ruby 松本发明的编程语言
git clone https://github.com/solso/sentiment-api-example
cd sentiment-api-example/
ll
ruby ./sentiment_api.rb 8081
yum -y install ruby
ruby ./sentiment_api.rb 8081
这一步报错了
Traceback (most recent call last):
	2: from ./sentiment_api.rb:4:in `<main>'
	1: from /usr/share/rubygems/rubygems/core_ext/kernel_require.rb:59:in `require'
/usr/share/rubygems/rubygems/core_ext/kernel_require.rb:59:in `require': cannot load such file -- sinatra (LoadError)
