从今天开始我们用Net Core进行项目实战,采用微服务构架,因此你会看到我各模块开始都是用的web api。项目中的代码直接可以复制。费话不多说,现在就来跟我一起开始吧!
1、打开VS2017—>文件---》新建---》项目,会看到如下的界面

2、选择.NET Core---》Asp.NET Core web 应用程序,命名好项目名称选好目录后点确定,如出现如下界面,这里我们选择的是创建一个webapi项目。
注意要选择ASP.NET core2.0,否则项目在创建数据库时会报错。如果这没有ASP.NET core2.0 SDK请移步下载安装。
下载地址:https://download.microsoft.com/download/0/F/D/0FD852A4-7EA1-4E2A-983A-0484AC19B92C/dotnet-sdk-2.0.0-win-x64.exe

然后把NuGet包引用一下,这里要引用两个dll :Microsoft.EntityFrameworkCore.Tools、MySql.Data.EntityFrameworkCore,如下图:

什么?你NuGet还不会用?鼠标选中项目右键---》管理NuGet程序包,会看到如下的程序界面,搜索要安装的包就可以了。

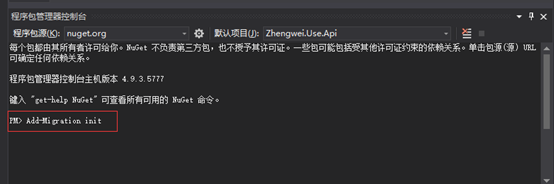
注意,如果搜索不到请检查程序包源 ,如果不是nuget.org请点击设置添加就可以了
3、新建一个Model文件夹,作为项目的model层,文件夹下新建四个类AppUser、BPFile、UserProperty、UserTag
public class AppUser
    {
        public int Id { get; set; }
        public string Name { get; set; }
        public string Company { get; set; }

        public string Title { get; set; }
        public string Phone { get; set; }
        public string Avatar { get; set; }
        public string Gender { get; set; }

        public string Address { get; set; }

        public string Email { get; set; }
        public string Tel { get; set; }
        public string ProvinceId { get; set; }
        public string CityId { get; set; }
        public string City { get; set; }
        public string NameCard { get; set; }
public List<UserProperty> Properties { get; set; }
    }
public class UserProperty
    {
        public int AppUserId { get; set; }
        public string Key { get; set; }
        public string Text { get; set;}
        public string Value { get; set; }
    }

public class UserTag
    {
        public int UserId { get; set; }
        public string Tag { get; set; }
        public DateTime CreatedTime { get; set; }
    }

public class BPFile
    {
        public int Id { get; set; }
        public int UserId { get; set; }
        //文件名
        public string FileName { get; set; }
        //上传源文件的地址
        public string OriginFilePath { get; set; }
        //格式转化后的地址
        public string FromatFilePath { get; set; }
        public DateTime CreatedTime { get; set; }

    }
4、新建一个Datas文件夹,作为项目的数据层,新建类UserContext.cs,OnModelCreating方法中有实体对应的表名(.ToTable("Users")),有规定表的主键(HasKey(u => u.Id)),有规定表的某个字段的最大长度(HasMaxLength(100))。
public class UserContext:DbContext
    {
        public UserContext(DbContextOptions<UserContext> options):base(options)
        {


        }
        protected override void OnModelCreating(ModelBuilder modelBuilder)
        {
            modelBuilder.Entity<AppUser>()
                        .ToTable("Users")
                        .HasKey(u => u.Id);


            modelBuilder.Entity<UserProperty>()
                        .ToTable("UserProperties")
                        .HasKey(u => new { u.Key,u.Value});

            modelBuilder.Entity<UserProperty>().Property(u => u.Key).HasMaxLength(100);
            modelBuilder.Entity<UserProperty>().Property(u => u.Value).HasMaxLength(100);


            modelBuilder.Entity<UserTag>()
                        .ToTable("UserTags")

                        .HasKey(u => new { u.UserId,u.Tag});
            modelBuilder.Entity<UserTag>()
                        .Property(u => u.Tag).HasMaxLength(100);
            modelBuilder.Entity<BPFile>()
                        .ToTable("UserBPFiles")
                        .HasKey(u => u.Id);

            base.OnModelCreating(modelBuilder);

        }
        public DbSet<AppUser> Users { get; set; }
    }
5、修改Startup文件,注入服务services.AddDbContext<UserContext>
public class Startup
    {
        public Startup(IConfiguration configuration)
        {
            Configuration = configuration;
        }

        public IConfiguration Configuration { get; }

        // This method gets called by the runtime. Use this method to add services to the container.
        public void ConfigureServices(IServiceCollection services)
        {

            services.AddDbContext<UserContext>(options =>
            {
                options.UseMySQL(Configuration.GetConnectionString("MysqlUser"));

            });
            services.AddMvc();
              //services.AddMvc().SetCompatibilityVersion(CompatibilityVersion.Version_2_1);
        }

        // This method gets called by the runtime. Use this method to configure the HTTP request pipeline.
        public void Configure(IApplicationBuilder app, IHostingEnvironment env)
        {
            if (env.IsDevelopment())
            {
                app.UseDeveloperExceptionPage();
            }
            else
            {
               // app.UseHsts();
            }

           // app.UseHttpsRedirection();
            app.UseMvc();

        }
    }
6、修改配置文件appsettings.json,增加数据库连接ConnectionStrings
{
  "Logging": {
    "LogLevel": {
      "Default": "Warning"
    }
  },
  "ConnectionStrings": {
    "MysqlUser": "server=localhost;port=3306;database=beta_user;userid=root;password=1230"
  },
  "AllowedHosts": "*"
}
7、安装Mysql 数据库,设置用户名root 密码1230。
8、以上所有的准备工作都做完了,就让我们开始初始化数据库吧。
选择工具-->NuGet包管理器--->程序包管理器控制台--->输入命令:Add-Migration init -->执行完后再输入命令: Update-Database。
9、成功执行后再用Navicat连我们的mysql数据库,会发现数据库为我们创建好了表:
