1. 真正参与双十一活动的商品品牌
这里应该包含的数据为双十一当天在售的 + 双十一之前预售的(套路嘛,都懂的,预售的商品会让买家预付定金,然后在双十一当天付款,这也属于参加了双十一的活动)
id_11sale_final = np.hstack((id_11,id_con3))
result2_id = pd.DataFrame({'id':id_11sale_final})
print(f'商品总数为{m}个')
print('真正参加活动的商品商品总数为{}个,占比为{:.2f}%'.format(len(result2_id),len(result2_id)/m*100))
–> 输出结果为:(这里使用到了数据横向连接的方式np.hstack,然后在将naddary数组转化为DataFrame数据)
商品总数为3502个
真正参加活动的商品商品总数为2788个,占比为79.61%
2. 获取商品id对应的原数据
就需要将当前的id数据与最初的df数据进行合并,然后找到所需要的原来数据,为了查看预售商品和当天在售商品之间的相对比例,关于这两个数据可以单独进行处理,方便后面的制图
1) 双十一在售的商品的品牌数据
因为id_11为naddary数组,所以需要先转化为DataFrame数据再进行合并,故引入一个中间变量(临时占位的作用)
x1 =  pd.DataFrame({'id':id_11})
x1_df = pd.merge(x1,df,on = 'id', how = 'left')
brand_11sale = x1_df.groupby('店名')['id'].count()
print(brand_11sale.shape)

#如果不好理解最后一行代码可以换成下面常用的,但是要留意一下两者输出结果的shape
#brand_11sale = x1_df[['id','店名']].groupby(by = '店名').count()
#print(brand_11sale.shape,type(brand_11sale))
#输出的结果为:(22, 1) <class 'pandas.core.frame.DataFrame'>
–> 输出结果为:
(22,) <class 'pandas.core.series.Series'>
2) con3 条件下的商品的品牌数据
id_con3数据是Series数据,也是不可以直接和DataFrame数据进行合并的,同样需要转换一下数据类型
x2 =  pd.DataFrame({'id':id_con3})
x2_df = pd.merge(x2,df,on = 'id', how = 'left')
brand_ys = x2_df.groupby('店名')['id'].count()

#brand_ys = x2_df[['id','店名']].groupby(by = '店名').count()
#同样也要注意一下输出的shape和type,这会影响下面的构建DataFrame数据
3) 将数据全部添加到DataFrame数据中
result2_data = pd.DataFrame({'当天参与活动商品数量':brand_11sale,
                            '预售商品数量':brand_ys})
result2_data['参与双十一活动商品总数'] = result2_data['当天参与活动商品数量'] + result2_data['预售商品数量']
result2_data.sort_values(by = '参与双十一活动商品总数',inplace = True,ascending = False)
print(result2_data.head(15))
–> 输出结果为:(这是使用第一种方式创建的)

那么如果使用常见的分组方式,也就是采用注释的方式如何进行添加到DataFrame数据中呢?
这里有两种方式完成这个功能,一个是直接在上面的基础上加上字段的名称,另一个就是df.assign()的方式
方法一:很简单的就是把原来的代码后面加上.id获取单字段,即是将原来的DataFrame数据变成Series即可,可以回顾一下之前DataFrame数据的创建
result2_data = pd.DataFrame({'当天参与活动商品数量':brand_11sale.id,
                            '预售商品数量':brand_ys.id},
                            index = brand_ys.index)
result2_data['参与双十一活动商品总数'] = result2_data['当天参与活动商品数量'] + result2_data['预售商品数量']
result2_data.sort_values(by = '参与双十一活动商品总数',inplace = True,ascending = False)
方法二:直接在原有的DataFrame数据上进行操作,不需要重新创建
result2_data = brand_11sale.assign(ys =  brand_ys.id.tolist())
result2_data['total'] = list(map(lambda x,y: x+y, result2_data.id,result2_data.ys))
result2_data.columns = ['当天参与活动商品数量','预售商品数量','参与双十一活动商品总数']
result2_data.sort_values(by = '参与双十一活动商品总数',inplace = True,ascending = False)
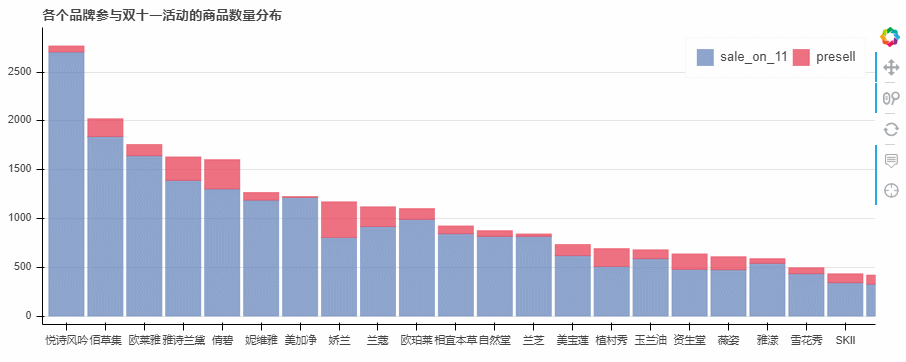
3. 制作堆叠图查看各个品牌参与双十一活动的商品数量分布
from bokeh.models import HoverTool
from bokeh.core.properties import value
# 导入相关模块

lst_brand = result2_data.index.tolist()
lst_type = result2_data.columns.tolist()[:2]
colors = ["#718dbf" ,"#e84d60"]
# 设置好参数

result2_data.index.name = 'brand'
result2_data.columns = ['sale_on_11','presell','sum']
# 修改数据index和columns名字为英文

source = ColumnDataSource(data=result2_data)
out
# 创建数据

hover = HoverTool(tooltips=[("品牌", "@brand"),
                            ("双十一当天参与活动的商品数量", "@sale_on_11"),
                            ("预售商品数量", "@presell"),
                            ("参与双十一活动商品总数", "@sum")
                           ])  # 设置标签显示内容

p = figure(x_range=lst_brand, plot_width=900, plot_height=350, title="各个品牌参与双十一活动的商品数量分布",
          tools=[hover,'reset,xwheel_zoom,pan,crosshair'])
# 构建绘图空间

p.vbar_stack(lst_type,  # 设置堆叠值,这里source中包含了不同年份的值,years变量用于识别不同堆叠层
             x='brand',   # 设置x坐标
             source=source,
             width=0.9, color=colors, alpha = 0.8,legend=[value(x) for x in lst_type],
             muted_color='black', muted_alpha=0.2
             )
# 绘制堆叠图

p.xgrid.grid_line_color = None
p.axis.minor_tick_line_color = None
p.outline_line_color = None
p.legend.location = "top_right"
p.legend.orientation = "horizontal"
p.legend.click_policy="mute"
# 设置其他参数

show(p)
–> 输出结果为: