一、Nginx配置文件认识
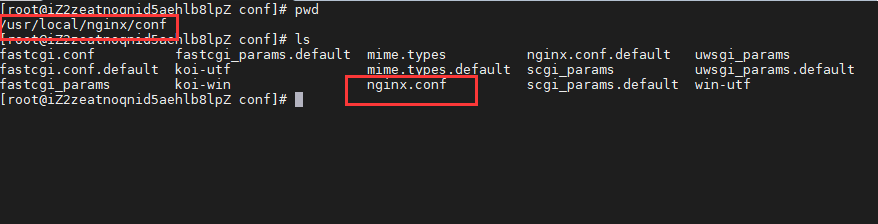
1.配置文件位置
配置文件在 /usr/local/nginx/conf 下有个 nginx.conf 文件
2.Nginx配置文件组成
Nginx的配置文件由三部分组成
- 第一部分 全局块
设置一些影响Nginx服务器,整体运行的配置信息。
#user  nobody;
worker_processes  1; #Nginx处理并发的大小,受硬件约束(值越大,处理并发量越大)

#error_log  logs/error.log;
#error_log  logs/error.log  notice;
#error_log  logs/error.log  info;

#pid        logs/nginx.pid;
- 第二部分events块
设置Nginx服务器和用户的网络连接的配置信息。
events {
    worker_connections  1024; # Nginx 配置服务器最大连接数
}
- 的三部分 HTTP 块(配置最频繁的地方)
配置反向代理,动静分离,负载均衡
http {
    include       mime.types;
    default_type  application/octet-stream;

    #log_format  main  '$remote_addr - $remote_user [$time_local] "$request" '
    #                  '$status $body_bytes_sent "$http_referer" '
    #                  '"$http_user_agent" "$http_x_forwarded_for"';

    #access_log  logs/access.log  main;

    sendfile        on;
    #tcp_nopush     on;

    #keepalive_timeout  0;
    keepalive_timeout  65;

    #gzip  on;

    server {
        listen       80;  # 端口号
        server_name  localhost; # 主机名称

        #charset koi8-r;

        #access_log  logs/host.access.log  main;

        location / {
            root   html; #路径包含 / 跳转
            index  index.html index.htm;
        }

        #error_page  404              /404.html;

        # redirect server error pages to the static page /50x.html
        #
        error_page   500 502 503 504  /50x.html;
        location = /50x.html {
            root   html;
        }

        # proxy the PHP scripts to Apache listening on 127.0.0.1:80
        #
        #location ~ \.php$ {
        #    proxy_pass   http://127.0.0.1;
        #}

        # pass the PHP scripts to FastCGI server listening on 127.0.0.1:9000
        #
        #location ~ \.php$ {
        #    root           html;
        #    fastcgi_pass   127.0.0.1:9000;
        #    fastcgi_index  index.php;
        #    fastcgi_param  SCRIPT_FILENAME  /scripts$fastcgi_script_name;
        #    include        fastcgi_params;
        #}

        # deny access to .htaccess files, if Apache's document root
        # concurs with nginx's one
        #
        #location ~ /\.ht {
        #    deny  all;
        #}
    }


    # another virtual host using mix of IP-, name-, and port-based configuration
    #
    #server {
    #    listen       8000;
    #    listen       somename:8080;
    #    server_name  somename  alias  another.alias;

    #    location / {
    #        root   html;
    #        index  index.html index.htm;
    #    }
    #}


    # HTTPS server
    #
    #server {
    #    listen       443 ssl;
    #    server_name  localhost;

    #    ssl_certificate      cert.pem;
    #    ssl_certificate_key  cert.key;

    #    ssl_session_cache    shared:SSL:1m;
    #    ssl_session_timeout  5m;

    #    ssl_ciphers  HIGH:!aNULL:!MD5;
    #    ssl_prefer_server_ciphers  on;

    #    location / {
    #        root   html;
    #        index  index.html index.htm;
    #    }
    #}

}
二、Nginx配置相关实例
1.Nginx配置-反向代理
(1)目标
打开浏览器,在浏览器地址栏输入地址 www.123.com,跳转到 liunx 系统 tomcat 主页
面中
(2)准备工作
1.安装JDK
2.在linux中安装并配置tomcat服务器,使用默认端口8080
3.开放8080端口
firewall-cmd --add-port=8080/tcp --permanent # 开放端口

firewall-cmd --reload # 重启防火墙
安装tomcat和JDK就不说了。
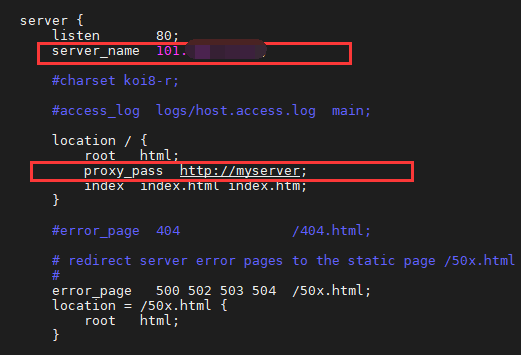
(3)配置
修改配置文件中 server下 server_name 为 访问的服务器ip地址,给server下 location / 下添加 proxy_pass http://127.0.0.1:8080

然后重启nginx就好了(运行命令必须在/usr/local/nginx/bin内)
#1.启动nginx
./nginx
#2.关闭nginx
./nginx -s stop
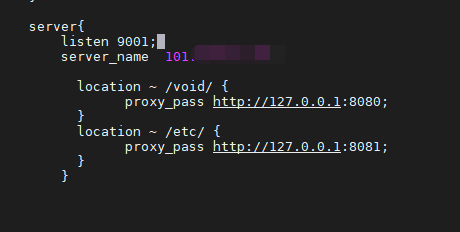
① 目标
使用nginx反向代理,根据访问的路径跳转到不同端口的服务中,nginx监听端口为9001
访问http://localhost:9001/etc/a.html 访问8080端口的服务器
访问http://localhost:9001/void/a.html 访问8081端口的服务器
② 准备工作
准备两个tomcat一个端口8080一个端口8081
在tomcat中创建显示的文件(
808x
)
③ 配置
在nginx的配置文件中配置,(每条设置后的分号不要忘记 ";" )
server{
	listen  9001;
	server_name 127.0.0.1; #本机ip
	location ~ /void/ {
		proxy_pass http:127.0.0.1:8080;
	}
	location ~ /void/ {
		proxy_pass http:127.0.0.1:8080;
	}
}
Nginx配置文件location说明
location 是有顺序的,会被第一个匹配的location处理。
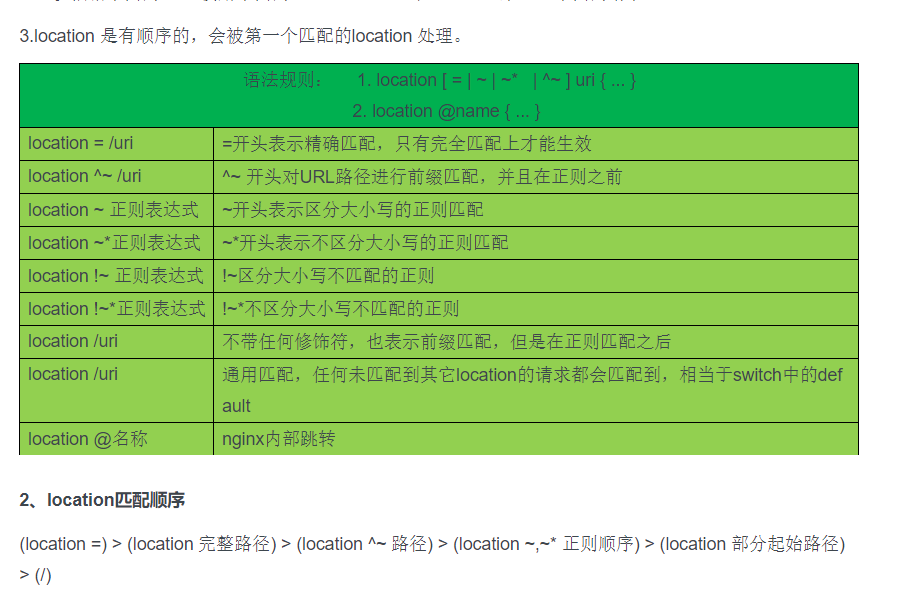
1.首先匹配=
2.其次匹配^~
3.再其次按照配置文件的顺序进行正则匹配
4.最后是交给/进行通用匹配
提示:当有匹配成功时,立刻停止匹配,按照当前匹配规则处理请求
2.Nginx配置-负载均衡
(1)实现效果
1.在浏览器地址输入:http://192.168.12.25/edu/a.html,负载均衡效果,平均到8080和8081端口去
(2)准备工作
1.准备两台tomcat服务器,一台端口为8080一台为8081
2.在两台tomcat里的webapp目录中,创建文件夹edu,在edu文件夹创建页面a.html 用于测试
(3)配置
在nginx的配置文件中配置,http 块中配置 ,和server块中配置
#http块中添加此块
upstream myserver{
	server 127.0.0.1:8080;
	server 127.0.0.1:8081;
}
#server块中
配置端口号和本机ip
location / {
	proxy_pass http://myserver; #配置内容
}

Nginx负载均衡策略
1.轮询(默认)
每个请求按时间顺序逐一分配到不同的后端服务器,如果后端服务器down掉,能自动剔除。
2、指定权重(weight)
指定轮询几率,weight和访问比率成正比,用于后端服务器性能不均的情况。 权重默认为1,权重越高,被分配的客户端就越多(在http块中配置的)

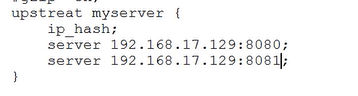
3、IP绑定 ip_hash
每个请求按访问ip的hash结果分配,这样每个访客固定访问一个后端服务器,可以解决session的问题。
在配置文件加入ip_hash;
4、fair(第三方)
按后端服务器的响应时间来分配请求,响应时间短的优先分配。
在配置文件加入fair;

5、url_hash(第三方)
按访问url的hash结果来分配请求,使每个url定向到同一个后端服务器,后端服务器为缓存时比较有效。
3.Nginx配置-动态分离
通过 location 指定不同的后缀名实现不同的请求转发。通过 expires 参数设置,可以使浏
览器缓存过期时间,减少与服务器之前的请求和流量。具体 Expires 定义:是给一个资源
设定一个过期时间,也就是说无需去服务端验证,直接通过浏览器自身确认是否过期即可,
所以不会产生额外的流量。此种方法非常适合不经常变动的资源。(如果经常更新的文件,
不建议使用 Expires 来缓存),我这里设置 3d,表示在这 3 天之内访问这个 URL,发送一
个请求,比对服务器该文件最后更新时间没有变化,则不会从服务器抓取,返回状态码 304,
如果有修改,则直接从服务器重新下载,返回状态码 200。
(1)准备工作
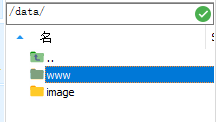
1.在linux系统中准备一些静态资源,用于一会访问测试。
/data/www/ 下存放html
/data/image/ 下 存放图片
(2)配置
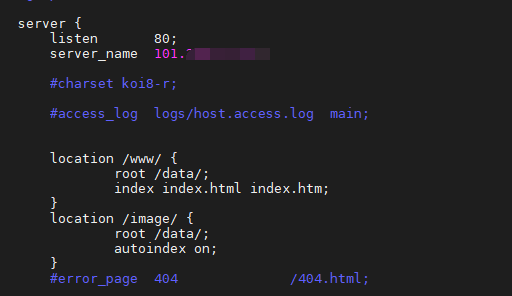
1.在nginx配置文件中配置
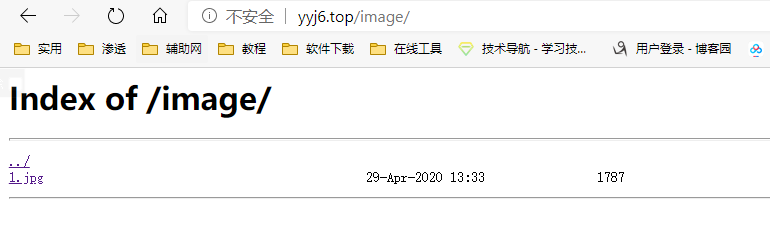
(3)测试
4.Nginx配置-高可用
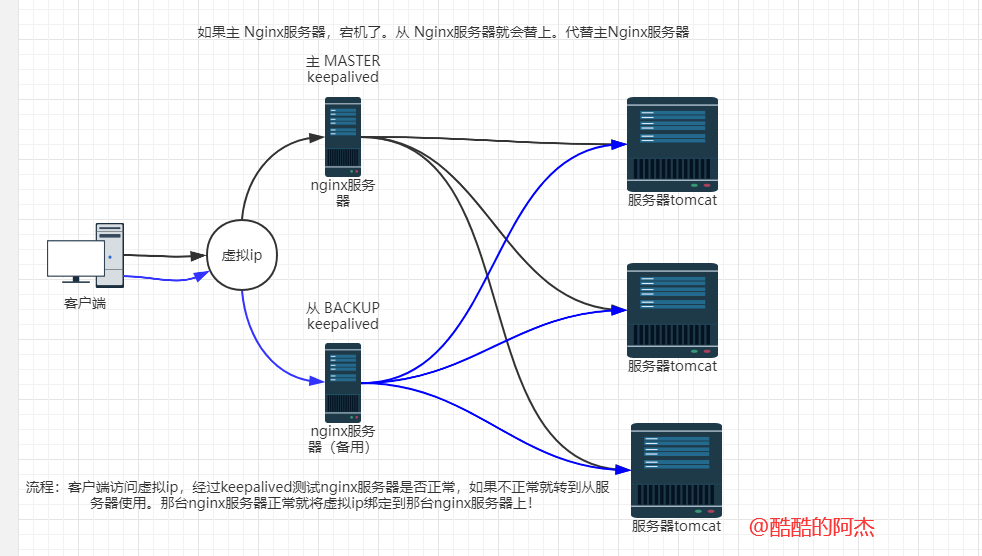
(1)准备工作
需要多台服务器
在这几台服务器上安装nginx
在这几个服务器上安装keepalived
# 下载安装 keepalived      安装位置就在  /etc/keepalived
yum install keepalived -y
# 查看是否安装成功
rpm -q -a keepalived
(2)开始配置
(1)配置文件在/etc/keepalived/keepalived.conf
global_defs {
   notification_email {
     [email protected] # 邮箱
     [email protected]
     [email protected]
   }
   notification_email_from [email protected] # 邮箱
   smtp_server 192.168.92.128 #服务器ip
   smtp_connect_timeout 30
   router_id LVS_DEVEL  #访问到主机的名字 在/etc/hosts 添加 127.0.0.1 LVS_DEVEL
}

vrrp_script chk_http_port {

    script "/usr/local/src/nginx_check.sh"

    interval 2  #(检测脚本执行的间隔)每隔两秒检测一次

    weight 2   # 权重
}

vrrp_instance VI_1 {
    state MASTER    #此服务器是主服务器就是MASTER,从服务器就是BACKUP
    interface ens33 #网卡 ifconfig 可以查看
    virtual_router_id 51 #主、备机的virtual_router_id必须相同
    priority 100  #主、备机取不同的优先级,主机值较大,备份机值较小 (优先级)
    advert_int 1 #每隔多久监测一次服务器是否存活
    authentication {
        auth_type PASS
        auth_pass 1111
    }
    virtual_ipaddress {
    	# 虚拟ip可以配置多个
        192.168.92.150  //VRRP H虚拟机地址
    }
}
(2)在 /usr/local/src/ 下添加检测脚本nginx_check.sh
配置文件中的 /server/nginx/sbin/nginx 是nginx的启动位置
#!/bin/bash
A=`ps -C nginx -no-header |wc -1`
if [ $A -eq 0 ];then
    /server/nginx/sbin/nginx
    sleep 2
    if [ `ps -C nginx --no-header |wc -1` -eq 0 ];then
        killall keepalived
    fi
fi
(3)启动服务器和keepalived
systemctl start keepalived.service
(3)测试
访问虚拟ip的地址