定义:
starter是一种服务(或者叫插件)——使得使用某个功能的开发者不需要关注各种依赖库的处理,不需要具体的配置信息,只需要导入相关maven坐标,由Spring Boot自动通过classpath路径下的类注入需要的Bean,并织入bean。
简而言之:组件化开发思维,提高代码复用性,避免重复造轮子,开箱即用!!
大概启动原理
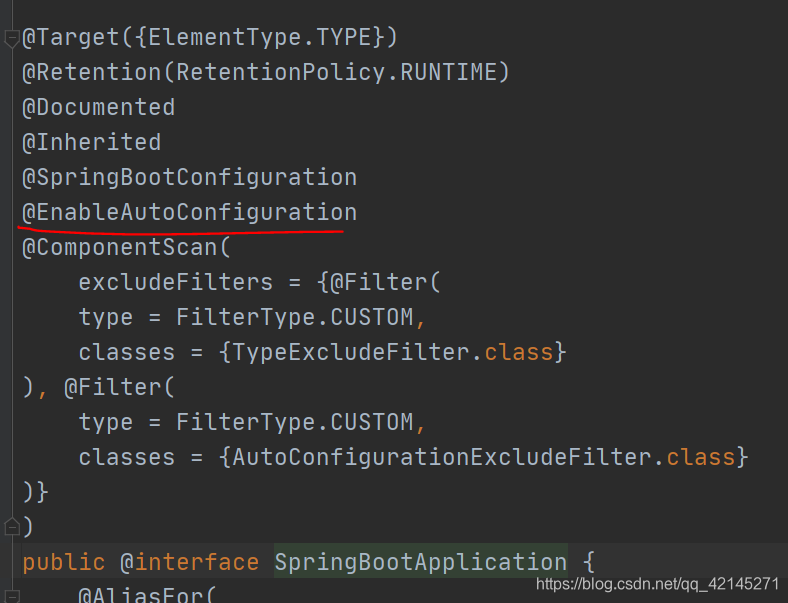
Spring Boot的启动类上有一个@SpringBootApplication注解,在@SpringBootApplication中有一个注解@EnableAutoConfiguration,就是开启自动配置。
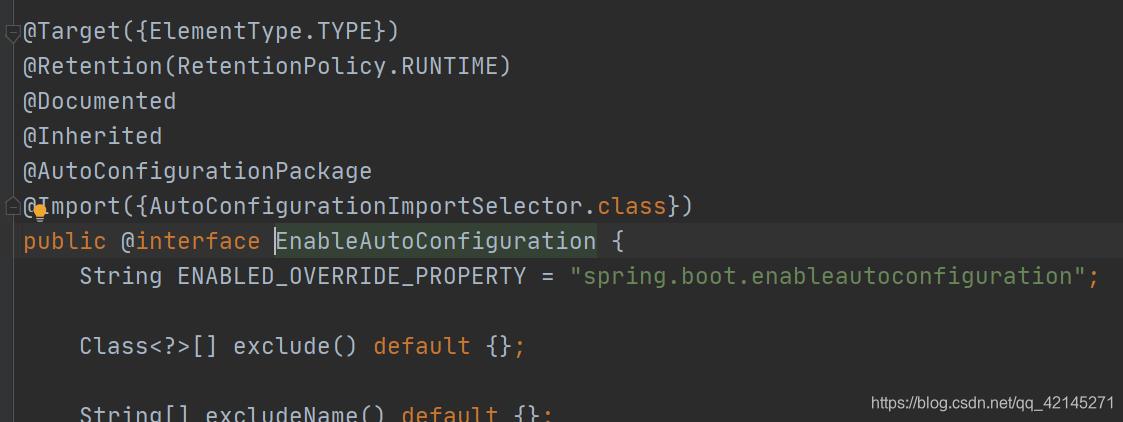
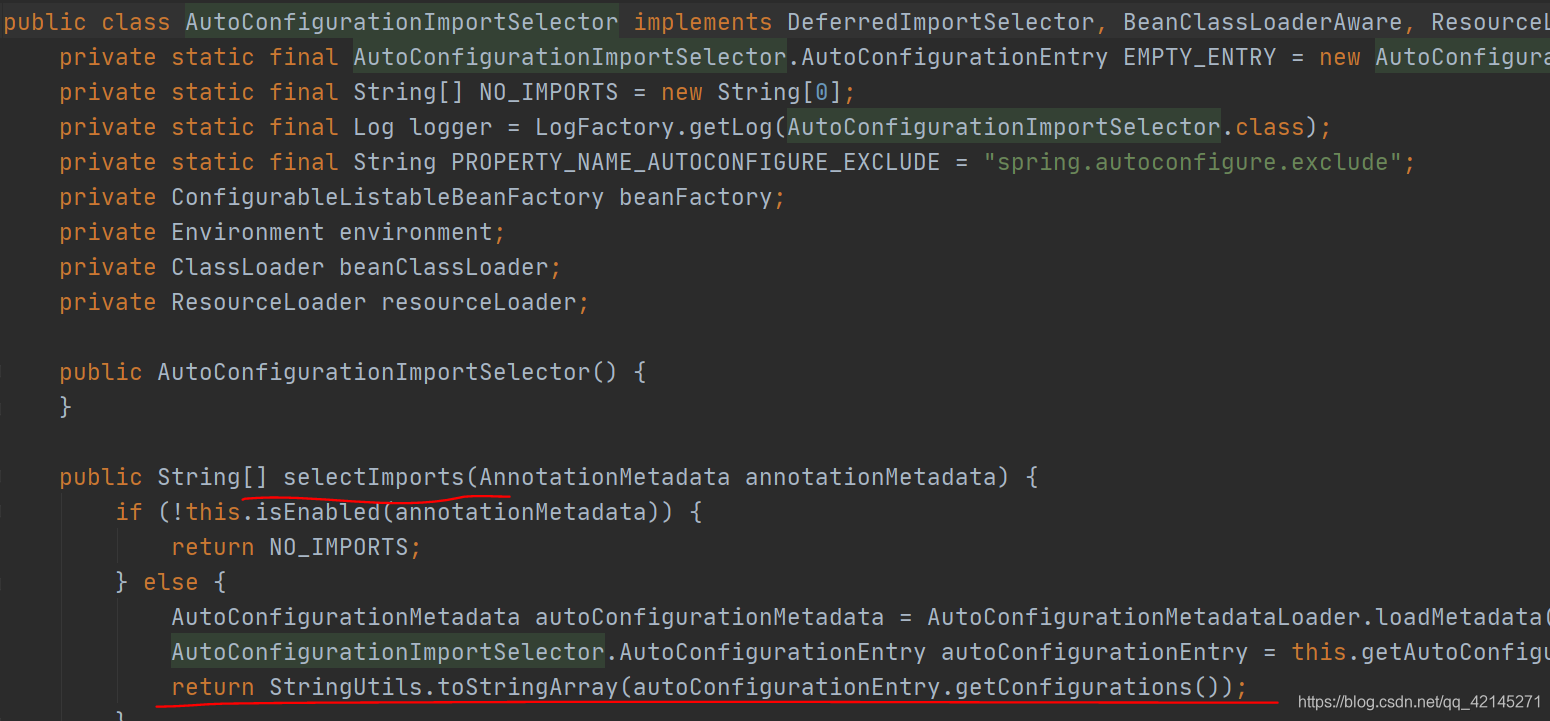
而这个注解也是一个派生注解,其中的关键功能由@Import提供,其导入的AutoConfigurationImportSelector的selectImports()方法通SpringFactoriesLoader.loadFactoryNames()扫描所有具有META-INF/spring.factories的jar包。

有一个这样的spring.factories文件,这个spring.factories文件也是一组一组的key=value的形式。
通过SPI机制扫描spring.factories这个文件,读取里面的配置信息。
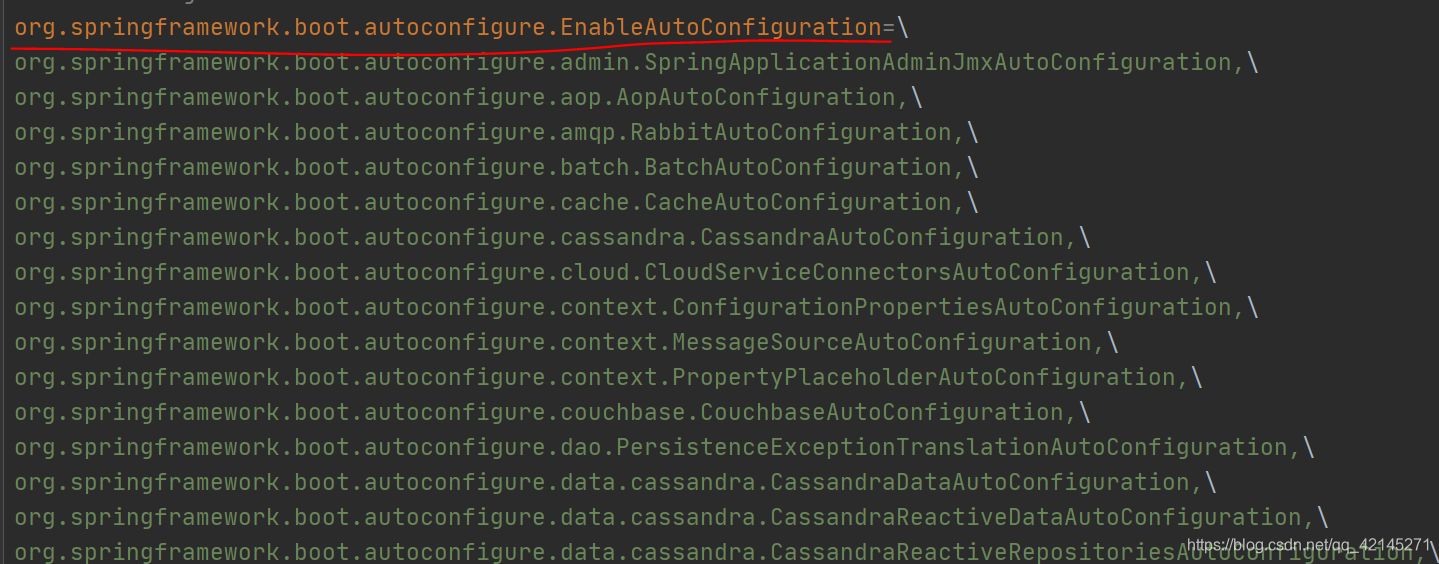
这个文件其中一个key是EnableAutoConfiguration类的全类名,而它的value是一个xxxxAutoConfiguration的类名的列表,这些类名以逗号分隔,@EnableAutoConfiguration注解通过@SpringBootApplication被间接的标记在了Spring Boot的启动类上。在SpringApplication.run(…)的内部就会执行selectImports()方法,找到所有JavaConfig自动配置类的全限定名对应的class,然后将所有自动配置类加载到Spring容器中。
主要流程:
Spring Boot启动的时候会通过@EnableAutoConfiguration注解找到META-INF/spring.factories配置文件中的所有自动配置类,并对其进行加载,而这些自动配置类都是以AutoConfiguration结尾来命名的,它实际上就是一个JavaConfig形式的Spring容器配置类,它能通过以Properties结尾命名的类中取得在全局配置文件中配置的属性如:server.port,而XxxxProperties类是通过@ConfigurationProperties注解与全局配置文件中对应的属性进行绑定的。
主要的几个注解:
@EnableAutoConfiguration
@SpringBootConfiguration -> @Configuration -> @Component
@Import({AutoConfigurationImportSelector.class})
@AutoConfigurationPackage
其实Starter就是一些整合包。
Spring 最初利用“工厂模式”( DI )和“代理模式”( AOP )解耦应用组件。按照这种模式封装了一个 MVC 框架,用开发 web 应用。后来发现每次开发都要搞很多依赖,写很多样板代码,使代码臃肿而麻烦,于是就有了一些整合包( starter ),这套就是 Spring Boot。它和原有的springmvc相比只不过是将原有的配置在xml文件中的内容做了自动化配置而已。
手写Starter实践步骤
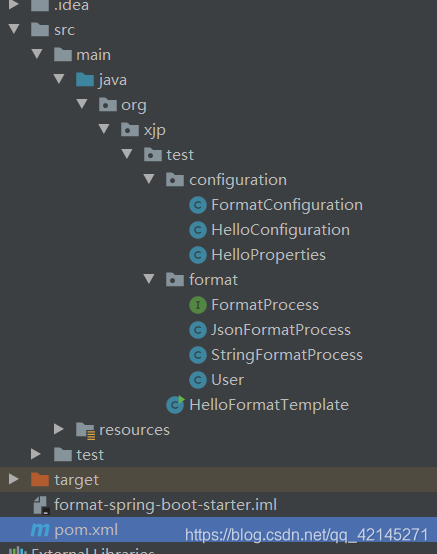
1. 新建项目
新建一个普通maven项目,作为一个Starter组件,编写一个测试A项目(后面统称为A项目),根据导入的maven坐标动态加载注入相关Bean。
2. 加入spring-boot-starter坐标
	<dependency>
      <groupId>org.springframework.boot</groupId>
      <artifactId>spring-boot-starter</artifactId>
      <version>2.2.6.RELEASE</version>
    </dependency>
3. 新建一个接口,添加一个format方法,然后两个类实现接口重写方法
public interface FormatProcess {

    <T> String format(T obj);

}
public class JsonFormatProcess implements FormatProcess{
    @Override
    public <T> String format(T obj) {
        return "JSON format: " + JSON.toJSONString(obj);
    }
}
public class StringFormatProcess implements FormatProcess{
    @Override
    public <T> String format(T obj) {
        return "String format:" + obj.toString();
    }
}
4. 接着添加一个format配置类,添加@Configuration注解,表明这是一个配置类
把前面写的JsonFormatProcess和StringFormatProcess 注入IOC容器 。
其中一个加上@Primary,表明多个这是默认的Bean调用方法。
@ConditionalOnMissingClass(“com.alibaba.fastjson.JSON”)这个注解表示如果某个B项目依赖了我们这个A项目的话,如果B项目没有添加fastjson依赖,那么就会走这个getStringFormat()方法;如果B项目有这个fastjson依赖,就会走getJsonFormat,大意就是判断是否有某个类。
@Configuration
public class FormatConfiguration {

    @Bean
    @Primary
    @ConditionalOnMissingClass("com.alibaba.fastjson.JSON")
    public StringFormatProcess getStringFormat(){
        return new StringFormatProcess();
    }

    @Bean
    @ConditionalOnClass(name = "com.alibaba.fastjson.JSON")
    public JsonFormatProcess getJsonFormat(){
        return new JsonFormatProcess();
    }
}
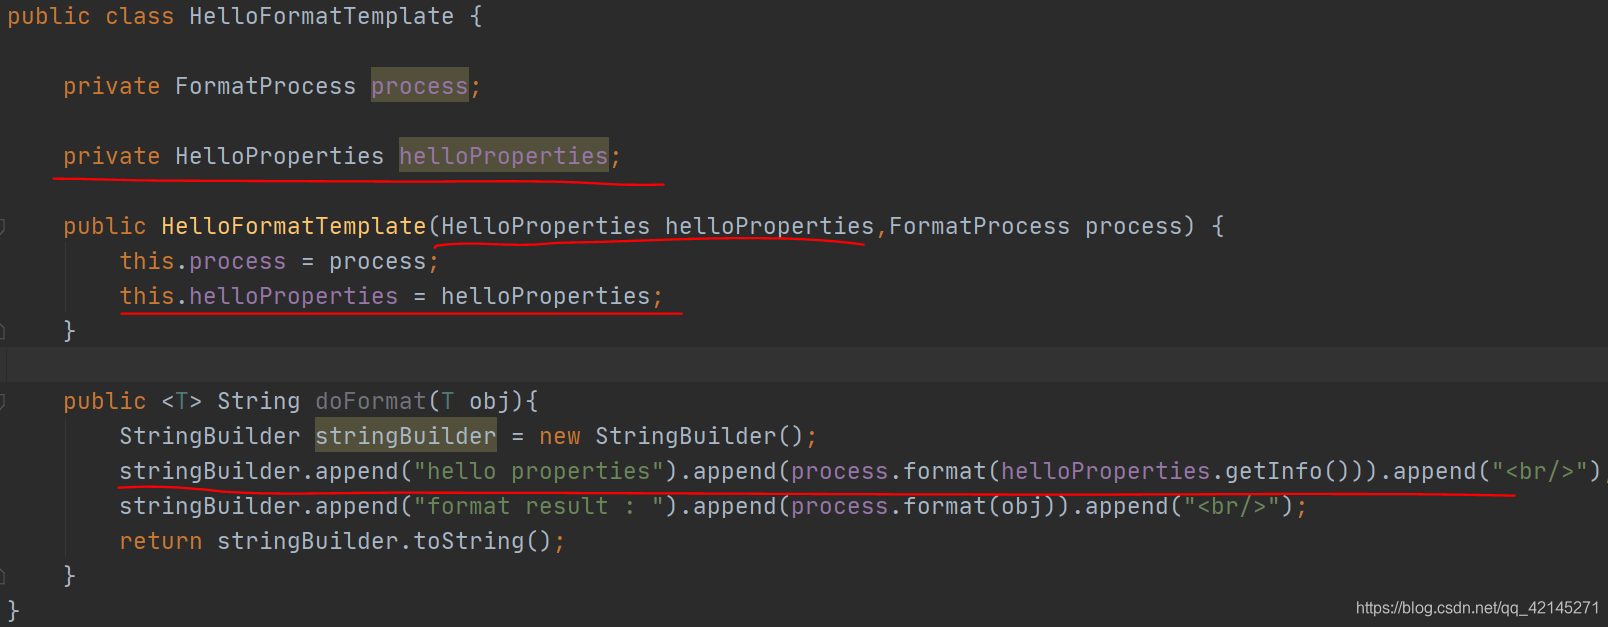
5. 新建一个模板类
新建HelloFormatTemplate,添加doFormat方法,通过FormatProcess 调用format方法。
后面通过注入HelloFormatTemplate 直接调doFormat来实现方法调用。
public class HelloFormatTemplate {

    private FormatProcess process;

    public HelloFormatTemplate(FormatProcess process) {
        this.process = process;
    }

    public <T> String doFormat(T obj){
        StringBuilder stringBuilder = new StringBuilder();
        stringBuilder.append("format result : ").append(process.format(obj)).append("<br/>");
        return stringBuilder.toString();
    }
}
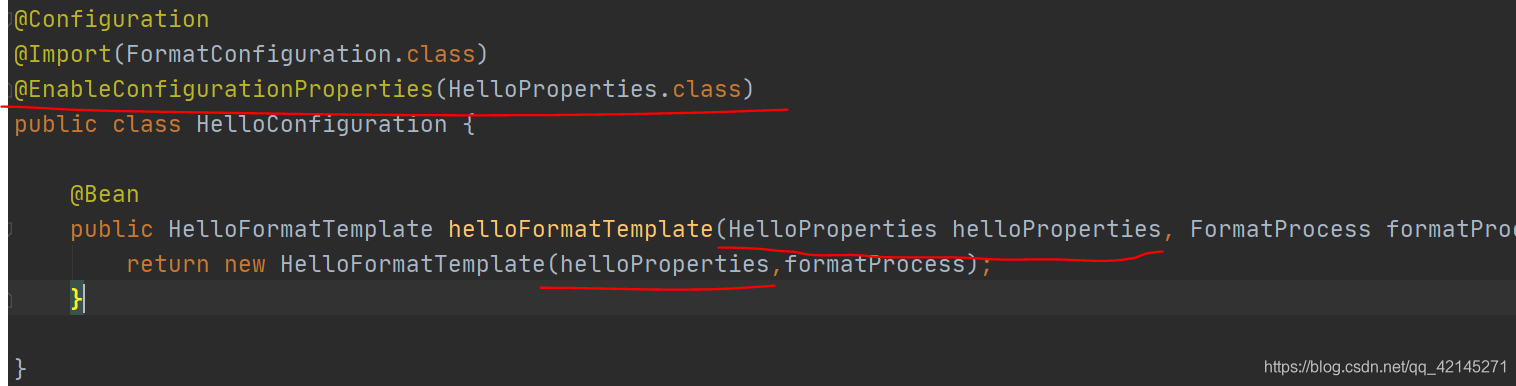
6. 添加HelloConfiguration配置类
@Import(FormatConfiguration.class)导入前面的FormatConfiguration配置类。
@Configuration
@Import(FormatConfiguration.class)
public class HelloConfiguration {

    @Bean
    public HelloFormatTemplate helloFormatTemplate(FormatProcess formatProcess){
        return new HelloFormatTemplate(helloProperties,formatProcess);
    }

}
7. resources资源文件夹下添加META-INF文件夹
添加META-INF文件夹,创建spring.factories文件,这文件是key-value的形式。
key是EnableAutoConfiguration全路径,value就是HelloConfiguration的全路径
org.springframework.boot.autoconfigure.EnableAutoConfiguration=\
org.xjp.test.configuration.HelloConfiguration
8. A项目编写完成,maven命令install安装到本地
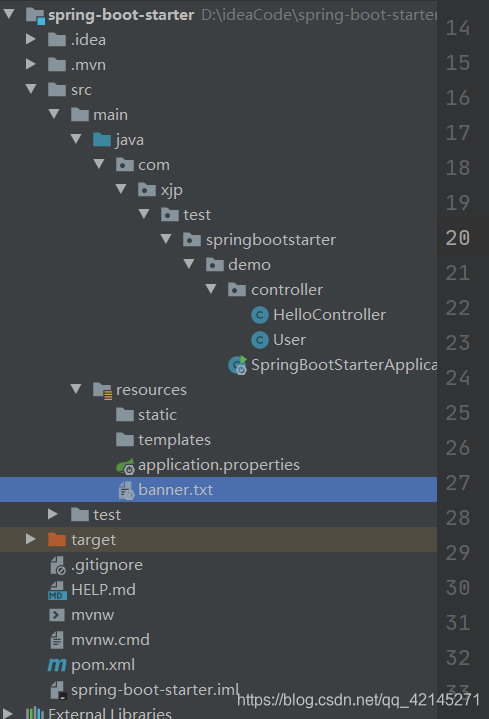
9. 新建一个SpringBoot项目
定义为B项目(后面统称为B项目),和前面的A项目区分
导入坐标
		<dependency>
            <groupId>org.springframework.boot</groupId>
            <artifactId>spring-boot-starter-web</artifactId>
        </dependency>
        //下面这个是前面maven打包的A项目
		<dependency>
            <groupId>org.xjp.test</groupId>
            <artifactId>format-spring-boot-starter</artifactId>
            <version>1.0-SNAPSHOT</version>
        </dependency>
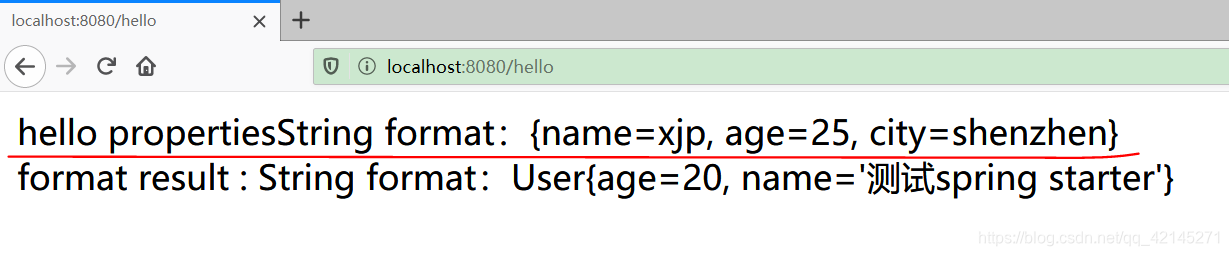
10. 新建Controller类和一个User实体类
@RestController
public class HelloController {

    @Autowired
    private HelloFormatTemplate helloFormatTemplate;

    @GetMapping("/hello")
    public String hello(){
        User user = new User();
        user.setAge(20);
        user.setName("测试spring starter");
        return helloFormatTemplate.doFormat(user);
    }
}
public class User {

    public Integer age;

    public String name;

    public Integer getAge() {
        return age;
    }

    @Override
    public String toString() {
        return "User{" +
                "age=" + age +
                ", name='" + name + '\'' +
                '}';
    }

    public void setAge(Integer age) {
        this.age = age;
    }

    public String getName() {
        return name;
    }

    public void setName(String name) {
        this.name = name;
    }
}
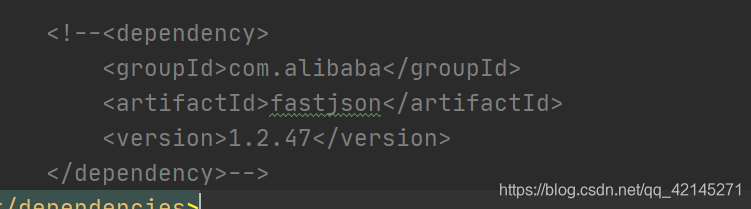
然后导入fastjson的pom坐标,因为前面A项目有一个注解判断条件(@ConditionalOnMissingClass和@ConditionalOnClass)是否调用getStringFormat()或者getJsonFormat()方法。
		<dependency>
            <groupId>com.alibaba</groupId>
            <artifactId>fastjson</artifactId>
            <version>1.2.47</version>
        </dependency>
因为加入了json坐标,所以会走getJsonFormat()这个方法

注释fastjson坐标,会走getStringFormat()方法。

这个就是SpringBoot一个Starter的大概原理和加载流程
如果我们需要自定义配置文件,那就是下面要说的
读取配置文件
1. A项目添加坐标
这个坐标就是允许我们自定义配置文件
	<dependency>
      <groupId>org.springframework.boot</groupId>
      <artifactId>spring-boot-configuration-processor</artifactId>
      <version>2.2.6.RELEASE</version>
      <optional>true</optional>//可选
    </dependency>
2. 添加配置文件配置类
@ConfigurationProperties表明这个是配置文件类,HelloProperties.HELLO_PREFIX这个表明配置文件的前缀是xjp.hello.prefix。
定义前缀和一个map集合。map集合的key就配置文件的key,Object就是value
@ConfigurationProperties(HelloProperties.HELLO_PREFIX)
public class HelloProperties {

    public static final String HELLO_PREFIX = "xjp.hello.prefix";

    public Map<String,Object> info;

    public Map<String, Object> getInfo() {
        return info;
    }

    public void setInfo(Map<String, Object> info) {
        this.info = info;
    }
}
重新maven打包
3. 添加Properties相关的字段和参数
4. 在B项目配置文件设置相关的key-value
key是String类型,value随意设置
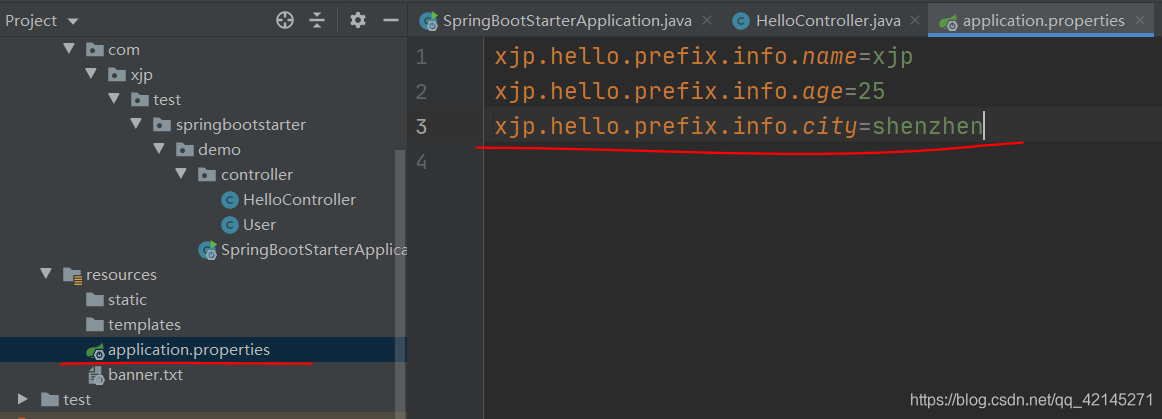
然后在application设置的key-value就可以显示在页面
小白一个,还在继续学习中。。。。。。
