一、高级文件处理接口shutil
shutil
是一种高层次的文件操作工具
类似于高级API,而且主要强大之处在于其对文件的复制与删除操作更是比较支持好。
使用方法
- copyfile( src, dst) 从源src复制到dst中去。当然前提是目标地址是具备可写权限。抛出的异常信息为IOException. 如果当前的dst已存在的话就会被覆盖掉
- copymode( src, dst) 只是会复制其权限其他的东西是不会被复制的
- copystat( src, dst) 复制权限、最后访问时间、最后修改时间
- copy( src, dst) 复制一个文件到一个文件或一个目录
- copy2( src, dst) 在copy上的基础上再复制文件最后访问时间与修改时间也复制过来了,类似于cp –p的东西
- copy2( src, dst) 如果两个位置的文件系统是一样的话相当于是rename操作,只是改名;如果是不在相同的文件系统的话就是做move操作
- copytree(olddir,newdir,True/Flase) 把olddir拷贝一份newdir,如果第3个参数是True,则复制目录时将保持文件夹下的符号连接,如果第3个参数是False,则将在复制的目录下生成物理副本来替代符号连接
[root@python ~]# mkdir /tmp/demo
[root@python ~]# cd /tmp/demo/
[root@python demo]# mkdir -p dir1
[root@python demo]# touch a.txt b.txt c.txt
[root@python demo]# touch sh.py cc.py 001.jpg 002.jpg 003.jpg
//创建所需文件

[root@python demo]# ipython
//打开ipython
也可以在PyCharm中创建文件,进行实施。
1、复制文件和文件夹
shutil.copy(file1,file2)     #文件
shutil.copytree(dir1,dir2) #文件夹
(1)复制文件
In [1]: import shutil

In [2]: shutil.copy('a.txt','aa.txt')
Out[2]: 'aa.txt'
//可在PyCharm和Linux的相应路径查看是否有生成的文件

In [3]: ls
001.jpg  003.jpg  a.txt  cc.py  sh.py
002.jpg  aa.txt   b.txt  c.txt
(2)复制文件夹
In [5]: shutil.copytree('dir1','dir11')
Out[5]: 'dir11'

In [6]: ls
001.jpg  003.jpg  a.txt  cc.py  dir1/   sh.py
002.jpg  aa.txt   b.txt  c.txt  dir11/
(3)将文件内容拷贝到另一个文件中
# _*_ coding:utf-8 _*_
__author__ = 'junxi'

import shutil

# 将文件内容拷贝到另一个文件中
shutil.copyfileobj(open('old.txt', 'r'), open('new.txt', 'w'))

# 拷贝文件
shutil.copyfile('old.txt', 'old1.txt')

# 仅拷贝权限。内容、组、用户均不变
shutil.copymode('old.txt', 'old1.txt')

# 复制权限、最后访问时间、最后修改时间
shutil.copystat('old.txt', 'old1.txt')

# 复制一个文件到一个文件或一个目录
shutil.copy('old.txt', 'old2.txt')

# 在copy上的基础上再复制文件最后访问时间与修改时间也复制过来了
shutil.copy2('old.txt', 'old2.txt')

# 把olddir拷贝一份newdir,如果第3个参数是True,则复制目录时将保持文件夹下的符号连接,如果第3个参数是False,则将在复制的目录下生成物理副本来替代符号连接
shutil.copytree('C:/Users/xiaoxinsoso/Desktop/aaa', 'C:/Users/xiaoxinsoso/Desktop/bbb')

# 移动目录或文件
shutil.move('C:/Users/xiaoxinsoso/Desktop/aaa', 'C:/Users/xiaoxinsoso/Desktop/bbb') # 把aaa目录移动到bbb目录下

# 删除一个目录
shutil.rmtree('C:/Users/xiaoxinsoso/Desktop/bbb') # 删除bbb目录
2、文件和文件夹的重命名与移动
shutil.move(filel, file2)
shutil.move(file, dir)
(1)文件的重命名
In [7]: shutil.move('aa.txt','dd.txt')
Out[7]: 'dd.txt'

In [8]: ls
001.jpg  003.jpg  b.txt  c.txt   dir1/   sh.py
002.jpg  a.txt    cc.py  dd.txt  dir11/
(2)文件移动到文件夹
In [9]: shutil.move('dd.txt','dir1')
Out[9]: 'dir1/dd.txt'

In [11]: ls dir1
dd.txt
3、删除目录
shutil.rmtree(dir)    # 删除目录
os.unlink(file)       # 删除文件
删除目录
In [15]: shutil.rmtree('dir1')

In [16]: ls
001.jpg  003.jpg  b.txt  c.txt   sh.py
002.jpg  a.txt    cc.py  dir11/
二、文件内容管理
1、目录和文件的对比
filecmp模块包含了比较目录和文件的操作。
filecmp可以实现文件,目录,遍历子目录的差异对比功能。
自带filecmp模块,无需安装。
(1)目录结构
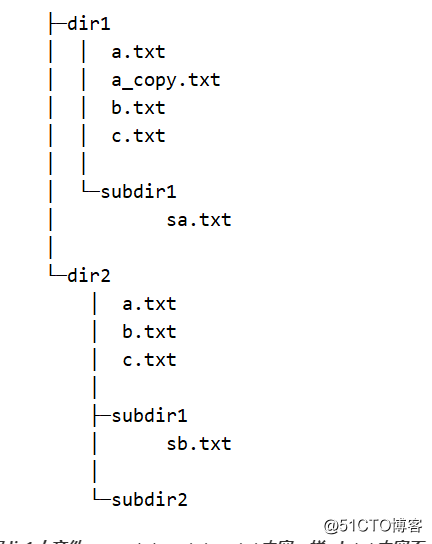
目录dir1中文件a_copy.txt,a.txt,c.txt内容一样,b.txt内容不一样
[root@python demo]# mkdir compare
[root@python demo]# cd compare/
[root@python compare]# mkdir -p dir1 dir2
[root@python compare]# mkdir dir1/subdir1
[root@python compare]# ls
dir1  dir2
[root@python compare]# touch dir1/a_copy.txt dir1/a.txt dir1/b.txt   dir1/c.txt
[root@python compare]# touch dir2/a.txt dir2/b.txt dir2/c.txt
[root@python compare]# mkdir -p dir2/subdir1 dir2/subdir2
[root@python compare]# touch dir2/subdir1/sb.txt
//创建所需文件

[root@python compare]# ipython
//打开ipython
filecmp提供3个操作方法,cmp(单文件对比),cmpfile(多文件对比),dircmp(目录对比)。
(2)示例代码:
使用filecmp模块的cmp函数比较两个文件是否相同,如果文件相同则返回True,否则False
In [1]: import filecmp

In [2]: filecmp.cmp('a.txt','b.txt')
Out[2]: False

In [3]: filecmp.cmp('a.txt','c.txt')
Out[3]: True

In [4]: filecmp.cmp('a.txt','a_copy.txt')
Out[4]: True
(3)比较两个文件
filecmp目录下还有一个名为cmpfiles的函数, 该函数用来同时比较两个不同的目录下的多个文件,并且返回一个三元组,分别包含相同的文件、不同的文件和无法比较的文件。示例如下:
In [9]: filecmp.cmpfiles('dir1','dir2',['a.txt','b.txt','c.txt','a_copy.txt'])
Out[9]: (['b.txt'], ['a.txt', 'c.txt'], ['a_copy.txt'])
# 返回一个三元组第一个是一样的第个是不一样的第三个是无法比较(没有这个文件或者其他原因)
(4)比较多个文件
cmpfiles函数同时用来比较两个目录下的文件,也可以使用该函数比较两个目录。但是,在比较两个目录时,需要通过参数指定可能的文件,因此比较繁琐。
filecmp中还有一个名为dircmp的函数,用来比较两个目录。调用dircmp函数以后,会返回一个dircmp类的对象,该对象保存了诸多属性,我们可以通过查看这些属性获取目录之间的差异。如下所示:
In [11]: d = filecmp.dircmp('dir1','dir2')
#设置测试目录

In [12]: d.report()
diff dir1 dir2
Only in dir1 : ['a_copy.txt']
Only in dir2 : ['subdir2']
Identical files : ['b.txt']
Differing files : ['a.txt', 'c.txt']
Common subdirectories: ['subdir1']
(5)直接比较目录不指定文件
目录对比,通过filecmp(a,b[,ignore[,hide]])类创建一个目录比较对象用于比较文件夹,通过该类比较两个文件夹,可以获取一些详细的比较结果(如只在A文件夹存在的文件列表),并支持子文件夹的递归比较。
In [17]: d.left_list      #查看dir1目录结构
Out[17]: ['a.txt', 'a_copy.txt', 'b.txt', 'c.txt', 'subdir1']

In [18]: d.right_list     #查看dir2目录结构
Out[18]: ['a.txt', 'b.txt', 'c.txt', 'subdir1', 'subdir2']

In [19]: d.left_only      #仅第dir1目录存在的
Out[19]: ['a_copy.txt']

In [20]: d.right_only     #仅第dir2目录存在的
Out[20]: ['subdir2']
2、MD5校验和比较
校验码是通过散列函数计算而成,是一种从任何数据中创建小的数字”指纹”的方法。散列函数把消息或数据压缩成摘要,使得数据量变小,便于进行比较。MDS是目前使用最官方的
MD5哈希一般用于检查文件的完整性,尤其常用于检查文件传输、磁盘错误或其他情况下文件的正确性。
Linux下计算一个文件的MD5校验码,如下所示:
[root@192 demo]# md5sum a.txt
d41d8cd98f00b204e9800998ecf8427e  a.txt
在Python中计算文件的MD5校验码也非常简单,使用标准库hashlib模块即可。如下所示:
import hashlib

d = hashlib.md5()
with open('b.txt') as f:
    for line in f:
        d.update(line.encode('utf-8'))
print(d.hexdigest())

# 或者可以这样(最常见的写法,常用于图片的命名)
>>> import hashlib

>>> hashlib.md5(b'123').hexdigest()
'202cb962ac59075b964b07152d234b70'

# 也可以使用hash.new()这个一般方法,hashlib.new(name[, data]),name传入的是哈希加密算法的名称,如md5
>>> hashlib.new('md5', b'123').hexdigest()
'202cb962ac59075b964b07152d234b70'
记得创建b.txt文件
三、Python管理压缩包
1、tarfile
既然有压缩模块zipfile,那有一个归档模块tarfile也是很自然的。tarfile模块用于解包和打包文件,包括被gzip,bz2或lzma压缩后的打包文件。如果是.zip类型的文件,建议使用zipfile模块,更高级的功能请使用shutil模块。
定义的类和异常
tarfile.open(name=None, mode='r', fileobj=None, bufsize=10240, \kwargs)返回一个TarFile类型的对象。本质上就是打开一个文件对象。Python随处可见这种文件对象类型的设计,你很容易就明白,不是吗?
name是文件名或路径。
bufsize用于指定数据块的大小,默认为20*512字节。
mode是打开模式,一个类似filemode[:compression]格式的字符串,可以有下表所示的组合,默认为“r”
| 模式 | 说明 |
|---|---|
| 'r'or'r:*' | 自动解压并打开文件(推荐模式) |
| 'r:' | 只打开文件不解压 |
| 'r:gz' | 采用gzip格式解压并打开文件 |
| 'r:bz2' | 采用bz2格式解压并打开文件 |
| 'r:xz' | 采用lzma格式解压并打开文件 |
| 'x'or'x:' | 仅创建打包文件,不压缩 |
| 'x:gz' | 采用gzip方式压缩并打包文件 |
| 'x:bz2' | 采用bzip2方式压缩并打包文件 |
| 'x:xz' | 采用lzma方式压缩并打包文件 |
| 'a'or'a:' | 打开文件,并以不压缩的方式追加内容。如果文件不存在,则新建 |
| 'w'or'w:' | 以不压缩的方式写入 |
| 'w:gz' | 以gzip的方式压缩并写入 |
| 'w:bz2' | 以bzip2的方式压缩并写入 |
| 'w:xz' | 以lzma的方式压缩并写入 |
注意 |
不支持'a:gz', 'a:bz2'和'a:xz'的模式 |
如果当前模式不能正常打开文件用于读取,将抛出ReadError异常,这种情况下,请使用“r”模式。如果指定的压缩方式不支持,将抛出CompressionError异常。
在w:gz,r:gz,w:bz2,r:bz2,x:gz,x:bz2模式下,tarfile.open()方法额外接受一个压缩等级参数compresslevel,默认值为9。
(1)读取文件
压缩文件提取码:0418
import tarfile

with tarfile.open('tengine-2.3.2.tar.gz') as t:
    # getmember() 查看文件列表
    for member in t.getmembers():
        print(member.name)
with tarfile.open('tengine-2.3.2.tar.gz') as t:
    t.extractall('a','tengine-2.3.2/man')
    t.extract('tengine-2.3.2/man','b')
常用方法说明:
- getmembers () : 获取tar包中的文件列表
- member.name : 获取tar包中文件的文件名
- extract(member, path) : 提取单个文件
- extractall(path,memebers) : 提取所有的文件
(2)创建tar包
记得创建read.txt文件
import tarfile

with tarfile.open( 'readme.tar',mode='w') as out :
    out.add('read.txt')
可在对应位置查看是否有readme.tar文件
(3)读取与创建压缩包
import tarfile

with tarfile.open('tarfile_add.tar ',mode='r:gz') as out:
    pass
with tarfile.open('tarfile_add.tar ',mode='r:bz2') as out:
    pass
(4)备份指定文件到压缩包中
import os
import fnmatch
import tarfile
import datetime

def is_file_math(filename, patterns):
    '''查找特定类型的文件'''
    for pattern in patterns:
        if fnmatch.fnmatch(filename, pattern):
            return True
        return False

def find_files(root, patterns=['*']):
    for root, dirnames, filenames in os.walk(root):
        for filename in filenames:
            if is_file_math(filename, patterns):
                yield os.path.join(root, filename)

patterns = ['*.txt','*.md']
now = datetime.datetime.now().strftime('%Y_%m_%d_%H_%M_%S')
filename = 'backup_all_file_{0}.tar.gz'.format(now)
with tarfile.open(filename, 'w') as f:
    for item in find_files('.', patterns):
        f.add(item)
可在对应位置查看是否有readme.tar文件
2、zipfile
zipfile 是python里用来做zip格式编码的压缩和解压缩的,由于是很常见的zip格式,所以这个模块使用频率也是比较高。
zipfile里有两个非常重要的class, 分别是ZipFile和ZipInfo, 在绝大多数的情况下,只需要使用这两个class就可以。
- ZipFile是主要的类,用来创建和读取zip文件;
- ZipInfo是存储的zip文件的每个文件的信息的。
(1)读取zip文件
import zipfile

demo_zip = zipfile.ZipFile('read.zip')
print(demo_zip.namelist())
demo_zip.extractall('1')
demo_zip.extract('a.jpg','2')
//记得创建名为2的目录,当然第一个字段的路径也必须正确。
常用方法说明:
- namelist() :返回zip文件中包含的所有文件和文件夹的字符串列表
- extract(filename, path): 从zip文件中提取单个文件
- extractall(path): 从zip文件中提取所有文件
(2)创建zip文件
import zipfile

newZip = zipfile.ZipFile( 'new.zip', mode='w' )
newZip.write('a.jpg')     #文件必须存在
newZip.close()
(3) Python命令行调用zipfile
#创建zip文件
python -m zipfile -c new1.zip b.txt

#查看zip文件内容
python -m zipfile -l new1.zip
File Name                                             Modified             Size
b.txt                                          2020-04-26 14:35:12            0

#提取zip文件到指定目录
python -m zipfile -e new1.zip /
zipfile模块提供的命令行接口包含的选项:
- -1: 显示zi p格式压缩包中的文件列表
- -e: 提取z i p格式的压缩包
- -c:创建zip格式的压缩包
- -t: 验证文件是不是一个有效的zi p格式压缩包
(4) zipfile的各个属性
import zipfile, os
zipFile = zipfile.ZipFile(os.path.join(os.getcwd(), 'duoduo.zip'))
zipInfo = zipFile.getinfo('文件中的文件.txt')
print ('filename:', zipInfo.filename) #获取文件名称
print ('date_time:', zipInfo.date_time) #获取文件最后修改时间。返回一个包含6个元素的元组:(年, 月, 日, 时, 分, 秒)
print ('compress_type:', zipInfo.compress_type) #压缩类型
print ('comment:', zipInfo.comment) #文档说明
print ('extra:', zipInfo.extra) #扩展项数据
print ('create_system:', zipInfo.create_system) #获取创建该zip文档的系统。
print ('create_version:', zipInfo.create_version) #获取 创建zip文档的PKZIP版本。
print ('extract_version:', zipInfo.extract_version) #获取 解压zip文档所需的PKZIP版本。
print ('extract_version:', zipInfo.reserved) # 预留字段,当前实现总是返回0。
print ('flag_bits:', zipInfo.flag_bits) #zip标志位。
print ('volume:', zipInfo.volume) # 文件头的卷标。
print ('internal_attr:', zipInfo.internal_attr) #内部属性。
print ('external_attr:', zipInfo.external_attr) #外部属性。
print ('header_offset:', zipInfo.header_offset) # 文件头偏移位。
print ('CRC:', zipInfo.CRC) # 未压缩文件的CRC-32。
print ('compress_size:', zipInfo.compress_size) #获取压缩后的大小。
print ('file_size:', zipInfo.file_size) #获取未压缩的文件大小。
zipFile.close() #
3、shutil创建和读取压缩包
shutil可以简单地理解为sh + util,shell工具的意思。shutil模块是对os模块的补充,主要针对文件的拷贝、删除、移动、压缩和解压操作。
使用方法
- copyfile( src, dst) 从源src复制到dst中去。当然前提是目标地址是具备可写权限。抛出的异常信息为IOException. 如果当前的dst已存在的话就会被覆盖掉
- copymode( src, dst) 只是会复制其权限其他的东西是不会被复制的
- copystat( src, dst) 复制权限、最后访问时间、最后修改时间
- copy( src, dst) 复制一个文件到一个文件或一个目录
- copy2( src, dst) 在copy上的基础上再复制文件最后访问时间与修改时间也复制过来了,类似于cp –p的东西
- copy2( src, dst) 如果两个位置的文件系统是一样的话相当于是rename操作,只是改名;如果是不在相同的文件系统的话就是做move操作
- copytree(olddir,newdir,True/Flase) 把olddir拷贝一份newdir,如果第3个参数是True,则复制目录时将保持文件夹下的符号连接,如果第3个参数是False,则将在复制的目录下生成物理副本来替代符号连接
测试
import shutil

print(shutil.get_archive_formats())
输出结果如下:
[('bztar', "bzip2'ed tar-file"), ('gztar', "gzip'ed tar-file"), ('tar', 'uncompressed tar file'), ('xztar', "xz'ed tar-file"), ('zip', 'ZIP file')](1)创建压缩包
import shutil
# 参数1:生成的压缩包文件名
# 参数2:压缩包的格式
# 参数3:压缩的目录
shutil.make_archive('a.jpg','gztar', 'ddd')
可在对应位置查看是否有生成的文件
(2)解压
import shutil
# 参数1:需要解压的压缩包
# 参数2:解压的目录
print(shutil.unpack_archive('a.jpg.tar.gz','jpg'))
可在对应位置查看是否有生成的文件