Android自动化测试教程
Appium
Appium简介
Appium是一个开源测试自动化框架,可用于原生,混合和移动Web应用程序测试。 它使用WebDriver协议驱动iOS,Android和Windows应用程序。
运行原理
Appium的运行原理,和selenium有点类似,都可以理解为c/s架构。
我们的电脑(c端)上运行自动化测试脚本,调用的是appium的webdriver的接口,appium服务器(s端)接收到我们client上发送过来的命令后,他会将这些命令转换为UIautomator认识的命令,然后由UIautomator来在设备上执行自动化。
appium界面

Capabilities配置介绍
Desired capability的功能是配置Appium会话。他们告诉Appium服务器您想要自动化的平台和应用程序。
Desired Capabilities是一组设置的键值对的集合,其中键对应设置的名称,而值对应设置的值。(如:“platformName”: “Android”)Desired Capabilities主要用于通知Appium服务器建立需要的Session。
公用Capability

使用说明
连接手机
首先连续点击版本号,出现“您已处于开发者模式,无需进行此操作”提示即可
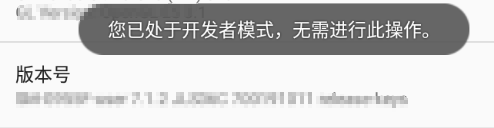
然后打开USB调试功能

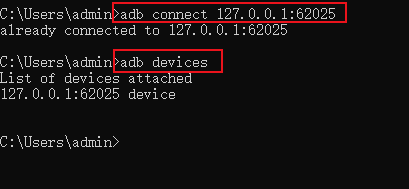
手机模拟器用下面其中一个命令连接手机即可
adb connect 127.0.0.1:62025
adb connect 127.0.0.1:62001
adb devices  ---查看是否连接 (真机USB连接后会自动连接)
查看元素
打开appium,点击红框,配置以下信息。

desired capability参数Json
{
 "platformName": "Android",
 "platformVersion": "7.1.2",#Android操作系统的版本
 "deviceName": "127.0.0.1",   #设备名称
 "appPackage": "com.android.settings",  #app的包名
 "appActivity": ".Settings",  #app的activity名称
 "unicodeKeyboard": "True",    #使用unicode编码方式键盘发送字符串
 "restKeyboard": "True"   # 将键盘隐藏一起来
}
点击Start Session

元素捕捉工具Inspector:

在dos界面下输入以下命令,点击需要操作的app:
adb logcat -v time | findstr START
 脚本中,cmp= 后面的值就是 包名

编写自动化脚本
from appium import webdriver
from time import sleep,time

desired_caps={
    "platformName": "Android", #系统名称
    "platformVersion": "7.1.2", #系统的版本号
    "deviceName": "127.0.0.1",#设备名称
    "appPackage": "com.android.settings", #app的包名
    "appActivity": ".Settings",#app的activity名称
    "unicodeKeyboard": "True",#使用unicode编码方式键盘发送字符串
 	"restKeyboard": "True"# 将键盘隐藏一起来
}
dr = webdriver.Remote('http://127.0.0.1:4723/wd/hub',desired_caps)#指定脚本要把内容发送到的地址以及端口
dr.implicitly_wait(30)#隐式等待30秒
元素定位方式
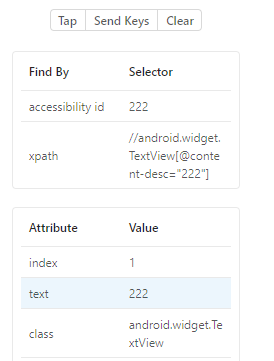
根据id定位
#根据id定位
dr.find_element_by_id(" 222 ").click()#点击
根据class定位
#根据class定位
dr.find_element_by_class_name('android.widget.TextView').send_keys('123')#输入信息
根据xpath定位
#根据xpath定位
dr.find_element_by_xpath('//android.widget.TextView[@content-desc="222"] ').click()
UIAutomator定位
UIAutomator元素定位是 Android 系统原生支持的定位方式,虽然与 xpath 类似,但比它更加好用,且支持元素全部属性定位.定位原理是通过android 自带的android uiautomator的类库去查找元素。 Appium元素定位方法其实也是基于Uiautomator来进行封装的。
使用方法 find_element_by_android_uiautomator() 可以运用UiAutomator元素定位。
UiAutomator提供一下三种方式来定位:
•id定位
•text定位
•class name定位
#根据id定位
test=dr.find_element_by_android_uiautomator\
	('new UiSelector().resourceId("com.android.contacts:id/floating_action_button")')
test.click()
#根据test定位
test=dr.find_element_by_android_uiautomator\
	('new UiSelector().text("本地保存")')
test.click()
#根据class name定位
test=dr.find_element_by_android_uiautomator\
	('new UiSelector().className("android.widget.Button")')
test.click()
定位一组元素

如上图,两个输入框的class属性都是一样的,如果要根据class属性分别来获取这两个值,就用使用定位一组元素的方式了,方式和UI界面的定位方式是一样的。代码实现如下:
test=dr.find_elements_by_class_name('android.widget.EditText')
#输入账号
test[0].send_keys("123456789")
#输入密码
test[1].send_keys("1234")
Swipe 两点之间的滑动操作
我们在使用App的过程中,经常会在屏幕上进行滑动的操作,如,刷新新闻,刷朋友圈等,会做上下滑动的动作;如果是看图片,就会左右移动。在Appium里面,我们是用swipe()这个方法来实现这个操作。
语法:
swipe(起始横坐标,起始纵坐标,目标横坐标,目标纵坐标,时间)
时间,是指滑动使用多长时间,单位为毫秒。默认为空,即可以不填
我们可以通过下图来对滑动进行理解:

from appium import webdriver
from time import sleep
#获取屏幕的大小
def get_size():
    x=dr.get_window_size()['width']
    y=dr.get_window_size()['height']
    return x,y
size=get_size()
print(size)
sleep(3) #等待3秒

 #从下向上滑动
def swipeUp():
    size = get_size()
    x1 =size[0]*0.5
    y1 =size[1]*0.9
    y2 =size[1]*0.1
    dr.swipe(x1,y1,x1,y2)
swipeUp()
sleep(0.5)#等待0.5秒

#从上向下滑动
def swipDown():
	size=get_size()
	x1=size[0]*0.5
	y1=size[1]*0.1
	y2=size[1]*0.9
	dr.swipe(x1,y1,x1,y2)
swipDown()
sleep(0.5)#等待0.5秒

#从右向左滑动
def swipeleft():
    size = get_size()
    x1 =size[0]*0.9
    y1 =size[1]*0.1
    x2 =size[1]*0.1
    dr.swipe(x1,y1,x2,y1)
swipeleft()
sleep(0.5)#等待0.5秒

#从左向右滑动
def swiperight():
    size = get_size()
    x1 =size[0]*0.1
    y1 =size[1]*0.1
    x2 =size[1]*0.9
    dr.swipe(x1,y1,x2,y1)
swiperight()
sleep(0.5)#等待0.5秒
在滑动时报以下错误,修改目标坐标到(0.5)或以下参数
演示: x2 =size[1]*0.5

连续滑动
swipe滑动操作,一般是两点之间的滑动,而实际使用过程中用户可能要进行一些多点连续滑动操作。如手势密码操作,切西瓜等场景。那么在Appium中该如何模拟这类操作呢?
TouchAction
TouchAction包含一些列操作,比如按压、长按、点击、移动、暂停。由这些不同操作可以组成一套动作。使用TochAction需要先导入对应的模块:
from appium.webdriver.common.touch_action import TouchAction
按压
方法:press() 按压一个元素或坐标点(x,y)。
press(self, el=None, x=None, y=None)
TouchAction(driver).press(element)
TouchAction(driver).press(x=0,y=308)
长按
方法:long_press()开始按压一个元素或坐标点(x,y)。 相比press()方法,long_press()多了一个入参,就是长按的时间。duration以毫秒为单位。1000表示按一秒钟。其用法与press()方法相同。
long_press(self,el=None, x=None, y=None, duration=1000)
点击
方法:tap() 对一个元素或控件执行点击操作。用法参考press()。
tap(self,element=None, x=None, y=None, count=1)
移动
方法:move_to() 将指针从上一个点移动到指定的元素或点。
move_to(self,el=None, x=None, y=None)
注意:
移动到目位置有时是算绝对坐标点,有时是基于前面一个坐标点的偏移量,这个要结合具体App来实践。
暂停
方法:wait()
wait(self,ms=0)
暂停脚本的执行,单位为毫秒。
释放
方法release() ,我们滑动总要停止吧?怎么停止?就是用这个方法停止。
release(self)
执行
方法:perform() 把要执行的操作发送到Appium服务器,即让要执行的操作生效。
perform(self)
#连续滑动
from appium import webdriver
from time import sleep
from appium.webdriver.common.touch_action import TouchAction
#获取屏幕的大小(随SHOU)
def get_size():
    x=dr.get_window_size()['width']
    y=dr.get_window_size()['height']
    return x,y
size=get_size()
print(size)

#向左滑动
def swipeleft():
    size = get_size()
    x1 =size[0]*0.9
    y1 =size[1]*0.1
    x2 =size[1]*0.1
    dr.swipe(x1,y1,x2,y1)
# swipeleft()
# swipeleft()

for i in range(3):
    swipeleft()
需要打开手机的指针位置来捕捉坐标点

#设置手势密码
TouchAction(dr).press(x =221 ,y=726 ).wait(1000).\
move_to(x=545  ,y =726  ).wait(1000).\
move_to(x=879  ,y =730  ).wait(1000).\
move_to(x=876  ,y =1057 ).wait(1000).\
move_to(x=535 ,y =1052  ).wait(1000).\
move_to(x=209 ,y =1059 ).wait(1000).\
move_to(x=206  ,y =1393 ).wait(1000).\
move_to(x=543  ,y =1397  ).wait(1000).\
release().perform()
sleep(1)
#dr.close_app()#关闭app
如下图

