AudioPolicy&AudioFlinger初始化
总体框架
AudioFlinger和AudioPolicy两者是Android Audio框架层最主要的两个服务,他们两个是Android框架层的本地服务,在init.rc中启动;
AudioPolicyManager负责音频策略定制者,说白了就相当于Audio系统的司令。
AudioFlinger负责与底层audio alsa进行交互的实现者,那么它就是Audio系统的军官,干苦力的;
总体框架:
两个服务都属于audioserver进程,严格意义上来说audioserver通过init进程fork出来的,所以它是Linux系统中的一个进程。
AudioFlinger:media.audio_flinger
AudioPolicyService:media.audio_policy

初始化步骤简介
1、通过init进程fork出来,从而开始各自服务的初始化
2、首先初始化audioflinger服务
3、其次初始化audiopolicyservice服务
4、进一步通过audiopolicyservice和audioflinger完成音频hal层的初始化,这部分将是本文的重点难点分析。
1、通过init进程fork出来,从而开始各自服务的初始化
来,看下它是怎么定义:
//frameworks/av/media/audioserver/audioserver.rc
service audioserver /system/bin/audioserver
    class core
    user audioserver
    onrestart restart audio-hal-2-0
    ioprio rt 4 //设置io优先级
    disabled
可以看到audioserver属于core类型,优于一般的main类型,也就是说它的启动是更早的。
audioflinger&audiopolicyserver启动:
frameworks/av/media/audioserver/main_audioserver.cpp
int main(int argc __unused, char **argv)
{
	---
     android::hardware::configureRpcThreadpool(4, false /*callerWillJoin*/);
     sp<ProcessState> proc(ProcessState::self());
     sp<IServiceManager> sm = defaultServiceManager();
     ALOGI("ServiceManager: %p", sm.get());
     AudioFlinger::instantiate();
     AudioPolicyService::instantiate();
	---
}
2、首先初始化audioflinger服务
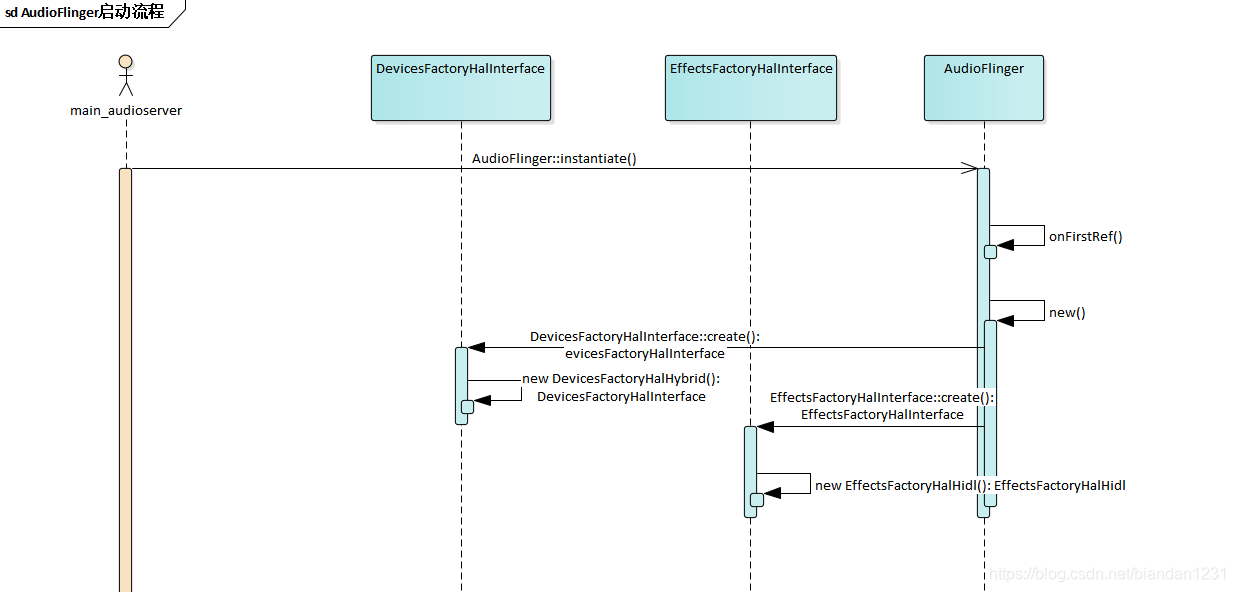
AudioFlinger初始化比较简洁,就是创建服务并将自身注册到systemserver中去,其次就是初始化部分通信组件以便后续与audio hal层进行通讯。如下图所示:
3、其次初始化audiopolicyservice服务
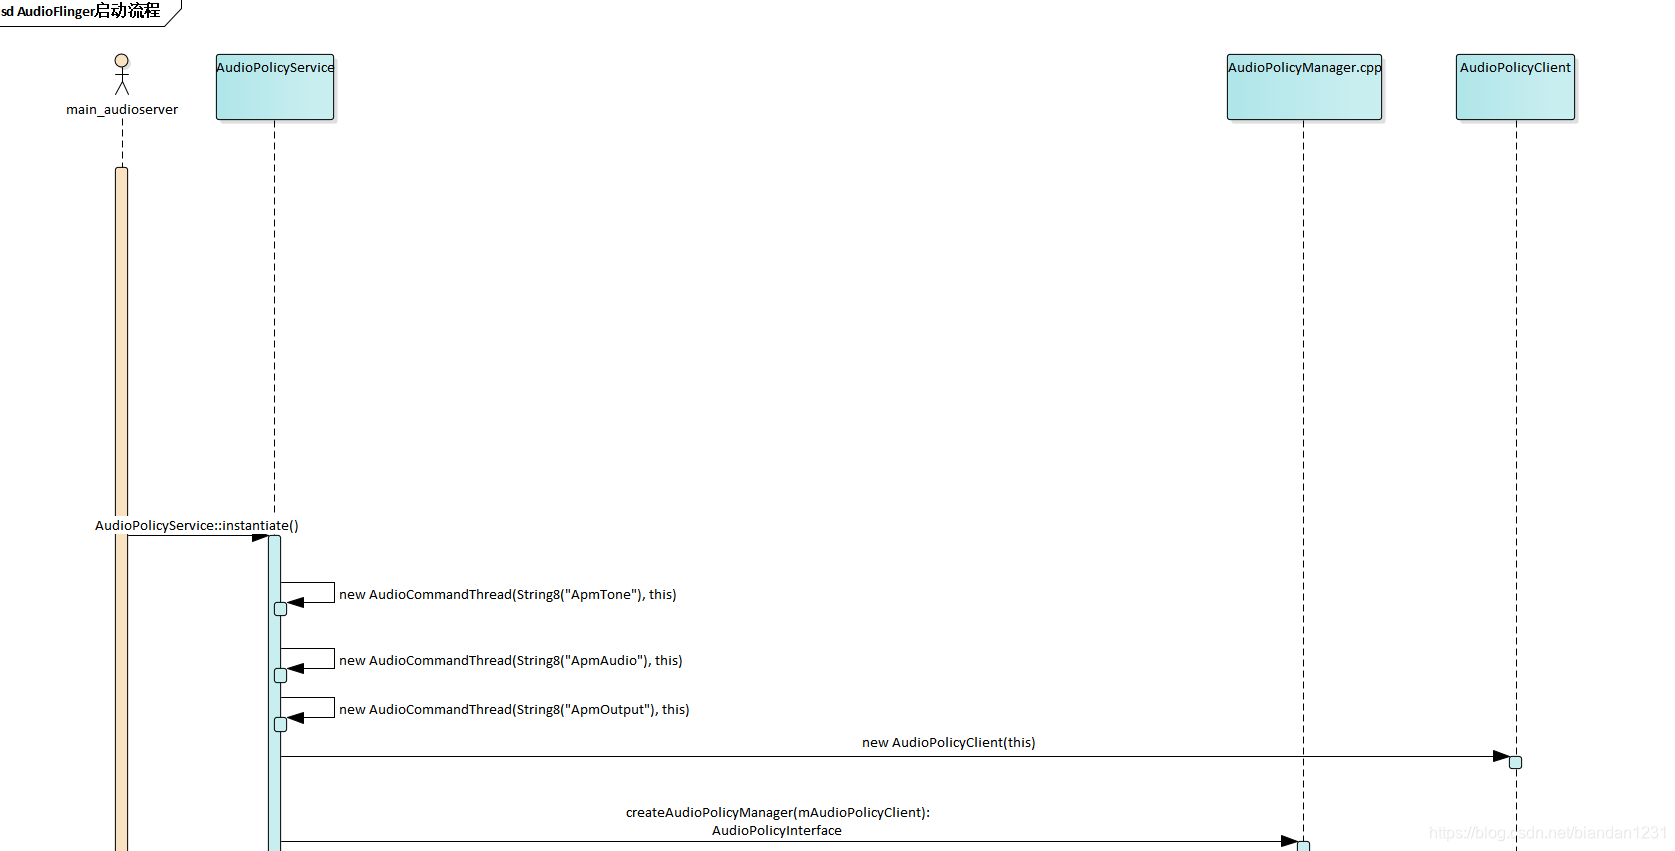
AudioPolicyService的初始化就比audioflinger服务初始化复杂了,下图仅仅是audiopolicyservice与audiopolicymanager的初始化。主要就是创建出几个线程(AudioCommandThread类型的线程),以便后续与上层进行交互使用,上层调用的比如播放暂停的操作指令会进入这个线程队列,实现上层异步调用也可以防止底层耗时操作导致阻塞上层应用。接着便是创建AudioPolicyManager实例以及客户端等。大概流程如下图所示:
4、进一步通过audiopolicyservice和audioflinger完成音频hal层的初始化,这部分将是本文的重点难点分析。
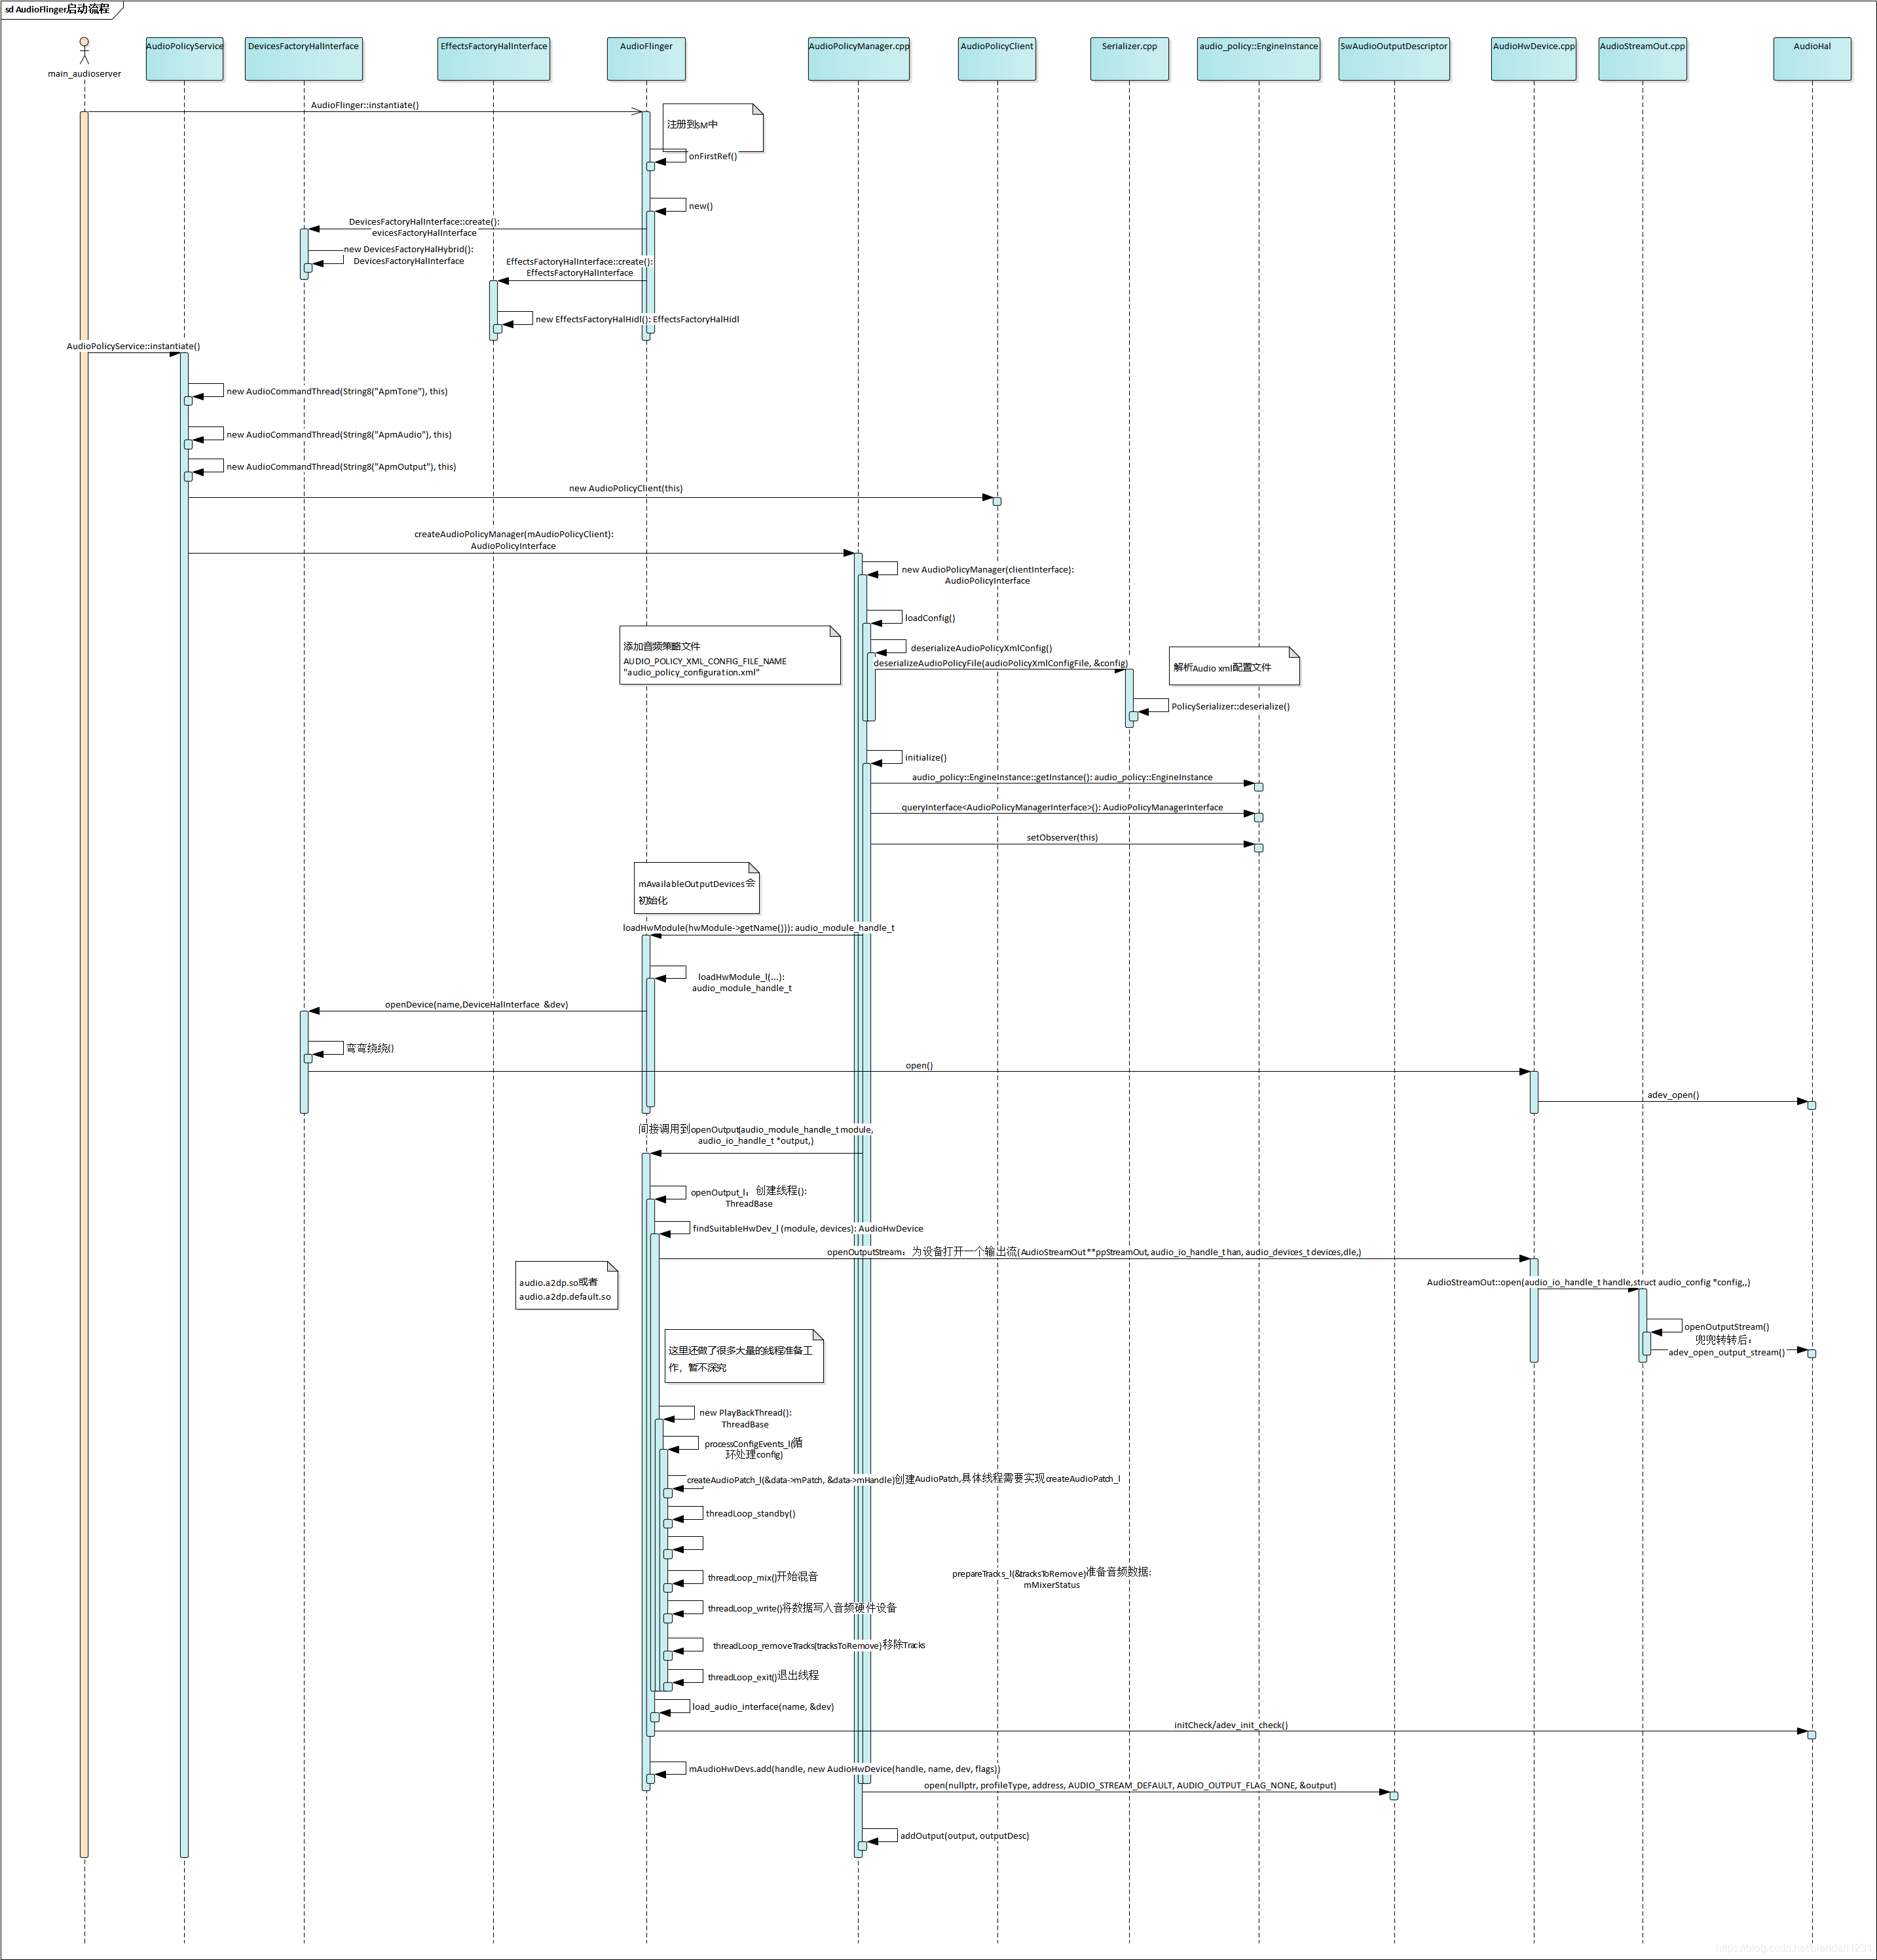
audiopolicyservice启动后,开始创建audiopolicymanager,并通过audiopolicymanager初始化audiopolicy策略,然后再进行对audio路由引擎(EngineInstance)进行初始化,初始化完路由引擎后便对audio hal 的so进行加载初始化,进一步通过加载后的so针对音频设备进行open操作,并默认打开主通道的输出音频流,最后将成功初始化的音频设备进行保存到audiopolicymanager以及audioflinger中,最后完成初始化。
详细的初始化流程如下图所示:
初始化步骤详细流程分析
从上面的初始大概流程可以知道,audio框架的初始化重点在audiopolicy部分的初始化,它不仅需要初始音频策略,还需针对加载的音频策略针对hal层的音频设备进行初始化,这部分还涉及到audioflinger部分,但以audiopolicy作为主线进行分析,下面将一步步对其进行分析。
//frameworks/av/services/audiopolicy/managerdefault/AudioPolicyManager.cpp
AudioPolicyManager::AudioPolicyManager(AudioPolicyClientInterface *clientInterface)
        : AudioPolicyManager(clientInterface, false /*forTesting*/)
{
	//1、加载audiopolicy的策略文件
    loadConfig();
    //2、针对加载的策略进行真正的初始化
    initialize();
}
可以看到AudioPolicyManager构造函数很简单,就两个调用:
第一步:loadConfig()
第二步:initialize()
下面进入详细分析:
1、loadConfig()
很简单,就通过配置文件USE_XML_AUDIO_POLICY_CONF来控制是使用XML配置的策略文件还是使用传统旧config配置文件。这个变量的初始化可以通过配置文件进行选择。
//frameworks/av/services/audiopolicy/managerdefault/AudioPolicyManager.cpp
void AudioPolicyManager::loadConfig() {
#ifdef USE_XML_AUDIO_POLICY_CONF
	//getConfig()这个很重要,为了后续的加载so做准备
    if (deserializeAudioPolicyXmlConfig(getConfig()) != NO_ERROR) {
#else
    if ((ConfigParsingUtils::loadConfig(AUDIO_POLICY_VENDOR_CONFIG_FILE, getConfig()) != NO_ERROR)
           && (ConfigParsingUtils::loadConfig(AUDIO_POLICY_CONFIG_FILE, getConfig()) != NO_ERROR)) {
#endif
        ALOGE("could not load audio policy configuration file, setting defaults");
        getConfig().setDefault();
    }
}
1.1这个getConfig()得到的mConfig成员变量如下:
mConfig(mHwModulesAll, mAvailableOutputDevices, mAvailableInputDevices, mDefaultOutputDevice,
static_cast<VolumeCurvesCollection*>(mVolumeCurves.get()))
这些成员变量在解析配置文件(XML格式或者config格式)会得到初始化,这点很重要,后续的so加载会根据配置的module name来进行加载。其会通过Serializer.cpp进行XML文件的解析,这个是一个很繁重的任务,如需讲明其解析过程还需另起一个篇幅才能将其介绍,与初始化关系不大,一笔带过。
XML的配置文件格式如下(简化版配置,这块涉及到音频路由,后续将会再写一篇详细介绍该配置文件):
//frameworks/av/services/audiopolicy/config/audio_policy_configuration.xml
<audioPolicyConfiguration version="1.0" xmlns:xi="http://www.w3.org/2001/XInclude">
    <globalConfiguration speaker_drc_enabled="true"/>
    <modules>
    	//编译后生成的so命名会根据module name 以及soc名字生成e.g. audio.[module name].[soc name]
    	//如IMX8的:audio.primary.imx8.so
        <module name="primary" halVersion="2.0">
            <attachedDevices>
                <item>Speaker</item>
            </attachedDevices>
            <defaultOutputDevice>Speaker</defaultOutputDevice>
            <mixPorts>//输出混音线程
                <mixPort name="primary output" role="source" flags="AUDIO_OUTPUT_FLAG_PRIMARY">
                    <profile name="" format="AUDIO_FORMAT_PCM_16_BIT" samplingRates="48000"
                    channelMasks="AUDIO_CHANNEL_OUT_STEREO"/>
                </mixPort>
            </mixPorts>
            <devicePorts>//输出设备节点
                <devicePort tagName="Speaker" type="AUDIO_DEVICE_OUT_SPEAKER" role="sink" >
                </devicePort>
            </devicePorts>
            <routes>
            	//音频路由
                <route type="mix" sink="Speaker" sources="esai output,primary output"/>
            </routes>
        </module>
    </modules>
</audioPolicyConfiguration>
2、initialize()
好了,上面的都是开胃菜,这个才是硬菜。
来,看下这个大概步骤,心中有谱,码海不慌。
主要是三个步骤:
2.1初始音频路由引擎
audio_policy::EngineInstance *engineInstance = audio_policy::EngineInstance::getInstance();
2.2、加载so 并且打开设备节点
mpClientInterface->loadHwModule(hwModule->getName())
2.3、打开输出流
status_t status = outputDesc->open(nullptr, profileType, address, AUDIO_STREAM_DEFAULT, AUDIO_OUTPUT_FLAG_NONE,&output);
怕你不信,所以贴了部分代码出来:
//frameworks/av/services/audiopolicy/managerdefault/AudioPolicyManager.cpp
status_t AudioPolicyManager::initialize() {
	//1、初始音频路由引擎
    // Once policy config has been parsed, retrieve an instance of the engine and initialize it.
    audio_policy::EngineInstance *engineInstance = audio_policy::EngineInstance::getInstance();
    if (!engineInstance) {
        ALOGE("%s:  Could not get an instance of policy engine", __FUNCTION__);
        return NO_INIT;
    }
    // Retrieve the Policy Manager Interface
    mEngine = engineInstance->queryInterface<AudioPolicyManagerInterface>();
    if (mEngine == NULL) {
        ALOGE("%s: Failed to get Policy Engine Interface", __FUNCTION__);
        return NO_INIT;
    }
    mEngine->setObserver(this);
    status_t status = mEngine->initCheck();

      for (const auto& hwModule : mHwModulesAll) {
      	//2、加载so 并且打开设备节点
        hwModule->setHandle(mpClientInterface->loadHwModule(hwModule->getName()));
        mHwModules.push_back(hwModule);
        // open all output streams needed to access attached devices
        // except for direct output streams that are only opened when they are actually
        // required by an app.
        // This also validates mAvailableOutputDevices list
        for (const auto& outProfile : hwModule->getOutputProfiles()) {
            //经过一系列有效判断后 创建输出相关参数
            sp<SwAudioOutputDescriptor> outputDesc = new SwAudioOutputDescriptor(outProfile,
                                                                                 mpClientInterface);
            const DeviceVector &supportedDevices = outProfile->getSupportedDevices();
            const DeviceVector &devicesForType = supportedDevices.getDevicesFromType(profileType);
            String8 address = devicesForType.size() > 0 ? devicesForType.itemAt(0)->mAddress
                    : String8("");
            audio_io_handle_t output = AUDIO_IO_HANDLE_NONE;
            //3、打开输出流
            status_t status = outputDesc->open(nullptr, profileType, address,
                                           AUDIO_STREAM_DEFAULT, AUDIO_OUTPUT_FLAG_NONE, &output);

            if (status != NO_ERROR) {
                ALOGW("Cannot open output stream for device %08x on hw module %s",
                      outputDesc->mDevice,
                      hwModule->getName());
            } else {
                for (const auto& dev : supportedDevices) {
                    ssize_t index = mAvailableOutputDevices.indexOf(dev);
                    // give a valid ID to an attached device once confirmed it is reachable
                    if (index >= 0 && !mAvailableOutputDevices[index]->isAttached()) {
                    	//这个很重要的变量,保存了可用的输出设备,后续会进一步说明
                        mAvailableOutputDevices[index]->attach(hwModule);
                    }
                }
                if (mPrimaryOutput == 0 &&
                        outProfile->getFlags() & AUDIO_OUTPUT_FLAG_PRIMARY) {
                    mPrimaryOutput = outputDesc;
                }
                addOutput(output, outputDesc);
                setOutputDevice(outputDesc, profileType, true, 0,  NULL, address);
            }
         }//end inner for
        }//end out for
    }
    // make sure all attached devices have been allocated a unique ID
好了,是不是也挺简单的,就三步。
2.1、初始音频路由引擎
2.1.1 创建路由
audio_policy::EngineInstance
这块有可配置路由和默认路由之分,音频流是根据路由策略进行打开相应的音频路由通路的。这部分内容需要领开一篇进行分析。这是一块很重要的内容,这里暂不展开分析。
2.2、加载so 并且打开设备节点
loadHwModule(hwModule->getName());
参数是由上面步骤初始配置文件得到,hwModule->getName():如IMX8的根据配置文件:audio.primary.imx8.so
会在vendor/lib/hw/加载文件,如果找不到会依次在system/lib/hw/进行查找。
详细步骤如下:
//注意这个返回值是audio_module_handle_t,这是个线程,这个很重要
//因为后续的播放录音Track都是挂到这个audio_module_handle_t上去的,这个是个线程
//frameworks/av/services/audioflinger/AudioFlinger.cpp
audio_module_handle_t AudioFlinger::loadHwModule(const char *name){
1==>进一步调用loadHwModule_l(name);
2====> 再进一步调用到DevicesFactoryHal的openDevice方法打开驱动设备
//frameworks/av/services/audioflinger/AudioFlinger.cpp
int rc = mDevicesFactoryHal->openDevice(name, &dev);
3=======>调用本地通讯方式的DeviceFactroy实现
//frameworks\av\media\libaudiohal\2.0\DevicesFactoryHalLocal.cpp
status_t DevicesFactoryHalLocal::openDevice(const char *name, sp<DeviceHalInterface> *device)
3.1=======>继续调用到load_audio_interface
//frameworks\av\media\libaudiohal\2.0\DevicesFactoryHalLocal.cpp
static status_t load_audio_interface(const char *if_name, audio_hw_device_t **dev){
    const hw_module_t *mod;
    int rc;
    rc = hw_get_module_by_class(AUDIO_HARDWARE_MODULE_ID, if_name, &mod);
    if (rc) {
        ALOGE("%s couldn't load audio hw module %s.%s (%s)", __func__,
                AUDIO_HARDWARE_MODULE_ID, if_name, strerror(-rc));
        goto out;
    }
    rc = audio_hw_device_open(mod, dev);
    return rc;
}
4=========>最终会调用到audio.h的方法open,audio_hw_device_open方法会调用设备的open方法
//hardware/libhardware/include/hardware/audio.h
static inline int audio_hw_device_open(const struct hw_module_t* module,
                                       struct audio_hw_device** device){
    return module->methods->open(module, AUDIO_HARDWARE_INTERFACE,
                                 TO_HW_DEVICE_T_OPEN(device));
}
5==========>最后会调用到
//最终会调用到各自厂商实现的hal层的open方法,代码路径就不放了
static int adev_open(const hw_module_t* module, const char* name,
                     hw_device_t** device)
到这里,音频设备打开就完毕了;
额外说明一下:mDevicesFactoryHal的初始化:
1、
// mDevicesFactoryHal初始化是在AudioFlinger初始化的时候进行的:
//frameworks/av/services/audioflinger/AudioFlinger.cpp
mDevicesFactoryHal = DevicesFactoryHalInterface::create();

//frameworks/av/media/libaudiohal/DevicesFactoryHalInterface.cpp
sp<DevicesFactoryHalInterface> DevicesFactoryHalInterface::create() {
    if (hardware::audio::V4_0::IDevicesFactory::getService() != nullptr) {
        return new V4_0::DevicesFactoryHalHybrid();
    }
    if (hardware::audio::V2_0::IDevicesFactory::getService() != nullptr) {
        return new DevicesFactoryHalHybrid();
    }
    return nullptr;
}
DevicesFactoryHalHybrid:Hybrid混合,包含了本地通讯方式,也包含了HIDL通讯方式:
//frameworks/av/media/libaudiohal/impl/DevicesFactoryHalHybrid.cpp
DevicesFactoryHalHybrid::DevicesFactoryHalHybrid(sp<IDevicesFactory> hidlFactory)
        : mLocalFactory(new DevicesFactoryHalLocal()),
          mHidlFactory(new DevicesFactoryHalHidl(hidlFactory)) {
}

status_t DevicesFactoryHalHybrid::openDevice(const char *name, sp<DeviceHalInterface> *device) {
    if (mHidlFactory != 0 && strcmp(AUDIO_HARDWARE_MODULE_ID_A2DP, name) != 0 &&
        strcmp(AUDIO_HARDWARE_MODULE_ID_HEARING_AID, name) != 0) {
        return mHidlFactory->openDevice(name, device);
    }
    return mLocalFactory->openDevice(name, device);
}
到这里,mDevicesFactoryHal的初始化介绍就完毕了。
但是Android 10以后是mDevicesFactoryHal的初始化是这样实现的:
//frameworks/av/media/libaudiohal/DevicesFactoryHalInterface.cpp
sp<DevicesFactoryHalInterface> DevicesFactoryHalInterface::create() {
   return createPreferredImpl<DevicesFactoryHalInterface>(
            "android.hardware.audio", "IDevicesFactory");
}
通过是从服务中根据名称"android.hardware.audio", "IDevicesFactory"获取的,暂不深究。
2.3、打开输出流
//frameworks/av/services/audiopolicy/managerdefault/AudioPolicyManager.cpp  AudioPolicyManager::initialize()
 const DeviceVector &supportedDevices = outProfile->getSupportedDevices();
            const DeviceVector &devicesForType = supportedDevices.getDevicesFromType(profileType);
            String8 address = devicesForType.size() > 0 ? devicesForType.itemAt(0)->mAddress
                    : String8("");
            audio_io_handle_t output = AUDIO_IO_HANDLE_NONE;
            status_t status = outputDesc->open(nullptr, profileType, address,
                                           AUDIO_STREAM_DEFAULT, AUDIO_OUTPUT_FLAG_NONE, &output);

//frameworks/av/services/audiopolicy/common/managerdefinitions/src/AudioOutputDescriptor.cpp
status_t SwAudioOutputDescriptor::open(const audio_config_t *config,
                                       const DeviceVector &devices,
                                       audio_stream_type_t stream,
                                       audio_output_flags_t flags,
                                       audio_io_handle_t *output)
{
    mDevices = devices;
    sp<DeviceDescriptor> device = devices.getDeviceForOpening();
    LOG_ALWAYS_FATAL_IF(device == nullptr,
                        "%s failed to get device descriptor for opening "
                        "with the requested devices, all device types: %s",
                        __func__, dumpDeviceTypes(devices.types()).c_str());

    audio_config_t lConfig;
    if (config == nullptr) {
        lConfig = AUDIO_CONFIG_INITIALIZER;
        lConfig.sample_rate = mSamplingRate;
        lConfig.channel_mask = mChannelMask;
        lConfig.format = mFormat;
    } else {
        lConfig = *config;
    }

    // if the selected profile is offloaded and no offload info was specified,
    // create a default one
    if ((mProfile->getFlags() & AUDIO_OUTPUT_FLAG_COMPRESS_OFFLOAD) &&
            lConfig.offload_info.format == AUDIO_FORMAT_DEFAULT) {
        flags = (audio_output_flags_t)(flags | AUDIO_OUTPUT_FLAG_COMPRESS_OFFLOAD);
        lConfig.offload_info = AUDIO_INFO_INITIALIZER;
        lConfig.offload_info.sample_rate = lConfig.sample_rate;
        lConfig.offload_info.channel_mask = lConfig.channel_mask;
        lConfig.offload_info.format = lConfig.format;
        lConfig.offload_info.stream_type = stream;
        lConfig.offload_info.duration_us = -1;
        lConfig.offload_info.has_video = true; // conservative
        lConfig.offload_info.is_streaming = true; // likely
    }

    mFlags = (audio_output_flags_t)(mFlags | flags);

    ALOGV("opening output for device %s profile %p name %s",
          mDevices.toString().c_str(), mProfile.get(), mProfile->getName().c_str());

    status_t status = mClientInterface->openOutput(mProfile->getModuleHandle(),
                                                   output,
                                                   &lConfig,
                                                   device,
                                                   &mLatency,
                                                   mFlags);
 mClientInterface:是在AudioPolicyManager调用的时候传进去的
 AudioPolicyClientInterface *mpClientInterface;  // audio policy client interface
到了AudioPolicyClientInterface 这个就明朗了,调用如下:
大概流程就是AudioPolicyManager–>AudioPolicyService–>AudioFlinger–>audio hal层了。至此,output 输出流打开成功。
最后将已经打开的输出流和输出设备保存到相应的数组里面,后续有流需要播出的时候直接进行查找,如果查找不到会尝试向底层查询,如果查询支持将会打开,如果查询不到,则会将其流类型改变并且将其加入到默认输出流里面进行播放处理。
小结:
这里的一切都是为音频播放做准备,后续将介绍音频路由部分。
