详细解析赋值、浅拷贝和深拷贝
一、赋值(Copy)
赋值是将某一数值或对象赋给某个变量的过程,分为下面 2 部分
- 基本数据类型:赋值,赋值之后两个变量互不影响
- 引用数据类型:赋址,两个变量具有相同的引用,指向同一个对象,相互之间有影响
对基本类型进行赋值操作,两个变量互不影响。
let a = "muyiy";
let b = a;
console.log(b);
// muyiy

a = "change";
console.log(a);
// change
console.log(b);
// muyiy
对引用类型进行赋址操作,两个变量指向同一个对象,改变变量 a 之后会影响变量 b,哪怕改变的只是对象 a 中的基本类型数据。
let a = {
    name: "muyiy",
    book: {
        title: "You Don't Know JS",
        price: "45"
    }
}
let b = a;
console.log(b);
// {
// 	name: "muyiy",
// 	book: {title: "You Don't Know JS", price: "45"}
// }

a.name = "change";
a.book.price = "55";
console.log(a);
// {
// 	name: "change",
// 	book: {title: "You Don't Know JS", price: "55"}
// }

console.log(b);
// {
// 	name: "change",
// 	book: {title: "You Don't Know JS", price: "55"}
// }
通常在开发中并不希望改变变量 a 之后会影响到变量 b,这时就需要用到浅拷贝和深拷贝。
二、浅拷贝(Shallow Copy)
1、什么是浅拷贝
创建一个新对象,这个对象有着原始对象属性值的一份精确拷贝。如果属性是基本类型,拷贝的就是基本类型的值,如果属性是引用类型,拷贝的就是内存地址 ,所以如果其中一个对象改变了这个地址,就会影响到另一个对象。
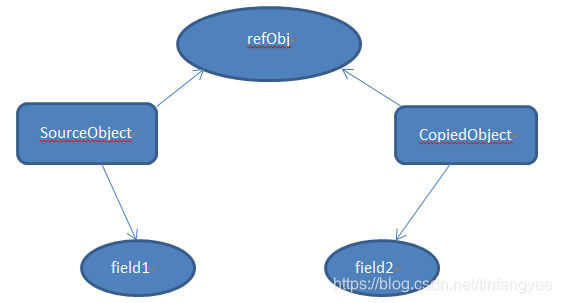
上图中,SourceObject 是原对象,其中包含基本类型属性 field1 和引用类型属性 refObj。浅拷贝之后基本类型数据 field2和 filed1 是不同属性,互不影响。但引用类型 refObj仍然是同一个,改变之后会对另一个对象产生影响。
简单来说可以理解为浅拷贝只解决了第一层的问题,拷贝第一层的基本类型值,以及第一层的引用类型地址。
2、浅拷贝使用场景
Object.assign()
Object.assign() 方法用于将所有可枚举属性的值从一个或多个源对象复制到目标对象。它将返回目标对象。
let a = {
    name: "muyiy",
    book: {
        title: "You Don't Know JS",
        price: "45"
    }
}
let b = Object.assign({}, a); // ep1
console.log(b);
// {
// 	name: "muyiy",
// 	book: {title: "You Don't Know JS", price: "45"}
// }

a.name = "change";
a.book.price = "55";
console.log(a);
// {
// 	name: "change",
// 	book: {title: "You Don't Know JS", price: "55"}
// }

console.log(b);
// {
// 	name: "muyiy",
// 	book: {title: "You Don't Know JS", price: "55"}
// }
上面代码改变对象 a 之后,对象 b 的基本属性保持不变。但是当改变对象 a 中的对象 book时,对象 b 相应的位置也发生了变化。

展开语法 Spread
// ep2 其余代码跟上面一样
let b = {...a};
通过代码可以看出实际效果和 Object.assign() 是一样的。
Array.prototype.slice()
slice()方法返回一个新的数组对象,这一对象是一个由 begin和 end(不包括end)决定的原数组的浅拷贝。原始数组不会被改变。
let a = [0, "1", [2, 3]];
let b = a.slice(1);
console.log(b);
// ["1", [2, 3]]

a[1] = "99";
a[2][0] = 4;
console.log(a);
// [0, "99", [4, 3]]

console.log(b);
//  ["1", [4, 3]]
可以看出,改变 a[1] 之后 b[0]的值并没有发生变化,但改变 a[2][0]之后,相应的 b[1][0]的值也发生变化。说明 slice()方法是浅拷贝,相应的还有concat等,在工作中面对复杂数组结构要额外注意
三、深拷贝(Deep Copy)
1、什么是深拷贝
深拷贝会拷贝所有的属性,并拷贝属性指向的动态分配的内存。当对象和它所引用的对象一起拷贝时即发生深拷贝。深拷贝相比于浅拷贝速度较慢并且花销较大。拷贝前后两个对象互不影响。

2、深拷贝使用场景
JSON.parse(JSON.stringify(object))
let a = {
    name: "muyiy",
    book: {
        title: "You Don't Know JS",
        price: "45"
    }
}
let b = JSON.parse(JSON.stringify(a));
console.log(b);
// {
// 	name: "muyiy",
// 	book: {title: "You Don't Know JS", price: "45"}
// }

a.name = "change";
a.book.price = "55";
console.log(a);
// {
// 	name: "change",
// 	book: {title: "You Don't Know JS", price: "55"}
// }

console.log(b);
// {
// 	name: "muyiy",
// 	book: {title: "You Don't Know JS", price: "45"}
// }
完全改变变量 a 之后对 b 没有任何影响,这就是深拷贝的魔力。
我们看下对数组深拷贝效果如何。
let a = [0, "1", [2, 3]];
let b = JSON.parse(JSON.stringify( a.slice(1) ));
console.log(b);
// ["1", [2, 3]]

a[1] = "99";
a[2][0] = 4;
console.log(a);
// [0, "99", [4, 3]]

console.log(b);
//  ["1", [2, 3]]
对数组深拷贝之后,改变原数组不会影响到拷贝之后的数组。
但是该方法有以下几个问题。
1、会忽略 undefined
2、会忽略 symbol
3、不能序列化函数
4、不能解决循环引用的对象
5、不能正确处理new Date()
6、不能处理正则
(1) undefined、symbol和函数这三种情况,会直接忽略。
let obj = {
    name: 'muyiy',
    a: undefined,
    b: Symbol('muyiy'),
    c: function() {}
}
console.log(obj);
// {
// 	name: "muyiy",
// 	a: undefined,
//  b: Symbol(muyiy),
//  c: ƒ ()
// }

let b = JSON.parse(JSON.stringify(obj));
console.log(b);
// {name: "muyiy"}
(2) 循环引用情况下,会报错。
let obj = {
    a: 1,
    b: {
        c: 2,
   		d: 3
    }
}
obj.a = obj.b;
obj.b.c = obj.a;

let b = JSON.parse(JSON.stringify(obj));
// Uncaught TypeError: Converting circular structure to JSON
(3) new Date 情况下,转换结果不正确。
new Date();
// Mon Dec 24 2018 10:59:14 GMT+0800 (China Standard Time)

JSON.stringify(new Date());
// ""2018-12-24T02:59:25.776Z""

JSON.parse(JSON.stringify(new Date()));
// "2018-12-24T02:59:41.523Z"
解决方法转成字符串或者时间戳就好了
let date = (new Date()).valueOf();
// 1545620645915

JSON.stringify(date);
// "1545620673267"

JSON.parse(JSON.stringify(date));
// 1545620658688
(4) 正则情况下,
let obj = {
    name: "muyiy",
    a: /'123'/
}
console.log(obj);
// {name: "muyiy", a: /'123'/}

let b = JSON.parse(JSON.stringify(obj));
console.log(b);
// {name: "muyiy", a: {}}
PS:为什么会存在这些问题可以学习一下 JSON。
除了上面介绍的深拷贝方法,常用的还有jQuery.extend()和 lodash.cloneDeep(),后面文章会详细介绍源码实现,敬请期待!
四、总结
| — | 和原数据是否指向同一对象 | 第一层数据为基本数据类型 | 原数据中包含子对象 |
|---|---|---|---|
| 赋值 | 是 | 改变会使原数据一同改变 | 改变会使原数据一同改变 |
| 浅拷贝 | 否 | 改变不会使原数据一同改变 | 改变会使原数据一同改变 |
| 深拷贝 | 否 | 改变不会使原数据一同改变 | 改变不会使原数据一同改变 |
浅拷贝 Object.assign模拟实现
上篇文章介绍了其定义和使用,主要是将所有可枚举属性的值从一个或多个源对象复制到目标对象,同时返回目标对象。(来自 MDN)
Object.assign(target, …sources)
实现一个 Object.assign 大致思路如下:
-
1、判断原生
Object是否支持该函数,如果不存在的话创建一个函数 assign,并使用Object.defineProperty将该函数绑定到Object上。 -
2、判断参数是否正确(目标对象不能为空,我们可以直接设置{}传递进去,但必须设置值)。
-
3、使用
Object()转成对象,并保存为to,最后返回这个对象to。 -
4、使用 for…in
循环遍历出所有可枚举的自有属性。并复制给新的目标对象(使用hasOwnProperty` 获取自有属性,即非原型链上的属性)。
实现代码如下,
这里为了验证方便,使用assign2代替assign。注意此模拟实现不支持 symbol属性,因为ES5 中根本没有 symbol 。
if (typeof Object.assign2 != 'function') {
  // Attention 1
  Object.defineProperty(Object, "assign2", {
    value: function (target) {
      'use strict';
      if (target == null) { // Attention 2
        throw new TypeError('Cannot convert undefined or null to object');
      }

      // Attention 3
      var to = Object(target);

      for (var index = 1; index < arguments.length; index++) {
        var nextSource = arguments[index];

        if (nextSource != null) {  // Attention 2
          // Attention 4
          for (var nextKey in nextSource) {
            if (Object.prototype.hasOwnProperty.call(nextSource, nextKey)) {
              to[nextKey] = nextSource[nextKey];
            }
          }
        }
      }
      return to;
    },
    writable: true,
    configurable: true
  });
}
测试一下
// 测试用例
let a = {
    name: "advanced",
    age: 18
}
let b = {
    name: "muyiy",
    book: {
        title: "You Don't Know JS",
        price: "45"
    }
}
let c = Object.assign2(a, b);
console.log(c);
// {
// 	name: "muyiy",
//  age: 18,
// 	book: {title: "You Don't Know JS", price: "45"}
// }
console.log(a === c);
// true
针对上面的代码做如下扩展。
注意1:可枚举性
原生情况下挂载在 Object上的属性是不可枚举的,但是直接在Object上挂载属性a 之后是可枚举的,所以这里必须使用 Object.defineProperty,并设置enumerable: false 以及 writable: true, configurable: true。
for(var i in Object) {
    console.log(Object[i]);
}
// 无输出

Object.keys( Object );
// []
上面代码说明原生 Object上的属性不可枚举。
我们可以使用 2 种方法查看 Object.assign是否可枚举,使用 Object.getOwnPropertyDescriptor或者 Object.propertyIsEnumerable 都可以,其中propertyIsEnumerable(..)会检查给定的属性名是否直接存在于对象中(而不是在原型链上)并且满足 enumerable: true。具体用法如下:
// 方法1
Object.getOwnPropertyDescriptor(Object, "assign");
// {
// 	value: ƒ,
//  writable: true, 	// 可写
//  enumerable: false,  // 不可枚举,注意这里是 false
//  configurable: true	// 可配置
// }

// 方法2
Object.propertyIsEnu
上面代码说明 Object.assign 是不可枚举的。
介绍这么多是因为直接在 Object 上挂载属性 a 之后是可枚举的,我们来看如下代码。
Object.a = function () {
    console.log("log a");
}

Object.getOwnPropertyDescriptor(Object, "a");
// {
// 	value: ƒ,
//  writable: true,
//  enumerable: true,  // 注意这里是 true
//  configurable: true
// }

Object.propertyIsEnumerable("a");
// true
所以要实现 Object.assign 必须使用Object.defineProperty,并设置 writable: true, enumerable: false, configurable: true,当然默认情况下不设置就是 false。
Object.defineProperty(Object, "b", {
    value: function() {
        console.log("log b");
    }
});

Object.getOwnPropertyDescriptor(Object, "b");
// {
// 	value: ƒ,
//  writable: false, 	// 注意这里是 false
//  enumerable: false,  // 注意这里是 false
//  configurable: false	// 注意这里是 false
// }
所以具体到本次模拟实现中,相关代码如下。
// 判断原生 Object 中是否存在函数 assign2
if (typeof Object.assign2 != 'function') {
  // 使用属性描述符定义新属性 assign2
  Object.defineProperty(Object, "assign2", {
    value: function (target) {
      ...
    },
    // 默认值是 false,即 enumerable: false
    writable: true,
    configurable: true
  });
}
注意2:判断参数是否正确
有些文章判断参数是否正确是这样的。
if (target === undefined || target === null) {
	throw new TypeError('Cannot convert undefined or null to object');
}
这样肯定没问题,但是这样写没有必要,因为undefined和 null 是相等的(高程 3 P52 ),即 undefined == null 返回 true,只需要按照如下方式判断就好了。
if (target == null) { // TypeError if undefined or null
	throw new TypeError('Cannot convert undefined or null to object');
}
注意3:原始类型被包装为对象
var v1 = "abc";
var v2 = true;
var v3 = 10;
var v4 = Symbol("foo");

var obj = Object.assign({}, v1, null, v2, undefined, v3, v4);
// 原始类型会被包装,null 和 undefined 会被忽略。
// 注意,只有字符串的包装对象才可能有自身可枚举属性。
console.log(obj);
// { "0": "a", "1": "b", "2": "c" }
上面代码中的源对象 v2、v3、v4 实际上被忽略了,原因在于他们自身没有可枚举属性。
var v1 = "abc";
var v2 = true;
var v3 = 10;
var v4 = Symbol("foo");
var v5 = null;

// Object.keys(..) 返回一个数组,包含所有可枚举属性
// 只会查找对象直接包含的属性,不查找[[Prototype]]链
Object.keys( v1 ); // [ '0', '1', '2' ]
Object.keys( v2 ); // []
Object.keys( v3 ); // []
Object.keys( v4 ); // []
Object.keys( v5 );
// TypeError: Cannot convert undefined or null to object

// Object.getOwnPropertyNames(..) 返回一个数组,包含所有属性,无论它们是否可枚举
// 只会查找对象直接包含的属性,不查找[[Prototype]]链
Object.getOwnPropertyNames( v1 ); // [ '0', '1', '2', 'length' ]
Object.getOwnPropertyNames( v2 ); // []
Object.getOwnPropertyNames( v3 ); // []
Object.getOwnPropertyNames( v4 ); // []
Object.getOwnPropertyNames( v5 );
// TypeError: Cannot convert undefined or null to object
这里其实又可以看出一个问题来,那就是目标对象是原始类型,会包装成对象,对应上面的代码就是目标对象 a 会被包装成 [String: 'abc'],那模拟实现时应该如何处理呢?很简单,使用Object(..)就可以了。
var a = "abc";
console.log( Object(a) );
// [String: 'abc']
到这里已经介绍很多知识了,让我们再来延伸一下,看看下面的代码能不能执行
var a = "abc";
var b = "def";
Object.assign(a, b);
答案是否定的,会提示以下错误。
TypeError: Cannot assign to read only property '0' of object '[object String]'
原因在于 Object("abc") 时,其属性描述符为不可写,即writable: false。
var myObject = Object( "abc" );

Object.getOwnPropertyNames( myObject );
// [ '0', '1', '2', 'length' ]

Object.getOwnPropertyDescriptor(myObject, "0");
// {
//   value: 'a',
//   writable: false, // 注意这里
//   enumerable: true,
//   configurable: false
// }
同理,下面的代码也会报错。
var a = "abc";
var b = {
  0: "d"
};
Object.assign(a, b);
// TypeError: Cannot assign to read only property '0' of object '[object String]'
但是并不是说只要 writable: false就会报错,看下面的代码。
var myObject = Object('abc');

Object.getOwnPropertyDescriptor(myObject, '0');
// {
//   value: 'a',
//   writable: false, // 注意这里
//   enumerable: true,
//   configurable: false
// }

myObject[0] = 'd';
// 'd'

myObject[0];
// 'a'
这里并没有报错,原因在于 JS 对于不可写的属性值的修改静默失败(silently failed),在严格模式下才会提示错误。
'use strict'
var myObject = Object('abc');

myObject[0] = 'd';
// TypeError: Cannot assign to read only property '0' of object '[object String]'
所以我们在模拟实现 Object.assign 时需要使用严格模式。
注意4:存在性
var anotherObject = {
    a: 1
};

// 创建一个关联到 anotherObject 的对象
var myObject = Object.create( anotherObject );
myObject.b = 2;

("a" in myObject); // true
("b" in myObject); // true

myObject.hasOwnProperty( "a" ); // false
myObject.hasOwnProperty( "b" ); // true
这边使用了in 操作符和 hasOwnProperty方法,区别如下(你不知道的JS上卷 P119):
1、in 操作符会检查属性是否在对象及其[[Prototype]] 原型链中。
2、hasOwnProperty(..)只会检查属性是否在 myObject 对象中,不会检查 [[Prototype]]原型链。
Object.assign方法肯定不会拷贝原型链上的属性,所以模拟实现时需要用 hasOwnProperty(..)判断处理下,但是直接使用 myObject.hasOwnProperty(..)是有问题的,因为有的对象可能没有连接到 Object.prototype上(比如通过 Object.create(null)来创建),这种情况下,使用 myObject.hasOwnProperty(..)就会失败。
var myObject = Object.create( null );
myObject.b = 2;

("b" in myObject);
// true

myObject.hasOwnProperty( "b" );
// TypeError: myObject.hasOwnProperty is not a function
解决方法也很简单,使用我们在【进阶3-3期】中介绍的call就可以了,使用如下。
var myObject = Object.create( null );
myObject.b = 2;

Object.prototype.hasOwnProperty.call(myObject, "b");
// true
所以具体到本次模拟实现中,相关代码如下。
// 使用 for..in 遍历对象 nextSource 获取属性值
// 此处会同时检查其原型链上的属性
for (var nextKey in nextSource) {
    // 使用 hasOwnProperty 判断对象 nextSource 中是否存在属性 nextKey
    // 过滤其原型链上的属性
    if (Object.prototype.hasOwnProperty.call(nextSource, nextKey)) {
        // 赋值给对象 to,并在遍历结束后返回对象 to
        to[nextKey] = nextSource[nextKey];
    }
}
实现一个深拷贝
先贴最终实现代码
// 判断是否对象或数据
function isObject(obj) {
	return typeof obj === 'object' && obj != null;
}
// 完善版本 (会遍历Symbol)
function cloneDeep4(source, hash = new WeakMap()) {

    if (!isObject(source)) return source;
    if (hash.has(source)) return hash.get(source);

    let target = Array.isArray(source) ? [] : {};
    hash.set(source, target);

  	Reflect.ownKeys(source).forEach(key => { // 改动
        if (isObject(source[key])) {
            target[key] = cloneDeep4(source[key], hash);
        } else {
            target[key] = source[key];
        }
  	});
    return target;
}


// 不考虑Symbol,
function cloneDeep3(source, hash = new WeakMap()) {

    if (!isObject(source)) return source;
    if (hash.has(source)) return hash.get(source); // 新增代码,查哈希表

    var target = Array.isArray(source) ? [] : {};
    hash.set(source, target); // 新增代码,哈希表设值

    for(var key in source) {
        if (Object.prototype.hasOwnProperty.call(source, key)) {
            if (isObject(source[key])) {
                target[key] = cloneDeep3(source[key], hash); // 新增代码,传入哈希表
            } else {
                target[key] = source[key];
            }
        }
    }
    return target;
}
测试案例
// 测试用例
var a = {
  name: 'muyiy',
  book: {
    title: "You Don't Know JS",
    price: '45'
  },
  a1: undefined,
  a2: null,
  a3: 123
}
a.circleRef = a

var b = cloneDeep(a)

a.name = '高级前端进阶'
a.book.price = '55'

console.log(a)
console.log(b)
引言
上篇文章详细介绍了浅拷贝 Object.assign,并对其进行了模拟实现,在实现的过程中,介绍了很多基础知识。今天这篇文章我们来看看一道必会面试题,即如何实现一个深拷贝。本文会详细介绍对象、数组、循环引用、引用丢失、Symbol 和递归爆栈等情况下的深拷贝实践,欢迎阅读。
第一步:简单实现
其实深拷贝可以拆分成 2 步,浅拷贝 + 递归,浅拷贝时判断属性值是否是对象,如果是对象就进行递归操作,两个一结合就实现了深拷贝。
根据上篇文章内容,我们可以写出简单浅拷贝代码如下。
function cloneShallow(source) {
    var target = {};
    for (var key in source) {
        if (Object.prototype.hasOwnProperty.call(source, key)) {
            target[key] = source[key];
        }
    }
    return target;
}

// 测试用例
var a = {
    name: "muyiy",
    book: {
        title: "You Don't Know JS",
        price: "45"
    },
    a1: undefined,
    a2: null,
    a3: 123
}
var b = cloneShallow(a);

a.name = "高级前端进阶";
a.book.price = "55";

console.log(b);
// {
//   name: 'muyiy',
//   book: { title: 'You Don\'t Know JS', price: '55' },
//   a1: undefined,
//   a2: null,
//   a3: 123
// }
上面代码是浅拷贝实现,只要稍微改动下,加上是否是对象的判断并在相应的位置使用递归就可以实现简单深拷贝。
function cloneDeep1(source) {
    var target = {};
    for(var key in source) {
        if (Object.prototype.hasOwnProperty.call(source, key)) {
            if (typeof source[key] === 'object') {
                target[key] = cloneDeep1(source[key]); // 注意这里
            } else {
                target[key] = source[key];
            }
        }
    }
    return target;
}

// 使用上面测试用例测试一下
var b = cloneDeep1(a);
console.log(b);
// {
//   name: 'muyiy',
//   book: { title: 'You Don\'t Know JS', price: '45' },
//   a1: undefined,
//   a2: {},
//   a3: 123
// }
一个简单的深拷贝就完成了,但是这个实现还存在很多问题。
-
1、没有对传入参数进行校验,传入
null时应该返回null而不是{} -
2、对于对象的判断逻辑不严谨,因为
typeof null === 'object' -
3、没有考虑数组的兼容
第二步:拷贝数组
我们来看下对于对象的判断,之前在【进阶3-3期】有过介绍,判断方案如下。
function isObject(obj) {
    return Object.prototype.toString.call(obj) === '[object Object]';
}
但是用在这里并不合适,因为我们要保留数组这种情况,所以这里使用typeof来处理。
typeof null //"object"
typeof {} //"object"
typeof [] //"object"
typeof function foo(){} //"function" (特殊情况)
改动过后的 isObject 判断逻辑如下。
function isObject(obj) {
	return typeof obj === 'object' && obj != null;
}
所以兼容数组的写法如下。
function cloneDeep2(source) {

    if (!isObject(source)) return source; // 非对象返回自身

    var target = Array.isArray(source) ? [] : {};
    for(var key in source) {
        if (Object.prototype.hasOwnProperty.call(source, key)) {
            if (isObject(source[key])) {
                target[key] = cloneDeep2(source[key]); // 注意这里
            } else {
                target[key] = source[key];
            }
        }
    }
    return target;
}

// 使用上面测试用例测试一下
var b = cloneDeep2(a);
console.log(b);
// {
//   name: 'muyiy',
//   book: { title: 'You Don\'t Know JS', price: '45' },
//   a1: undefined,
//   a2: null,
//   a3: 123
// }
第三步:循环引用
我们知道 JSON无法深拷贝循环引用,遇到这种情况会抛出异常。
// 此处 a 是文章开始的测试用例
a.circleRef = a;

JSON.parse(JSON.stringify(a));
// TypeError: Converting circular structure to JSON
1、使用哈希表
解决方案很简单,其实就是循环检测,我们设置一个数组或者哈希表存储已拷贝过的对象,当检测到当前对象已存在于哈希表中时,取出该值并返回即可。
function cloneDeep3(source, hash = new WeakMap()) {

    if (!isObject(source)) return source;
    if (hash.has(source)) return hash.get(source); // 新增代码,查哈希表

    var target = Array.isArray(source) ? [] : {};
    hash.set(source, target); // 新增代码,哈希表设值

    for(var key in source) {
        if (Object.prototype.hasOwnProperty.call(source, key)) {
            if (isObject(source[key])) {
                target[key] = cloneDeep3(source[key], hash); // 新增代码,传入哈希表
            } else {
                target[key] = source[key];
            }
        }
    }
    return target;
}
测试一下,看看效果如何。
// 此处 a 是文章开始的测试用例
a.circleRef = a;

var b = cloneDeep3(a);
console.log(b);
// {
// 	name: "muyiy",
// 	a1: undefined,
//	a2: null,
// 	a3: 123,
// 	book: {title: "You Don't Know JS", price: "45"},
// 	circleRef: {name: "muyiy", book: {…}, a1: undefined, a2: null, a3: 123, …}
// }
2、使用数组
这里使用了ES6 中的 WeakMap 来处理,那在 ES5 下应该如何处理呢?
也很简单,使用数组来处理就好啦,代码如下。
function cloneDeep3(source, uniqueList) {

    if (!isObject(source)) return source;
    if (!uniqueList) uniqueList = []; // 新增代码,初始化数组

    var target = Array.isArray(source) ? [] : {};

    // ============= 新增代码
    // 数据已经存在,返回保存的数据
    var uniqueData = find(uniqueList, source);
    if (uniqueData) {
        return uniqueData.target;
    };

    // 数据不存在,保存源数据,以及对应的引用
    uniqueList.push({
        source: source,
        target: target
    });
    // =============

    for(var key in source) {
        if (Object.prototype.hasOwnProperty.call(source, key)) {
            if (isObject(source[key])) {
                target[key] = cloneDeep3(source[key], uniqueList); // 新增代码,传入数组
            } else {
                target[key] = source[key];
            }
        }
    }
    return target;
}

// 新增方法,用于查找
function find(arr, item) {
    for(var i = 0; i < arr.length; i++) {
        if (arr[i].source === item) {
            return arr[i];
        }
    }
    return null;
}

// 用上面测试用例已测试通过
现在已经很完美的解决了循环引用这种情况,那其实还是一种情况是引用丢失,我们看下面的例子。
var obj1 = {};
var obj2 = {a: obj1, b: obj1};

obj2.a === obj2.b;
// true

var obj3 = cloneDeep2(obj2);
obj3.a === obj3.b;
// false
引用丢失在某些情况下是有问题的,比如上面的对象 obj2,obj2 的键值 a 和 b 同时引用了同一个对象 obj1,使用 cloneDeep2 进行深拷贝后就丢失了引用关系变成了两个不同的对象,那如何处理呢。
其实你有没有发现,我们的 cloneDeep3 已经解决了这个问题,因为只要存储已拷贝过的对象就可以了。
var obj3 = cloneDeep3(obj2);
obj3.a === obj3.b;
// true
第四步:拷贝 Symbol
这个时候可能要搞事情了,那我们能不能拷贝 Symol 类型呢?
当然可以,不过 Symbol在ES6 下才有,我们需要一些方法来检测出Symble 类型。
方法一:Object.getOwnPropertySymbols(...)
方法二:Reflect.ownKeys(...)
对于方法一可以查找一个给定对象的符号属性时返回一个 ?symbol类型的数组。注意,每个初始化的对象都是没有自己的 symbol属性的,因此这个数组可能为空,除非你已经在对象上设置了 symbol 属性。(来自MDN)
var obj = {};
var a = Symbol("a"); // 创建新的symbol类型
var b = Symbol.for("b"); // 从全局的symbol注册?表设置和取得symbol

obj[a] = "localSymbol";
obj[b] = "globalSymbol";

var objectSymbols = Object.getOwnPropertySymbols(obj);

console.log(objectSymbols.length); // 2
console.log(objectSymbols)         // [Symbol(a), Symbol(b)]
console.log(objectSymbols[0])      // Symbol(a)
对于方法二返回一个由目标对象自身的属性键组成的数组。它的返回值等同于Object.getOwnPropertyNames(target).concat(Object.getOwnPropertySymbols(target))。(来自MDN)
Reflect.ownKeys({z: 3, y: 2, x: 1}); // [ "z", "y", "x" ]
Reflect.ownKeys([]); // ["length"]

var sym = Symbol.for("comet");
var sym2 = Symbol.for("meteor");
var obj = {[sym]: 0, "str": 0, "773": 0, "0": 0,
           [sym2]: 0, "-1": 0, "8": 0, "second str": 0};
Reflect.ownKeys(obj);
// [ "0", "8", "773", "str", "-1", "second str", Symbol(comet), Symbol(meteor) ]
// 注意顺序
// Indexes in numeric order,
// strings in insertion order,
// symbols in insertion order
方法一
思路就是先查找有没有 Symbol属性,如果查找到则先遍历处理 Symbol 情况,然后再处理正常情况,多出来的逻辑就是下面的新增代码。
function cloneDeep4(source, hash = new WeakMap()) {

    if (!isObject(source)) return source;
    if (hash.has(source)) return hash.get(source);

    let target = Array.isArray(source) ? [] : {};
    hash.set(source, target);

    // ============= 新增代码
    let symKeys = Object.getOwnPropertySymbols(source); // 查找
    if (symKeys.length) { // 查找成功
        symKeys.forEach(symKey => {
            if (isObject(source[symKey])) {
                target[symKey] = cloneDeep4(source[symKey], hash);
            } else {
                target[symKey] = source[symKey];
            }
        });
    }
    // =============

    for(let key in source) {
        if (Object.prototype.hasOwnProperty.call(source, key)) {
            if (isObject(source[key])) {
                target[key] = cloneDeep4(source[key], hash);
            } else {
                target[key] = source[key];
            }
        }
    }
    return target;
}
测试下效果
// 此处 a 是文章开始的测试用例
var sym1 = Symbol("a"); // 创建新的symbol类型
var sym2 = Symbol.for("b"); // 从全局的symbol注册?表设置和取得symbol

a[sym1] = "localSymbol";
a[sym2] = "globalSymbol";

var b = cloneDeep4(a);
console.log(b);
// {
// 	name: "muyiy",
// 	a1: undefined,
//	a2: null,
// 	a3: 123,
// 	book: {title: "You Don't Know JS", price: "45"},
// 	circleRef: {name: "muyiy", book: {…}, a1: undefined, a2: null, a3: 123, …},
//  [Symbol(a)]: 'localSymbol',
//  [Symbol(b)]: 'globalSymbol'
// }
方法二
function cloneDeep4(source, hash = new WeakMap()) {

    if (!isObject(source)) return source;
    if (hash.has(source)) return hash.get(source);

    let target = Array.isArray(source) ? [] : {};
    hash.set(source, target);

  	Reflect.ownKeys(source).forEach(key => { // 改动
        if (isObject(source[key])) {
            target[key] = cloneDeep4(source[key], hash);
        } else {
            target[key] = source[key];
        }
  	});
    return target;
}

// 测试已通过function cloneDeep4(source, hash = new WeakMap()) {

    if (!isObject(source)) return source;
    if (hash.has(source)) return hash.get(source);

    let target = Array.isArray(source) ? [] : {};
    hash.set(source, target);

  	Reflect.ownKeys(source).forEach(key => { // 改动
        if (isObject(source[key])) {
            target[key] = cloneDeep4(source[key], hash);
        } else {
            target[key] = source[key];
        }
  	});
    return target;
}

// 测试已通过
这里使用了 Reflect.ownKeys()获取所有的键值,同时包括 Symbol,对 source遍历赋值即可。
写到这里已经差不多了,我们再延伸下,对于target换一种写法,改动如下。
function cloneDeep4(source, hash = new WeakMap()) {

    if (!isObject(source)) return source;
    if (hash.has(source)) return hash.get(source);

    let target = Array.isArray(source) ? [...source] : { ...source }; // 改动 1
    hash.set(source, target);

  	Reflect.ownKeys(target).forEach(key => { // 改动 2
        if (isObject(source[key])) {
            target[key] = cloneDeep4(source[key], hash);
        } else {
            target[key] = source[key];
        }
  	});
    return target;
}

// 测试已通过
在改动 1 中,返回一个新数组或者新对象,获取到源对象之后就可以如改动 2 所示传入 target 遍历赋值即可。
Reflect.ownKeys()这种方式的问题在于不能深拷贝原型链上的数据,因为返回的是目标对象自身的属性键组成的数组。如果想深拷贝原型链上的数据怎么办,那用for..in 就可以了。
拓展
我们再介绍下两个知识点,分别是构造字面量数组时使用展开语法和构造字面量对象时使用展开语法。(以下代码示例来源于 MDN)
1、展开语法之字面量数组
这是ES2015 (ES6) 才有的语法,可以通过字面量方式, 构造新数组,而不再需要组合使用push, splice, concat 等方法。`
var parts = ['shoulders', 'knees'];
var lyrics = ['head', ...parts, 'and', 'toes'];
// ["head", "shoulders", "knees", "and", "toes"]
这里的使用方法和参数列表的展开有点类似。
function myFunction(v, w, x, y, z) { }
var args = [0, 1];
myFunction(-1, ...args, 2, ...[3]);
返回的是新数组,对新数组修改之后不会影响到旧数组,类似于 arr.slice()。
var arr = [1, 2, 3];
var arr2 = [...arr]; // like arr.slice()
arr2.push(4);

// arr2 此时变成 [1, 2, 3, 4]
// arr 不受影响
展开语法和Object.assign()行为一致, 执行的都是浅拷贝(即只遍历一层)。
var a = [[1], [2], [3]];
var b = [...a];
b.shift().shift(); // 1
// [[], [2], [3]]
这里 a 是多层数组,b 只拷贝了第一层,对于第二层依旧和 a 持有同一个地址,所以对 b 的修改会影响到 a。
2、展开语法之字面量对象
这是 ES2018 才有的语法,将已有对象的所有可枚举属性拷贝到新构造的对象中,类似于Object.assign() 方法。
var obj1 = { foo: 'bar', x: 42 };
var obj2 = { foo: 'baz', y: 13 };

var clonedObj = { ...obj1 };
// { foo: "bar", x: 42 }

var mergedObj = { ...obj1, ...obj2 };
// { foo: "baz", x: 42, y: 13 }
Object.assign() 函数会触发 setters,而展开语法不会。有时候不能替换或者模拟Object.assign()函数,因为会得到意想不到的结果,如下所示
var obj1 = { foo: 'bar', x: 42 };
var obj2 = { foo: 'baz', y: 13 };
const merge = ( ...objects ) => ( { ...objects } );

var mergedObj = merge ( obj1, obj2);
// { 0: { foo: 'bar', x: 42 }, 1: { foo: 'baz', y: 13 } }

var mergedObj = merge ( {}, obj1, obj2);
// { 0: {}, 1: { foo: 'bar', x: 42 }, 2: { foo: 'baz', y: 13 } }
这里实际上是将多个解构变为剩余参数( rest),然后再将剩余参数展开为字面量对象.
第五步:破解递归爆栈
上面四步使用的都是递归方法,但是有一个问题在于会爆栈,错误提示如下。
// RangeError: Maximum call stack size exceeded
那应该如何解决呢?其实我们使用循环就可以了,代码如下。
function cloneDeep5(x) {
    const root = {};

    // 栈
    const loopList = [
        {
            parent: root,
            key: undefined,
            data: x,
        }
    ];

    while(loopList.length) {
        // 广度优先
        const node = loopList.pop();
        const parent = node.parent;
        const key = node.key;
        const data = node.data;

        // 初始化赋值目标,key为undefined则拷贝到父元素,否则拷贝到子元素
        let res = parent;
        if (typeof key !== 'undefined') {
            res = parent[key] = {};
        }

        for(let k in data) {
            if (data.hasOwnProperty(k)) {
                if (typeof data[k] === 'object') {
                    // 下一次循环
                    loopList.push({
                        parent: res,
                        key: k,
                        data: data[k],
                    });
                } else {
                    res[k] = data[k];
                }
            }
        }
    }

    return root;
}
由于篇幅问题就不过多介绍了,详情请参考下面这篇文章。
