随着应用程序的不断升级,客户的需求不断增多,程序员不得不对自己的应用程序做出相应的修改,如果修改的内容较多,那么就必须找出一种简便方法,下面就为大家介绍一下在SilverLight 中左边导航栏TreeView 如何动态绑定 Xml 文件中的数据
1、准备工作,首先建立一个TreeViewData.xml文件,代码如下:
- <?xml version="1.0" encoding="utf-8" ?>
- <root>
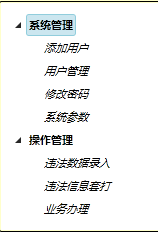
- <node name="系统管理">
- <node name="添加用户"/>
- <node name="用户管理"/>
- <node name="修改密码"/>
- <node name="系统参数"/>
- </node>
- <node name="操作管理">
- <node name="违法数据录入"/>
- <node name="违法信息套打" />
- <node name="业务办理" />
- </node>
- </root>
2、建立一个TreeViewLoadXmlTest.xaml文件并在其中添加如下代码:
- <navigation:Page x:Class="MySilverLight.TreeViewLoadXmlTest"
- xmlns="http://schemas.microsoft.com/winfx/2006/xaml/presentation"
- xmlns:x="http://schemas.microsoft.com/winfx/2006/xaml"
- xmlns:d="http://schemas.microsoft.com/expression/blend/2008"
- xmlns:mc="http://schemas.openxmlformats.org/markup-compatibility/2006"
- xmlns:common="clr-namespace:System.Windows;assembly=System.Windows.Controls"
- xmlns:controls="clr-namespace:System.Windows.Controls;assembly=System.Windows.Controls"
- mc:Ignorable="d"
- xmlns:navigation="clr-namespace:System.Windows.Controls;assembly=System.Windows.Controls.Navigation"
- d:DesignWidth="640" d:DesignHeight="480"
- Title="TreeViewLoadXmlTest Page">
- <Grid x:Name="LayoutRoot">
- <StackPanel Background="#ffc">
- <StackPanel.Resources>
- <common:HierarchicalDataTemplate
- x:Key="childTemplate"
- ItemsSource="{Binding Path=Children}">
- <StackPanel>
- <TextBlock Text="{Binding Path=Title}"
- FontStyle="Italic"/>
- </StackPanel>
- </common:HierarchicalDataTemplate>
- <common:HierarchicalDataTemplate
- x:Key="treeTemplate"
- ItemsSource="{Binding Path=Children}"
- ItemTemplate="{StaticResource childTemplate}">
- <TextBlock Text="{Binding Path=Title}"
- FontWeight="Bold"/>
- </common:HierarchicalDataTemplate>
- </StackPanel.Resources>
- <!--
- ItemsSource - 数据源
- ItemTemplate - 指定层级显示数据的模板
- -->
- <controls:TreeView x:Name="treeView" Margin="5"
- ItemsSource="{Binding}"
- ItemTemplate="{StaticResource treeTemplate}"
- SelectedItemChanged="treeView_SelectedItemChanged">
- </controls:TreeView>
- </StackPanel>
- </Grid>
- </navigation:Page>
值得注意的是,在写代码之前,需要在头部加上这样两句话:
xmlns:common="clr-namespace:System.Windows;assembly=System.Windows.Controls"
xmlns:controls="clr-namespace:System.Windows.Controls;assembly=System.Windows.Controls"
否则,在后面会提示common 和controls出错
3、接下来需要准备一个TreeViewModel.cs类,代码如下:
- namespace MySilverLight
- {
- public class TreeViewModel
- {
- public string Title { get; set; }
- public Uri Address { get; set; }
- public List<TreeViewModel> Children { get; set; }
- }
- }
在此需要引入using System.Collections.Generic;
4、打开后台代码文件TreeViewLoadXmlTest.xaml.cs ,代码如下:
- namespace MySilverLight
- {
- public partial class TreeViewLoadXmlTest : Page
- {
- public TreeViewLoadXmlTest()
- {
- InitializeComponent();
- this.Loaded += new RoutedEventHandler(TreeView_Loaded);
- }
-
- // 当用户导航到此页面时执行。
- protected override void OnNavigatedTo(NavigationEventArgs e)
- {
- }
- void TreeView_Loaded(object sender, RoutedEventArgs e)
- {
- XElement root = XElement.Load("TreeViewData.xml");
-
- // 构造带层级关系的数据源(递归方式)
- var result = LoadData(root);
-
- treeView.DataContext = result;
- }
- private List<TreeViewModel> LoadData(XElement root)
- {
- if (root == null)
- return null;
-
- var items = from n in root.Elements("node")
- select new TreeViewModel
- {
- Title = (string)n.Attribute("name"),
- Children = LoadData(n)
- };
-
- return items.ToList();
- }
- private void treeView_SelectedItemChanged(object sender, RoutedPropertyChangedEventArgs<object> e)
- {
- MessageBox.Show(((TreeViewModel)e.NewValue).Title);
- }
- }
- }
这里同样值得注意的是,需要引用命名空间,System.Xml.Linq;否则XElement会提示找不到;
直到这里,我们的工作基本上算是完成了,效果如下:
本文出自 “程序人生_意念” 博客,请务必保留此出处http://07180402.blog.51cto.com/3679519/987599