上一篇讲了配置文件形式的SpringAOP:Spring中的AOP以及切入点表达式和各种通知
本篇继续看一下注解形式怎么去理解和应用AOP
前几篇已经讲了不少AOP相关的知识,本篇不再赘述,直接用代码写一下注解形式的AOP
举的例子还是前几篇的例子,只不过是用注解的形式去用一下AOP
package com.cj.study.spring.aop.annotation;

public interface PersonService {

	public String savePerson();

	public void updatePerson();

	public void deletePerson();

}
package com.cj.study.spring.aop.annotation;

import org.springframework.stereotype.Repository;

//目标类
@Repository("personService")
public class PersonServiceImpl implements PersonService{

	//目标方法
	public String savePerson() {
		System.out.println("添加");
		return "保存成功!";
	}

	//目标方法
	public void updatePerson() {
		System.out.println("修改");
	}

	//目标方法
	public void deletePerson() {
		System.out.println("删除");
	}

}
package com.cj.study.spring.aop.annotation;

import org.aspectj.lang.annotation.After;
import org.aspectj.lang.annotation.Aspect;
import org.aspectj.lang.annotation.Before;
import org.aspectj.lang.annotation.Pointcut;
import org.springframework.stereotype.Component;

/**
 *
 *  @Aspect + @Pointcut()这两个注解就相当于之前配置文件里下边的内容
 *  <aop:config>
 *		<aop:pointcut expression="execution(* com.cj.study.spring.aop.*.*(..))" id="perform"/>
 *  </aop:config>
 *
 *  @Before()这个注解就相当于之前配置文件里
 *  <aop:aspect ref="myTransaction">
 *		<aop:before method="beginTransaction" pointcut-ref="perform"/>
 *	</aop:aspect>
 *
 * @author caoju
 *
 */
//切面类
@Component("myTransaction")
@Aspect
public class MyTransaction {

	//这个 aaa() 方法没有其他作用,仅仅是用它来标明一下切入点表达式
	@Pointcut("execution(* com.cj.study.spring.aop..*.*(..))")
	public void aaa(){

	}

	//切面里的通知方法
	@Before("aaa()")
	public void beginTransaction(){
		System.out.println("开启事务 ");
	}

	//切面里的通知方法
	@After("aaa()")
	public void commit(){
		System.out.println("提交事务");
	}

}
<?xml version="1.0" encoding="UTF-8"?>
<beans xmlns="http://www.springframework.org/schema/beans"
	xmlns:context="http://www.springframework.org/schema/context"
	xmlns:aop="http://www.springframework.org/schema/aop"
	xmlns:xsi="http://www.w3.org/2001/XMLSchema-instance"
	xsi:schemaLocation="http://www.springframework.org/schema/beans
           http://www.springframework.org/schema/beans/spring-beans-4.2.xsd
           http://www.springframework.org/schema/aop
           http://www.springframework.org/schema/aop/spring-aop-2.5.xsd
           http://www.springframework.org/schema/context
           http://www.springframework.org/schema/context/spring-context-2.5.xsd">

	<!-- 配置包扫描器,把目标类和切面类纳入到spring容器中管理 -->
	<context:component-scan base-package="com.cj.study.spring.aop.annotation" />

	<!-- 启动aop的注解解析器 -->
	<aop:aspectj-autoproxy></aop:aspectj-autoproxy>

</beans>
package com.cj.study.spring.aop.annotation;

import org.junit.Test;
import org.springframework.context.ApplicationContext;
import org.springframework.context.support.ClassPathXmlApplicationContext;

public class AopAnnodationTest {
	@Test
	public void test(){
		ApplicationContext context = new ClassPathXmlApplicationContext("com/cj/study/spring/aop/annotation/applicationContext.xml");
		PersonService proxyPersonService = (PersonService) context.getBean("personService");
		String returnValue = proxyPersonService.savePerson();
		System.out.println(returnValue);
	}
}
打断点看下返回的是否是代理类
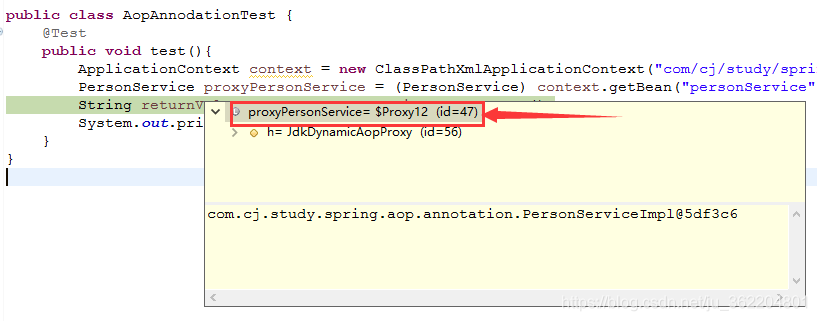
可以看到返回的是$Proxy,说明返回的是代理对象
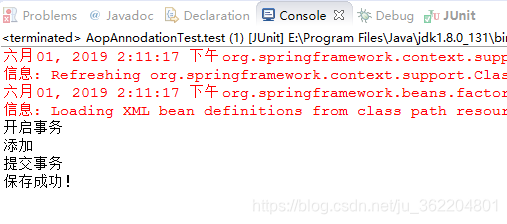
看下最后的结果
以上就是以注解的形式用了一下AOP
需要知道的是:不管是配置文件的形式还是注解的形式,他们两种实现的功能是一样的
注解形式的可能比配置文件更抽象一点,但是你要清楚它做的事情和配置文件做的是一样的,只是形式上有差别。注解可以对比着配置文件去理解,我已经在代码里进行了注释
不管是配置文件还是注解,最终都要用反射来实现,关于反射和注解,我之前的文章也写过
感兴趣的小可爱,可以自行参考
