1. 图片压缩相关概念
在android开发中,图片加载到内存中通常需要占用大量的内存,导致app性能过度消耗,严重的话可能会导致OOM异常,所以对图片进行优化就尤为重要。
android图片压缩的格式可以通过以下一张图进行概括,这张图摘自官方API文档:

对于各个参数的含义,通过以下一张表格总结一下
| ALPHA_8 | 每个像素存储为单个半透明(alpha)通道,占用1字节内存,用来存储遮罩非常有用 |
| ARGB_4444 | 每个像素占用2字节存储空间,由于在这个配置下的图片质量比较差,官方建议使用ARGB_8888,官方已提示ARGB_4444不推荐使用 |
| ARGB_8888 | 每个像素占用4字节存储空间,每个通道(A,R,G,B)都以8位精度进行存储,这种格式下图片质量最佳,官方推荐尽可能使用这种格式存储 |
| HARDWARE | 一种特殊的存储格式,当位图仅仅存储在图形内存中时,位图始终保持不变 |
| RGBA_F16 | 每个像素存储在8个字节上,很少用 |
| RGB_565 | 每个像素存储在2个字节上,没有透明度,只包括了红,绿,蓝三个通道,当使用不需要透明度图片时,可以使用该格式存储 |
android图片加载到内存,bitmap所占内存的大小可以由下列公式进行计算:
bitmap所占内存 = 图片分辨率 * 一个像素所占的字节数
上述公式其实是不严谨的,对于从SD卡,assests目录或者网络中加载图片所占用的内存,是可以通过上述的公式计算出来的。但是如果图片存储在res目录中,当图片加载进内存时,会经过一次分辨率的转换,然后在计算内存占用多少,这时图片的分辨率应该是转换之后的分辨率,而不是原图的分辨率。
这里只讨论常规图片压缩方式,图片都是存储在SD卡或者assests目录中,对于存储在res目录下的情况忽略。
bitmap的压缩方式主要有:
1. 采样率压缩
2. 缩放压缩
3. 质量压缩
4. 设置RGB_565
5. 使用createScaledBitmap
下面简单讨论下各种压缩方式
2. 采样率压缩
通过设置BitmapFactory.Options的inSampleSize参数,达到压缩图片的目的。该参数表示压缩为原图的几分之一,必须大于1,小于1按照1处理。
下面通过加载原图和设置inSampleSize来对比设置inSampleSize加载图片之后的效果。
把一张原图不经过压缩直接加载到内存中:
Bitmap bitmap =
BitmapFactory.decodeFile(Environment.getExternalStorageDirectory().getAbsolutePath() + "/compresstest/test.png");
if(bitmap != null) {
    String info = "原始图片大小: " + (bitmap.getByteCount()) + " 宽度: " + bitmap.getWidth() + " 高度: " + bitmap.getHeight();
    Log.v("sample", info);
    tvOrgin.setText(info);
    imgvOrgin.setImageBitmap(bitmap);
}
设置inSampleSize参数,加载一张图片到内存中:
BitmapFactory.Options options = new BitmapFactory.Options();
String str = edtvSample.getText().toString();
int sample = 2;
try {
    sample = Integer.parseInt(str);
} catch (Exception e) {
    Toast.makeText(this, "请输入有效数字内容", Toast.LENGTH_SHORT).show();
    e.printStackTrace();
    return ;
}
options.inSampleSize = sample;

Bitmap bitmap = BitmapFactory.decodeFile(Environment.getExternalStorageDirectory().getAbsolutePath() + "/compresstest/test.png", options);
if(bitmap != null) {
    String info = "压缩图片大小: " + (bitmap.getByteCount()) + " 宽度: " + bitmap.getWidth() + " 高度: " + bitmap.getHeight();
    Log.v("sample", info);
    tvCompress.setText(info);
    imgvCompress.setImageBitmap(bitmap);
}
其中inSampleSize通过界面动态设置,以此来查看不同inSampleSize加载图片的具体效果。
例如把inSampleSize设置成4,宽度和高度都变为了原来的1/4,图片内存整整缩小为原来的1/16。
![]()
下面是我测试的一张效果:
3. 缩放压缩
通过Martix变换,设置缩放值以此来达到图片压缩的目的。
Bitmap bitmap =
BitmapFactory.decodeFile(Environment.getExternalStorageDirectory().getAbsolutePath() + "/compresstest/test.png");
String strx = edtvSx.getText().toString();
String stry = edtvSy.getText().toString();

float sx = 0.5f;
float sy = 0.5f;
try {
    sx = Float.parseFloat(strx);
    sy = Float.parseFloat(stry);
} catch (Exception e) {
    Toast.makeText(this, "请输入有效数字内容", Toast.LENGTH_SHORT).show();
    e.printStackTrace();
    return ;
}
if(bitmap != null) {
    Matrix matrix = new Matrix();
    matrix.setScale(sx, sy);
    Bitmap newBitmap = Bitmap.createBitmap(bitmap, 0, 0, bitmap.getWidth(), bitmap.getHeight(), matrix, true);
    String info = " sx: " + sx + " sy: " + sy + " 压缩图片大小: " + (newBitmap.getByteCount()) + " 宽度为: " + newBitmap.getWidth() + " 高度为: " + newBitmap.getHeight();
    Log.v("martix", info);
    tvCompress.setText(info);
    imgvCompress.setImageBitmap(newBitmap);
}
把x,y缩放值分别设置成0.5f,可以看到压缩后的图片宽,高都是原图宽高的1/2,图片整体大小是原图的1/4.
![]()
效果图: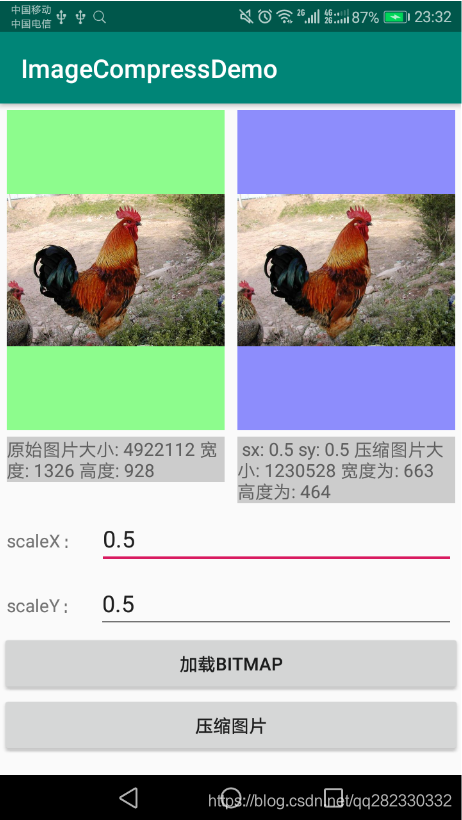
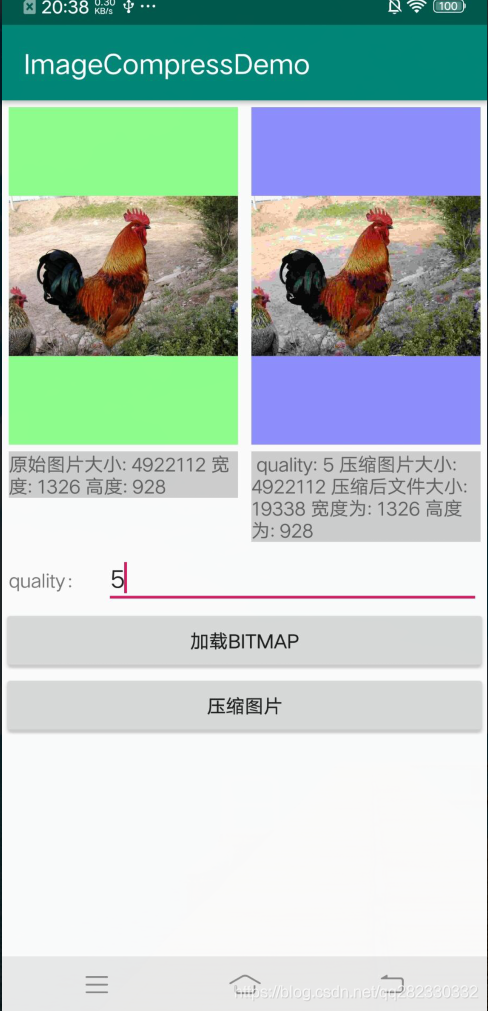
4. 质量压缩
质量压缩并不会减少bitmap占用的内存,bitmap的分辨率会和原图保持一致。质量压缩的原理是通过算法扣掉(同化)了 图片中的一些某个点附近相近的像素,以此介绍图片中的颜色数量,达到减少文件大小的目的。
质量压缩测试代码:
        Bitmap bitmap =
BitmapFactory.decodeFile(Environment.getExternalStorageDirectory().getAbsolutePath() + "/compresstest/test.png");
        ByteArrayOutputStream baos = new ByteArrayOutputStream();
        String str = edtvQuality.getText().toString();
        int quality = 100;
        try {
            quality = Integer.parseInt(str);
        } catch (Exception e) {
            Toast.makeText(this, "请输入有效数字内容", Toast.LENGTH_SHORT).show();
            e.printStackTrace();
            return ;
        }
        if(bitmap != null) {
//            bitmap.compress(Bitmap.CompressFormat.PNG, quality, baos); // 设置Bitmap.CompressFormat.PNG,quality将不起作用,PNG是无损压缩
            bitmap.compress(Bitmap.CompressFormat.JPEG, quality, baos);
            byte[] bytes = baos.toByteArray();
            Bitmap newBitmap = BitmapFactory.decodeByteArray(bytes, 0, bytes.length);
            String info = " quality: " + quality + " 压缩图片大小: " + (newBitmap.getByteCount()) + " 压缩后文件大小: " + (bytes.length) + " 宽度为: " + newBitmap.getWidth() + " 高度为: " + newBitmap.getHeight();
            Log.v("quality", info);
            tvCompress.setText(info);
            imgvCompress.setImageBitmap(newBitmap);
        }
关键代
码是:
bitmap.compress(Bitmap.CompressFormat.JPEG, quality, baos);其中quality是压缩质量,100表示保持最佳质量压缩效果,值越小表示压缩效果越差。
如果上述方法的CompressFormat参数设置成Bitmap.CompressFormat.PNG,那么后面的quality参数将会失效,无论怎样改变quality的值,压缩后的文件都不会改变这是因为PNG是无损压缩。
把quality设置成5,可以看下压缩效果:
![]()
效果图:
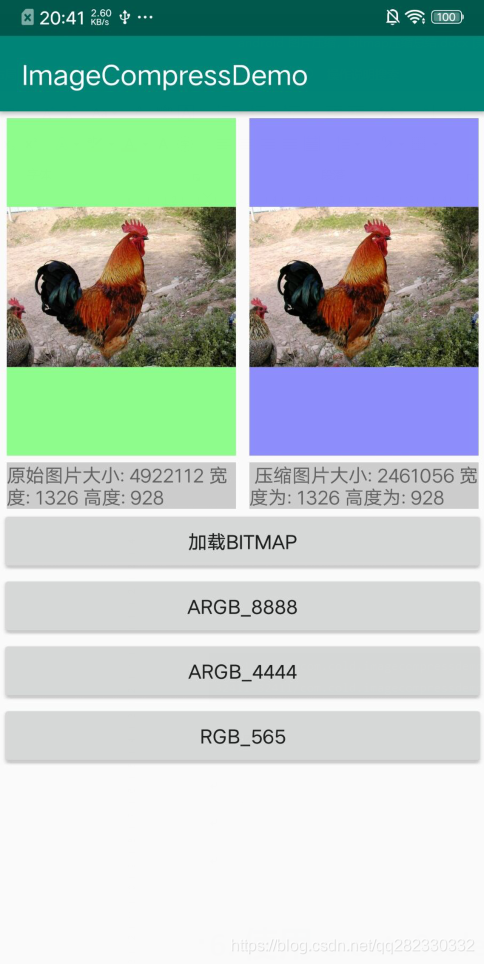
5. 设置RGB_565
设置RGB_565相比ARGB_8888减少了一半内存,这是因为RGB_565每个像素是2个字节存储的,但是bitmap的宽和高并不会改变。
BitmapFactory.Options options = new BitmapFactory.Options();
options.inPreferredConfig = config;
Bitmap bitmap = BitmapFactory.decodeFile(Environment.getExternalStorageDirectory().getAbsolutePath() + "/compresstest/test.png", options);
if(bitmap != null) {
    String info = " 压缩图片大小: " + (bitmap.getByteCount()) + " 宽度为: " + bitmap.getWidth() + " 高度为: " + bitmap.getHeight();
    Log.v("rgb", info);
    tvCompress.setText(info);
    imgvCompress.setImageBitmap(bitmap);
}
以下是使用RGB_565压缩的输出:

效果图:
6. 使用createScaledBitmap
使用createScaledBitmap()方法可以把图片压缩成用户期望任意尺寸的图片,如果期望尺寸和图片相差太大,会导致图片失真。
Bitmap bitmap =
BitmapFactory.decodeFile(Environment.getExternalStorageDirectory().getAbsolutePath() + "/compresstest/test.png");
String strx = edtvWidth.getText().toString();
String stry = edtvHeight.getText().toString();

int width = 200;
int height = 200;
try {
    width = Integer.parseInt(strx);
    height = Integer.parseInt(stry);
} catch (Exception e) {
    Toast.makeText(this, "请输入有效数字内容", Toast.LENGTH_SHORT).show();
    e.printStackTrace();
    return ;
}
if(bitmap != null) {
    Bitmap newBitmap = Bitmap.createScaledBitmap(bitmap, width, height, true);
    String info = " width: " + width + " height: " + height + " 压缩图片大小: " + (newBitmap.getByteCount()) + " 宽度为: " + newBitmap.getWidth() + " 高度为: " + newBitmap.getHeight();
    Log.v("scale", info);
    tvCompress.setText(info);
    imgvCompress.setImageBitmap(newBitmap);
}
把宽高设置成200之后的效果:
![]()
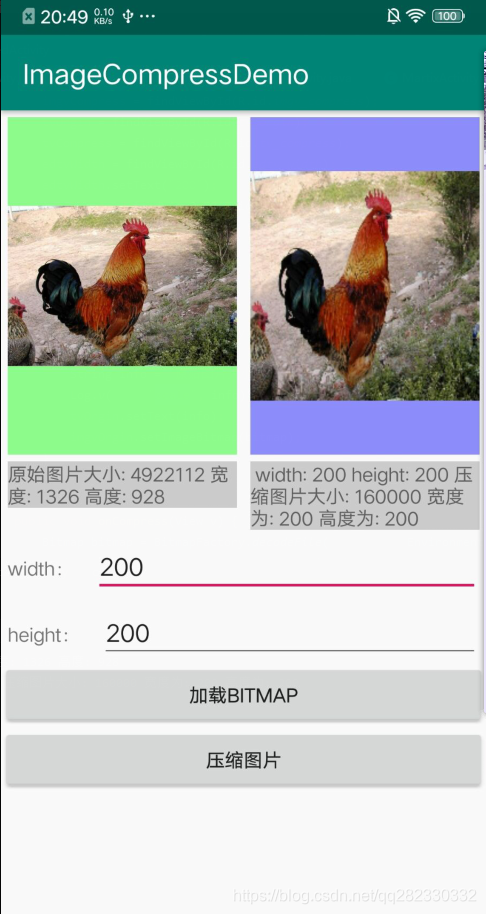
可以看到,如果不按比例进行缩放设置,图片是会拉伸,失真的。
本文的源码比较简单,就不上传了,需要的留下邮箱私发。
