Intercepting Win32 API calls has always been a challenging subject among most of the Windows developers and I have to admit, it's been one of my favorite topics. The term Hooking represents a fundamental technique of getting control over a particular piece of code execution. It provides an straightforward mechanism that can easily alter the operating system's behavior as well as 3rd party products, without having their source code available.
Many modern systems draw the attention to their ability to utilize existing Windows applications by employing spying techniques. A key motivation for hooking, is not only to contribute to advanced functionalities, but also to inject user-supplied code for debugging purposes.
Unlike some relatively "old" operating systems like DOS and Windows 3.xx, the present Windows OS as NT/2K and 9x provide sophisticated mechanisms to separate address spaces of each process. This architecture offers a real memory protection, thus no application is able to corrupt the address space of another process or in the worse case even to crash the operating system itself. This fact makes a lot harder the development of system-aware hooks.
My motivation for writing this article was the need for a really simple hooking framework, that will offer an easy to use interface and ability to capture different APIs. It intends to reveal some of the tricks that can help you to write your own spying system. It suggests a single solution how to build a set for hooking Win32 API functions on NT/2K as well as 98/Me (shortly named in the article 9x) family Windows. For the sake of simplicity I decided not to add a support do UNICODE. However, with some minor modifications of the code you could easily accomplish this task.
Spying of applications provides many advantages:
- API function's monitoring
The ability to control API function calls is extremely helpful and enables developers to track down specific "invisible" actions that occur during the API call. It contributes to comprehensive validation of parameters as well as reports problems that usually remain overlooked behind the scene. For instance sometimes, it might be very helpful to monitor memory related API functions for catching resource leaks. - Debugging and reverse engineering
Besides the standard methods for debugging API hooking has a deserved reputation for being one of the most popular debugging mechanisms. Many developers employ the API hooking technique in order to identify different component implementations and their relationships. API interception is very powerful way of getting information about a binary executable. - Peering inside operating system
Often developers are keen to know operating system in dept and are inspired by the role of being a "debugger". Hooking is also quite useful technique for decoding undocumented or poorly documented APIs. - Extending originally offered functionalities by embedding custom modules into external Windows applications Re-routing the normal code execution by injecting hooks can provide an easy way to change and extend existing module functionalities. For example many 3rd party products sometimes don't meet specific security requirements and have to be adjusted to your specific needs. Spying of applications allows developers to add sophisticated pre- and post-processing around the original API functions. This ability is an extremely useful for altering the behavior of the already compiled code.
Functional requirements of a hooking system
There are few important decisions that have to be made, before you start implementing any kind of API hooking system. First of all, you should determine whether to hook a single application or to install a system-aware engine. For instance if you would like to monitor just one application, you don't need to install a system-wide hook but if your job is to track down all calls toTerminateProcess() or WriteProcessMemory() the only way to do so is to have a system-aware hook. What approach you will choose depends on the particular situation and addresses specific problems.
General design of an API spying framework
Usually a Hook system is composed of at least two parts - a Hook Server and a Driver. The Hook Server is responsible for injecting the Driver into targeted processes at the appropriate moment. It also administers the driver and optionally can receive information from the Driver about its activities whereas the Driver module that performs the actual interception.
This design is rough and beyond doubt doesn't cover all possible implementations. However it outlines the boundaries of a hook framework.
Once you have the requirement specification of a hook framework, there are few design points you should take into account:
- What applications do you need to hook
- How to inject the DLL into targeted processes or which implanting technique to follow
- Which interception mechanism to use
I hope next the few sections will provide answers to those issues.
Injecting techniques
- Registry
In order to inject a DLL into processes that link with USER32.DLL, you simply can add the DLL name to the value of the following registry key:HKEY_LOCAL_MACHINE/Software/Microsoft/Windows NT/CurrentVersion/Windows/AppInit_DLLs
Its value contains a single DLL name or group of DLLs separated either by comma or spaces. According to MSDN documentation [7], all DLLs specified by the value of that key are loaded by each Windows-based application running within the current logon session. It is interesting that the actual loading of these DLLs occurs as a part of USER32's initialization. USER32 reads the value of mentioned registry key and calls
LoadLibrary()for these DLLs in itsDllMaincode. However this trick applies only to applications that use USER32.DLL. Another restriction is that this built-in mechanism is supported only by NT and 2K operating systems. Although it is a harmless way to inject a DLL into a Windows processes there are few shortcomings:- In order to activate/deactivate the injection process you have to reboot Windows.
- The DLL you want to inject will be mapped only into these processes that use USER32.DLL, thus you cannot expect to get your hook injected into console applications, since they usually don't import functions from USER32.DLL.
- On the other hand you don't have any control over the injection process. It means that it is implanted into every single GUI application, regardless you want it or not. It is a redundant overhead especially if you intend to hook few applications only. For more details see [2] "Injecting a DLL Using the Registry"
- System-wide Windows Hooks
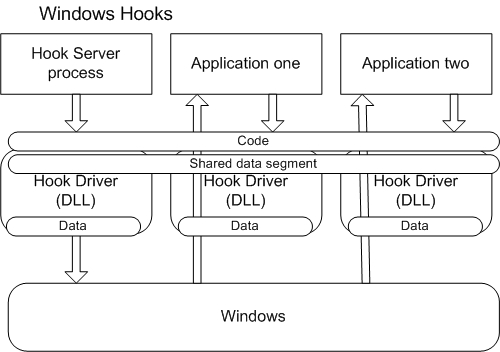
Certainly a very popular technique for injecting DLL into a targeted process relies on provided by Windows Hooks. As pointed out in MSDN a hook is a trap in the system message-handling mechanism. An application can install a custom filter function to monitor the message traffic in the system and process certain types of messages before they reach the target window procedure.A hook is normally implemented in a DLL in order to meet the basic requirement for system-wide hooks. The basic concept of that sort of hooks is that the hook callback procedure is executed in the address spaces of each hooked up process in the system. To install a hook you call
SetWindowsHookEx()with the appropriate parameters. Once the application installs a system-wide hook, the operating system maps the DLL into the address space in each of its client processes. Therefore global variables within the DLL will be "per-process" and cannot be shared among the processes that have loaded the hook DLL. All variables that contain shared data must be placed in a shared data section. The diagram bellow shows an example of a hook registered by Hook Server and injected into the address spaces named "Application one" and "Application two".Figure 1
A system-wide hook is registered just ones when
SetWindowsHookEx()is executed. If no error occurs a handle to the hook is returned. The returned value is required at the end of the custom hook function when a call toCallNextHookEx()has to be made. After a successful call toSetWindowsHookEx(), the operating system injects the DLL automatically (but not necessary immediately) into all processes that meet the requirements for this particular hook filter. Let's have a closer look at the following dummyWH_GETMESSAGEfilter function://--------------------------------------------------------------------------- // GetMsgProc // // Filter function for the WH_GETMESSAGE - it's just a dummy function //--------------------------------------------------------------------------- LRESULT CALLBACK GetMsgProc( int code, // hook code WPARAM wParam, // removal option LPARAM lParam // message ) { // We must pass the all messages on to CallNextHookEx. return ::CallNextHookEx(sg_hGetMsgHook, code, wParam, lParam); }
A system-wide hook is loaded by multiple processes that don't share the same address space.
For instance hook handle
sg_hGetMsgHook, that is obtained bySetWindowsHookEx()and is used as parameter inCallNextHookEx()must be used virtually in all address spaces. It means that its value must be shared among hooked processes as well as the Hook Server application. In order to make this variable "visible" to all processes we should store it in the shared data section.The following is an example of employing
#pragma data_seg(). Here I would like to mention that the data within the shared section must be initialized, otherwise the variables will be assigned to the default data segment and#pragma data_seg()will have no effect.//--------------------------------------------------------------------------- // Shared by all processes variables //--------------------------------------------------------------------------- #pragma data_seg(".HKT") HHOOK sg_hGetMsgHook = NULL; BOOL sg_bHookInstalled = FALSE; // We get this from the application who calls SetWindowsHookEx()'s wrapper HWND sg_hwndServer = NULL; #pragma data_seg()
You should add a SECTIONS statement to the DLL's DEF file as wellSECTIONS .HKT Read Write Shared
or use#pragma comment(linker, "/section:.HKT, rws")
Once a hook DLL is loaded into the address space of the targeted process, there is no way to unload it unless the Hook Server calls
UnhookWindowsHookEx()or the hooked application shuts down. When the Hook Server callsUnhookWindowsHookEx()the operating system loops through an internal list with all processes which have been forced to load the hook DLL. The operating system decrements the DLL's lock count and when it becomes 0, the DLL is automatically unmapped from the process's address space.Here are some of the advantages of this approach:
- This mechanism is supported by NT/2K and 9x Windows family and hopefully will be maintained by future Windows versions as well.
- Unlike the registry mechanism of injecting DLLs this method allows DLL to be unloaded when Hook Server decides that DLL is no longer needed and makes a call to
UnhookWindowsHookEx()
Although I consider Windows Hooks as very handy injection technique, it comes with its own disadvantages:
- Windows Hooks can degrade significantly the entire performance of the system, because they increase the amount of processing the system must perform for each message.
- It requires lot of efforts to debug system-wide Windows Hooks. However if you use more than one instance of VC++ running in the same time, it would simplify the debugging process for more complex scenarios.
- Last but not least, this kind of hooks affect the processing of the whole system and under certain circumstances (say a bug) you must reboot your machine in order to recover it.
- Injecting DLL by using
CreateRemoteThread()API function
Well, this is my favorite one. Unfortunately it is supported only by NT and Windows 2K operating systems. It is bizarre, that you are allowed to call (link with) this API on Win 9x as well, but it just returnsNULLwithout doing anything.Injecting DLLs by remote threads is Jeffrey Ritcher's idea and is well documented in his article [9] "Load Your 32-bit DLL into Another Process's Address Space Using INJLIB".
The basic concept is quite simple, but very elegant. Any process can load a DLL dynamically using
LoadLibrary()API. The issue is how do we force an external process to callLoadLibrary()on our behalf, if we don't have any access to process's threads? Well, there is a function, calledCreateRemoteThread()that addresses creating a remote thread. Here comes the trick - have a look at the signature of thread function, whose pointer is passed as parameter (i.e.LPTHREAD_START_ROUTINE) to theCreateRemoteThread():DWORD WINAPI ThreadProc(LPVOID lpParameter);
And here is the prototype ofLoadLibraryAPIHMODULE WINAPI LoadLibrary(LPCTSTR lpFileName);
Yes, they do have "identical" pattern. They use the same calling conventionWINAPI, they both accept one parameter and the size of returned value is the same. This match gives us a hint that we can useLoadLibrary()as thread function, which will be executed after the remote thread has been created. Let's have a look at the following sample code:hThread = ::CreateRemoteThread( hProcessForHooking, NULL, 0, pfnLoadLibrary, "C://HookTool.dll", 0, NULL);
By usingGetProcAddress()API we get the address of theLoadLibrary()API. The dodgy thing here is that Kernel32.DLL is mapped always to the same address space of each process, thus the address ofLoadLibrary()function has the same value in address space of any running process. This ensures that we pass a valid pointer (i.e.pfnLoadLibrary) as parameter ofCreateRemoteThread().As parameter of the thread function we use the full path name of the DLL, casting it to
LPVOID. When the remote thread is resumed, it passes the name of the DLL to the ThreadFunction (i.e.LoadLibrary). That's the whole trick with regard to using remote threads for injection purposes.There is an important thing we should consider, if implanting through
CreateRemoteThread()API. Every time before the injector application operate on the virtual memory of the targeted process and makes a call toCreateRemoteThread(), it first opens the process usingOpenProcess()API and passesPROCESS_ALL_ACCESSflag as parameter. This flag is used when we want to get maximum access rights to this process. In this scenarioOpenProcess()will returnNULLfor some of the processes with low ID number. This error (although we use a valid process ID) is caused by not running under security context that has enough permissions. If you think for a moment about it, you will realize that it makes perfect sense. All those restricted processes are part of the operating system and a normal application shouldn't be allowed to operate on them. What would happen if some application has a bug and accidentally attempts to terminate an operating system's process? To prevent the operating system from that kind of eventual crashes, it is required that a given application must have sufficient privileges to execute APIs that might alter operating system behavior. To get access to the system resources (e.g. smss.exe, winlogon.exe, services.exe, etc) throughOpenProcess()invocation, you must be granted the debug privilege. This ability is extremely powerful and offers a way to access the system resources, that are normally restricted. Adjusting the process privileges is a trivial task and can be described with the following logical operations:- Open the process token with permissions needed to adjust privileges
- Given a privilege's name "
SeDebugPrivilege", we should locate its local LUID mapping. The privileges are specified by name and can be found in Platform SDK file winnt.h - Adjust the token in order to enable the "
SeDebugPrivilege"privilege by callingAdjustTokenPrivileges()API - Close obtained by
OpenProcessToken()process token handle
- Implanting through BHO add-ins
Sometimes you will need to inject a custom code inside Internet Explorer only. Fortunately Microsoft provides an easy and well documented way for this purpose - Browser Helper Objects. A BHO is implemented as COM DLL and once it is properly registered, each time when IE is launched it loads all COM components that have implementedIObjectWithSiteinterface. - MS Office add-ins
Similarly, to the BHOs, if you need to implant in MS Office applications code of your own, you can take the advantage of provided standard mechanism by implementing MS Office add-ins. There are many available samples that show how to implement this kind of add-ins.
Interception mechanisms
Injecting a DLL into the address space of an external process is a key element of a spying system. It provides an excellent opportunity to have a control over process's thread activities. However it is not sufficient to have the DLL injected if you want to intercept API function calls within the process.
This part of the article intends to make a brief review of several available real-world hooking aspects. It focuses on the basic outline for each one of them, exposing their advantages and disadvantages.
In terms of the level where the hook is applied, there are two mechanisms for API spying - Kernel level and User level spying. To get better understanding of these two levels you must be aware of the relationship between the Win32 subsystem API and the Native API. Following figure demonstrates where the different hooks are set and illustrates the module relationships and their dependencies on Windows 2K:
Figure 2
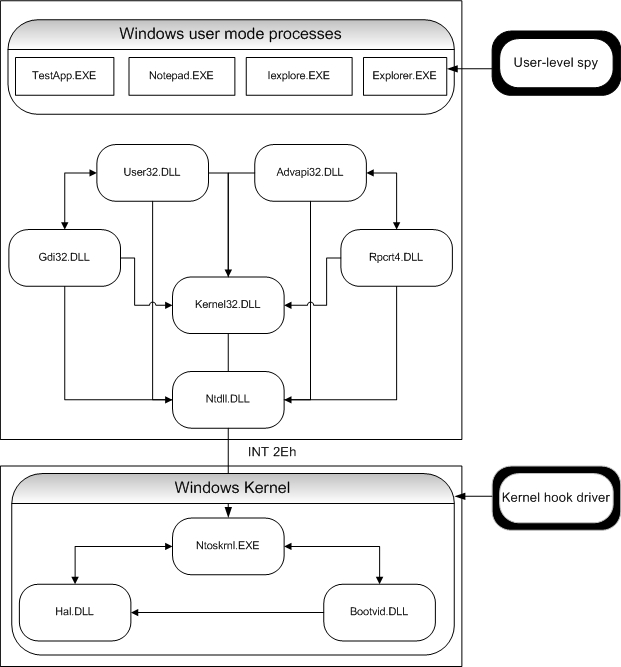
The major implementation difference between them is that interceptor engine for kernel-level hooking is wrapped up as a kernel-mode driver, whereas user-level hooking usually employs user-mode DLL.
- NT Kernel level hooking
There are several methods for achieving hooking of NT system services in kernel mode. The most popular interception mechanism was originally demonstrated by Mark Russinovich and Bryce Cogswell in their article [3] "Windows NT System-Call Hooking". Their basic idea is to inject an interception mechanism for monitoring NT system calls just bellow the user mode. This technique is very powerful and provides an extremely flexible method for hooking the point that all user-mode threads pass through before they are serviced by the OS kernel.You can find an excellent design and implementation in "Undocumented Windows 2000 Secrets" as well. In his great book Sven Schreiber explains how to build a kernel-level hooking framework from scratch [5].
Another comprehensive analysis and brilliant implementation has been provided by Prasad Dabak in his book "Undocumented Windows NT" [17].
However, all these hooking strategies, remain out of the scope of this article.
- Win32 User level hooking
- Windows subclassing.
This method is suitable for situations where the application's behavior might be changed by new implementation of the window procedure. To accomplish this task you simply callSetWindowLongPtr()withGWLP_WNDPROCparameter and pass the pointer to your own window procedure. Once you have the new subclass procedure set up, every time when Windows dispatches a message to a specified window, it looks for the address of the window's procedure associated with the particular window and calls your procedure instead of the original one.The drawback of this mechanism is that subclassing is available only within the boundaries of a specific process. In other words an application should not subclass a window class created by another process.
Usually this approach is applicable when you hook an application through add-in (i.e. DLL / In-Proc COM component) and you can obtain the handle to the window whose procedure you would like to replace.
For example, some time ago I wrote a simple add-in for IE (Browser Helper Object) that replaces the original pop-up menu provided by IE using subclassing.
- Proxy DLL (Trojan DLL)
An easy way for hacking API is just to replace a DLL with one that has the same name and exports all the symbols of the original one. This technique can be effortlessly implemented using function forwarders. A function forwarder basically is an entry in the DLL's export section that delegates a function call to another DLL's function.You can accomplish this task by simply using
#pragma comment:#pragma comment(linker, "/export:DoSomething=DllImpl.ActuallyDoSomething")
However, if you decide to employ this method, you should take the responsibility of providing compatibilities with newer versions of the original library. For more details see [13a] section "Export forwarding" and [2] "Function Forwarders".
- Code overwriting
There are several methods that are based on code overwriting. One of them changes the address of the function used by CALL instruction. This method is difficult, and error prone. The basic idea beneath is to track down all CALL instructions in the memory and replace the addresses of the original function with user supplied one.Another method of code overwriting requires a more complicated implementation. Briefly, the concept of this approach is to locate the address of the original API function and to change first few bytes of this function with a JMP instruction that redirects the call to the custom supplied API function. This method is extremely tricky and involves a sequence of restoring and hooking operations for each individual call. It's important to point out that if the function is in unhooked mode and another call is made during that stage, the system won't be able to capture that second call.
The major problem is that it contradicts with the rules of a multithreaded environment.However, there is a smart solution that solves some of the issues and provides a sophisticated way for achieving most of the goals of an API interceptor. In case you are interested you might peek at [12] Detours implementation.
- Spying by a debugger
An alternative to hooking API functions is to place a debugging breakpoint into the target function. However there are several drawbacks for this method. The major issue with this approach is that debugging exceptions suspend all application threads. It requires also a debugger process that will handle this exception. Another problem is caused by the fact that when the debugger terminates, the debugger is automatically shut down by Windows. - Spying by altering of the Import Address Table
This technique was originally published by Matt Pietrek and than elaborated by Jeffrey Ritcher ([2] "API Hooking by Manipulating a Module's Import Section") and John Robbins ([4] "Hooking Imported Functions"). It is very robust, simple and quite easy to implement. It also meets most of the requirements of a hooking framework that targets Windows NT/2K and 9x operating systems. The concept of this technique relies on the elegant structure of the Portable Executable (PE) Windows file format. To understand how this method works, you should be familiar with some of the basics behind PE file format, which is an extension of Common Object File Format (COFF). Matt Pietrek reveals the PE format in details in his wonderful articles - [6] "Peering Inside the PE.", and [13a/b] "An In-Depth Look into the Win32 PE file format". I will give you a brief overview of the PE specification, just enough to get the idea of hooking by manipulation of the Import Address Table.In general an PE binary file is organized, so that it has all code and data sections in a layout that conform to the virtual memory representation of an executable. PE file format is composed of several logical sections. Each of them maintains specific type of data and addresses particular needs of the OS loader.
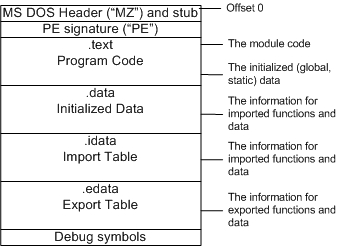
The section
.idata, I would like to focus your attention on, contains information about Import Address Table. This part of the PE structure is particularly very crucial for building a spy program based on altering IAT.
Each executable that conforms with PE format has layout roughly described by the figure below.Figure 3
The program loader is responsible for loading an application along with all its linked DLLs into the memory. Since the address where each DLL is loaded into, cannot be known in advance, the loader is not able to determine the actual address of each imported function. The loader must perform some extra work to ensure that the program will call successfully each imported function. But going through each executable image in the memory and fixing up the addresses of all imported functions one by one would take unreasonable amount of processing time and cause huge performance degradation. So, how does the loader resolves this challenge? The key point is that each call to an imported function must be dispatched to the same address, where the function code resides into the memory. Each call to an imported function is in fact an indirect call, routed through IAT by an indirect JMP instruction. The benefit of this design is that the loader doesn't have to search through the whole image of the file. The solution appears to be quite simple - it just fixes-up the addresses of all imports inside the IAT. Here is an example of a snapshot PE File structure of a simple Win32 Application, taken with the help of the [8] PEView utility. As you can see TestApp import table contains two imported by GDI32.DLL function -
TextOutA()andGetStockObject().Figure 4
Actually the hooking process of an imported function is not that complex as it looks at first sight. In a nutshell an interception system that uses IAT patching has to discover the location that holds the address of imported function and replace it with the address of an user supplied function by overwriting it. An important requirement is that the newly provided function must have exactly the same signature as the original one. Here are the logical steps of a replacing cycle: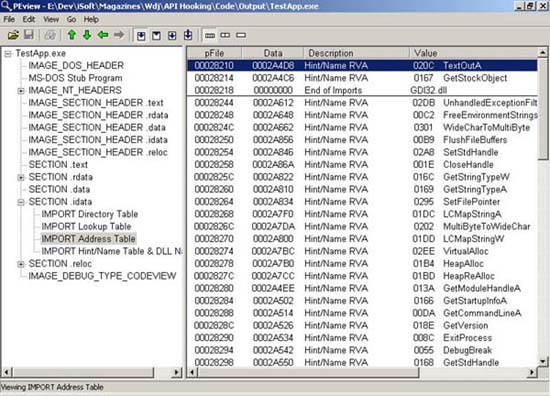
- Locate the import section from the IAT of each loaded by the process DLL module as well as the process itself
- Find the
IMAGE_IMPORT_DESCRIPTORchunk of the DLL that exports that function. Practically speaking, usually we search this entry by the name of the DLL - Locate the
IMAGE_THUNK_DATAwhich holds the original address of the imported function - Replace the function address with the user supplied one
By changing the address of the imported function inside the IAT, we ensure that all calls to the hooked function will be re-routed to the function interceptor.Replacing the pointer inside the IAT is that
.idatasection doesn't necessarily have to be a writable section. This requires that we must ensure that.idatasection can be modified. This task can be accomplished by usingVirtualProtect()API.Another issue that deserves attention is related to the
GetProcAddress()API behavior on Windows 9x system. When an application calls this API outside the debugger it returns a pointer to the function. However if you call this function within from the debugger it actually returns different address than it would when the call is made outside the debugger. It is caused by the fact that that inside the debugger each call toGetProcAddress()returns a wrapper to the real pointer. Returned byGetProcAddress()value points toPUSHinstruction followed by the actual address. This means that on Windows 9x when we loop through the thunks, we must check whether the address of examined function is aPUSHinstruction (0x68 on x86 platforms) and accordingly get the proper value of the address function.Windows 9x doesn't implement copy-on-write, thus operating system attempts to keep away the debuggers from stepping into functions above the 2-GB frontier. That is the reason why
GetProcAddress()returns a debug thunk instead of the actual address. John Robbins discusses this problem in [4] "Hooking Imported Functions".
- Windows subclassing.
Figuring out when to inject the hook DLL
That section reveals some challenges that are faced by developers when the selected injection mechanism is not part of the operating system's functionality. For example, performing the injection is not your concern when you use built-in Windows Hooks in order to implant a DLL. It is an OS's responsibility to force each of those running processes that meet the requirements for this particular hook, to load the DLL [18]. In fact Windows keeps track of all newly launched processes and forces them to load the hook DLL. Managing injection through registry is quite similar to Windows Hooks. The biggest advantage of all those "built-in" methods is that they come as part of the OS.
Unlike the discussed above implanting techniques, to inject by CreateRemoteThread() requires maintenance of all currently running processes. If the injecting is made not on time, this can cause the Hook System to miss some of the calls it claims as intercepted. It is crucial that the Hook Server application implements a smart mechanism for receiving notifications each time when a new process starts or shuts down. One of the suggested methods in this case, is to interceptCreateProcess() API family functions and monitor all their invocations. Thus when an user supplied function is called, it can call the originalCreateProcess() with dwCreationFlags OR-ed withCREATE_SUSPENDED flag. This means that the primary thread of the targeted application will be in suspended state, and the Hook Server will have the opportunity to inject the DLL by hand-coded machine instructions and resume the application using ResumeThread() API. For more details you might refer to [2] "Injecting Code withCreateProcess()".
The second method of detecting process execution, is based on implementing a simple device driver. It offers the greatest flexibility and deserves even more attention. Windows NT/2K provides a special functionPsSetCreateProcessNotifyRoutine() exported by NTOSKRNL. This function allows adding a callback function, that is called whenever a process is created or deleted. For more details see [11] and [15] from the reference section.
Enumerating processes and modules
Sometimes we would prefer to use injecting of the DLL by CreateRemoteThread() API, especially when the system runs under NT/2K. In this case when the Hook Server is started it must enumerate all active processes and inject the DLL into their address spaces. Windows 9x and Windows 2K provide a built-in implementation (i.e. implemented by Kernel32.dll) of Tool Help Library. On the other hand Windows NT uses for the same purpose PSAPI library. We need a way to allow the Hook Server to run and then to detect dynamically which process "helper" is available. Thus the system can determine which the supported library is, and accordingly to use the appropriate APIs.
I will present an object-oriented architecture that implements a simple framework for retrieving processes and modules under NT/2K and 9x [16]. The design of my classes allows extending the framework according to your specific needs. The implementation itself is pretty straightforward.
CTaskManager implements the system's processor. It is responsible for creating an instance of a specific library handler (i.e.CPsapiHandler or CToolhelpHandler) that is able to employ the correct process information provider library (i.e. PSAPI or ToolHelp32 respectively).CTaskManager is in charge of creating and marinating a container object that keeps a list with all currently active processes. After instantiating of theCTaskManager object the application calls Populate() method. It forces enumerating of all processes and DLL libraries and storing them into a hierarchy kept byCTaskManager's member m_pProcesses.
Following UML diagram shows the class relationships of this subsystem:
Figure 5
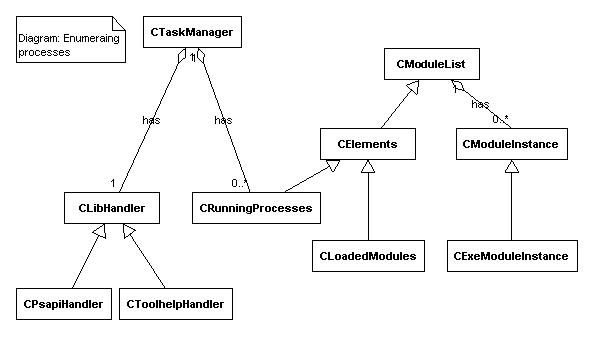
It is important to highlight the fact that NT's Kernel32.dll doesn't implement any of the ToolHelp32 functions. Therefore we must link them explicitly, using runtime dynamic linking. If we use static linking the code will fail to load on NT, regardless whether or not the application has attempted to execute any of those functions. For more details see my article"Single interface for enumerating processes and modules under NT and Win9x/2K.".
Requirements of the Hook Tool System
Now that I've made a brief introduction to the various concepts of the hooking process it's time to determine the basic requirements and explore the design of a particular hooking system. These are some of the issues addressed by the Hook Tool System:
- Provide a user-level hooking system for spying any Win32 API functions imported by name
- Provide the abilities to inject hook driver into all running processes by Windows hooks as well as
CreateRemoteThread()API. The framework should offer an ability to set this up by an INI file - Employ an interception mechanism based on the altering Import Address Table
- Present an object-oriented reusable and extensible layered architecture
- Offer an efficient and scalable mechanism for hooking API functions
- Meet performance requirements
- Provide a reliable communication mechanism for transferring data between the driver and the server
- Implement custom supplied versions of
TextOutA/W()andExitProcess()API functions - Log events to a file
- The system is implemented for x86 machines running Windows 9x, Me, NT or Windows 2K operating system
Design and implementation
This part of the article discusses the key components of the framework and how do they interact each other. This outfit is capable to capture any kind ofWINAPI imported by name functions.
Before I outline the system's design, I would like to focus your attention on several methods for injecting and hooking.
First and foremost, it is necessary to select an implanting method that will meet the requirements for injecting the DLL driver into all processes. So I designed an abstract approach with two injecting techniques, each of them applied accordingly to the settings in the INI file and the type of the operating system (i.e. NT/2K or 9x). They are - System-wide Windows Hooks andCreateRemoteThread() method. The sample framework offers the ability to inject the DLL on NT/2K by Windows Hooks as well as to implant byCreateRemoteThread() means. This can be determined by an option in the INI file that holds all settings of the system.
Another crucial moment is the choice of the hooking mechanism. Not surprisingly, I decided to apply altering IAT as an extremely robust method for Win32 API spying.
To achieve desired goals I designed a simple framework composed of the following components and files:
- TestApp.exe - a simple Win32 test application that just outputs a text using TextOut() API. The purpose of this app is to show how it gets hooked up.
- HookSrv.exe - control program
- HookTool .DLL - spy library implemented as Win32 DLL
- HookTool.ini - a configuration file
- NTProcDrv.sys - a tiny Windows NT/2K kernel-mode driver for monitoring process creation and termination. This component is optional and addresses the problem with detection of process execution under NT based systems only.
HookSrv is a simple control program. Its main role is to load the HookTool.DLL and then to activate the spying engine. After loading the DLL, the Hook Server callsInstallHook() function and passes a handle to a hidden windows where the DLL should post all messages to.
HookTool.DLL is the hook driver and the heart of presented spying system. It implements the actual interceptor and provides three user supplied functionsTextOutA/W() and ExitProcess() functions.
Although the article emphasizes on Windows internals and there is no need for it to be object-oriented, I decided to encapsulate related activities in reusable C++ classes. This approach provides more flexibility and enables the system to be extended. It also benefits developers with the ability to use individual classes outside this project.
Following UML class diagram illustrates the relationships between set of classes used in HookTool.DLL's implementation.
Figure 6
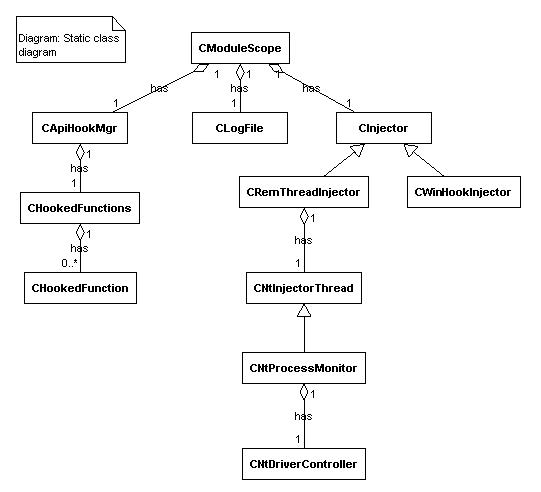
In this section of the article I would like to draw your attention to the class design of the HookTool.DLL. Assigning responsibilities to the classes is an important part of the development process. Each of the presented classes wraps up a specific functionality and represents a particular logical entity.
CModuleScope is the main doorway of the system. It is implemented using "Singleton" pattern and works in a thread-safe manner. Its constructor accepts 3 pointers to the data declared in the shared segment, that will be used by all processes. By this means the values of those system-wide variables can be maintained very easily inside the class, keeping the rule for encapsulation.
When an application loads the HookTool library, the DLL creates one instance ofCModuleScope on receiving DLL_PROCESS_ATTACH notification. This step just initializes the only instance ofCModuleScope. An important piece of the CModuleScope object construction is the creation of an appropriate injector object. The decision which injector to use will be made after parsing the HookTool.ini file and determining the value of UseWindowsHook parameter under [Scope] section. In case that the system is running under Windows 9x, the value of this parameter won't be examined by the system, because Window 9x doesn't support injecting by remote threads.
After instantiating of the main processor object, a call to ManageModuleEnlistment() method will be made. Here is a simplified version of its implementation:
// Called on DLL_PROCESS_ATTACH DLL notification
BOOL CModuleScope::ManageModuleEnlistment()
{
	BOOL bResult = FALSE;
	// Check if it is the hook server
	if (FALSE == *m_pbHookInstalled)
	{
		// Set the flag, thus we will know that the server has been installed
		*m_pbHookInstalled = TRUE;
		// and return success error code
		bResult = TRUE;
	}
	// and any other process should be examined whether it should be
	// hooked up by the DLL
	else
	{
		bResult = m_pInjector->IsProcessForHooking(m_szProcessName);
		if (bResult)
			InitializeHookManagement();
	}
	return bResult;
}
The implementation of the method ManageModuleEnlistment() is straightforward and examines whether the call has been made by the Hook Server, inspecting the valuem_pbHookInstalled points to. If an invocation has been initiated by the Hook Server, it just sets up indirectly the flagsg_bHookInstalled to TRUE. It tells that the Hook Server has been started.
The next action taken by the Hook Server is to activate the engine through a single call toInstallHook() DLL exported function. Actually its call is delegated to a method ofCModuleScope - InstallHookMethod(). The main purpose of this function is to force targeted for hooking processes to load or unload the HookTool.DLL.
 // Activate/Deactivate hooking
engine BOOL	CModuleScope::InstallHookMethod(BOOL bActivate, HWND hWndServer)
{
	BOOL bResult;
	if (bActivate)
	{
		*m_phwndServer = hWndServer;
		bResult = m_pInjector->InjectModuleIntoAllProcesses();
	}
	else
	{
		m_pInjector->EjectModuleFromAllProcesses();
		*m_phwndServer = NULL;
		bResult = TRUE;
	}
	return bResult;
}
HookTool.DLL provides two mechanisms for self injecting into the address space of an external process - one that uses Windows Hooks and another that employs injecting of DLL byCreateRemoteThread() API. The architecture of the system defines an abstract classCInjector that exposes pure virtual functions for injecting and ejecting DLL. The classesCWinHookInjector and CRemThreadInjector inherit from the same base -CInjector class. However they provide different realization of the pure virtual methodsInjectModuleIntoAllProcesses() and EjectModuleFromAllProcesses(), defined inCInjector interface.
CWinHookInjector class implements Windows Hooks injecting mechanism. It installs a filter function by the following call
// Inject the DLL into all running processes
BOOL CWinHookInjector::InjectModuleIntoAllProcesses()
{
	*sm_pHook = ::SetWindowsHookEx(
		WH_GETMESSAGE,
		(HOOKPROC)(GetMsgProc),
		ModuleFromAddress(GetMsgProc),
		0
		);
	return (NULL != *sm_pHook);
}
As you can see it makes a request to the system for registering WH_GETMESSAGE hook. The server executes this method only once. The last parameter ofSetWindowsHookEx() is 0, because GetMsgProc() is designed to operate as a system-wide hook. The callback function will be invoked by the system each time when a window is about to process a particular message. It is interesting that we have to provide a nearly dummy implementation of the GetMsgProc() callback, since we don't intend to monitor the message processing. We supply this implementation only in order to get free injection mechanism provided by the operating system.
After making the call to SetWindowsHookEx(), OS checks whether the DLL (i.e. HookTool.DLL) that exportsGetMsgProc() has been already mapped in all GUI processes. If the DLL hasn't been loaded yet, Windows forces those GUI processes to map it. An interesting fact is, that a system-wide hook DLL should not returnFALSE in its DllMain(). That's because the operating system validatesDllMain()'s return value and keeps trying to load this DLL until itsDllMain() finally returns TRUE.
A quite different approach is demonstrated by the CRemThreadInjector class. Here the implementation is based on injecting the DLL using remote threads.CRemThreadInjector extends the maintenance of the Windows processes by providing means for receiving notifications of process creation and termination. It holds an instance ofCNtInjectorThread class that observes the process execution. CNtInjectorThread object takes care for getting notifications from the kernel-mode driver. Thus each time when a process is created a call toCNtInjectorThread ::OnCreateProcess() is issued, accordingly when the process exitsCNtInjectorThread ::OnTerminateProcess() is automatically called. Unlike the Windows Hooks, the method that relies on remote thread, requires manual injection each time when a new process is created. Monitoring process activities will provide us with a simple technique for alerting when a new process starts.
CNtDriverController class implements a wrapper around API functions for administering services and drivers. It is designed to handle the loading and unloading of the kernel-mode driver NTProcDrv.sys. Its implementation will be discussed later.
After a successful injection of HookTool.DLL into a particular process, a call toManageModuleEnlistment() method is issued inside the DllMain(). Recall the method's implementation that I described earlier. It examines the shared variablesg_bHookInstalled through the CModuleScope 's member m_pbHookInstalled. Since the server's initialization had already set the value ofsg_bHookInstalled to TRUE, the system checks whether this application must be hooked up and if so, it actually activates the spy engine for this particular process.
Turning the hacking engine on, takes place in the CModuleScope::InitializeHookManagement()'s implementation. The idea of this method is to install hooks for some vital functions asLoadLibrary() API family as well as GetProcAddress(). By this means we can monitor loading of DLLs after the initialization process. Each time when a new DLL is about to be mapped it is necessary to fix-up its import table, thus we ensure that the system won't miss any call to the captured function.
At the end of the InitializeHookManagement() method we provide initializations for the function we actually want to spy on.
Since the sample code demonstrates capturing of more than one user supplied functions, we must provide a single implementation for each individual hooked function. This means that using this approach you cannot just change the addresses inside IAT of the different imported functions to point to a single "generic" interception function. The spying function needs to know which function this call comes to. It is also crucial that the signature of the interception routine must be exactly the same as the originalWINAPI function prototype, otherwise the stack will be corrupted. For exampleCModuleScope implements three static methods MyTextOutA(),MyTextOutW() and MyExitProcess(). Once the HookTool.DLL is loaded into the address space of a process and the spying engine is activated, each time when a call to the originalTextOutA() is issued, CModuleScope:: MyTextOutA() gets called instead.
Proposed design of the spying engine itself is quite efficient and offers great flexibility. However, it is suitable mostly for scenarios where the set of functions for interception is known in advance and their number is limited.
If you want to add new hooks to the system you simply declare and implement the interception function as I did withMyTextOutA/W() and MyExitProcess(). Then you have to register it in the way shown by InitializeHookManagement() implementation.
Intercepting and tracing process execution is a very useful mechanism for implementing systems that require manipulations of external processes. Notifying interested parties upon starting of a new processes is a classic problem of developing process monitoring systems and system-wide hooks. The Win32 API provides a set of great libraries (PSAPI and ToolHelp [16]) that allow you to enumerate processes currently running in the system. Although these APIs are extremely powerful they don't permit you to get notifications when a new process starts or ends up. Luckily, NT/2K provides a set of APIs, documented in Windows DDK documentation as "Process Structure Routines" exported by NTOSKRNL. One of these APIsPsSetCreateProcessNotifyRoutine() offers the ability to register system-wide callback function which is called by OS each time when a new process starts, exits or has been terminated. The mentioned API can be employed as a simple way to for tracking down processes simply by implementing a NT kernel-mode driver and a user mode Win32 control application. The role of the driver is to detect process execution and notify the control program about these events. The implementation of the Windows process's observer NTProcDrv provides a minimal set of functionalities required for process monitoring under NT based systems. For more details see articles [11] and [15]. The code of the driver can be located in theNTProcDrv.c file. Since the user mode implementation installs and uninstalls the driver dynamically the currently logged-on user must have administrator privileges. Otherwise you won't be able to install the driver and it will disturb the process of monitoring. A way around is to manually install the driver as an administrator or run HookSrv.exe using offered by Windows 2K "Run as different user" option.
Last but not least, the provided tools can be administered by simply changing the settings of an INI file (i.e.HookTool.ini). This file determines whether to use Windows hooks (for 9x and NT/2K) orCreateRemoteThread() (only under NT/2K) for injecting. It also offers a way to specify which process must be hooked up and which shouldn't be intercepted. If you would like to monitor the process there is an option (Enabled) under section [Trace] that allows to log system activities. This option allows you to report rich error information using the methods exposed by CLogFile class. In fact ClogFile provides thread-safe implementation and you don't have to take care about synchronization issues related to accessing shared system resources (i.e. the log file). For more details see CLogFile and content of HookTool.ini file.
Sample code
The project compiles with VC6++ SP4 and requires Platform SDK. In a production Windows NT environment you need to provide PSAPI.DLL in order to use providedCTaskManager implementation.
Before you run the sample code make sure that all the settings in HookTool.ini file have been set according to your specific needs.
For those that will like the lower-level stuff and are interested in further development of the kernel-mode driver NTProcDrv code, they must install Windows DDK.
Out of the scope
For the sake of simplicity these are some of the subjects I intentionally left out of the scope of this article:
- Monitoring Native API calls
- A driver for monitoring process execution on Windows 9x systems.
- UNICODE support, although you can still hook UNICODE imported APIs
Conclusion
This article by far doesn't provide a complete guide for the unlimited API hooking subject and without any doubt it misses some details. However I tried to fit in this few pages just enough important information that might help those who are interested in user mode Win32 API spying.
