Spring Boot框架从入门到实践
SpringBoot初相识
一、SpringBoot框架简介
- SpringBoot是Spring家族中一个全新的框架,用来简化Spring应用程序的创建和开发过程,SpringBoot能简化我们之前采用的Spring MVC+Spring+MyBatis框架进行开发的过程
- 以往我们采用Spring MVC+Spring+MyBatis框架进行开发的时候,搭建和整合三大框架,需要做很多工作,比如配置web.xml,配置Spring,配置MyBatis,SpringBoot抛弃了繁琐的xml配置过程,采用大量的默认配置简化我们的开发过程。
- Spring Boot可以非常方便的搭建基于Spring框架的应用程序,让编码变简单,配置变简单,部署变简单,监控变简单。
二、SpringBoot的特性
- 能够快速搭建基于Spring的应用程序
- 能够直接使用Java Main方法启动内嵌的Tomcat服务器运行Spring Boot程序,不需要部署War文件
- 提供约定的Starter POM来简化Maven配置
- 根据项目的Maven依赖配置,SpringBoot自动配置Spring、Spring MVC等
- 提供了程序的检查检查等功能
- 基本不使用XML配置文件,采用注解配置
三、SpringBoot四大核心
- 自动配置:针对很多Spring应用程序和常见的应用功能,Spring Boot能自动提供相关配置。
- 起步依赖:告诉Spring Boot需要什么功能,它就能引入需要的依赖库
- Actuator:能够深入运行中的SpringBoot程序,了解应用程序内部信息
- 命令行界面:这是SpringBoot的可选特性
SpringBoot初体验
一、第一个Spring Boot程序
-
创建一个Spring Boot项目
-
加入Spring Boot父级和起步依赖
-
父级依赖
加入Spring父级依赖可以简化项目的Maven配置
<parent> <groupId>org.springframework.boot</groupId> <artifactId>spring-boot-starter-parent</artifactId> <version>1.5.9.RELEASE</version> <relativePath></relativePath> </parent> -
起步依赖
<dependencies>
        <dependency>
            <groupId>org.springframework.boot</groupId>
            <artifactId>spring-boot-starter-web</artifactId>
        </dependency>
    </dependencies>
-
-
创建Spring Boot的入口Main方法
package springboot; import org.springframework.boot.SpringApplication; import org.springframework.boot.autoconfigure.SpringBootApplication; @SpringBootApplication public class Application { public static void main(String[] args) { //Spring Boot程序->Spring容器->内嵌的tomcat SpringApplication.run(Application.class,args); } } -
创建一个SpringMCVC的Controller
package springboot.controller; import org.springframework.web.bind.annotation.RequestMapping; import org.springframework.web.bind.annotation.RestController; @RestController public class HelloController { @RequestMapping("/hello") public String hello(){ return "Hello,Spring Boot"; } } -
运行SpringBoot的入口Main方法
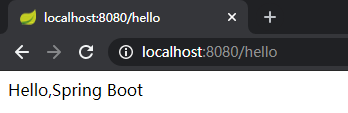
二、SpringBoot程序解析
- SpringBoot的父级依赖
Spring-boot-starter-parent配置之后,当前的项目就是SpringBoot项目 - Spring-boot-starter-parent是一个特殊的starter依赖,用来提供相关的Maven默认依赖,使用它之后,常用的jar包依赖可以省去version配置
- @SpringBootApplication注解是SpringBoot项目的核心注解,主要作用是开启spring自动配置
- main方法作为项目启动运行的入口
- @Controller和@ResponseBody依然是我们之前的SpringMVC
SpringBoot核心配置文件
一、多环境配置文件
- 配置开发环境
- spring.profiles.active=dev
- application-dev.properties
- 配置生产环境
- spring.profiles.active=product
- application-product.properties
二、自定义配置文件读取
采用注释读取属性值
- @Value注解
package springboot.controller;

import org.springframework.beans.factory.annotation.Value;
import org.springframework.stereotype.Controller;
import org.springframework.web.bind.annotation.RequestMapping;
import org.springframework.web.bind.annotation.ResponseBody;

@Controller
public class ConfigInfoController {
    @Value("${boot.name}")
    private String name;
    @Value("${boot.location}")
    private String location;

    @RequestMapping("/boot/config")
    public @ResponseBody
    String config() {
        return name + "------" + location;
    }
}
- @ConfigurationProperties
package springboot.controller;

import org.springframework.beans.factory.annotation.Autowired;
import org.springframework.beans.factory.annotation.Value;
import org.springframework.stereotype.Controller;
import org.springframework.web.bind.annotation.RequestMapping;
import org.springframework.web.bind.annotation.ResponseBody;
import springboot.config.ConfigInfo;

@Controller
public class ConfigController {
    @Autowired
    private ConfigInfo configInfo;

    @RequestMapping("/boot/config")
    public @ResponseBody String config(){
        return configInfo.getName()+"-----"+configInfo.getLocation();
    }
}
SpringBoot下SpringMVC开发
- @Controller:处理HTTP请求
- @RestController:
@Controller与@ResponseBody的组合注解
返回字符串或json数据 - @GetMapping:RequestMapping和Get请求方法的组合
- @PostMapping:RequestMapping和Post请求方法的组合
- @PutMapping: RequestMapping和Put请求方法的组合
- @DeleteMapping:RequestMapping和Delete请求方法的组合
SpringBoot使用JSP
- 在pom.xml中配置依赖项
<!--    引入SpringBoot内嵌Tomcat对JSP的解析包-->
        <dependency>
            <groupId>org.apache.tomcat.embed</groupId>
            <artifactId>tomcat-embed-jasper</artifactId>
        </dependency>

<!--        Servlet依赖的Jar包-->
        <dependency>
            <groupId>javax.servlet</groupId>
            <artifactId>javax.servlet-api</artifactId>
        </dependency>

<!--        JSP依赖的JAR包-->
        <dependency>
            <groupId>javax.servlet.jsp</groupId>
            <artifactId>javax.servlet.jsp-api</artifactId>
            <version>2.3.3</version>
        </dependency>

<!--        jsp标签依赖的jar包-->
        <dependency>
            <groupId>javax.servlet</groupId>
            <artifactId>jstl</artifactId>
        </dependency>
    </dependencies>
-
在Application.properties文件中配置springMVC的视图展示为JSP
spring.mvc.view.prefix=/ #前缀 spring.mvc.view.suffix=.jsp #后缀 -
在src/main目录下创建一个webapp目录,在该目录下新建jsp页面
在Spring Boot中集成MyBatis
-
在pom.xml中配置相关jar依赖
<!-- 加载Mybatis整合Springboot--> <dependency> <groupId>org.mybatis.spring.boot</groupId> <artifactId>mybatis-spring-boot-starter</artifactId> <version>1.3.2</version> </dependency> <!-- MySQL的JDBC驱动包--> <dependency> <groupId>mysql</groupId> <artifactId>mysql-connector-java</artifactId> </dependency> -
在SpringBoot的核心配置文件application.properties中配置MyBatis的Mapper.xml文件所在的位置。
mybatis.mapper-location=classpath:edu/sust/springboot/mapper/*.xml -
在springboot的核心配置文件application.properties中配置数据源
spring.datasource.username=root
spring.datasource.password=123456
spring.datasource.driver-class-name=com.mysql.jdbc.Driver
spring.datasource.url=jdbc:mysql://localhost:3306/springdb?useUnicode=true&characterEncoding=utf8&useSSL=false
4.在MyBatis的Mapper接口中添加@Mapper注解
-
