Introduction
这个术语第一次出现在1997年的软件工程词典中。它出现在Bertrand Meyer撰写的“面向对象的软件构造”一书中。 此软件体系结构旨在减轻已知的面向对象体系结构的警告。 在这种情况下,这些警告尤其是:
写入和读取几乎始终会给系统带来很大不同的负载。 写操作通常比读操作复杂得多。 此外,它们影响应用程序的不同范围。 写操作需要确保正确,有效和一致的数据正确到达存储。 写入和读取操作之间的安全问题也有所不同。 数据通常存储在数据库中的方式是使用3NF或经过优化且与其接近的某种方式。 当我们读取数据时,我们通常会建立视图以向用户提供可读数据。 因此,几乎不会对呈现给用户的数据进行规范化。 这也称为非规范化数据。
通过这个非常简单的列表,您可以看到读写操作以不同的方式进行,它们有不同的关注点,它们产生了不同的性能关注点,并且它们生成了不同的负载,这些负载可能以非常不同的方式给系统带来很大压力。
CQRS也是DDD(域驱动设计)的一种形式。 最初并没有考虑它是实际的DDD。 但是,通过开发,它总是迫使建筑师首先考虑设计。 每个应用程序至少具有一个有界上下文。 受限制的上下文很难定义,但是从本质上讲,它们隔离了应用程序的职责,例如,借记卡,图书馆图书存档器,患者数据的处理。 例如,后者可以分为多个子域。 可能有一个单独的域来跟踪像HIV这样的慢性疾病,而另一个域则可以跟踪常见的流感。 两者都有不同的数据问题。 作为慢性病,HIV患者一生中将需要跟踪更多数据,例如T细胞计数,病毒载量和其他血液数据。 流感患者不需要太多监控。 与第一个域相关的隐私问题比第二个域更多。 评估领域有点技巧,需要工程师的分析能力才能确定它们。
定义域后,就该开始为其设计CQRS了。 就像您已经看到的那样,此设计的主要关注点是读取操作和写入操作的分离。 写操作不能是读操作。 同样,“读取”操作也不能是“写入”操作。
Commands
命令定义为可以在不返回值的情况下对数据进行突变的任何操作。 本质上,这些都是写操作。 用CRUD术语来说,它们是创建,更新和删除操作。 您也可以将它们称为CUD。
Queries
查询被定义为永远不会使数据突变并且总是返回的任何操作。 最后,这些基本上都是读取操作。 查询操作仅是读取操作。 它们只是CRUD中的R。
Models
有许多实现CQRS的方法。 重点始终是尽可能使读取操作与写入操作分开。 在我们的实现中,我们还将分离操作并使用事件源。 这将使我们能够进一步分离保存数据的媒介。 我们将使用两个不同的数据库。 一个数据库将成为命令流的一部分,而另一个数据库将成为读取流的一部分。 实作 首先让我们看一下所有运动部件如何工作:
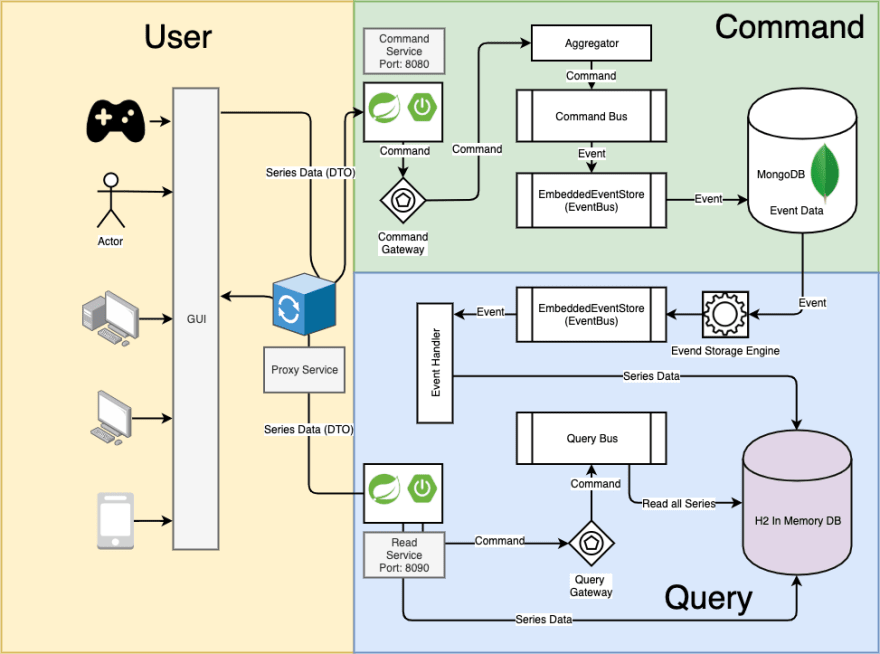
在此示例中,我将尝试使其尽可能简单。 那里还有更多详细的选择。 有更多复杂,动态和可扩展的选项。 这些选项之一是使用RabbitMQ或任何其他类型的消息排队系统来进一步分离所有组件。 但是,这将注意力转移到本教程的范围之外。 这里的重点是提出一个以CQRS的所有基本点为核心的解决方案。
这是我们将需要的所有依赖项:
<project xmlns="http://maven.apache.org/POM/4.0.0">
    <modelVersion>4.0.0</modelVersion>

    <groupId>org.jesperancinha.video</groupId>
    <artifactId>video-series-app</artifactId>
    <version>0.0.1-SNAPSHOT</version>

    <parent>
        <groupId>org.springframework.boot</groupId>
        <artifactId>spring-boot-starter-parent</artifactId>
        <version>2.2.2.RELEASE</version>
        <relativePath/>
    </parent>

    <modules>
        <module>video-series-command</module>
        <module>video-series-query</module>
        <module>video-series-core</module>
    </modules>
    <packaging>pom</packaging>

    <properties>
        <!-- External Dependency Versions -->
        <java.version>13</java.version>
        <h2.version>1.4.200</h2.version>
        <lombok.version>1.18.10</lombok.version>
        <spring-tx.version>5.2.2.RELEASE</spring-tx.version>
        <axon.version>4.2</axon.version>
    </properties>

    <dependencyManagement>
        <dependencies>
            <!-- Inner dependencies -->
            <dependency>
                <groupId>org.jesperancinha.video</groupId>
                <artifactId>video-series-core</artifactId>
                <version>${project.version}</version>
            </dependency>

            <!-- External Dependencies -->
            <dependency>
                <groupId>com.h2database</groupId>
                <artifactId>h2</artifactId>
                <version>${h2.version}</version>
                <scope>runtime</scope>
            </dependency>
            <dependency>
                <groupId>org.springframework</groupId>
                <artifactId>spring-tx</artifactId>
                <version>${spring-tx.version}</version>
            </dependency>
            <dependency>
                <groupId>org.axonframework</groupId>
                <artifactId>axon-spring-boot-starter</artifactId>
                <version>${axon.version}</version>
                <exclusions>
                    <exclusion>
                        <groupId>org.axonframework</groupId>
                        <artifactId>axon-server-connector</artifactId>
                    </exclusion>
                </exclusions>
            </dependency>

            <dependency>
                <groupId>org.axonframework</groupId>
                <artifactId>axon-mongo</artifactId>
                <version>${axon-mongo.version}</version>
            </dependency>

            <dependency>
                <groupId>org.projectlombok</groupId>
                <artifactId>lombok</artifactId>
                <version>${lombok.version}</version>
                <optional>true</optional>
            </dependency>

        </dependencies>
    </dependencyManagement>
</project>
请注意,我正在使用轴突框架。 这是在最流行的框架上实施的一些与CQRS设计非常匹配的东西。 即,我们将首先了解EventHandlers和Aggregator的工作方式,EventBus的工作方式以及CommandBus的工作方式。 我们还将看到它如何与MongoDB配合使用,以最终用新数据更新数据库。
Core
在本模块中,我将考虑该应用程序共有的所有内容。 我也可以将此模块命名为common。 为了运行我们的应用程序,我们将需要考虑一些重要的事情。 考虑到它的复杂性,我将只实现一个读取所有操作和一个保存操作。 这些分别是我的查询和命令。 我们需要一个DTO才能将数据导入我们的系统:
@Data
@AllArgsConstructor
@NoArgsConstructor
@Builder
public class VideoSeriesDto {

    private String name;

    private Integer volumes;

    private BigDecimal cashValue;

    private String genre;
}
经由编写器发送数据是需要读者以及编写者理解的操作。 我们唯一的常用命令应该位于此处:
@Data
@Builder
public class AddSeriesEvent {

    private String id;

    private String name;

    private Integer volumes;

    private BigDecimal cashValue;

    private String genre;

}
最后,从所看到的架构中我们知道,“写入服务”和“读取服务”都需要访问EventStore。 本质上,这就是我们的mongoDB数据库。 Axon具有非常好的现成的库,这些库使我们能够轻松地实现此事件源机制。 这就是我选择此功能的部分原因。 它使实现的形式非常简单:
@Slf4j
@Configuration
public class AxonConfig {

    @Value("${spring.data.mongodb.host:127.0.0.1}")
    private String mongoHost;

    @Value("${spring.data.mongodb.port:27017}")
    private int mongoPort;

    @Value("${spring.data.mongodb.database:test}")
    private String mongoDatabase;

    @Bean
    public TokenStore tokenStore(Serializer serializer) {
        return MongoTokenStore.builder().mongoTemplate(axonMongoTemplate()).serializer(serializer).build();
    }

    @Bean
    public EventStorageEngine eventStorageEngine(MongoClient client) {
        return MongoEventStorageEngine.builder().mongoTemplate(DefaultMongoTemplate.builder().mongoDatabase(client).build()).build();
    }

    @Bean
    public MongoTemplate axonMongoTemplate() {
        return DefaultMongoTemplate.builder().mongoDatabase(mongo(), mongoDatabase).build();
    }

    @Bean
    public MongoClient mongo() {
        MongoFactory mongoFactory = new MongoFactory();
        mongoFactory.setMongoAddresses(Collections.singletonList(new ServerAddress(mongoHost, mongoPort)));
        return mongoFactory.createMongo();
    }
}
Command Service
首先,我们需要实现命令的表示形式。 对于我们的命令服务,我们只有一个命令可以添加更多视频系列。 因此,我们的命令具有与实际系列相同的属性。 注意id字段:
@Data
@Builder
@EqualsAndHashCode
@ToString
public class AddVideoSeriesCommand {

    @TargetAggregateIdentifier
    private String id;

    private String name;

    private Integer volumes;

    private BigDecimal cashValue;

    private String genre;

}
id字段确实是一个字符串。 这实际上是我们的操作ID。 它可以通过多种方式实现。 我们只需要确保它始终是唯一的字符串,数字或我们选择的任何内容即可。
现在是时候实现聚合器了,它将通过命令总线发送我们的命令并使它到达我们的命令处理程序:
@Slf4j
@NoArgsConstructor
@Aggregate
@Data
public class VideoSeriesAggregate {

    @AggregateIdentifier
    private String id;

    @CommandHandler
    public VideoSeriesAggregate(AddVideoSeriesCommand command) {
        apply(AddSeriesEvent.builder()
                .id(UUID.randomUUID().toString())
                .cashValue(command.getCashValue())
                .genre(command.getGenre())
                .name(command.getName())
                .volumes(command.getVolumes()).build()
        );
    }

    @EventSourcingHandler
    public void on(AddSeriesEvent event) {
        this.id = event.getId();
    }

}
注意EventSourcingHandler。 它似乎并没有做什么用,但请记住,在此代码部分中,您正在查看Aggregate元素的内容。 如果查看mongo数据库,您会发现类似以下内容:
{
    "_id" : ObjectId("5df8ac587a0bba4960afce68"),
    "aggregateIdentifier" : "ed313d16-8d94-480a-85a0-b6897bcca4f5",
    "type" : "SeriesAggregate",
    "sequenceNumber" : NumberLong(0),
    "serializedPayload" : "<org.jesperancinha.video.core.events.AddSeriesEvent><id>ed313d16-8d94-480a-85a0-b6897bcca4f5</id><name>wosssda</name><volumes>10</volumes><cashValue>123.2</cashValue><genre>woo</genre></org.jesperancinha.video.core.events.AddSeriesEvent>",
    "timestamp" : "2019-12-17T10:22:16.640261Z",
    "payloadType" : "org.jesperancinha.video.core.events.AddSeriesEvent",
    "payloadRevision" : null,
    "serializedMetaData" : "<meta-data><entry><string>traceId</string><string>398a250f-8086-40e7-a767-1aa793231f62</string></entry><entry><string>correlationId</string><string>398a250f-8086-40e7-a767-1aa793231f62</string></entry></meta-data>",
    "eventIdentifier" : "2ac1a49f-0124-4f6e-b13f-140c8f36979a"
}
注意aggregateIndentifier。 那是你的身份证。 您需要EventSourcingHandler才能完成请求,并将您的事件源到EventStore。
现在,我们只需要通过实现一个Controller来完成我们的应用程序:
@RestController
@RequestMapping("/video-series")
public class VideoSeriesController {

    private final CommandGateway commandGateway;

    public VideoSeriesController(CommandGateway commandGateway) {
        this.commandGateway = commandGateway;
    }

    @PostMapping
    public void postNewVideoSeries(@RequestBody VideoSeriesDto videoSeriesDto) {
        commandGateway.send(
                AddVideoSeriesCommand.builder()
                        .name(videoSeriesDto.getName())
                        .volumes(videoSeriesDto.getVolumes())
                        .genre(videoSeriesDto.getGenre())
                        .cashValue(videoSeriesDto.getCashValue())
                        .build());
    }
}
注意,我们正在注入CommandGateway。 这正是允许我们将命令发送到系统中的网关。
最后,Spring Boot启动器:
@SpringBootApplication
@Import(AxonConfig.class)
public class VideoAppCommandLauncher {
    public static void main(String[] args) {
            SpringApplication.run(VideoAppCommandLauncher.class);
        }
}
为了完成我们的应用程序,我们仍然需要配置我们的Spring Boot Launcher:
# spring
server.port=8080
# h2
spring.h2.console.path=/spring-h2-video-series-command-console
spring.h2.console.enabled=true
# datasource
spring.datasource.url=jdbc:h2:file:~/spring-datasource-video-series-command-url;auto_server=true
spring.datasource.driver-class-name=org.h2.Driver
spring.datasource.username=sa
spring.datasource.password=sa
# hibernate
spring.jpa.properties.hibernate.dialect=org.hibernate.dialect.H2Dialect
spring.jpa.hibernate.ddl-auto=update
spring.jpa.show-sql=true
# mongodb
spring.data.mongodb.host=localhost
spring.data.mongodb.port=27017
spring.data.mongodb.database=cqrs
Query Service
查询服务本质上是EventStore的读取器,并且将在无需用户干预的情况下对其进行操作。 查询服务需要执行查询。 这样,我实现了一个命令来做到这一点:
public class FindAllVideoSeriesQuery {
}
请注意,该命令最终只是一个空类。 那是故意的。 我们不需要参数来通过读取所有操作,但是我们确实需要其表示形式。 因为我们正在访问数据库并存储记录,所以我们现在需要实现负责此数据的实体:
@Data
@AllArgsConstructor
@NoArgsConstructor
@Builder
@Entity
@Table(name = "VIDEO_SERIES")
public class VideoSeries {

    @Id
    @GeneratedValue(strategy = IDENTITY)
    @Column
    private Long id;

    @Column
    private String name;

    @Column
    private Integer volumes;

    @Column
    private BigDecimal cashValue;

    @Column
    private String genre;
}
您可能已经猜到了,在此实现中,我们将使用JPA存储库:
public interface VideoSeriesRepository extends JpaRepository<VideoSeries, Long> {
}
在查询方面,我们拥有EventHandler,其形状与Aggregate非常相似。 当然不同之处在于,一旦获得事件或命令,它们将立即处理:
@Service
@ProcessingGroup("video-series")
public class VideoSeriesEventHandler {

    private final VideoSeriesRepository videoSeriesRepository;

    public VideoSeriesEventHandler(VideoSeriesRepository videoSeriesRepository) {
        this.videoSeriesRepository = videoSeriesRepository;
    }

    @EventHandler
    public void on(AddSeriesEvent event) {
        videoSeriesRepository.save(VideoSeries
                .builder()
                .name(event.getName())
                .volumes(event.getVolumes())
                .genre(event.getGenre())
                .cashValue(event.getCashValue())
                .build());
    }

    @QueryHandler
    public List<VideoSeriesDto> handle(FindAllVideoSeriesQuery query) {
        return videoSeriesRepository.findAll().stream().map(
                videoSeries -> VideoSeriesDto.builder()
                        .name(videoSeries.getName())
                        .volumes(videoSeries.getVolumes())
                        .cashValue(videoSeries.getCashValue())
                        .genre(videoSeries.getGenre())
                        .build()).collect(Collectors.toList());
    }

}
注意,现在有了QueryHandler,而不是CommandHandler。 在EventSourcingHandler中,我们现在有了EventHandler。 有注释用于分别区分comand服务和查询服务中发生的情况。 另外,ID不存在。 该ID并不重要,因为没有数据将进入事件存储。 所有数据都直接由JPA存储库处理。
现在,我们可以将注意力集中在查询服务控制器的Controller上:
@RestController
@RequestMapping("/video-series")
public class VideoSeriesController {

    @Autowired
    private QueryGateway queryGateway;

    @GetMapping
    public List<VideoSeriesDto> gertAllVideoSeries() {
        return queryGateway.query(new FindAllVideoSeriesQuery(), ResponseTypes.multipleInstancesOf(VideoSeriesDto.class))
                .join();
    }
}
最后是我们的查询启动器:
@SpringBootApplication
@Import(AxonConfig.class)
public class VideoAppQueryLauncher {
    public static void main(String[] args) {
            SpringApplication.run(VideoAppQueryLauncher.class);
        }
}
要完成我们的应用程序,我们需要对其进行配置:
# spring
server.port=8090
# h2
spring.h2.console.path=/spring-h2-video-series-query-console
spring.h2.console.enabled=true
# datasource
spring.datasource.url=jdbc:h2:file:~/spring-datasource-video-series-query-url;auto_server=true
spring.datasource.driver-class-name=org.h2.Driver
spring.datasource.username=sa
spring.datasource.password=sa
# hibernate
spring.jpa.properties.hibernate.dialect=org.hibernate.dialect.H2Dialect
spring.jpa.hibernate.ddl-auto=none
spring.jpa.show-sql=true
# mongodb
spring.data.mongodb.host=localhost
spring.data.mongodb.port=27017
spring.data.mongodb.database=cqrs
给它一些结构:
drop table if exists VIDEO_SERIES;

create table VIDEO_SERIES
(
    ID         bigint auto_increment primary key not null,
    NAME       varchar(100)                      not null,
    VOLUMES    int                               not null,
    CASH_VALUE decimal                           not null,
    GENRE      varchar(100)                      not null
);
最后是一些数据:
insert into VIDEO_SERIES (NAME, VOLUMES, CASH_VALUE, GENRE) values ('Modern Family', 12, 12.3, 'SITCOM');
insert into VIDEO_SERIES (NAME, VOLUMES, CASH_VALUE, GENRE) values ('Six Feet Under', 10, 34.3, 'DRAMA');
insert into VIDEO_SERIES (NAME, VOLUMES, CASH_VALUE, GENRE) values ('Queer as Folk', 24, 55.3, 'DRAMA');
我们终于准备好进行一些测试。 我所做的测试非常简单。 首先,我执行了一个请求以查看所有当前数据:
$ curl localhost:8090/video-series
[{"name":"Modern Family","volumes":12,"cashValue":12.3,"genre":"SITCOM"},{"name":"Six Feet Under","volumes":10,"cashValue":34.3,"genre":"DRAMA"},{"name":"Queer as Folk","volumes":24,"cashValue":55.3,"genre":"DRAMA"}]
如您所见,我们得到三个系列。 让我们添加一个新的:
$ curl -d '{ "name":"True Blood", "volumes":30, "cashValue": 1323.2, "genre": "Bloody"}' -H "Content-Type: application/json" -X POST http://localhost:8080/video-series
您现在应该看到:
$ curl localhost:8090/video-series
[{"name":"Modern Family","volumes":12,"cashValue":12.3,"genre":"SITCOM"},{"name":"Six Feet Under","volumes":10,"cashValue":34.3,"genre":"DRAMA"},{"name":"Queer as Folk","volumes":24,"cashValue":55.3,"genre":"DRAMA"},{"name":"True Blood","volumes":30,"cashValue":1323.2,"genre":"Bloody"}]
Conclusion
Note that although we can see that this works, it’s very important that you understand what happened behind the curtain for this application. The separation between the “write” and “read” operations and the fact that they are named command and query operations respectively is what makes the foundations of this architecture. The more decoupled the architecture is designed, the better it is. There are thousands of corner cases and special situations in the landscape of DDD and CQRS. Event source is just one of the ways to get this implemented. In our example we used Spring, SpringBoot and Axon to get our commands and events across our network. We didn’t use any messaging queuing system. I do intend to write another article on that, but that will be for later. For the time being I hope you enjoyed this marathon ride to this very simple example. If you have any questions or would like let me know your opinion about this, please leave a comment below or contact me directly at [email protected].
I’ve placed the complete implementation on GitLab.
感谢您的阅读!
from: https://dev.to//jofisaes/cqrs-command-query-responsibility-segregation-36co
