在构建Web应用程序时,必须进行身份验证和授权。 然而,正确地做起来并不容易。 计算机安全是真正的专业。 众多开发人员昼夜不停地与众多国际黑客进行对抗,从而创建了一个持续的开发周期,以发现漏洞,进行攻击并加以修复。 跟上所有这些独奏会很痛苦(如果不是不可能的话)。
Fortunately, there’s no need. Spring Security and Spring Boot have made implementing a web application using OAuth 2.0 nice and simple. And Okta, a software-as-service identity access provider, has built on top of Spring Boot to make the process even easier.
在本教程中,您将首先使用Spring Boot和Spring Security构建OAuth 2.0 Web应用程序和身份验证服务器。 之后,您将使用Okta摆脱自我托管的身份验证服务器,并进一步简化Spring Boot应用程序。
让我们开始吧!
Create an OAuth 2.0 Server
Start by going to the 小号pring Initializr and creating a new project with the following settings:
- 将项目类型从Maven更改为摇篮。将组更改为com。okta。spring。将工件更改为AuthorizationServerApplication。添加一个依赖项:网页。
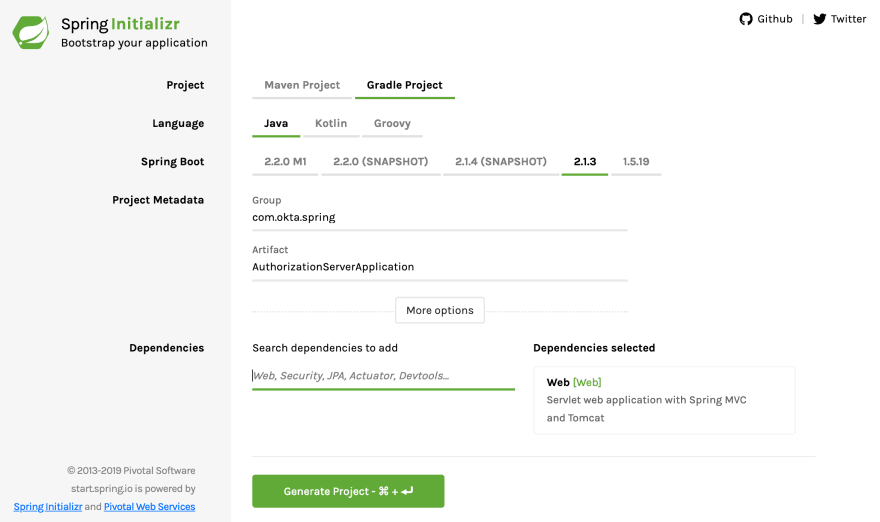
下载项目并将其复制到硬盘上有意义的位置。 在本教程中,您将创建三个不同的项目,因此您可能需要创建一个父目录,例如SpringBootOAuth某处。
您需要向其中添加一个依赖项build.gradle文件:
implementation 'org.springframework.security.oauth:spring-security-oauth2:2.3.3.RELEASE'
这增加了Spring的OAuth优势。
更新src / main / resources / application.properties匹配:
server.port=8081
server.servlet.context-path=/auth
user.oauth.clientId=R2dpxQ3vPrtfgF72
user.oauth.clientSecret=fDw7Mpkk5czHNuSRtmhGmAGL42CaxQB9
user.oauth.redirectUris=http://localhost:8082/login/oauth2/code/
user.oauth.user.username=Andrew
user.oauth.user.password=abcd
这将设置服务器端口,servlet上下文路径以及服务器将返回给客户端的内存中临时生成的令牌以及我们用户的用户名和密码的一些默认值。 在生产中,对于真正的身份验证服务器,您将需要更多的复杂后端,而没有硬编码的重定向URI,用户名和密码。
更新AuthorizationServerApplication要添加的类@EnableResourceServer:
package com.okta.spring.AuthorizationServerApplication;

import org.springframework.boot.SpringApplication;
import org.springframework.boot.autoconfigure.SpringBootApplication;
import org.springframework.security.oauth2.config.annotation.web.configuration.EnableResourceServer;

@SpringBootApplication
@EnableResourceServer
public class AuthorizationServerApplication {

    public static void main(String[] args) {
        SpringApplication.run(AuthorizationServerApplication.class, args);
    }
}
创建一个新的班级AuthServerConfig与您的应用程序类在同一包中com.okta.spring.AuthorizationServerApplication下src /主/ java(从现在开始,请在src /主/ java/com/okta/spring/AuthorizationServerApplication)。 此Spring配置类启用并配置OAuth授权服务器。
package com.okta.spring.AuthorizationServerApplication;

import org.springframework.beans.factory.annotation.Autowired;
import org.springframework.beans.factory.annotation.Value;
import org.springframework.context.annotation.Configuration;
import org.springframework.security.crypto.bcrypt.BCryptPasswordEncoder;
import org.springframework.security.oauth2.config.annotation.configurers.ClientDetailsServiceConfigurer;
import org.springframework.security.oauth2.config.annotation.web.configuration.AuthorizationServerConfigurerAdapter;
import org.springframework.security.oauth2.config.annotation.web.configuration.EnableAuthorizationServer;
import org.springframework.security.oauth2.config.annotation.web.configurers.AuthorizationServerSecurityConfigurer;

@Configuration
@EnableAuthorizationServer
public class AuthServerConfig extends AuthorizationServerConfigurerAdapter {

    @Value("${user.oauth.clientId}")
    private String ClientID;
    @Value("${user.oauth.clientSecret}")
    private String ClientSecret;
    @Value("${user.oauth.redirectUris}")
    private String RedirectURLs;

   private final PasswordEncoder passwordEncoder;

    public AuthServerConfig(PasswordEncoder passwordEncoder) {
        this.passwordEncoder = passwordEncoder;
    }

    @Override
    public void configure(
        AuthorizationServerSecurityConfigurer oauthServer) throws Exception {
        oauthServer.tokenKeyAccess("permitAll()")
            .checkTokenAccess("isAuthenticated()");
    }

    @Override
    public void configure(ClientDetailsServiceConfigurer clients) throws Exception {
        clients.inMemory()
            .withClient(ClientID)
            .secret(passwordEncoder.encode(ClientSecret))
            .authorizedGrantTypes("authorization_code")
            .scopes("user_info")
            .autoApprove(true)
            .redirectUris(RedirectURLs);
    }
}
的AuthServerConfigclass是在客户端正确进行身份验证时将创建并返回JSON Web令牌的类。
创建一个安全配置类:
package com.okta.spring.AuthorizationServerApplication;

import org.springframework.beans.factory.annotation.Value;
import org.springframework.context.annotation.Bean;
import org.springframework.context.annotation.Configuration;
import org.springframework.core.annotation.Order;
import org.springframework.security.config.annotation.authentication.builders.AuthenticationManagerBuilder;
import org.springframework.security.config.annotation.web.builders.HttpSecurity;
import org.springframework.security.config.annotation.web.configuration.WebSecurityConfigurerAdapter;
import org.springframework.security.crypto.bcrypt.BCryptPasswordEncoder;

@Configuration
@Order(1)
public class SecurityConfiguration extends WebSecurityConfigurerAdapter {

    @Value("${user.oauth.user.username}")
    private String username;
    @Value("${user.oauth.user.password}")
    private String password;

    @Override
    protected void configure(HttpSecurity http) throws Exception {
        http.requestMatchers()
            .antMatchers("/login", "/oauth/authorize")
            .and()
            .authorizeRequests()
            .anyRequest().authenticated()
            .and()
            .formLogin().permitAll();
    }

    @Override
    protected void configure(AuthenticationManagerBuilder auth) throws Exception {
        auth.inMemoryAuthentication()
            .withUser(username)
            .password(passwordEncoder().encode(password))
            .roles("USER");
    }

    @Bean
    public BCryptPasswordEncoder passwordEncoder() {
        return new BCryptPasswordEncoder();
    }
}
的安全配置class是实际验证对授权服务器的请求的类。 请注意,在顶部附近,它从application.properties文件。
最后,创建一个名为UserController:
package com.okta.spring.AuthorizationServerApplication;

import org.springframework.web.bind.annotation.GetMapping;
import org.springframework.web.bind.annotation.RestController;

import java.security.Principal;

@RestController
public class UserController {

    @GetMapping("/user/me")
    public Principal user(Principal principal) {
        return principal;
    }
}
该文件允许客户端应用程序查找有关通过服务器进行身份验证的用户的更多信息。
那就是你的资源服务器! 还不错 Spring Boot使其非常容易。 四个文件和一些属性。 稍后,您将使用Okta使其变得更加简单,但目前,继续创建可用于测试身份验证服务器的客户端应用程序。
启动授权服务器:
./gradlew bootRun
等待它完成运行。 终端应该以这样的结尾:
...
2019-02-23 19:06:49.122 INFO 54333 --- [main] o.s.b.w.embedded.tomcat.TomcatWebServer : Tomcat started on port(s): 8081 (http) with context path '/auth '
2019-02-23 19:06:49.128 INFO 54333 --- [main] c.o.s.A.AuthorizationServerApplication : Started AuthorizationServerApplication in 3.502 seconds (JVM running for 3.945)
注意:如果您收到有关JAXB的错误(java。lang。ClassNotFoundException:javax。xml。bind。JAXBException),这是因为您使用的是Java11。要解决此问题,请将JAXB添加到您的build。gradle。
implementation 'org.glassfish.jaxb:jaxb-runtime'
Build Your Client App
Back to Spring Initializr. Create a new project with the following settings:
- 项目类型应为摇篮(不是Maven)。组:com。okta。spring。工件:SpringBootOAuthClient。添加三个依赖项:网页,胸腺,and OAuth2客户端。

下载项目,将其复制到最终的放置位置,然后解压缩它。
这次您需要将以下依赖项添加到您的build.gradle文件:
implementation 'org.thymeleaf.extras:thymeleaf-extras-springsecurity5:3.0.4.RELEASE'
重命名src / main / resources / application.properties至application.yml and update it至match the YAML below:
server:
  port: 8082
  session:
    cookie:
      name: UISESSION
spring:
  thymeleaf:
    cache: false
  security:
    oauth2:
      client:
        registration:
          custom-client:
            client-id: R2dpxQ3vPrtfgF72
            client-secret: fDw7Mpkk5czHNuSRtmhGmAGL42CaxQB9
            client-name: Auth Server
            scope: user_info
            provider: custom-provider
            redirect-uri-template: http://localhost:8082/login/oauth2/code/
            client-authentication-method: basic
            authorization-grant-type: authorization_code
        provider:
          custom-provider:
            token-uri: http://localhost:8081/auth/oauth/token
            authorization-uri: http://localhost:8081/auth/oauth/authorize
            user-info-uri: http://localhost:8081/auth/user/me
            user-name-attribute: name
请注意,您正在此处配置clientId和客户秘密,以及身份验证服务器的各种URI。 这些需要与另一个项目中的值匹配。
更新SpringBootOAuthClientApplication要匹配的课程:
package com.okta.spring.SpringBootOAuthClient;

import org.springframework.boot.SpringApplication;
import org.springframework.boot.autoconfigure.SpringBootApplication;

@SpringBootApplication
public class SpringBootOAuthClientApplication {

    public static void main(String[] args) {
        SpringApplication.run(SpringBootOAuthClientApplication.class, args);
    }
}
创建一个名为的新Java类Web控制器:
package com.okta.spring.SpringBootOAuthClient;

import org.springframework.stereotype.Controller;
import org.springframework.ui.Model;
import org.springframework.web.bind.annotation.RequestMapping;

import java.security.Principal;

@Controller
public class WebController {

    @RequestMapping("/securedPage")
    public String securedPage(Model model, Principal principal) {
        return "securedPage";
    }

    @RequestMapping("/")
    public String index(Model model, Principal principal) {
        return "index";
    }
}
这是将传入请求映射到Thymeleaf模板文件(您将在几秒钟内完成)的控制器。
创建另一个名为的Java类安全配置:
package com.okta.spring.SpringBootOAuthClient;

import org.springframework.context.annotation.Configuration;
import org.springframework.security.config.annotation.web.builders.HttpSecurity;
import org.springframework.security.config.annotation.web.configuration.WebSecurityConfigurerAdapter;

@Configuration
public class SecurityConfiguration extends WebSecurityConfigurerAdapter {
    @Override
    public void configure(HttpSecurity http) throws Exception {
        http.antMatcher("/**").authorizeRequests()
            .antMatchers("/", "/login**").permitAll()
            .anyRequest().authenticated()
            .and()
            .oauth2Login();
    }
}
此类为您的应用程序定义了Spring Security配置:允许本地路径上的所有请求并要求对所有其他路由进行身份验证。 它还设置了Spring Boot OAuth登录流程。
The last files you need to add are the two Thymeleaf template files. A full look at Thymeleaf templating is well beyond the scope of this tutorial, but you can take a look at their website for more info.
模板放在src / main / resources / templates目录。 您会在上方的控制器中注意到,它们只是返回路线的字符串。 当Thymeleaf依赖项包含在构建中时,Spring Boot会自动假定您正在从控制器中返回模板文件的名称,因此该应用程序将在src / main / resources / templates使用返回的字符串加一个文件名。html。
创建主页模板:src / main / resources / templates / index.html:
<!DOCTYPE html>
<html lang="en">
<head>
    <meta charset="UTF-8">
    <title>Home</title>
</head>
<body>
    <h1>Spring Security SSO</h1>
    <a href="securedPage">Login</a>
</body>
</html>
和安全模板:src / main / resources / templates / securedPage.html:
<!DOCTYPE html>
<html xmlns:th="http://www.thymeleaf.org">
<head>
    <meta charset="UTF-8">
    <title>Secured Page</title>
</head>
<body>
    <h1>Secured Page</h1>
    <span th:text="${#authentication.name}"></span>
</body>
</html>
我只想指出这一行:
<span th:text="${#authentication.name}"></span>
这行将插入已验证用户的名称。 这行是为什么您需要org.thymeleaf.extras:thymeleaf-extras-springsecurity5依赖build.gradle文件。
启动客户端应用程序:
./gradlew bootRun
请稍等片刻。 终端应该以这样的结尾:
...
2019-02-23 19:29:04.448 INFO 54893 --- [main] o.s.b.w.embedded.tomcat.TomcatWebServer : Tomcat started on port(s): 8082 (http) with context path ''
2019-02-23 19:29:04.453 INFO 54893 --- [main] c.o.s.S.SpringBootOAuthClientApplication : Started SpringBootOAuthClientApplication in 3.911 seconds (JVM running for 4.403)
Test the Resource Server
在您选择的浏览器中导航到您的客户端应用程序,网址为http:// localhost:8082 /。
点击登录链接。
您将被定向到登录页面:

输入用户名安德鲁和密码A B C D(来自application.properties验证服务器中的文件)。
请点击登入你会被带到超级幻想securePage.html模板上应显示“ Secured Page”和“ Andrew”。
大! 有用。 现在,您将使其变得更加简单。
您可以停止服务器和客户端Spring Boot应用程序。
Create an OpenID Connect Application
Okta is a SaaS (software-as-service) authentication and authorization provider. We provide free accounts to developers so they can develop OIDC apps with no fuss. Head over to developer.okta.com and sign up for an account. After you’ve verified your email, log in and perform the following steps:
- 去应用 > Add 应用。选择应用程序类型网页然后点击下一个。Give the app a name。 I named mine “Spring Boot OAuth”。下登录重定向URI将值更改为http:// localhost:8080 / login / oauth2 / code / okta。 The rest of the default values will work。请点击完成。
让页面保持打开状态并注意客户编号和客户机密。 您稍后会需要它们。
Create a New Spring Boot App
Back to the Spring Initializr one more time. Create a new project with the following settings:
- 将项目类型从Maven更改为摇篮。将组更改为com。okta。spring。将工件更改为Okta OAuth客户端。添加三个依赖项:网页,胸腺,and Okta。请点击产生专案。

复制该项目并将其解压缩到某个地方。
在里面build.gradle文件,添加以下依赖项:
implementation 'org.thymeleaf.extras:thymeleaf-extras-springsecurity5:3.0.4.RELEASE'
Also while you’re there, notice the dependency com.okta.spring:okta-spring-boot-starter:1.1.0. This is the Okta Spring Boot Starter. It’s a handy project that makes integrating Okta with Spring Boot nice and easy. For more info, take a look at the project’s GitHub.
改变src / main / resources / application.properties至application.yml并添加以下内容:
server:
  port: 8080
okta:
  oauth2:
    issuer: https://{yourOktaDomain}/oauth2/default
    client-id: {yourClientId}
    client-secret: {yourClientSecret}
spring:
  thymeleaf:
    cache: false
记得当我说你需要你的客户编号和客户机密以上。 好,时间到了。 您需要将它们以及Okta发行者URL填充到文件中。 看起来像这样:dev-123456。okta。com。 你可以在下面找到它API > 授权服务器。
您还需要在src / main / resources / templates目录。 的index.html模板文件完全相同,并且可以根据需要复制。 的securePage.html模板文件与Okta返回的身份验证信息的方式相比,与您之前构建的简单身份验证服务器的方式稍有不同。
创建主页模板:src / main / resources / templates / index.html:
<!DOCTYPE html>
<html lang="en">
<head>
    <meta charset="UTF-8">
    <title>Home</title>
</head>
<body>
    <h1>Spring Security SSO</h1>
    <a href="securedPage">Login</a>
</body>
</html>
和安全模板:src / main / resources / templates / securedPage.html:
<!DOCTYPE html>
<html xmlns:th="http://www.thymeleaf.org">
<head>
    <meta charset="UTF-8">
    <title>Secured Page</title>
</head>
<body>
    <h1>Secured Page</h1>
    <span th:text="${#authentication.principal.attributes.name}">Joe Coder</span>
</body>
</html>
创建一个名为的Java类Web控制器在里面com.okta.spring.SpringBootOAuth包:
package com.okta.spring.OktaOAuthClient;

import org.springframework.stereotype.Controller;
import org.springframework.ui.Model;
import org.springframework.web.bind.annotation.RequestMapping;

import java.security.Principal;

@Controller
public class WebController {

    @RequestMapping("/securedPage")
    public String securedPage(Model model, Principal principal) {
        return "securedPage";
    }

    @RequestMapping("/")
    public String index(Model model, Principal principal) {
        return "index";
    }
}
该类仅创建两个路由,一个用于本地路由,一个用于安全路由。 再次,Spring Boot和Thymeleaf会自动将其粘贴到以下两个模板文件中src / main / resources / templates。
最后,创建另一个Java类名称安全配置:
package com.okta.spring.OktaOAuthClient;

import org.springframework.context.annotation.Configuration;
import org.springframework.security.config.annotation.web.builders.HttpSecurity;
import org.springframework.security.config.annotation.web.configuration.WebSecurityConfigurerAdapter;

@Configuration
public class SecurityConfiguration extends WebSecurityConfigurerAdapter {
    @Override
    public void configure(HttpSecurity http) throws Exception {
        http.antMatcher("/**").authorizeRequests()
            .antMatchers("/").permitAll()
            .anyRequest().authenticated()
            .and()
            .oauth2Login();
    }
}
而已! am!
运行由Okta-OAuth支持的客户端:
./gradlew bootRun
您应该看到一堆以结尾的输出:
...
2019-02-23 20:09:03.465 INFO 55890 --- [main] o.s.b.w.embedded.tomcat.TomcatWebServer : Tomcat started on port(s): 8080 (http) with context path ''
2019-02-23 20:09:03.470 INFO 55890 --- [main] c.o.s.O.OktaOAuthClientApplication : Started OktaOAuthClientApplication in 3.285 seconds (JVM running for 3.744)
Navigate to http://localhost:8080.
点击登录按钮。
这次,您将被带到Okta登录页面。 您可能需要使用隐身浏览器或在此处注销developer.okta.com仪表板,以免跳过登录页面并立即定向到安全端点。

登录后,您将看到带有您的姓名的安全页面!
Learn More About Spring Boot, Spring Security, and OAuth 2.0
就是这样。 超级容易。 在上一教程中,您研究了如何使用Spring Boot和Spring Security来实现非常基本的身份验证服务器和客户端应用程序。 接下来,您使用Okta使用功能齐全的SSO和OAuth身份验证制作了一个更简单的客户端应用程序。
You can see the completed code for this tutorial on GitHub at oktadeveloper/okta-spring-boot-authz-server-example.
如果您想了解有关Spring Boot,OAuth 2.0和Spring Security的更多信息,请查看以下有用的教程:
- Get Started with Spring Boot, OAuth 2.0, and Okta
- What the Heck is OAuth?
- Get Started with Spring Security 5.0 and OIDC
- Identity, Claims, & Tokens – An OpenID Connect Primer, Part 1 of 3
- Build a Secure API with Spring Boot and GraphQL
If you have any questions about this post, please add a comment below. For more awesome content, follow @oktadev on Twitter, or subscribe to our YouTube channel!
from: https://dev.to//oktadev/a-quick-guide-to-oauth-2-0-with-spring-security-1cad
