课程回顾
反射的概念: 运行期创建对象并调用对象的方法
①反射类的信息: 类名称, 类的父类,类的接口,类的包信息,类的注解; newInstance创建对象
②反射类的属性: 属性名称,属性的类型,属性的修饰符,调用属性的set/get方法, 强制访问
③反射类的构造方法: Constructor构造方法, 可以获取无参,有参; newInstance(Object … args)
④反射类的普通方法: Method, 获取所有声明的方法,获取自身和父类的方法,获取指定的方法, invoke方法
⑤反射类的main方法: getMethod(“main”, String[].class),mm.invoke(null, new Object[]{ new String[]{} })
⑥反射越过泛型检查:
⑦反射jar包的类信息: 获取类信息,获取类的属性,类的方法
⑧发射创建数组: Array.newInstance(Integer.class, 10)
⑨反射获取类泛型信息: 获取方法的泛型信息,获取返回值泛型信息
⑩手写Spring框架: 读取配置文件, 创建对象,放到Map, getBean根据key获取对象
静态代理
代理: 代表公司, 区域代理; 李宁郑州总代理; 代表公司在本区域销售李宁公司的产品. 媒婆: 代理,
静态代理一般只代理一个公司的商品, 李宁专卖店: 只销售李宁公司的产品.

还有一种商业形式: 大型商场, 连锁超市; 代理的众多公司的商品, 不再限于一家公司. 简单理解可以说动态代理.

说说宝宝的故事: 王宝强的故事, 汉语八级考试试题: 宝宝生的宝宝不象宝宝, 吓死宝宝了.
王宝强: 被代理人
宋喆: 代理人 经纪人
我想找王宝强做个品牌形象代言人, 我先找宋喆, 经纪人负责讨价还价; 但是真正的做广告的是王宝强. 静态代理
package com.hanker.staticproxy;
//娱乐共同的约束--接口
public interface Enterment {
	static final public   String AAA="XXX";
	public abstract void dance();
	void sing();
}
//==================
package com.hanker.staticproxy;
//真实对象---演员类
public class Actor implements Enterment{

	private String name;//演员名称

	public Actor(String name) {
		super();
		this.name = name;
	}

	public void dance() {
		System.out.println(name+"跳舞......");
	}

	public void sing() {
		System.out.println(name+"唱歌.....");
	}
}
//=================
package com.hanker.staticproxy;
//代理对象---中间人,代理人, 知名社会活动家
public class MiddleMan implements Enterment{
	private  String name;//姓名
	private Actor actor;//被代理的演员对象

	public MiddleMan(String name, Actor actor) {
		super();
		this.name = name;
		this.actor = actor;
	}

	public void dance() {
		System.out.println(name + " 哥们收点好处费.....");
		actor.dance();
		System.out.println(name+ " 下次继续合作...");
	}

	public void sing() {
		System.out.println("--开始唱歌-----");
		actor.sing();
		System.out.println("--结束唱歌-----");
	}
}
//===============
package com.hanker.staticproxy;
//测试类
public class Test {

	public static void main(String[] args) {
		Actor actor = new Actor("宝宝");//创建一个演员
		MiddleMan mm = new MiddleMan("宋喆",actor);
		mm.dance();
		mm.sing();
	}
}
以上是静态代理, 代理类只能代理一类对象. 如何实现代理任意类型的对象? 动态代理: 在java反射包中提供的有帮助类: Proxy 代理, InvocationHandler 调用处理器.
可以通过一个真实对象, 对应一个代理对象; 这样的问题是: 代理对象的泛滥.
动态代理
还有一种业务: 影视公司, 会签约一批艺人, 影视公司不再是一个明星的代理; 而是代理一批明星. 也可以理解为动态代理.
需求:
在执行方法之前答应日志信息, 在执行方法之后打印日志信息;
统计方法执行的时间: 在方法执行之前记录一个时间, 在方法执行之后再记录时间; 两者相减即可.
也可以是执行权限检查: 开当前用户有没有权限执行该方法.核心: 在不改变原始方法的前提下
动态代理Proxy类简介
public class Proxy extends Object implements Serializable
//属性
protected InvocationHandler h  //该代理实例的调用处理程序。
//构造方法
protected  Proxy(InvocationHandler h)
//从一个子类(通常是一个动态代理类)构造一个新的 Proxy实例,具有指定的调用处理程序的值。
//普通方法

//返回指定代理实例的调用处理程序。
static InvocationHandler getInvocationHandler(Object proxy)
//给出类加载器和接口数组的代理类的 java.lang.Class对象。
static Class<?> getProxyClass(ClassLoader loader, 类<?>... interfaces)
//如果且仅当使用 getProxyClass方法或 newProxyInstance方法将指定的类动态生成为代理类时,则返回true。
static boolean isProxyClass(Class<?> cl)
//返回指定接口的代理类的实例,该接口将方法调用分派给指定的调用处理程序。
static Object newProxyInstance(ClassLoader loader,   //类加载器
                               Class<?>[] interfaces,//接口数组
                               InvocationHandler h)  //调用处理器
动态代理类加载器
ClassLoader : 类加载器 ,把java的字节码文件加载到jvm执行; 当然之前要做一些列的检查,连接,校验.
公共汽车: jvm
ClassLoader: 售票员, 乘务员, 负责把客人拉到车上. 保证加载到jvm中的字节码是有效的,安全的,没有被人为修改过.
Class<?>[] interfaces,//接口数组 被代理对象实现的接口数组
InvocationHandler h : 调用处理器, 才是真正调用业务方法的地方.
动态代理案例
package com.hanker.dynamicproxy;
public interface ProductManager {
	int addProduct();//添加方法
	int deleteProduct(int no);//删除方法
}
//===========================
package com.hanker.dynamicproxy;
//要代理的业务对象, 不允许修改源代码
public class ProductManagerImpl implements ProductManager {
	@Override
	public int addProduct() {
		System.out.println("执行添加商品");
		return 1;
	}
	@Override
	public int deleteProduct(int no) {
		System.out.println("执行删除商品..."+no);
		return 1001;
	}
}
//=============没有代理对象==============
package com.hanker.dynamicproxy;

public class Test {

	public static void main(String[] args) {
		test1();
	}
	private static void test1() {
		ProductManger manager =new ProductMangerImpl();
		manager.addProduct();
		int result = manager.deleteProduct(1002);
		System.out.println("返回值:"+result);
	}
}
//=============通过Proxy创建代理对象======================
package com.hanker.dynamicproxy;

import java.lang.reflect.InvocationHandler;
import java.lang.reflect.Proxy;

//代理工厂类
public class ProxyFactory {
	//被代理对象
	private Object target;
	//初始化代理对象
	public ProxyFactory(Object target) {
		this.target = target;
	}
	//获取代理对象
	public Object getProxy() {
		Object  proxy = null;
		//调用处理器
		InvocationHandler h = new  MyLogInvocationHanler(target);
		//仅仅是创建代理对象,方法调用在哪里?
		proxy = Proxy.newProxyInstance(
				target.getClass().getClassLoader(), //被代理对象的类加载器
				target.getClass().getInterfaces(),  //被代理对象实现的接口
				h);                                 //调用处理器
		//返回代理对象
		return proxy;
	}

}
//============调用处理器 =============
package com.hanker.dynamicproxy;

import java.lang.reflect.InvocationHandler;
import java.lang.reflect.Method;

public class MyLogInvocationHanler implements InvocationHandler {
	//被代理的对象
	private Object object;
	//初始化被代理对象
	public MyLogInvocationHanler(Object object) {
		this.object = object;
	}

	/**
	 * Object proxy 被代理对象
	 * Method method 被调用的方法
	 * Object[] args 被调用的方法的参数
	 */
	@Override
	public Object invoke(Object proxy, Method method, Object[] args) throws Throwable {
		//获取调用方法名称
		String name = method.getName();
		before(name);//添加日志
		//调用真实对象的方法
		Object result = method.invoke(object, args);
		after(name);//添加日志
		return result;
	}

	public void before(String methodName) {
		System.out.println("开始执行"+methodName);
	}
	public void after(String methodName) {
		System.out.println("结束执行"+methodName);
	}

}
//===============测试方法==================
package com.hanker.dynamicproxy;

public class Test {

	public static void main(String[] args) {
		test2();
	}
	private static void test2() {
		//创建被代理对象
		ProductManger manager =new ProductMangerImpl();
		//把被代理对象传入代理工厂
		ProxyFactory factory = new ProxyFactory(manager);
		//获取代理对象
		ProductManger proxy = (ProductManger) factory.getProxy();
		//查看代理类的名称
		System.out.println("代理对象的名称:"+proxy.getClass().getName());
		//调用代理对象的方法
		proxy.addProduct();
		proxy.deleteProduct(10000);
	}
}
动态代理执行过程
测试类----代理对象------InvocationHandler的实现类-------真实对象.
ProxyFactory只负责创建代理对象,并指定一个调用处理器类: MyLogInvocationHandler
MyLogInvocationHandler再调用真实对象的业务方法, 在调用真实业务对象的方法之前和之后可以添加日志处理
案例2:

package com.hanker.dynamicproxy;

import java.lang.reflect.InvocationHandler;
import java.lang.reflect.Method;

public class MyTimeInvocationHandler implements InvocationHandler {

	private Object target;
	public MyTimeInvocationHandler(Object  target) {
		this.target = target;
	}
	@Override
	public Object invoke(Object proxy, Method method, Object[] args) throws Throwable {
		long start = System.currentTimeMillis();//当前时间的毫秒数
		Object result = method.invoke(target, args);
		long end = System.currentTimeMillis();
		System.out.println("耗时:" + (end-start) + "毫秒");
		return result;
	}

}
//=============================
package com.hanker.dynamicproxy;

import java.lang.reflect.InvocationHandler;
import java.lang.reflect.Proxy;

//代理工厂类
public class ProxyFactory {
	//被代理对象
	private Object target;
	//初始化代理对象
	public ProxyFactory(Object target) {
		this.target = target;
	}
	//获取代理对象
	public Object getProxy() {
		Object  proxy = null;
		//调用处理器
		//InvocationHandler h = new  MyLogInvocationHanler(target);
		InvocationHandler timeHandler = new MyTimeInvocationHandler(target);
		//仅仅是创建代理对象,方法调用在哪里?
		proxy = Proxy.newProxyInstance(
				target.getClass().getClassLoader(), //被代理对象的类加载器
				target.getClass().getInterfaces(),  //被代理对象实现的接口
				timeHandler);                       //调用处理器
		//返回代理对象
		return proxy;
	}

}
//==========测试类没有修改==============
多级代理: 日志+时间
//被代理对象
package com.hanker.dynamicproxy;
//要代理的业务对象, 不允许修改源代码
public class ProductMangerImpl implements ProductManger {
	@Override
	public int addProduct() {
		System.out.println("执行添加商品");
		try {
			Thread.sleep(1000);//模拟业务方法的执行
		} catch (InterruptedException e) {
			e.printStackTrace();
		}
		return 1;
	}
	@Override
	public int deleteProduct(int no) {
		System.out.println("执行删除商品..."+no);
		try {
			Thread.sleep(2000);//模拟业务方法的执行
		} catch (InterruptedException e) {
			e.printStackTrace();
		}
		return 1001;
	}
}
//===========代理工厂类==================
package com.hanker.dynamicproxy;

import java.lang.reflect.InvocationHandler;
import java.lang.reflect.Proxy;

//代理工厂类
public class ProxyFactory {
	//被代理对象
	private Object target;
	//初始化代理对象
	public ProxyFactory(Object target) {
		this.target = target;
	}
	//获取代理对象
	public Object getProxy() {
		Object  proxy = null;
		//调用处理器
		InvocationHandler timeHandler = new MyTimeInvocationHandler(target);
		//仅仅是创建代理对象,方法调用在哪里?
		proxy = Proxy.newProxyInstance(
				target.getClass().getClassLoader(), //被代理对象的类加载器
				target.getClass().getInterfaces(),  //被代理对象实现的接口
				timeHandler);                       //调用处理器
		//返回代理对象
		return proxy;
	}
}
//===================测试类======================
package com.hanker.dynamicproxy;

import java.lang.reflect.InvocationHandler;
import java.lang.reflect.Proxy;
public class Test {
	public static void main(String[] args) {
		//如果我想即输出日志又记录时间怎么办?
		//            鞋厂(200元)--省代(300元)--市代理(400元)--县级代理(500元)
		//需要两级代理: 公司--省代---市代理---县级代理
		//创建被代理对象
		ProductManger manager =new ProductMangerImpl();
		//把被代理对象传入代理工厂
		ProxyFactory factory = new ProxyFactory(manager);
		//获取代理对象: proxy省代理
		ProductManger proxy = (ProductManger) factory.getProxy();
		//查看代理类的名称
		System.out.println("代理对象的名称:"+proxy.getClass().getName());
		//proxy.addProduct();//一级代理
		//二级代理要增加的内容
		InvocationHandler h = new  MyLogInvocationHanler(proxy);//传入一级代理对象
		ProductManger proxy2 = (ProductManger)Proxy.newProxyInstance(
				proxy.getClass().getClassLoader(),
				proxy.getClass().getInterfaces(), h);
		//调用代理对象的方法
		proxy2.addProduct();
		proxy2.deleteProduct(10000);
	}
}
执行效果如下图所示, 需要强调的是MyBatis的插件开发就是多级代理模式实现的.
深入理解动态代理
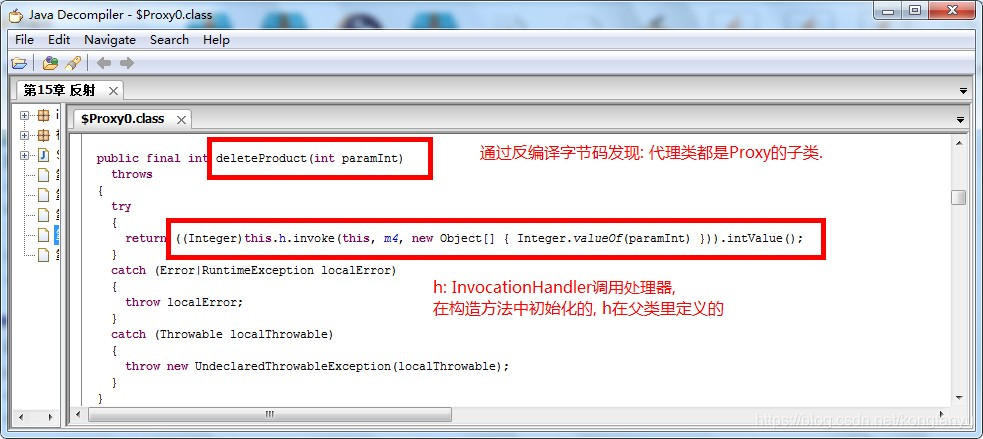
常识问题: 字节码文件是怎么产生的, 由java源码编译出来的. 也就意味着字节码都有对应的源码.但是:我们看到代理对象的类名是: com.sun.proxy.$Proxy0. 问题: 该类的源代码在哪里? 我们不会写源码保存到com.sun.proxy包的.那这个类就没有源代码, 而是直接在内存中生成的字节码文件.磁盘也没有.
动态代理源码分析
Proxy类的newProxyInstance方法
@CallerSensitive
public static Object newProxyInstance(ClassLoader loader,Class<?>[] interfaces,InvocationHandler h)
    throws IllegalArgumentException{
        Objects.requireNonNull(h);
        final Class<?>[] intfs = interfaces.clone();
        final SecurityManager sm = System.getSecurityManager();
        if (sm != null) {
            checkProxyAccess(Reflection.getCallerClass(), loader, intfs);
        }
        /*
         * Look up or generate the designated proxy class.
         * 查找或者生成指定的代理类, 下面继续分析
         */
        Class<?> cl = getProxyClass0(loader, intfs);
        /*
         * Invoke its constructor with the designated invocation handler.
         * 使用指定的调用处理器调用构造方法
         */
        try {
            if (sm != null) {
                checkNewProxyPermission(Reflection.getCallerClass(), cl);
            }
            //根据参数获取构造方法
            final Constructor<?> cons = cl.getConstructor(constructorParams);
            final InvocationHandler ih = h;//把属性 h 赋值给ih
            if (!Modifier.isPublic(cl.getModifiers())) {
                AccessController.doPrivileged(new PrivilegedAction<Void>() {
                    public Void run() {
                        cons.setAccessible(true);
                        return null;
                    }
                });
            }
            return cons.newInstance(new Object[]{h});//创建对象,使用调用处理器
        } catch (IllegalAccessException|InstantiationException e) {
            throw new InternalError(e.toString(), e);
        } catch (InvocationTargetException e) {
            Throwable t = e.getCause();
            if (t instanceof RuntimeException) {
                throw (RuntimeException) t;
            } else {
                throw new InternalError(t.toString(), t);
            }
        } catch (NoSuchMethodException e) {
            throw new InternalError(e.toString(), e);
        }
    }
newProxyInstance()方法帮我们执行了生成代理类----获取构造器----生成代理对象这三步;
生成代理类: Class<?> cl = getProxyClass0(loader, intfs);
获取构造器: final Constructor<?> cons = cl.getConstructor(constructorParams);
生成代理对象: cons.newInstance(new Object[]{h});
Proxy.getProxyClass0()如何生成代理类? getProxyClass0方法源码
/**
     * Generate a proxy class.  Must call the checkProxyAccess method
     * to perform permission checks before calling this.
     */
    private static Class<?> getProxyClass0(ClassLoader loader,
                                           Class<?>... interfaces) {
        if (interfaces.length > 65535) {
            throw new IllegalArgumentException("interface limit exceeded");
        }

        // If the proxy class defined by the given loader implementing
        // the given interfaces exists, this will simply return the cached copy;
        // otherwise, it will create the proxy class via the ProxyClassFactory
        //cache是缓存的意思, 看缓存中是否有代理对象了
        return proxyClassCache.get(loader, interfaces);
    }
继续跟踪 proxyClassCache.get(loader, interfaces);
public V get(K key, P parameter) {// key:类加载器;parameter:接口数组
        // 检查指定类型的对象引用不为空null。当参数为null时,抛出空指针异常。
        Objects.requireNonNull(parameter);
		// 清除已经被GC回收的弱引用
        expungeStaleEntries();
		// 将ClassLoader包装成CacheKey, 作为一级缓存的key
        Object cacheKey = CacheKey.valueOf(key, refQueue);

        // lazily install the 2nd level valuesMap for the particular cacheKey
		// 获取得到二级缓存
        ConcurrentMap<Object, Supplier<V>> valuesMap = map.get(cacheKey);
		// 没有获取到对应的值
        if (valuesMap == null) {
            ConcurrentMap<Object, Supplier<V>> oldValuesMap
                = map.putIfAbsent(cacheKey,
                                  valuesMap = new ConcurrentHashMap<>());
            if (oldValuesMap != null) {
                valuesMap = oldValuesMap;
            }
        }

        // create subKey and retrieve the possible Supplier<V> stored by that
        // subKey from valuesMap
		// 根据代理类实现的接口数组来生成二级缓存key
        Object subKey = Objects.requireNonNull(subKeyFactory.apply(key, parameter));
		// 通过subKey获取二级缓存值
        Supplier<V> supplier = valuesMap.get(subKey);
        Factory factory = null;
		// 这个循环提供了轮询机制, 如果条件为假就继续重试直到条件为真为止
        while (true) {
            if (supplier != null) {
                // supplier might be a Factory or a CacheValue<V> instance
				// 在这里supplier可能是一个Factory也可能会是一个CacheValue
				// 在这里不作判断, 而是在Supplier实现类的get方法里面进行验证
                V value = supplier.get();
                if (value != null) {
                    return value;
                }
            }
            // else no supplier in cache
            // or a supplier that returned null (could be a cleared CacheValue
            // or a Factory that wasn't successful in installing the CacheValue)

            // lazily construct a Factory
            if (factory == null) {
			    // 新建一个Factory实例作为subKey对应的值
                factory = new Factory(key, parameter, subKey, valuesMap);
            }

            if (supplier == null) {
			    // 到这里表明subKey没有对应的值, 就将factory作为subKey的值放入
                supplier = valuesMap.putIfAbsent(subKey, factory);
                if (supplier == null) {
                    // successfully installed Factory
					// 到这里表明成功将factory放入缓存
                    supplier = factory;
                }
				// 否则, 可能期间有其他线程修改了值, 那么就不再继续给subKey赋值, 而是取出来直接用
                // else retry with winning supplier
            } else {
			    // 期间可能其他线程修改了值, 那么就将原先的值替换
                if (valuesMap.replace(subKey, supplier, factory)) {
                    // successfully replaced
                    // cleared CacheEntry / unsuccessful Factory
                    // with our Factory
					// 成功将factory替换成新的值
                    supplier = factory;
                } else {
                    // retry with current supplier
					// 替换失败, 继续使用原先的值
                    supplier = valuesMap.get(subKey);
                }
            }
        }
    }
该方法中的Object subKey = Objects.requireNonNull(subKeyFactory.apply(key, parameter));
subKeyFactory调用apply,具体实现在ProxyClassFactory中完成。
ProxyClassFactory.apply()实现代理类创建。
private static final class ProxyClassFactory
        implements BiFunction<ClassLoader, Class<?>[], Class<?>>{
        // prefix for all proxy class names
	// 统一代理类的前缀名都以$Proxy
        private static final String proxyClassNamePrefix = "$Proxy";

        // next number to use for generation of unique proxy class names
	// 使用唯一的编号给作为代理类名的一部分,如$Proxy0,$Proxy1等
        private static final AtomicLong nextUniqueNumber = new AtomicLong();

        @Override
        public Class<?> apply(ClassLoader loader, Class<?>[] interfaces) {

            Map<Class<?>, Boolean> interfaceSet = new IdentityHashMap<>(interfaces.length);
            for (Class<?> intf : interfaces) {
                /*
                 * Verify that the class loader resolves the name of this
                 * interface to the same Class object.
		 * 验证指定的类加载器(loader)加载接口所得到的Class对象(interfaceClass)是否与intf对象相同
                 */
                Class<?> interfaceClass = null;
                try {
                    interfaceClass = Class.forName(intf.getName(), false, loader);
                } catch (ClassNotFoundException e) {
                }
                if (interfaceClass != intf) {
                    throw new IllegalArgumentException(
                        intf + " is not visible from class loader");
                }
                /*
                 * Verify that the Class object actually represents an
                 * interface.
		 * 验证该Class对象是不是接口
                 */
                if (!interfaceClass.isInterface()) {
                    throw new IllegalArgumentException(
                        interfaceClass.getName() + " is not an interface");
                }
                /*
                 * Verify that this interface is not a duplicate.
		 * 验证该接口是否重复
                 */
                if (interfaceSet.put(interfaceClass, Boolean.TRUE) != null) {
                    throw new IllegalArgumentException(
                        "repeated interface: " + interfaceClass.getName());
                }
            }
	    // 声明代理类所在包
            String proxyPkg = null;     // package to define proxy class in
            int accessFlags = Modifier.PUBLIC | Modifier.FINAL;

            /*
             * Record the package of a non-public proxy interface so that the
             * proxy class will be defined in the same package.  Verify that
             * all non-public proxy interfaces are in the same package.
	     * 验证所有非公共的接口在同一个包内;公共的就无需处理
             */
            for (Class<?> intf : interfaces) {
                int flags = intf.getModifiers();
                if (!Modifier.isPublic(flags)) {
                    accessFlags = Modifier.FINAL;
                    String name = intf.getName();
                    int n = name.lastIndexOf('.');
					// 截取完整包名
                    String pkg = ((n == -1) ? "" : name.substring(0, n + 1));
                    if (proxyPkg == null) {
                        proxyPkg = pkg;
                    } else if (!pkg.equals(proxyPkg)) {
                        throw new IllegalArgumentException(
                            "non-public interfaces from different packages");
                    }
                }
            }

            if (proxyPkg == null) {
                // if no non-public proxy interfaces, use com.sun.proxy package
		/*如果都是public接口,那么生成的代理类就在com.sun.proxy包下如果报java.io.FileNotFoundException: com\sun\proxy\$Proxy0.class
		(系统找不到指定的路径。)的错误,就先在你项目中创建com.sun.proxy路径*/
                proxyPkg = ReflectUtil.PROXY_PACKAGE + ".";
            }

            /*
             * Choose a name for the proxy class to generate.
	     * nextUniqueNumber 是一个原子类,确保多线程安全,防止类名重复,类似于:$Proxy0,$Proxy1......
             */
            long num = nextUniqueNumber.getAndIncrement();
	    // 代理类的完全限定名,如com.sun.proxy.$Proxy0.calss
            String proxyName = proxyPkg + proxyClassNamePrefix + num;

            /*
             * Generate the specified proxy class.
	     * 生成类字节码的方法(重点)
             */
            byte[] proxyClassFile = ProxyGenerator.generateProxyClass(
                proxyName, interfaces, accessFlags);
            try {
                return defineClass0(loader, proxyName,
                                    proxyClassFile, 0, proxyClassFile.length);
            } catch (ClassFormatError e) {
                /*
                 * A ClassFormatError here means that (barring bugs in the
                 * proxy class generation code) there was some other
                 * invalid aspect of the arguments supplied to the proxy
                 * class creation (such as virtual machine limitations
                 * exceeded).
                 */
                throw new IllegalArgumentException(e.toString());
            }
        }
    }
代理类创建真正在ProxyGenerator.generateProxyClass()方法中,方法签名如下:
byte[] proxyClassFile = ProxyGenerator.generateProxyClass(proxyName, interfaces, accessFlags);
private byte[] generateClassFile() {
/* ============================================================
* Step 1: Assemble ProxyMethod objects for all methods to generate proxy dispatching code for.
* 步骤1:为所有方法生成代理调度代码,将代理方法对象集合起来。
*/
        //增加 hashcode、equals、toString方法
        addProxyMethod(hashCodeMethod, Object.class);
        addProxyMethod(equalsMethod, Object.class);
        addProxyMethod(toStringMethod, Object.class);
        // 获得所有接口中的所有方法,并将方法添加到代理方法中
        for (Class<?> intf : interfaces) {
            for (Method m : intf.getMethods()) {
                addProxyMethod(m, intf);
            }
        }

        /*
         * 验证方法签名相同的一组方法,返回值类型是否相同;意思就是重写方法要方法签名和返回值一样
         */
        for (List<ProxyMethod> sigmethods : proxyMethods.values()) {
            checkReturnTypes(sigmethods);
        }

        /* ============================================================
         * Step 2: Assemble FieldInfo and MethodInfo structs for all of fields and methods in the class we are generating.
         * 为类中的方法生成字段信息和方法信息
         */
        try {
            // 生成代理类的构造函数
            methods.add(generateConstructor());
            for (List<ProxyMethod> sigmethods : proxyMethods.values()) {
                for (ProxyMethod pm : sigmethods) {
                    // add static field for method's Method object
                    fields.add(new FieldInfo(pm.methodFieldName,
                            "Ljava/lang/reflect/Method;",
                            ACC_PRIVATE | ACC_STATIC));
                    // generate code for proxy method and add it
					// 生成代理类的代理方法
                    methods.add(pm.generateMethod());
                }
            }
            // 为代理类生成静态代码块,对一些字段进行初始化
            methods.add(generateStaticInitializer());
        } catch (IOException e) {
            throw new InternalError("unexpected I/O Exception", e);
        }

        if (methods.size() > 65535) {
            throw new IllegalArgumentException("method limit exceeded");
        }
        if (fields.size() > 65535) {
            throw new IllegalArgumentException("field limit exceeded");
        }

        /* ============================================================
         * Step 3: Write the final class file.
         * 步骤3:编写最终类文件
         */
        /*
         * Make sure that constant pool indexes are reserved for the following items before starting to write the final class file.
         * 在开始编写最终类文件之前,确保为下面的项目保留常量池索引。
         */
        cp.getClass(dotToSlash(className));
        cp.getClass(superclassName);
        for (Class<?> intf: interfaces) {
            cp.getClass(dotToSlash(intf.getName()));
        }

        /*
         * Disallow new constant pool additions beyond this point, since we are about to write the final constant pool table.
         * 设置只读,在这之前不允许在常量池中增加信息,因为要写常量池表
         */
        cp.setReadOnly();

        ByteArrayOutputStream bout = new ByteArrayOutputStream();
        DataOutputStream dout = new DataOutputStream(bout);

        try {
            // u4 magic;
            dout.writeInt(0xCAFEBABE);
            // u2 次要版本;
            dout.writeShort(CLASSFILE_MINOR_VERSION);
            // u2 主版本
            dout.writeShort(CLASSFILE_MAJOR_VERSION);

            cp.write(dout);             // (write constant pool)

            // u2 访问标识;
            dout.writeShort(accessFlags);
            // u2 本类名;
            dout.writeShort(cp.getClass(dotToSlash(className)));
            // u2 父类名;
            dout.writeShort(cp.getClass(superclassName));
            // u2 接口;
            dout.writeShort(interfaces.length);
            // u2 interfaces[interfaces_count];
            for (Class<?> intf : interfaces) {
                dout.writeShort(cp.getClass(
                        dotToSlash(intf.getName())));
            }
            // u2 字段;
            dout.writeShort(fields.size());
            // field_info fields[fields_count];
            for (FieldInfo f : fields) {
                f.write(dout);
            }
            // u2 方法;
            dout.writeShort(methods.size());
            // method_info methods[methods_count];
            for (MethodInfo m : methods) {
                m.write(dout);
            }
            // u2 类文件属性:对于代理类来说没有类文件属性;
            dout.writeShort(0); // (no ClassFile attributes for proxy classes)

        } catch (IOException e) {
            throw new InternalError("unexpected I/O Exception", e);
        }

        return bout.toByteArray();
    }
手动生成字节码文件
生成字节码文件的方法:
① :配置类的访问规则, 默认 sun包下的类不允许访问
选择项目----右键—properties菜单( alt+enter )


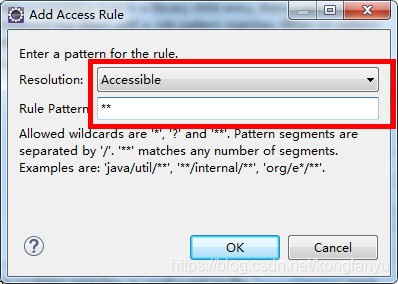
后面一路OK就可以了.
package com.hanker.dynamicproxy;
import java.io.File;
import java.io.FileOutputStream;
import java.lang.reflect.InvocationHandler;
import java.lang.reflect.Proxy;
import sun.misc.ProxyGenerator;
public class Test {
	public static void main(String[] args) {
		testProxy();
	}
	public static void testProxy() {
		//生成代理对象的字节码文件
		byte[] bytes = ProxyGenerator.generateProxyClass("$Proxy0", new Class[]{ProductMangerImpl.class});
		try (FileOutputStream fos =
				new FileOutputStream(new File("E:\\java20191202\\1.java核心\\第15章 反射\\$Proxy0.class")))
		{
			fos.write(bytes);
			fos.flush();
		} catch (Exception e) {
			e.printStackTrace();
		}
	}
}
生成一个字节码文件:
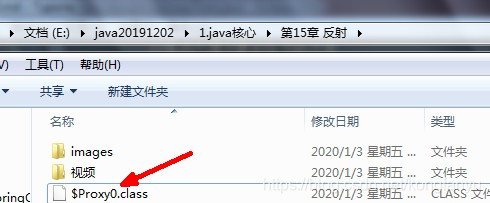
反编译字节码文件
使用 jd-gui.exe 工具反编译class文件.
基于CGLIB实现动态代理
CGLIB简介
CGLIB(Code Generation Library)是一个开源项目!是一个强大的,高性能,高质量的Code生成类库,它可以在运行期扩展Java类与实现Java接口。Hibernate用它来实现PO(Persistent Object 持久化对象)字节码的动态生成。CGLIB是一个强大的高性能的代码生成包。它广泛的被许多AOP的框架使用,例如Spring AOP为他们提供方法的interception(拦截)。CGLIB包的底层是通过使用一个小而快的字节码处理框架ASM,来转换字节码并生成新的类。
除了CGLIB包,脚本语言例如Groovy和BeanShell,也是使用ASM来生成java的字节码。当然不鼓励直接使用ASM,因为它要求你必须对JVM内部结构包括class文件的格式和指令集都很熟悉。
CGLIB依赖两个jar包:cglib-3.3.0.jar , asm-7.1.jar; 添加到构建路径.
CGLIB动态代理
创建业务类,注意这个业务类并没有实现任何接口
package com.hanker.cglib;
//要代理的业务对象
public class ProductMangerImpl {
public ProductMangerImpl() {
System.out.println("创建ProductMangerImpl对象");
}
public int addProduct() {
System.out.println("执行添加商品");
return 1;
}
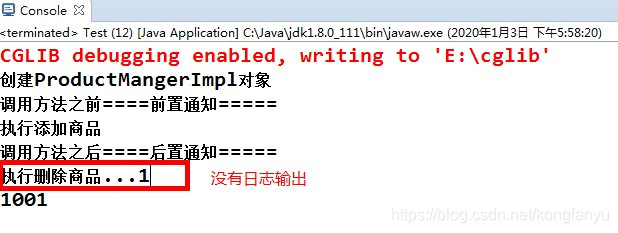
//该方法不能被子类覆盖,Cglib是无法代理final修饰的方法
public final int deleteProduct(int no) {
System.out.println("执行删除商品..."+no);
return 1001;
}
}
创建方法拦截器实现类
package com.hanker.cglib;
import java.lang.reflect.Method;
import net.sf.cglib.proxy.MethodInterceptor;
import net.sf.cglib.proxy.MethodProxy;
//实现MethodInterceptor接口的方法拦截器
public class MyMethodInterceptor implements MethodInterceptor{
    /**
     * obj:cglib生成的代理对象
     * method:被代理对象方法
     * args:方法入参
     * methodProxy: 代理方法
     */
	@Override
	public Object intercept(Object obj, Method method, Object[] args, MethodProxy methodProxy) throws Throwable {
		System.out.println("调用方法之前====前置通知=====");
		Object result = methodProxy.invokeSuper(obj, args);
		System.out.println("调用方法之后====后置通知=====");
		return result;
	}

}
生成CGLIB代理对象调用目标方法:
package com.hanker.cglib;

import net.sf.cglib.core.DebuggingClassWriter;
import net.sf.cglib.proxy.Enhancer;
public class Test {
	public static void main(String[] args) {
		// 指定代理类字节码文件的路径
		System.setProperty(DebuggingClassWriter.DEBUG_LOCATION_PROPERTY, "E:\\cglib");
		// 通过CGLIB动态代理获取代理对象的过程
		Enhancer  enhancer = new Enhancer();
		// 设置enhancer的父类
		enhancer.setSuperclass(ProductMangerImpl.class);
		// 设置enhancer的回调对象
		enhancer.setCallback(new MyMethodInterceptor());
		// 创建代理对象
		ProductMangerImpl proxy = (ProductMangerImpl) enhancer.create();
		//通过代理对象调用目标方法
		proxy.addProduct();//带日志
		int result = proxy.deleteProduct(1);//不带日志
		System.out.println(result);
	}
}
执行效果:
CGLIB动态代理源码分析
实现CGLIB动态代理必须实现MethodInterceptor(方法拦截器)接口,源码如下:
package net.sf.cglib.proxy;
public interface MethodInterceptor extends Callback{
    /**
     * All generated proxied methods call this method instead of the original method.
     * The original method may either be invoked by normal reflection using the Method object,
     * or by using the MethodProxy (faster).
     * @param obj "this", the enhanced object
     * @param method intercepted Method
     * @param args argument array; primitive types are wrapped
     * @param proxy used to invoke super (non-intercepted method); may be called
     * as many times as needed
     * @throws Throwable any exception may be thrown; if so, super method will not be invoked
     * @return any value compatible with the signature of the proxied method. Method returning void will ignore this value.
     * @see MethodProxy
     */
    public Object intercept(Object obj, java.lang.reflect.Method method, Object[] args,
                               MethodProxy proxy) throws Throwable;
}
这个接口只有一个intercept()方法,这个方法有4个参数:
1)obj表示增强的对象,即实现这个接口类的一个对象;
2)method表示要被拦截的方法;
3)args表示要被拦截方法的参数;
4)proxy表示要触发父类的方法对象;
在上面的Test代码中,通过Enhancer.create()方法创建代理对象,create()方法的源码:
/**
* Generate a new class if necessary and uses the specified
* callbacks (if any) to create a new object instance.
* Uses the no-arg constructor of the superclass.
* @return a new instance
*/
public Object create() {
     classOnly = false;
     argumentTypes = null;
	return createHelper();
}
该方法含义就是如果有必要就创建一个新类,并且用指定的回调对象创建一个新的对象实例,
使用的父类的参数的构造方法来实例化父类的部分。核心内容在createHelper()中,源码如下:
private Object createHelper() {
        preValidate();
        Object key = KEY_FACTORY.newInstance((superclass != null) ? superclass.getName() : null,
                ReflectUtils.getNames(interfaces),
                filter == ALL_ZERO ? null : new WeakCacheKey<CallbackFilter>(filter),
                callbackTypes,
                useFactory,
                interceptDuringConstruction,
                serialVersionUID);
        this.currentKey = key;
        Object result = super.create(key);
        return result;
    }
preValidate()方法校验callbackTypes、filter是否为空,以及为空时的处理。通过newInstance()方法创建EnhancerKey对象,作为Enhancer父类AbstractClassGenerator.create()方法创建代理对象的参数。
protected Object create(Object key) {
        try {
            ClassLoader loader = getClassLoader();
            Map<ClassLoader, ClassLoaderData> cache = CACHE;
            ClassLoaderData data = cache.get(loader);
            if (data == null) {
                synchronized (AbstractClassGenerator.class) {
                    cache = CACHE;
                    data = cache.get(loader);
                    if (data == null) {
                        Map<ClassLoader, ClassLoaderData> newCache = new WeakHashMap<ClassLoader, ClassLoaderData>(cache);
                        data = new ClassLoaderData(loader);
                        newCache.put(loader, data);
                        CACHE = newCache;
                    }
                }
            }
            this.key = key;
            Object obj = data.get(this, getUseCache());
            if (obj instanceof Class) {
                return firstInstance((Class) obj);
            }
            return nextInstance(obj);
        } catch (RuntimeException e) {
            throw e;
        } catch (Error e) {
            throw e;
        } catch (Exception e) {
            throw new CodeGenerationException(e);
        }
    }
真正创建代理对象方法在nextInstance()方法中,该方法为抽象类AbstractClassGenerator的一个方法,签名如下:abstract protected Object nextInstance(Object instance) throws Exception;
在子类Enhancer中实现,实现源码如下:
protected Object nextInstance(Object instance) {
        EnhancerFactoryData data = (EnhancerFactoryData) instance;
        if (classOnly) {
            return data.generatedClass;
        }
        Class[] argumentTypes = this.argumentTypes;
        Object[] arguments = this.arguments;
        if (argumentTypes == null) {
            argumentTypes = Constants.EMPTY_CLASS_ARRAY;
            arguments = null;
        }
        return data.newInstance(argumentTypes, arguments, callbacks);
}
看看data.newInstance(argumentTypes, arguments, callbacks)方法,
第一个参数为代理对象的构成器类型,第二个为代理对象构造方法参数,第三个为对应回调对象。
最后根据这些参数,通过反射生成代理对象,源码如下:
/**
* Creates proxy instance for given argument types, and assigns the callbacks.
* Ideally, for each proxy class, just one set of argument types should be used,
* otherwise it would have to spend time on constructor lookup.
* Technically, it is a re-implementation of {@link Enhancer#createUsingReflection(Class)},
* with "cache {@link #setThreadCallbacks} and {@link #primaryConstructor}"
*
* @see #createUsingReflection(Class)
* @param argumentTypes constructor argument types
* @param arguments constructor arguments
* @param callbacks callbacks to set for the new instance
* @return newly created proxy
*/
public Object newInstance(Class[] argumentTypes, Object[] arguments, Callback[] callbacks) {
    setThreadCallbacks(callbacks);
    try {
        // Explicit reference equality is added here just in case Arrays.equals does not have one
        if (primaryConstructorArgTypes == argumentTypes ||
            Arrays.equals(primaryConstructorArgTypes, argumentTypes)) {
            // If we have relevant Constructor instance at hand, just call it
            // This skips "get constructors" machinery
            return ReflectUtils.newInstance(primaryConstructor, arguments);
        }
        // Take a slow path if observing unexpected argument types
        return ReflectUtils.newInstance(generatedClass, argumentTypes, arguments);
    } finally {
        // clear thread callbacks to allow them to be gc'd
        setThreadCallbacks(null);
    }
}
最后生成代理对象:

将其反编译后代码如下:
public class ProductMangerImpl$$EnhancerByCGLIB$$e5b0daae
      extends ProductMangerImpl implements Factory{
  ....
    public final int addProduct(){
    ...
    if (tmp17_14 != null){
      // 调用拦截器
      Object tmp36_31 = tmp17_14.intercept(this, CGLIB$addProduct$0$Method,
                                                 CGLIB$emptyArgs, CGLIB$addProduct$0$Proxy);
      tmp36_31;
      return tmp36_31 == null ? 0 : ((Number)tmp36_31).intValue();
    }
    return super.addProduct();
  }
  ....
}
最后我们总结一下JDK动态代理和Gglib动态代理的区别:
1.JDK动态代理是实现了被代理对象的接口,Cglib是继承了被代理对象。
2.JDK和Cglib都是在运行期生成字节码,JDK是直接写Class字节码,Cglib使用ASM框架写Class字节码,Cglib代理实现更复杂,生成代理类比JDK效率低。
3.JDK调用代理方法,是通过反射机制调用,Cglib是通过FastClass机制直接调用方法,Cglib执行效率更高。
