规划图

图源https://blog.51cto.com/xiyuxingxia/2396846
注,下面一些图片可能因设置了防盗链无法显示,如需要markdown请移步 https://mysqldb.org 群友分享目录下的文档目录
(需允许运行网页脚本才能显示)
搭建此小型架构是为了检验第一阶段的学习水平,感觉还有很多细节处理的不到位,希望大佬们能多多指教
防火墙放在lb上了,暂时还不知道如何置于lb之前,大佬们可以帮忙指点一下
目录:
[TOC]
准备环境
主机类型 主机名 内网ip 外网ip 软件
防火墙服务器 firewalld 172.16.1.81 10.0.0.81 firewalld
负载均衡服务器 lb01 172.16.1.5 10.0.0.5 nginx,keepalived
负载均衡服务器 lb02 172.16.1.6 10.0.0.6 nginx,keepalived
web服务器 web01 172.16.1.7 10.0.0.7 nginx
web服务器 web02 172.16.1.8 10.0.0.8 nginx
web服务器 web03 172.16.1.9 10.0.0.9 nginx
数据库服务器 db01 172.16.1.51 10.0.0.51 mariadb
存储服务器 nfs01 172.16.1.31 10.0.0.31 nfs
备份服务器 backup 172.16.1.41 10.0.0.41 rsync
批量管理服务器 m01 172.16.1.61 10.0.0.61 ansible
跳板机服务器 jumpserver 172.16.1.71 10.0.0.71 jumpserver
监控服务器 zabbix 172.16.1.72 10.0.0.72 zabbix
模板机优化
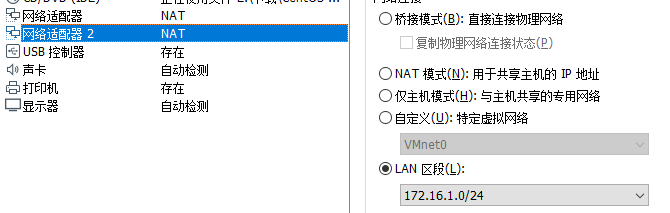
外网网卡为NAT模式,ip地址10.0.0.200
添加一块内网网卡(lan区段):
开机,会自动识别出eth1
编辑eth1网卡配置文件:
# vi /etc/sysconfig/network-scripts/ifcfg-eth1

TYPE=Ethernet

BOOTPROTO=none

NAME=eth1

DEVICE=eth1

ONBOOT=yes

IPADDR=172.16.1.200

PREFIX=24
(内网无需DNS和网关)
重启网络,测试网络
hosts文件添加内网主机解析:
172.16.1.5 lb01
172.16.1.6 lb02
172.16.1.7 web01
172.16.1.8 web02
172.16.1.9 web03
172.16.1.51 db01
172.16.1.31 nfs01
172.16.1.41 backup
172.16.1.61 m01
修改为阿里yum源(先备份原来的)
wget -O /etc/yum.repos.d/CentOS-Base.repo http://mirrors.aliyun.com/repo/Centos-7.repo

wget -O /etc/yum.repos.d/epel.repo http://mirrors.aliyun.com/repo/epel-7.repo

yum makecache
关闭selinux
sed -i.bak 's/SELINUX=enforcing/SELINUX=disabled/' /etc/selinux/config

grep SELINUX=disabled /etc/selinux/config

setenforce 0

getenforce
关闭防火墙
systemctl stop firewalld

systemctl disable firewalld

systemctl status  firewalld
修改为英文字符集
localectl set-locale LANG="en_US.UTF-8"
#时间同步
yum install -y ntpdate

echo '#time sync by lidao at 2017-03-08' >>/var/spool/cron/root

echo '/5    /usr/sbin/ntpdate ntp1.aliyun.com >/dev/null 2>&1' >>/var/spool/cron/root

crontab -l
加大文件描述符
echo '              -      nofile          65536' >>/etc/security/limits.conf

tail -1 /etc/security/limits.conf
安装所需软件
yum install lrzsz nmap tree dos2unix nc telnet wget lsof ntpdate bash-completion bash-completion-extras -y
ssh连接速度慢优化
sed -i.bak 's@#UseDNS yes@UseDNS no@g;s@^GSSAPIAuthentication yes@GSSAPIAuthentication no@g'  /etc/ssh/sshd_config

systemctl restart sshd
克隆主机
链接克隆,节省资源
克隆后主机配置
a 修改主机名称

hostnamectl set-hostname backup

b 修改主机地址,更改模板机的ip 200 为上面规划的ip

sed -i 's#200#41#g' /etc/sysconfig/network-scripts/ifcfg-eth[01]

grep 41 /etc/sysconfig/network-scripts/ifcfg-eth[01]

sed -i '/UUID/d' /etc/sysconfig/network-scripts/ifcfg-eth[01]

grep UUID /etc/sysconfig/network-scripts/ifcfg-eth[01]

systemctl restart network
PS:一台一台顺序启动,进行修改,不要同时启动
项目部署
思路:
将三台web主机LNP先搭起来,连接后端db01数据库
分发公钥,编写配置文件
m01# yum install -y ansible
vim /etc/ansible/hosts
编写主机清单文件
[web]

172.16.1.7

172.16.1.8

172.16.1.9

[lb]

172.16.1.5

172.16.1.6

[db]

172.16.1.51

[nfs]

10.0.0.31

[backup]

172.16.1.41
管理端创建秘钥对信息
[root@m01 ~]# ssh-keygen -t dsa

Generating public/private dsa key pair.

Enter file in which to save the key (/root/.ssh/id_dsa):

Created directory '/root/.ssh'.

Enter passphrase (empty for no passphrase):

Enter same passphrase again:

Your identification has been saved in /root/.ssh/id_dsa.

Your public key has been saved in /root/.ssh/id_dsa.pub.
免交互分发公钥
$ yum install -y sshpass

$ vim fenfa_pub_key.sh

#!/bin/bash

for ip in {5,6,7,8,9,31,41,51}

do

  echo "==================== host 172.16.1.$ip pub-key start fenfa ==================== "

  sshpass -p123456 ssh-copy-id -i /root/.ssh/id_dsa.pub [email protected].$ip "-o StrictHostKeyChecking=no" &>/dev/null

  echo -e "host 172.16.1.$ip fenfa success."

  echo "==================== host 172.16.1.$ip fenfa end ==================== "

  echo ""

done

#######

$ bash fenfa_pub_key.sh
分发公钥检查
[root@m01 scripts]# cat check_pub_key.sh

#!/bin/bash

CMD=$1

for ip in {5,6,7,8,9,31,41,51}

do

  echo "==================== host 172.16.1.$ip check ==================== "

  ssh 172.16.1.$ip $CMD

  echo ""

done

$ bash check_pub_key.sh
测试是否可以管理多个主机
[root@m01 scripts]# ansible all -a "hostname"

172.16.1.7 | CHANGED | rc=0 >>

web01

172.16.1.8 | CHANGED | rc=0 >>

web02

172.16.1.9 | CHANGED | rc=0 >>

web03

172.16.1.51 | CHANGED | rc=0 >>

db01
部署LNMP
编辑官方yum源文件
[root@m01]# mkdir /etc/ansible/files

[root@m01]# cd /etc/ansible/files

[root@m01 files]# vim nginx.repo

[nginx-stable]

name=nginx stable repo

baseurl=http://nginx.org/packages/centos/$releasever/$basearch/

gpgcheck=1

enabled=1

gpgkey=https://nginx.org/keys/nginx_signing.key
编辑负载均衡配置文件
m01 files]# vim lb.conf

upstream lbtest {

  server 10.0.0.7:80;

  server 10.0.0.8:80;

  server 10.0.0.9:80;

}

server {

    listen      80;

    server_name  mysite.com;

    location / {

        proxy_pass http://lbtest;

        proxy_set_header Host $host;

        proxy_set_header X-Forwarded-For $remote_addr;

        proxy_next_upstream error timeout http_404 http_502 http_403;

    }

}
编写剧本
安装php7 yum源,nginx,php7,启动nginx,php-fpm
[root@m01 files]# mkdir /etc/ansible/ansible-playbook

[root@m01 files]# cd /etc/ansible/ansible-playbook

[root@m01 ansible-playbook]# vim lnmp_lb.ymal

- hosts: web

  tasks:

    - name: remove old php  # 删除php老版本

      yum: name=php-mysql,php,php-fpm,php-common state=absent

    - name: install php7_yum_yuan_epel  # 安装php7 yum源

      yum: name=http://mysqldb.org/packages/php7_yum_yuan/epel-release-latest-7.noarch.rpm,http://mysqldb.org/packages/php7_yum_yuan/webtatic-release.rpm state=installed

# yum源原链接为 https://dl.fedoraproject.org/pub/epel/epel-release-latest-7.noarch.rpm和https://mirror.webtatic.com/yum/el7/webtatic-release.rpm虚拟机下载速度奇慢,故用云主机下载之后再传到本地安装,rpm包已上传到mysqldb.org 方便群友下载

    - name: send nginx_yum_yuan  # 分发nginx官方yum源

      copy: src=/etc/ansible/files/nginx.repo dest=/etc/yum.repos.d/

    - name: install php7 & nginx  # 安装php,nginx,nfs-utils

      yum: name=nginx,nfs-utils,php71w,php71w-cli,php71w-common,php71w-devel,php71w-embedded,php71w-gd,php71w-mcrypt,php71w-mbstring,php71w-pdo,php71w-xml,php71w-fpm,php71w-mysqlnd,php71w-opcache,php71w-pecl-memcached,php71w-pecl-redis,php71w-pecl-mongodb state=installed

    - name: start nginx  # 启动nginx

      service: name=nginx state=started enabled=yes

    - name: change owner for php  # nginx进程的管理用户要和php服务进程的管理用户保持一致

      shell: sed -i.bak -e 's#user = apache#user = nginx#g' -e 's#group = apache#group = nginx#g' /etc/php-fpm.d/www.conf

    - name: start php-fpm  # 启动php-fpm

      service: name=php-fpm state=started enabled=yes

    - name: mkdir /html/www/mysite  # 创建网站目录

      file: dest=/html/www/mysite state=directory owner=nginx group=nginx

    - name: send wordpress.tar.gz  # 分发wordpress网站代码

      copy: src=/etc/ansible/files/wordpress-5.2.1.tar.gz dest=/html/www/mysite

    - name: unarchive wordpress  # 解压,注意权限,copy=no为在远端主机找src

      unarchive: src=/html/www/mysite/wordpress-5.2.1.tar.gz dest=/html/www/mysite copy=no owner=nginx group=nginx

#########################################################################

- hosts: lb

  tasks:

    - name: send nginx_yum_yuan

      copy: src=/etc/ansible/files/nginx.repo dest=/etc/yum.repos.d/

    - name: install nginx & keepalived  # 安装nginx,keepalived

      yum: name=nginx,keepalived state=installed

    - name: send nginx_conf.d_lb.conf  # 向两台lb发送配置文件

      copy: src=/etc/ansible/files/lb.conf dest=/etc/nginx/conf.d/

    - name: start nginx  启动nginx负载均衡

      service: name=nginx state=started
db01安装数据库
[root@db01 ~]# yum install mariadb-server mariadb -y

启动mariadb

systemctl start mariadb.service

systemctl enable mariadb.service

初始化

[root@db01 ~]# mysql_secure_installation

mysql root密码设置为了mysql123
为方便测试,给root用户添加远程访问权限
db01 ~]# mysql -uroot -pmysql123

>use mysql;

>update db set host = '%' where user = 'root';

>flush privileges;
在web01上编辑nginx配置文件
web01# vim /etc/nginx/conf.d/mysite.conf

server {

    listen      80;

    server_name  mysite.com;

    location / {

        root  /html/www/mysite/wordpress;

        index index.php index.html index.htm;

    }

location ~ \.php$ {

        root /html/www/mysite/wordpress;

        fastcgi_index index.php;

        fastcgi_param SCRIPT_FILENAME $document_root$fastcgi_script_name;

        fastcgi_pass  127.0.0.1:9000;

        include fastcgi_params;

}

}

# 最好将nginx.conf主配置文件中的include字段里的 *.conf 改为mysite.conf,方便直接访问ip测试
测试php与mysql的通信
web01# mkdir /html/www/mysite

web01# vim /html/www/mysite/index.php
修改windows本地hosts,添加 10.0.0.7 mysite.com (此处先进行测试,之后ip地址要改为负载均衡的ip)
访问域名即可看到php状态页
php与mysql建立连接测试
web01]# vim /html/www/mysite/test_mysql.php
访问mysite.com/test_mysql.php
successful
删掉测试页,安装wordpress
上传wordpress文件到/html/www/mysite 解压
web01 mysite]# chown nginx:nginx /html/www/ -R
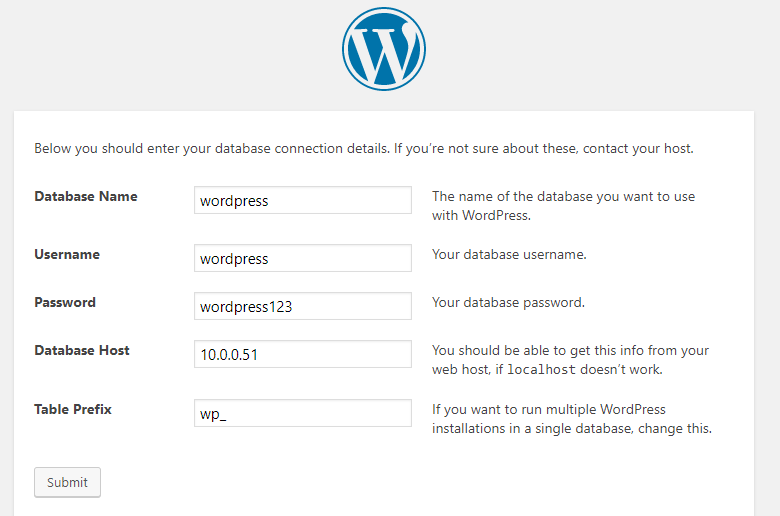
对数据库服务进行配置
db01 ~]# mysql -u root -pmysql123

创建数据库: create database wordpress;

检查: show databases;

创建数据库管理用户: grant all on wordpress.* to 'wordpress'@'%' identified by 'wordpress123';

检查: select user,host from mysql.user
访问mysite.com
为方便记忆,管理后台用户同为wordpress,密码wordpress123
发布一篇带图片的文章
分发nginx和wordpress配置文件
将测试成功的web01上的mysite.conf , nginx.conf , wp-config.php 拖到 m01 上,并推给其他web主机
m01$ ansible web -m copy -a "src=/etc/ansible/files/nginx.conf dest=/etc/nginx/"

m01$ ansible web -m copy -a "src=/etc/ansible/files/mysite.conf dest=/etc/nginx/conf.d/"

m01$ ansible web -m copy -a "src=/etc/ansible/files/wp-config.php dest=/html/www/mysite/wordpress owner=nginx group=nginx"

重启nginx,使配置文件生效

m01$ ansible web -m service -a "name=nginx state=restarted enabled=yes"
此时访问各web主机的ip,可看到显示的页面一致(如果设置了防盗链,web02 03是不会显示web01发布的文章图片的,只会显示文字)
将图片迁移到nfs存储服务器
鼠标放到图片上,右键即可看到路径
部署nfs
nfs01 ~]# yum install -y nfs-utils rpcbind

nfs01 ~]# useradd nginx -u 997 -s /sbin/nologin -M    # uid要与web主机的nginx uid一致

nfs01 ~]# mkdir /data/images/ -p

nfs01 ~]# chown nginx:nginx /data/images/ -R
编写nfs服务配置文件
vim /etc/exports

/data/images  172.16.1.0/24(rw,sync)
启动服务,注意先后顺序
[root@nfs01 ~]# systemctl start rpcbind.service

[root@nfs01 ~]# systemctl enable rpcbind.service

[root@nfs01 ~]# systemctl start nfs

[root@nfs01 ~]# systemctl enable nfs

测试:

[root@nfs01 ~]# showmount -e 172.16.1.31

Export list for 172.16.1.31:

/data/images 172.16.1.0/24
web01上创建一个备份目录,临时存放图片
web01]# mkdir /html/bak

web01 wordpress]# mv wp-content/uploads/* /html/bak/
web01 web02此时无上传,故无upload文件夹,但之后需要挂载nfs,所以手动创建一下:
m01]# ansible web -m file -a "dest=/html/www/mysite/wordpress/wp-content/uploads/ state=directory owner=nginx group=nginx"
挂载nfs
m01 ~]# ansible web -m mount -a "src=172.16.1.31:/data/images path=/html/www/mysite/wordpress/wp-content/uploads/ fstype=nfs state=mounted"

检查是否挂载成功:

m01 ~]# ansible web -m command -a "df -h"

开机自动挂载:

m01 ansible]# ansible web -m shell -a "echo 'mount -t nfs 172.16.1.31:/data/images /html/www/mysite/wordpress/wp-content/uploads/' >> /etc/rc.d/rc.local"

注意,此文件要加执行权限!
把图片移动回去:
[root@web01 wordpress]# mv /html/bak/* /html/www/mysite/wordpress/wp-content/uploads/
mv: cannot create directory ‘/html/www/mysite/wordpress/wp-content/uploads/2020’: Permission denied
提示无权限,查看nfs的默认配置参数:
nfs01 ~]# cat /var/lib/nfs/etab
/data/images 172.16.1.0/24(rw,sync,wdelay,hide,nocrossmnt,secure,root_squash,no_all_squash,no_subtree_check,secure_locks,acl,no_pnfs,anonuid=65534,anongid=65534,sec=sys,rw,secure,root_squash,no_all_squash)
分析:
此时 upload目录属主为nginx,但是往upload移动文件时,root被映射为了普通用户,故此时为其他人,无权限写入
解决:
nfs01 ~]# vim /etc/exports

/data/images  172.16.1.0/24(rw,sync,anonuid=997,anongid=997)

# 此时root用户也映射为了nginx

再次执行:

[root@web01 wordpress]# mv /html/bak/* /html/www/mysite/wordpress/wp-content/uploads/
访问mysite.com,图片出现
部署负载均衡服务器
文章首部的ansible剧本已经直接安装,上传配置文件,并启动了
windows本地hosts修改为 10.0.0.5 mysite.com
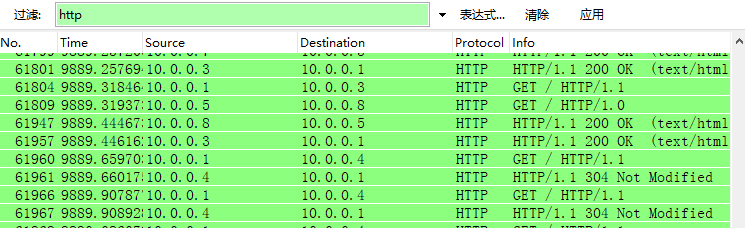
访问域名,并抓包:

可见负载成功
后面部署zabbix时内存要爆了,所以把web01和web02主机关机调小了点内存,开机后访问ip测试,报了502错误,把php-fpm开启即可解决。(但是访问mysite.com没有问题,正常显示wp,(此时是web01)这是因为负载均衡文件lb.conf里定义了proxy_next_upstream error timeout http_404 http_502 http_403; )
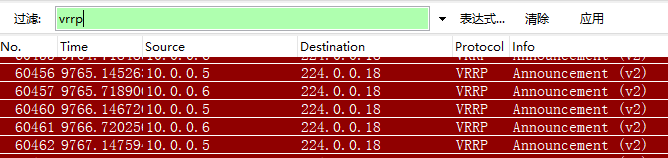
高可用keepalived
部署前注意时间同步问题
[root@lb01 ~]# vim /etc/keepalived/keepalived.conf

! Configuration File for keepalived

global_defs {

    router_id lb01

}

vrrp_instance keep1 {

    state MASTER

    interface eth0

    virtual_router_id 51

    priority 150

    advert_int 1

    authentication {

        auth_type PASS

        auth_pass 1111

    }

    virtual_ipaddress {

        10.0.0.3/24

    }

}

###############################################

[root@lb02 ~]# vim /etc/keepalived/keepalived.conf

! Configuration File for keepalived

global_defs {

  router_id lb02

}

vrrp_instance keep1 {

    state BACKUP

    interface eth0

    virtual_router_id 51

    priority 100

    advert_int 1

    authentication {

        auth_type PASS

        auth_pass 1111

    }

    virtual_ipaddress {

        10.0.0.3/24

    }

}
修改windows本地DNS: 10.0.0.3 mysite.com
访问域名,并抓包测试


down掉lb01,此时虚拟ip 10.0.0.3会飘到lb02
解决脑裂问题:
进行监控,发出告警
配置邮件
不使用ssl最小化配置:
lb02 scripts]# vim /etc/mail.rc

# 添加:

set [email protected] smtp=smtp.163.com

set [email protected] smtp-auth-password=授权码 smtp-auth=login
重启
systemctl restart postfix.service
测试:
echo "邮件正文" | mail -s 邮件主题 收件地址
结合while循环可实时监控(备机)
lb02 scripts]# vim check_xu_ip.sh

#!/bin/bash

while true;

do

ip a s eth0|grep "10.0.0.3" >/dev/null ;

if [ $? -eq 0 ]

then

  echo "keepalived服务出现异常,请进行检查"|mail -s 异常告警-keepalived  [email protected]

  break

fi

sleep 2 ;

done
后台执行脚本,nohup用法
lb02 scripts]# nohup ./check_xu_ip.sh &
此时脚本会在后台一直运行,直到发现虚拟ip飘过来,发送邮件并停止
停掉主机lb01的keepalived服务,此时会收到keepalived告警邮件
实现keepalived服务自动释放vip地址资源
nginx服务若挂掉,此时keepalived并不会释放虚拟ip,导致用户无法访问服务,出现占着茅坑不拉屎的情况
编写监控nginx服务状态监控脚本(主机)
lb01 scripts]# vim check_web.sh

#!/bin/bash

num=`ps -ef|grep -c nginx`

if [ $num -lt 2 ]  # 监测到nginx进程数小于2即为nginx挂掉(nginx至少一个master一个worker进程)

then

  systemctl stop keepalived

fi
权限权限权限!!! 在这里折腾了半小时,down掉nginx无法释放vip,最后发现是因为脚本无执行权限 chmod + x /server/scripts/check_web.sh
keepalived配置文件中调用nginx监控脚本
keepalived信息配置

[root@lb01 scripts]# vim /etc/keepalived/keepalived.conf

! Configuration File for keepalived

global_defs {

    router_id lb01

}

vrrp_script check_web {

    script "/server/scripts/check_web.sh"  # 定义需要监控脚本(脚本是执行权限)

    interval 3    # 执行脚本的间隔时间(秒)

}

vrrp_instance keep1 {

    state MASTER

    interface eth0

    virtual_router_id 51

    priority 150

    advert_int 1

    authentication {

        auth_type PASS

        auth_pass 1111

    }

virtual_ipaddress {

    10.0.0.3/24

    }

track_script {

    check_web    # 调用执行你的脚本信息

  }

}
重启keepalived
备机执行:nohup ./check_xu_ip.sh &
脚本加执行权限,此条命令追加到/etc/rc.local,实现开机自动运行
很快监测到虚拟ip已经飘过来
收到告警邮件
高可用集群双主配置
编写lb01服务器keepalived配置文件
lb01]# vim /etc/keepalived/keepalived.conf
! Configuration File for keepalived

global_defs {

    router_id lb01

}

vrrp_script check_web {

    script "/server/scripts/check_web.sh"

    interval 3

}

vrrp_instance keep1 {

    state MASTER

    interface eth0

    virtual_router_id 51

    priority 150

    advert_int 1

    authentication {

        auth_type PASS

        auth_pass 1111

    }

virtual_ipaddress {

    10.0.0.3/24

    }

track_script {

    check_web

  }

}

vrrp_instance keep2 {

    state BACKUP

    interface eth0

    virtual_router_id 52

    priority 100

    advert_int 1

    authentication {

        auth_type PASS

        auth_pass 1111

    }

    virtual_ipaddress {

    10.0.0.4/24

    }

    track_script {

    check_web

  }

}
第二个历程: 编写lb02服务器keepalived配置文件
(lb02也写一份nginx检测脚本)
lb02]# vim /etc/keepalived/keepalived.conf
! Configuration File for keepalived

global_defs {

  router_id lb02

}

vrrp_script check_web {

    script "/server/scripts/check_web.sh"

    interval 3

}

vrrp_instance keep1 {

    state BACKUP

    interface eth0

    virtual_router_id 51

    priority 100

    advert_int 1

    authentication {

        auth_type PASS

        auth_pass 1111

    }

    virtual_ipaddress {

        10.0.0.3/24

    }

track_script {

    check_web

  }

}

vrrp_instance keep2 {

    state MASTER

    interface eth0

    virtual_router_id 52

    priority 150

    advert_int 1

    authentication {

        auth_type PASS

        auth_pass 1111

    }

    virtual_ipaddress {

    10.0.0.4/24

    }

track_script {

    check_web

  }

}
重启keepalived,此时lb01有vip 10.0.0.3 lb02有vip 10.0.0.4
windows本地hosts添加一条 10.0.0.4 test.mysite.com
访问mysite.com和test.mysite
mysite.com为原wordpress页面,test.mysite.com为nginx默认页面(lb02的nginx conf.d下的default.conf)
抓包查看效果
停掉lb02的nginx,10.0.0.4会飘到lb01,再次访问域名并抓包查看效果
恢复lb02的服务状态
#部署rsync备份服务
服务端
backup ~]# yum install -y rsync
backup ~]# vim /etc/rsyncd.conf
uid = rsync

gid = rsync

port = 873

fake super = yes

use chroot = no

max connections = 200

timeout = 300

pid file = /var/run/rsyncd.pid

lock file = /var/run/rsync.lock

log file = /var/log/rsyncd.log

ignore errors

read only = false

list = false

hosts allow = 172.16.1.0/24

hosts deny = 0.0.0.0/32

auth users = rsync_backup

secrets file = /etc/rsync.password

[site]

comment = "wp site file"

path = /backup/site

[images]

comment = "wp images"

path = /backup/images

[conf]

comment = "nginx conf file"

path = /backup/conf

[sql]

comment = "database"

path = /backup/db
创建rsync服务的虚拟用户
useradd rsync -M -s /sbin/nologin
创建备份服务认证密码文件
echo "rsync_backup:123456" >/etc/rsync.password
chmod 600 /etc/rsync.password
创建备份目录并修改属主属组信息
backup ~]# mkdir /backup/{site,images,conf,database}
backup]# chown -R rsync:rsync /backup/
启动备份服务
systemctl start rsyncd
systemctl enable rsyncd
systemctl status rsyncd
客户端配置
web01:
创建一个密码文件
echo "123456" >/etc/rsync.password

chmod 600 /etc/rsync.password
第二个历程: 进行免交互传输数据测试
rsync -avz /etc/hosts [email protected]::conf --password-file=/etc/rsync.password
测试成功,把传过来的测试文件删掉,以免影响后续操作
inotify&sersync实时同步wp网站目录
因web集群主机网站代码完全一致,图片存储在nfs,都连接后端数据库,故只对一台主机操作
以下在web01客户端操作
yum install -y inotify-tools
sersync下载地址:https://github.com/wsgzao/sersync
备用:
wget http://mysqldb.org/packages/inotify_sersync_rsync.zip
解压sersync,移动到/usr/local
编写配置文件:
vim conf/confxml.xml
启动sersync服务程序
[root@nfs01 bin]# export PATH="$PATH:/usr/local/sersync/bin"

加入/etc/profile使重启也生效

或者做个软链接指向到/usr/loca/bin也可以

参数-d:  启用守护进程模式

参数-r:  在监控前,将监控目录与远程主机用rsync命令推送一遍

        进行同步测试

参数-o:  指定配置文件,默认使用confxml.xml文件

        -o /usr/local/sersync/conf/confxml.xml

        -o /usr/local/sersync/conf/confxml02.xml

#如何停掉sersync:

# yum install -y psmisc

# killall sersync                                    停止实时同步服务

sersync -dro  /usr/local/sersync/confxml.xml  启动实时同步服务

开机自启:

web01]# echo 'sersync -dro /usr/local/sersync/confxml.xml' >> /etc/rc.local
启动sersync后,到backup主机的/backup/site目录下查看,可看到wordpress文件都被推送过来,可手动创建个文件,测试生成新文件是否会被实时推送,我这里测试成功
备份配置文件
web01]# mkdir /server/scripts/
web01 scripts]# vim conf_bak.sh
#!/bin/bash

# 打包后的备份文件的存储路径

BACKUP_DIR="/backup"

# 创建备份目录

mkdir $BACKUP_DIR/

# 打包配置文件

tar zchPf $BACKUP_DIR/conf_bak_$(date +%F)_$(hostname).tar.gz  /etc/rc.d/rc.local  /etc/profile /var/spool/cron/root /server/scripts /etc/nginx/nginx.conf /etc/nginx/conf.d/mysite.conf

# 推送到backup并发送邮件 # 邮件配置见keepalive部分

rsync -az $BACKUP_DIR/conf_bak_$(date +%F)_$(hostname).tar.gz [email protected]::conf --password-file=/etc/rsync.password  && echo "$(hostname) backup xxxxx" | mail -s "$(hostname) backup successful" [email protected]

# 删除7天以前的备份文件

find $BACKUP_DIR -type f -mtime +7 | xargs rm -f
写入定时任务,每天2点执行备份
00 02 * /bin/bash /server/scripts/conf_bak.sh
可改一下时间,任务执行后,会受到备份成功邮件
rsync服务端backup也设置个定时任务,通过find定时清理旧的备份数据
备份db和nfs上的图片
db和nfs主机也传一份配置好的mail.rc
@m01 files]# ansible db,nfs -m copy -a "src=./mail.rc dest=/etc/"
重启m01 files]# ansible db,nfs -m service -a "name=postfix state=restarted"
推送rsync客户端密码文件,注意权限
m01 files]# ansible db,nfs -m copy -a "src=./rsync.password dest=/etc/ mode=600"
db01备份脚本
[root@db01 scripts]# cat sql_bak.sh
#!/bin/bash

# 打包后的备份文件的存储路径

BACKUP_DIR="/backup"

# 创建备份目录

mkdir $BACKUP_DIR/

# 导出数据库

mysqldump -uwordpress -pwordpress123 wordpress > /backup/wp_bak_$(date +%F)_$(hostname).sql

tar zchPf $BACKUP_DIR/wp_bak_$(date +%F)_$(hostname).sql.tar.gz  /backup/wp_bak_$(date +%F)_$(hostname).sql

# 推送到backup

rsync -az $BACKUP_DIR/wp_bak_$(date +%F)_$(hostname).sql.tar.gz [email protected]::conf --password-file=/etc/rsync.password  && echo "$(hostname) backup xxxxx" | mail -s "$(hostname) backup successful"  [email protected]

# 删除7天以前的备份文件

find $BACKUP_DIR -type f -mtime +7 | xargs rm -f
每天2点定时执行
00 02 * /bin/bash /server/scripts/sql_bak.sh
更改时间测试,执行成功,收到邮件
用户可能会随时上传图片,故nfs上的图片需要做实时同步,步骤和上面wp网站目录实时同步大同小异,这里不再赘述
部署zabbix
zabbix服务端主机部署
下载安装zabbix yum 源文件
清华源
rpm -ivh https://mirrors.tuna.tsinghua.edu.cn/zabbix/zabbix/4.0/rhel/7/x86_64/zabbix-release-4.0-1.el7.noarch.rpm

rpm -ivh https://mirrors.tuna.tsinghua.edu.cn/zabbix/zabbix/3.4/rhel/7/x86_64/zabbix-release-4.0-1.el7.noarch.rpm  -- 老版本
可能因dns问题,经常下载失败,可尝试更改dns,或从mysqldb.org下载,rpm包已上传至http://mysqldb.org/packages/zabbix/zabbix_yum/
下载安装zabbix服务端相关软件
zabbix服务程序软件: zabbix-server-mysql

zabbix服务web软件: zabbix-web-mysql httpd php

数据库服务软件: mariadb-server

yum install -y zabbix-server-mysql zabbix-web-mysql httpd php mariadb-server
软件配置
vim /etc/zabbix/zabbix_server.conf

# 大概126行,设置个密码

DBPassword=zabbix

vim /etc/httpd/conf.d/zabbix.conf

# 大概20行,设置时区

php_value date.timezone Asia/Shanghai
配置数据库服务
systemctl start mariadb.service

systemctl status mariadb.service
创建zabbix数据库--zabbix
create database zabbix character set utf8 collate utf8_bin;
创建数据库管理用户
grant all privileges on zabbix.* to zabbix@localhost identified by 'zabbix';
在zabbix数据库中导入相应的表信息
zcat /usr/share/doc/zabbix-server-mysql-4.0.19/create.sql.gz|mysql -uzabbix -pzabbix zabbix
启动zabbix程序相关服务
数据库服务 zabbix服务 httpd服务
systemctl start zabbix-server.service httpd mariadb.service

systemctl enable zabbix-server.service httpd mariadb.service

无需启动php(集成在apache里的模块)
至此zabbix-server命令行操作结束
登录zabbix服务端web界面, 进行初始化配置
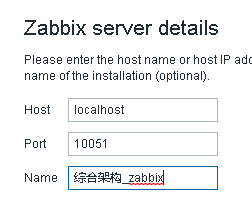
http://10.0.0.72/zabbix/setup.php

这里也可以把数据库设置在后端,但是于学习而言没太大意义,直接连接本机数据库
10051 zabbix-server 服务端默认端口号
10050 zabbix-agent 客户端默认端口号
/etc/zabbix/web/zabbix.conf.php – 记录web页面初始化信息
登录zabbix服务web页面
登录
web后台用户名Admin 密码zabbix
监控客户端部署流程
安装清华源
m01 ansible]# ansible all -m shell -a "rpm -ivh https://mirrors.tuna.tsinghua.edu.cn/zabbix/zabbix/4.0/rhel/7/x86_64/zabbix-release-4.0-1.el7.noarch.rpm"
安装zabbix客户端软件
m01 ansible]# ansible all -m yum  -a "name=zabbix-agent state=installed"

10.0.0.31 | SUCCESS => {

    "ansible_facts": {

        "discovered_interpreter_python": "/usr/bin/python"

    },

    "changed": false,

    "msg": "",

    "rc": 0,

    "results": [

        "zabbix-agent-4.0.0-2.el7.x86_64 providing zabbix-agent is already installed"

    ]

}

172.16.1.9 | FAILED! => {

    "ansible_facts": {

        "discovered_interpreter_python": "/usr/bin/python"

    },

    "changed": false,

    "msg": "Failure talking to yum: failure: repodata/repomd.xml from zabbix: [Errno 256] No more mirrors to try.\nhttp://repo.zabbix.com/zabbix/4.0/rhel/7/x86_64/repodata/repomd.xml: [Errno 14] curl#6 - \"Could not resolve host: repo.zabbix.com; Unknown error\""
此源也经常抽风,可看到有的成功有的失败
rpm包已上传mysqldb.org
可不安装yum源直接:
m01 ansible]# ansible 172.16.1.9 -m yum -a "name=http://mysqldb.org/packages/zabbix/zabbix_yum/zabbix-agent-4.0.0-2.el7.x86_64.rpm state=installed"
编写zabbix客户端配置文件
/etc/zabbix/zabbix_agentd.conf
# 98行,替换为zabbix server端ip

m01 ansible]# ansible all -m shell  -a "sed -i.bak '[email protected]@172.16.1.72@g' /etc/zabbix/zabbix_agentd.conf"
启动zabbix-agent服务,并开机自启
m01 ansible]# ansible all -m service -a  "name=zabbix-agent state=started enabled=yes"

检查:

m01 ansible]# ansible all -m shell -a  "netstat -lntup|grep 10050"
先添加web01测试
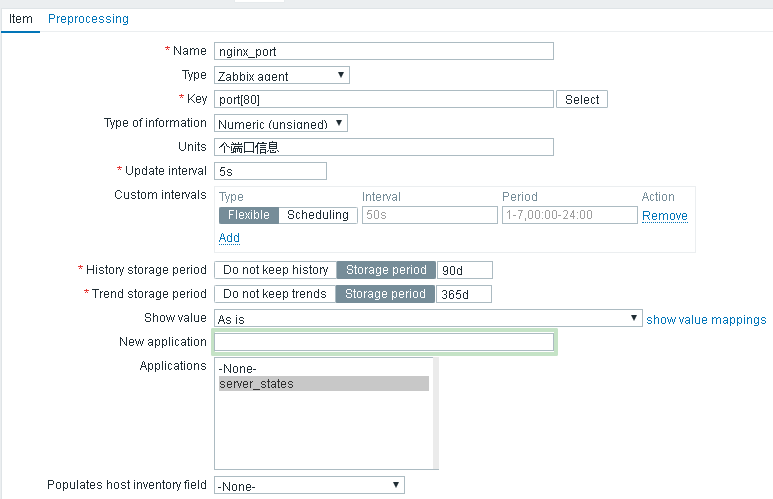
zabbix自带有监控端口的key,但为了练习,手动添加配置文件:
web01]# vim /etc/zabbix/zabbix_agentd.d/port.conf

UserParameter=port[*],ss -lntup|grep -c $1
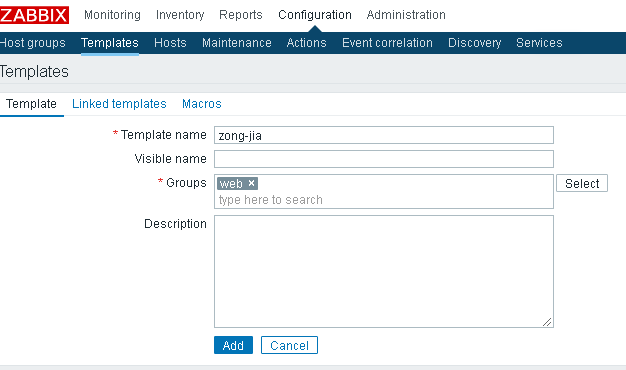
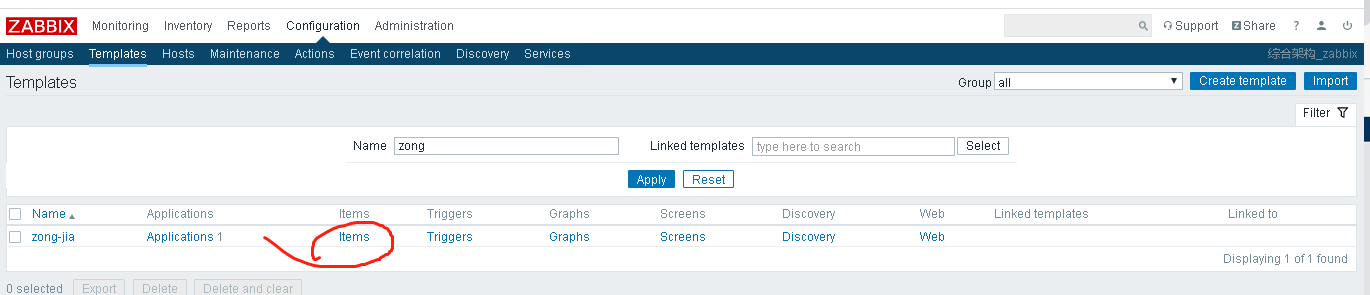
创建模板
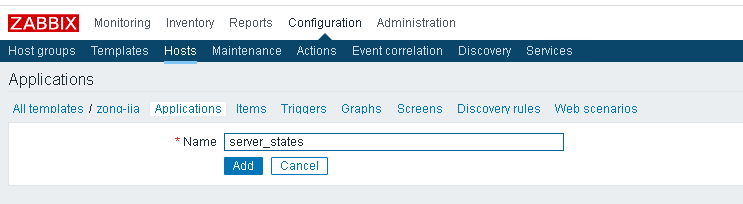
模板添加应用集
添加ssh监控项

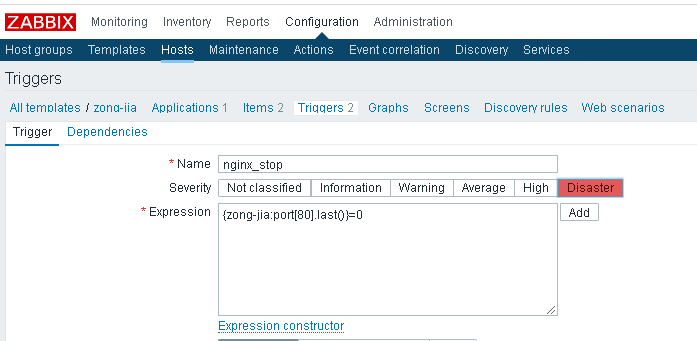
克隆监控项,并修改为nginx
添加触发器

ssh略
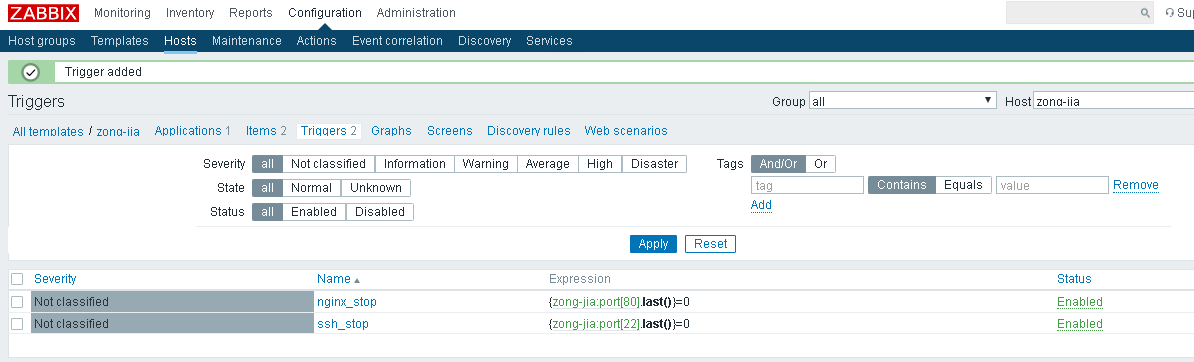
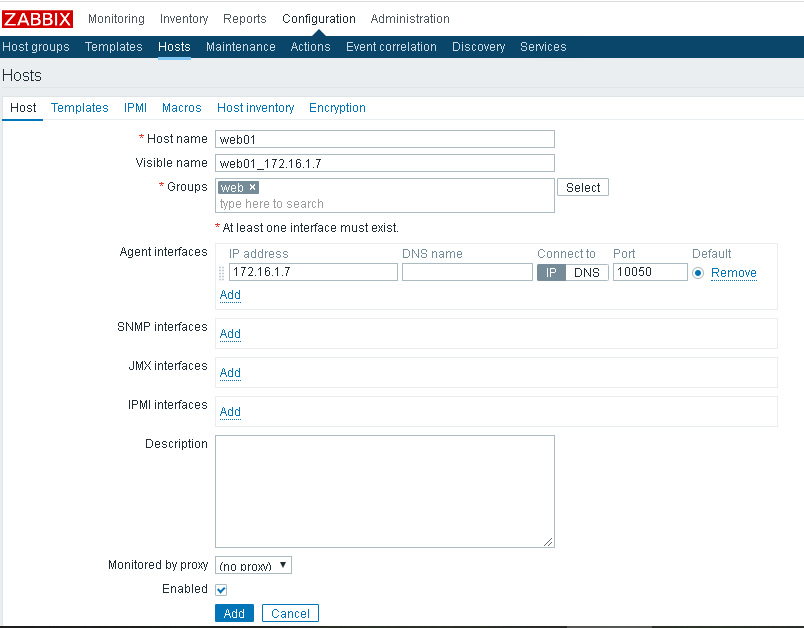
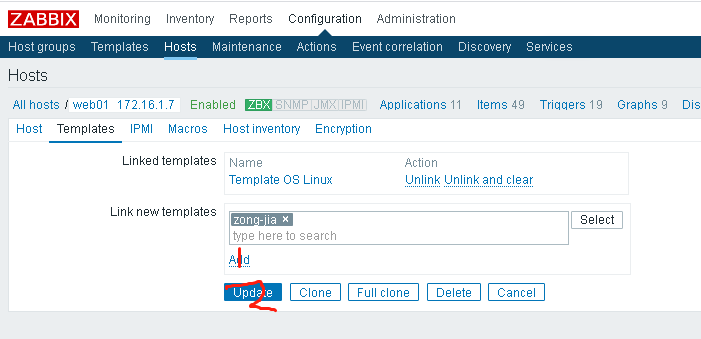
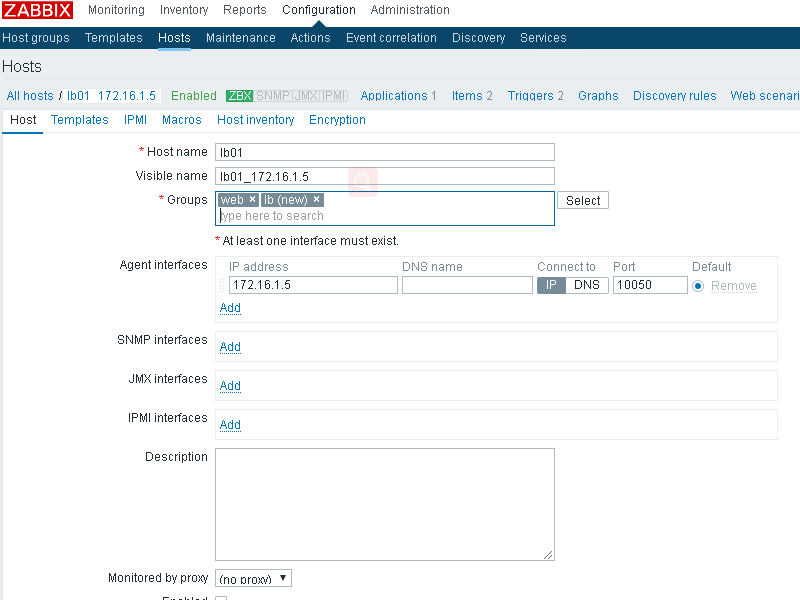
添加主机
添加主机,点击主机名,链接模板
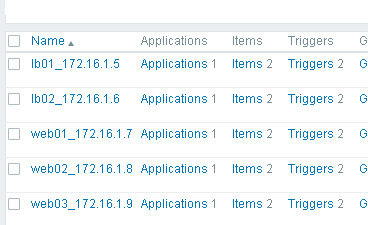
可看到有了两个监控项

报警
web01停掉nginx测试
报警成功,发现问题严重性未分类,回到模板,触发器定义为灾难级别
报警声音设置,小人头:
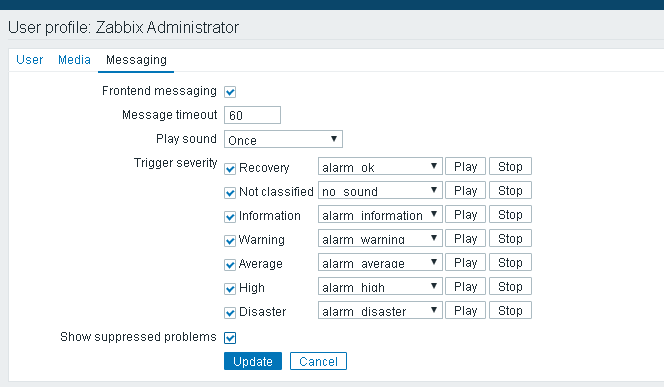
再次停掉nginx,报警级别为disaster,并有警报声
添加其他主机
[root@m01 files]# cat port.conf

UserParameter=port[*],ss -lntup|grep -c $1
推送到各客户端并重启
m01 files]# ansible lb,web -m copy -a "src=./port.conf dest=/etc/zabbix/zabbix_agentd.d"

m01 files]# ansible lb,web -m service -a "name=zabbix-agent state=restarted"
点击之前创建的主机名,拉到底部,clone

把lb也加入到lb组,方便管理
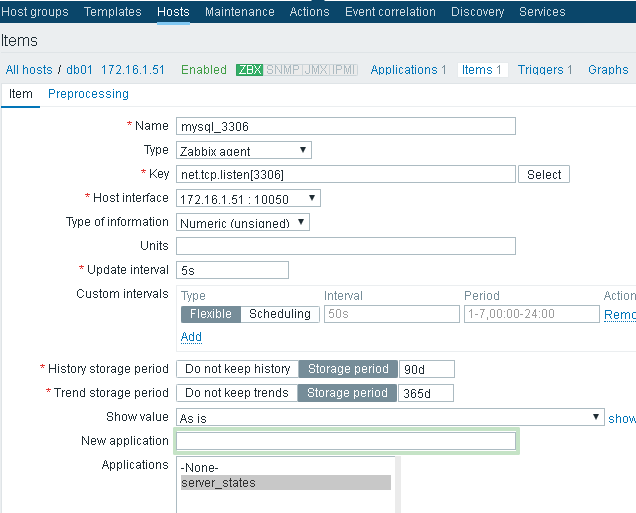
单独创建db01主机
这次使用自带的key
`
key:net.tcp.listen[port]
Checks if this port is in LISTEN state. 0 - it is not, 1 - it is inLISTEN state.`
参考 https://www.jb51.net/article/137001.htm
配置监控项
【配置】----【主机】----【监控项】
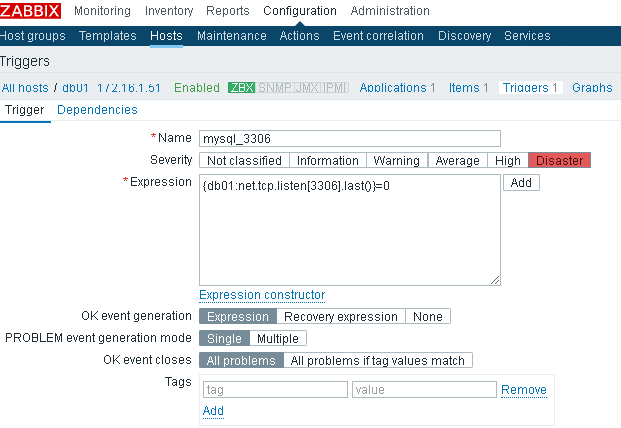
配置触发器
【创建触发器】
添加该监控项的触发器。对于端口的监控,正常则返回值=1;对于进程的监控,正常则返回值>=1;如果返回结果为0,则代表该进程宕掉。如最后两次的结果都等于0时,则报警。(对于进程的触发器配置,是一样的)
选择主机,点击【触发器】,【创建触发器】
配置图形
【创建图形】
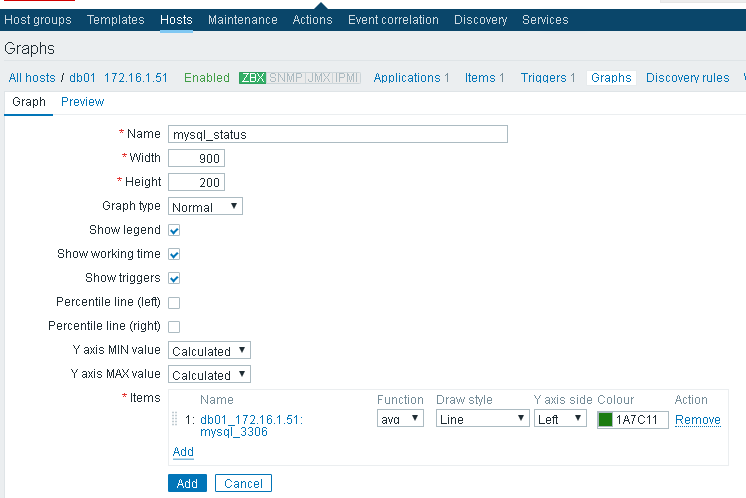
查看图形:

1表示该端口正常运行,0表示该端口关闭。
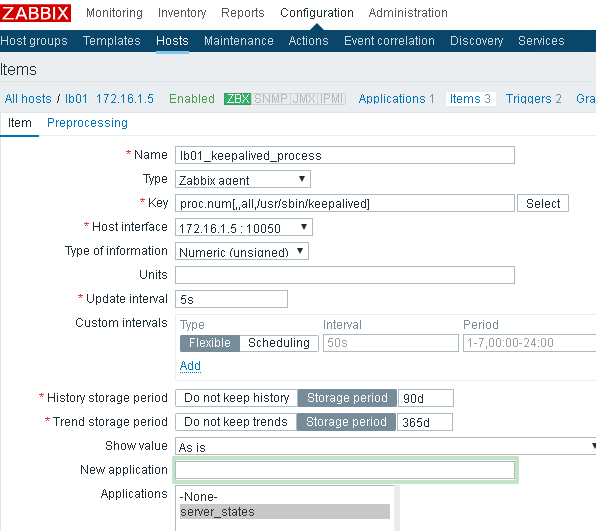
监控keepalive进程
参考: https://blog.51cto.com/412166174/1968158
用自带的key:
proc.num[,,,]
通过ps -ef|grep xxx查看进程名
[root@lb01 ~]#  ps -ef|grep keep

root      10090      1  0 Apr17 ?        00:00:13 /usr/sbin/keepalived -D

root      10091  10090  0 Apr17 ?        00:00:11 /usr/sbin/keepalived -D

root      10092  10090  0 Apr17 ?        00:01:58 /usr/sbin/keepalived -D
点击lb01的items,新建item
key值:
proc.num[,,all,/usr/sbin/keepalived]
[,,all,/usr/sbin/keepalived] ,,代表默认所有进程,所有用户下,all默认值,进程名
在zabbix-server端检查
[root@zabbix zabbix-4.0.16]# zabbix_get  -s 172.16.1.5 -k 'proc.num[,,all,/usr/sbin/keepalived]'

3
创建触发器
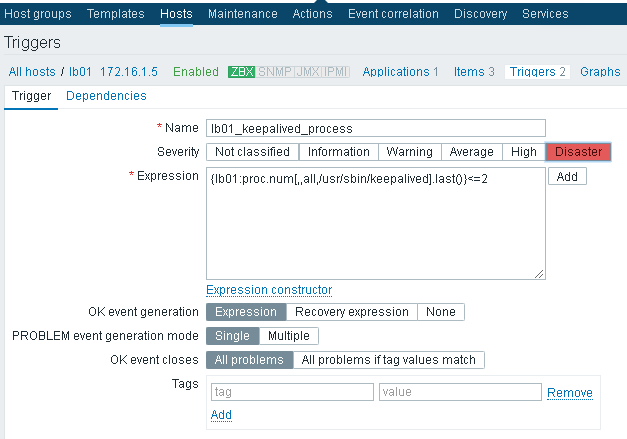
keepalive进程小于2就报警
杀掉keepalived,过一会会收到警报
其他主机的配置大同小异,不再赘述
邮件告警
报警发送短信可用瑞象云,有免费额度
亲测成功: https://my.oschina.net/u/4157713/blog/3211867
微信报警脚本:http://mysqldb.org/scripts/zabbix_weixin.py
这里只配置一下邮件告警
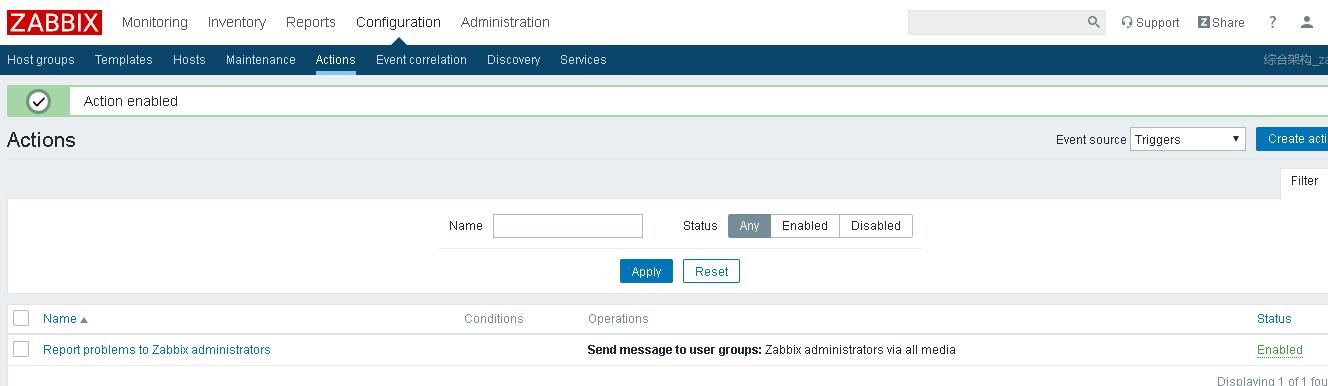
修改动作配置
配置—动作—将默认动作进行开启
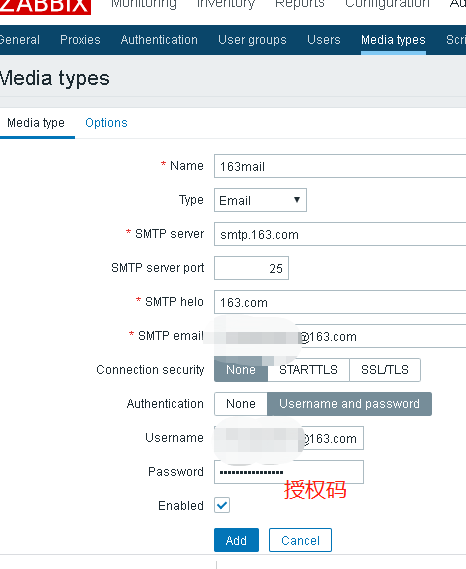
建立和163邮箱服务关系
管理—报警媒介类型—创建报警媒介
定义接收报警的邮件地址
小人头–报警媒介–设置收件人信息
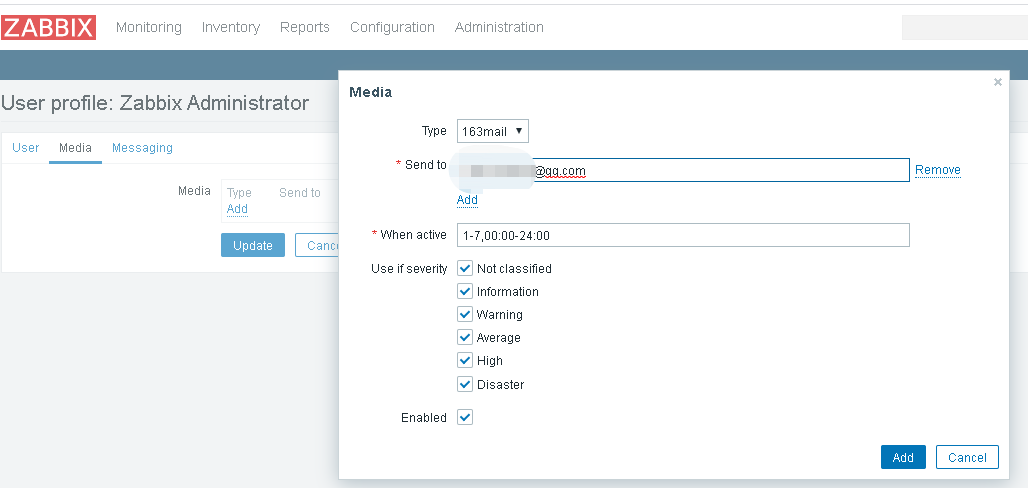
add后一定要update
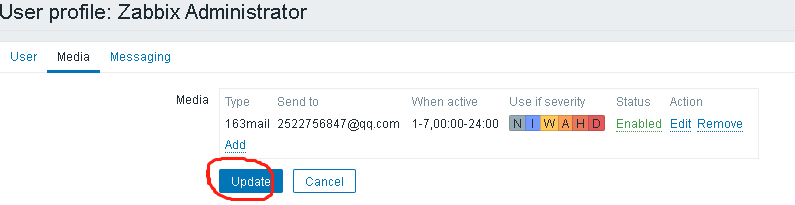
否则无效

停掉keepalived测试,很快收到邮件,恢复后也会收到恢复信息
跳板机
物理内存爆了,jumpserver最小配置需2核4g,故跳板机先用ssh实现,jumpserver改天在研究
官方文档https://docs.jumpserver.org/
ssh跳板机参考https://www.jianshu.com/p/3cd2793ba719
需一台有公网ip的云主机
阿里云上更改sshd配置文件:
@ali_ql ~]# vim /etc/ssh/sshd_config

GatewayPorts yes
不开启此项只监听localhost,只能阿里云本机连接内网
重启sshd
内网管理机执行:
@m01 ~]# ssh -fNgR 2222:127.0.0.1:22  123.x.x.x(阿里云公网ip)

# 输入阿里云密码
命令 含义
-R port:host:port 将远程机器的端口映射到本地。第一个port是远端服务器port,第二个port是本地port,ip地址是本地IP
-f 告诉SSH客户端在后台运行
-g 允许远程主机可远程访问,这里有坑,下面会解释。
-N Do not execute a shell or command. 不执行脚本或命令,通常与-f连用。
工作原理:
1、本地主机和远程主机建立连接;
2、远程主机上分配了一个 socket 侦听 port 端口;
3、远程端口上有了连接, 该连接就经过安全通道转向本机的端口。备注:root 登录远程主机才能转发特权端口。
在内网机器上执行上述命令后,netstat可以看见本机和远程机器已建立ssh的链接
@m01 ~]# netstat -an|grep 123.x.x.x

tcp        0      0 10.0.0.61:43892        123.x.x.x:22        ESTABLISHED
登录阿里云查看
@ali_ql ~]# lsof -i :2222

COMMAND  PID USER  FD  TYPE  DEVICE SIZE/OFF NODE NAME

sshd    4604 root    8u  IPv4 6581267      0t0  TCP *:EtherNet/IP-1 (LISTEN)
此时在远程机器ssh阿里云的2222端口,就可以访问内网机器了。(阿里云需开放入方向2222端口)
@amazon mysqldb.org]# ssh 123.x.x.x -p 2222  # 阿里云自己连接: ssh 127.0.0.1 -p 2222

# 输入内网管理机密码
阿里云再次查看连接状态,会多出个连接
@ali_ql ~]# lsof -i :2222

COMMAND  PID USER  FD  TYPE  DEVICE SIZE/OFF NODE NAME

sshd    4604 root    8u  IPv4 6581267      0t0  TCP *:EtherNet/IP-1 (LISTEN)

sshd    4604 root    9u  IPv4 6583264      0t0  TCP ali_ql:EtherNet/IP-1->ec2-54-252-165-181.ap-soutes-1.compute.amazonaws.com 59292 (ESTABLISHED)
如需中断连接,直接在阿里云或者管理机m01上杀掉pid即可
防火墙
lb上开启防火墙
m01 ~]# ansible lb -m service -a "name=firewalld state=started enabled=yes"

xshell> telnet 10.0.0.6 80

Trying 10.0.0.6...

telnet: connect to address 10.0.0.6: No route to host
此时无法访问mysite.com
放行80端口并重启防火墙
m01 ~]# ansible lb -m shell -a "firewall-cmd --zone=public --add-port=80/tcp --permanent"

m01 ~]# ansible lb -m service -a "name=firewalld state=restarted"
此时 mysite.com 可成功访问
完结
虽写的不是很好,但也是我花了几天时间完成的,大佬们可一笑而过,不过或许能给萌新提供个参考,转载请注明来源于 http://mysqldb.org