生命周期具有四个阶段:Bean的定义、Bean的初始化、Bean的使用、Bean的销毁。
Bean的定义
在一个大型应用中,会有很多Bean需要在配置文档中定义,这样配置文档会很大,变得不好维护。这时可以把相关的Bean放在一个配置文档中,出现多个配置文档。
Bean的初始化
初始化有两种方式:
(1)在配置文档中通过指定init-method属性来完成。(一般推荐使用这种,这种没有把代码与Spring耦合)
public void init() {
    this.msg = "HelloWorld";
    this.date = new Date();
}
<bean id="HelloWorld" class="com.gc.action.HelloWorld" init-method="init">
</bean>(2)实现org.springframework.beans.factory.InitializingBean接口。如果一个Bean实现了这一接口,则它的所有必需的属性被BeanFactory设置后,会自动执行它的afterPropertiesSet()方法。
public class HelloWorld implements InitializingBean {    //实现接口
    private String msg = null;
    private Date date = null;
    public void afterPropertiesSet() {                   //实现方法
        this.msg = "HelloWorld";
        this.date = new Date();
    }
}
<bean id="HelloWorld" class="com.gc.action.HelloWorld">
</bean>在实现时会自动调用afterPropertiesSet()方法。
Bean的使用
三种使用方式:
(1)使用BeanWrapper
HelloWorld helloWorld = new HelloWorld();            //new一个对象
BeanWrapper bw = new BeanWrapperImpl(helloWorld);    //获取对象数据
bw.setPropertyValue("msg","HelloWorld");             //设置msg的值
System.out.println(bw.getPropertyValue("msg"));      //调用显示msg的值
(2)使用BeanFactory
InputStream is = new FileInputStream("config.xml");    //输入流读取xml
XmlBeanFactory factory = new XmlBeanFactory(is);       //解析读取的内容
HelloWorld helloWorld = (HelloWorld)factory.getBean("HelloWorld");    //获取HelloWorld句柄
System.out.println(helloWorld.getMsg());               //调用getMsg()函数显示msg的值
(3)使用ApplicationContext
ApplicationContext actx = new FileSystemXmlApplicationContext("config.xml"); //读取并解析xml
HelloWorld helloWorld = (HelloWorld)actx.getBean("HelloWorld");    //获取HelloWorld句柄
System.out.println(helloWorld.getMsg());               //调用getMsg()函数显示msg的值
Bean的销毁
销毁有两种方式:
(1)在配置文档中通过指定destroy-method属性来完成。(一般推荐使用这种,这种没有把代码与Spring耦合)
public void cleanup() {
    this.msg = "";
    this.date = null;
    System.out.println("您销毁了 msg " + this.msg + "和 date " + this.date);
}
<bean id="HelloWorld" class="com.gc.action.HelloWorld" destroy-method="cleanup">
</bean>(2)实现org.springframework.beans.factory.DisposableBean接口。如果实现该接口,则会自动执行它的destroy()方法。
public class HelloWorld implements DisposableBean {    //实现接口
    private String msg = null;
    private Date date = null;
    public void destroy() {
        this.msg = "";
        this.date = null;
        System.out.println("您销毁了 msg " + this.msg + "和 date " + this.date);
    }
}
<bean id="HelloWorld" class="com.gc.action.HelloWorld">
</bean>配置文档中只需要定义相应的Bean,不需要指定销毁的函数,由于类实现了销毁接口,在运行时自动调用destroy()方法。
Bean的管理
- Spring中最基本、最重要的两个包:org.springframework.beans和org.springframework.context。
- 两个包中最重要的类:BeanFactory和ApplicationContext。
- BeanFactory提供一种先进的配置机制来管理任何种类的Bean。
- ApplicationContext建立在BeanFactory之上,并增加了国际化支持、获取资源、事件传递等功能。
对Bean的管理主要有3种方式:
- 使用BeanWrapper管理Bean;
- 使用BeanFactory管理Bean;
- 使用ApplicationContext管理Bean;
(1)使用BeanWrapper管理Bean
- 在org.springframework.beans包中,有两个重要的类:BeanWrapper接口及其实现BeanWrapperImpl。
- BeanWrapper:封装了Bean的行为,提供了设置和获得属性值的功能。通过BeanWrapper可以获得Bean的属性描述、查询只读或者可写属性。
//设置一个无参的构造函数
public HelloWorld(){
}
Object obj = Class.forName("com.gc.action.HelloWorld").newInstance();//取类HelloWorld的实例
BeanWrapper bw = new BeanWrapperImpl(obj); //通过类BeanWrapper设定类HelloWorld的属性
bw.setPropertyValue("msg","HelloWorld"); //根据类变量设置变量的值
bw.setPropertyValue("date",new Date());
System.out.println(bw.getPropertyValue("date") + " " + bw.getPropertyValue("msg"));(2)使用BeanFactory管理Bean
- BeanFactory实际上是实例化,配置和管理众多Bean的容器。这些Bean通常会彼此合作,因而它们之间会产生依赖。
- 一个BeanFactory可以用接口org.springframework.beans.factory.BeanFactory表示,该接口有多个实现。最常用的简单的BeanFactory实现是org.springframework.beans.factory.xml.XmlBeanFactory。
ClassPathResource res = new ClassPathResource("config.xml");    //获取配置文档
XmlBeanFactory factory = new XmlBeanFactory(is);                //解析配置文档
HelloWorld helloWorld = (HelloWorld)factory.getBean("HelloWorld"); //根据id读取Bean
System.out.println(helloWorld.getDate() + " " + helloWorld.getMsg()); //输出内容
(3)使用ApplicationContext管理Bean
- ApplicationContext建立在BeanFactory之上,并增加了国际化的支持、获取资源、事件传递等功能。
- 一般来说,ApplicationContext是BeanFactory的完全超集,任何BeanFactory功能同样也适用于ApplicationContext。
ApplicationContext actx = new FileSystemXmlApplicationContext("config.xml"); //读取并解析xml
HelloWorld helloWorld = (HelloWorld)actx.getBean("HelloWorld");    //根据id获取Bean
System.out.println(helloWorld.getDate() + " " + helloWorld.getMsg()); //输出内容
ApplicationContext更强功能
(一)国际化支持
对于信息的处理一般有两种方法:
- 将信息存放在数据库,用的时候从数据库里取;
- 将信息存放在java类里,用的时候从Java类里取。
这两种方式对于实现国际化都比较困难。而Spring在国际化方面提供了良好的支持。
ApplicationContext继承了org.springframework.context.MessageResource接口,使用getMessage()的各个方法来取得信息资源,从而实现国际化信息的目的。
getMessage()有3个方法:
- String getMessage(String code, Object[] args, String default, Locale loc),该方法是从MessageSource取得信息的基本方法。如果找不到指定信息,则会使用默认信息。
- String getMessage(String code, Object[] args, Locale loc),如果找不到指定信息,则抛出一个NoSuchMessageException异常。
- String getMessage(MessageSourceResolvable resolvable, Locale loc),通过MessageSourceResolvable 传入需要获取信息的代号。
国际化设置:
(1) 当ApplicationContext被加载的时候,它会自动查找在XML中定义的messageSource。Spring约定这个Bean必须被定义为messageSource。开发人员可以通过org.springframework.context.support.ResourceBundleMessageSource来取得国际化信息。
<beans>
    <!--负责国际化支持-->
    <bean id="messageSource" class="org.springframework.context.support.ResourceBundleMessageSource">
        <property name="basename">
            <!--国际化支持的定义在文件名为messages文件中-->
            <value>messages</value>
        </property>
    </bean>
</beans>设定Bean的basename为messages,意味着存放信息资源的文档的名称为messages.properties或messages.calss。
(2) 用记事本编写messages.properties的内容,并将其存放在WEB-INF\src下。
HelloWorldDate=\u95EE\u5019\u8BED\uFF1A{0} \u95EE\u5019\u65F6\u95F4\uFF1A{1}
// HelloWorldDate=问候语:{0} 问候事件:{1}
其中,{0}和{1}用来标识当从外部传入参数时,传入值存放的位置。
由于中文不是国际通用语言,因此在messages.properties中应以ascill码的形式进行保存,然后通过测试程序中的 Locale 来定义显示语言来显示中文。这里提供 2 种方式:
★新建一个文件messages.properties,将其复制到 eclipse 中myApp\WEB-INF\src下

然后,在eclipse中进行编辑 ,敲入需要的内容,在输入的过程中,eclipse 会自动将输入的内容转化成 ascill 码。
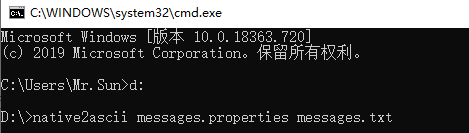
★★新建一个文件messages.properties,输入需要的中文内容。
HelloWorldDate=问候语:{0} 问候事件:{1}然后,按 win + R ,输入 cmd ,从控制台进入 messages.properties 所在的路径,输入【native2ascii messages.properties messages.txt】进行转换,然后将转换后得到的 txt 内容复制到 messages.properties 中。之后,将其复制到 eclipse 中myApp\WEB-INF\src下。
(3)测试程序,objs数字中的内容,分别对应{0}和{1},使用的是 getMessage(String code, Object[] args, Locale loc) 方法。
public static void main(String[] args){
    ApplicationContext actx = new FileSystemXmlApplicationContext("configDate.xml");//加载解析xml
	Object[] objs = new Object[] {"HelloWorld",Calendar.getInstance().getTime()};   //设置对象
    //从messages.properties中找HelloWorldDate,并将objs中的值按位置进行参数赋值,并以中文的形式保存到msg
	String msg = actx.getMessage("HelloWorldDate", objs, Locale.CHINA);
	System.out.println(msg);
}
(二)资源访问
ApplicationContext 继承了 ResourceLoader 接口,开发人员可以使用 getResource() 方法,并指定资源文件的URL来存取。
设定资源文件路径上有3种方式:
(1)虚拟路径。如果资源文件位于CLASSPATH下,可以使用虚拟路径。
ApplicationContext actx = new FileSystemXmlApplicationContext("configDate.xml");
Resource resource = actx.getResource("classpath:messages.properties");classpath是Spring约定的URL虚拟路径。
(2)实际路径。指定标准的URL,如“file:”或“http:”
ApplicationContext actx = new FileSystemXmlApplicationContext("configDate.xml");
Resource resource = actx.getResource("file:d:/myApp/WEB-INF/src/messages.properties");
(3)相对路径。
ApplicationContext actx = new FileSystemXmlApplicationContext("configDate.xml");
Resource resource = actx.getResource("WEB-INF/src/messages.properties");
当通过ApplicationContext取得Resource后,可以使用
- getFile() :存取源文件内容;
- exists():检查资源文件是否存在;
- isOpen():检查资源文件是否被打开;
- getURL():返回资源文件的URL。
(三)事件传递
ApplicationContext处理事件是通过ApplicationEvent类和ApplicationListener接口来提高的。通过ApplicationContext的publishEvent()方法来通知ApplicationListener。
实现一个程序用来输出日志信息:
- 定义继承ApplicationEvent的类LogEvent。LogEvent 类就是通过 ApplicationContext 被发布出去的。
- 定义实现ApplicationListener接口的类LogListener。ApplicationContext 会在发布LogEvent事件时通知LogListener。
- 定义实现ApplicationContextAware接口的类Log。通过publishEvent()方法,带入LogEvent作为参数,来通知LogListener。
- 编写测试程序,输出规定格式信息。
//******************Log.java*******************
public class Log implements ApplicationContextAware {
	//设定变量applicationContext
	private ApplicationContext applicationContext;
	//变量applicationContext的set方法
	public void setApplicationContext(ApplicationContext applicationContext) throws BeansException {
		this.applicationContext = applicationContext;
	}

	//通过publishEnent发布事件
	public int log(String log) {
		LogEvent event = new LogEvent(log);
		this.applicationContext.publishEvent(event);
		return 0;
	}
}


//******************LogEvent.java*******************
//LogEvent类就是通过ApplicationContext被发布出去的
public class LogEvent extends ApplicationEvent {

	public LogEvent(Object msg) {
		super(msg);
	}

}


//******************LogListener .java*******************
public class LogListener implements ApplicationListener {
	//ApplicationContext会在发布LogEvent事件时通知LogListener
	public void onApplicationEvent(ApplicationEvent event) {
		if (event instanceof LogEvent) {
			//设定时间
			SimpleDateFormat format = new SimpleDateFormat("yyyy-MMM-dd HH:mm:ss");
			format.setLenient(false);
			String currentDate = format.format(new Date());
			System.out.println("输出时间:" + currentDate + " 输出内容:" + event.toString());
		}
	}
}
//******************config.xml*******************
<?xml version="1.0" encoding="UTF8"?>
<!DOCTYPE beans PUBLIC "-//SPRING//DTD BEAN//EN"
"http://www.springframework.org/dtd/spring-beans.dtd">
<beans>
<!--负责事件传递-->
<bean id="log" class="com.gc.action.Log"/>
<bean id="listener" class="com.gc.action.LogListener"/>
</beans>//*****************TestHelloWorld.java*********************
public class TestHelloWorld {
public static void main(String[] args) throws InstantiationException,IllegalAccessException,ClassNotFoundException{
ApplicationContext actx = new FileSystemXmlApplicationContext("config.xml");
Log log = (Log)actx.getBean("log");
log.log("gf");
}
}
输出结果
输出时间:2020-四月-18 16:11:08 输出内容:com.gc.action.LogEvent[source=gf]
LogListener.java 文档最后的 event.toString() 改为 event.getSource()
输出结果
输出时间:2020-四月-18 16:11:08 输出内容:gf该例子仅仅为了说明事件传递的功能。实现日志输出的更好的选择是Spring的AOP。当然,上面例子也需要引入AOP支持文件,否则会出错。
Spring AOP功能引入:
(1)将 spring-aop-5.0.0.RELEASE.jar 从 spring-framework 文件夹的 libs 下进行复制

(2)黏贴到 myApp 下 WEB-INF的 lib 中。

(3)然后右击,选择【Build Path】进行添加。

