服务器环境:CentOS7.2
安装yum源
检查wget命令:(如果提示wget命令不存在,先执行 yum -y install wget)
提示:yum install yum-fastestmirror -y执行一遍,yum可以优先选择最快下载源
方式一:安装源在线安装(较慢)
先查看是否安装MySQL
#yum search MySQL
第一步,下载MySQL安装
[root@localhost ~]# mkdir /data/
[root@localhost data]# ls
[root@localhost data]# wget https://dev.mysql.com/get/mysql57-community-release-el7-11.noarch.rpm
【注意】如果提示wget命令不存在,先执行
yum -y install wget
下载完成后,目录下多了一个mysql57-xxx的文件,这个就是mysql安装源

安装mysql安装源
[root@localhost data]# yum -y localinstall mysql57-community-release-el7-11.noarch.rpm
第二步,在线安装MySQL
[root@localhost data]# yum -y install mysql-community-server
下载的东西有点多,需要等待一会
耗时较长:

第三步,启动MySQL服务
[root@localhost data]# systemctl start mysqld
第四步,设置开机启动
[root@localhost data]# systemctl enable mysqld

[root@localhost data]# systemctl daemon-reload
第五步,修改root登录密码
mysql安装完成之后,会在/var/log/mysqld.log文件中给root生成了一个临时的默认密码。

复制此密码,使用此密码登录root
[root@localhost data]#  mysql -uroot -pcsuEOi2J=/wy
Welcome to the MySQL monitor.  Commands end with ; or \g.
Your MySQL connection id is 2
Server version: 5.7.25

Copyright (c) 2000, 2020, Oracle and/or its affiliates. All rights reserved.

Oracle is a registered trademark of Oracle Corporation and/or its
affiliates. Other names may be trademarks of their respective
owners.

Type 'help;' or '\h' for help. Type '\c' to clear the current input statement.

mysql>
修改密码, mysql5.7默认密码策略要求密码必须是大小写字母数字特殊字母的组合,至少8位
mysql> ALTER USER 'root'@'localhost' IDENTIFIED BY 'Test2016@';
Query OK, 0 rows affected (0.01 sec)
第六步,设置允许远程登录
mysql> GRANT ALL PRIVILEGES ON *.* TO 'root'@'%' IDENTIFIED BY 'Test2016@' WITH GRANT OPTION;
Query OK, 0 rows affected, 1 warning (0.00 sec)
第七步,退出
mysql> exit
Bye
第八步,防火墙开放3306端口
[root@localhost data]# firewall-cmd --zone=public --add-port=3306/tcp --permanent

success

[root@localhost data]# firewall-cmd --reload

success
第九步,配置mysql默认编码为utf-8
修改/etc/my.cnf配置文件,在[mysqld]下添加编码配置
character_set_server=utf8

init_connect='SET NAMES utf8'
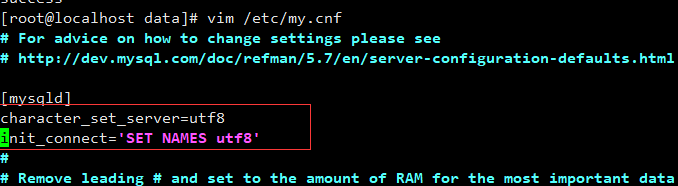
:wq!保存退出
第十步,重启MySQL
[root@localhost data]# systemctl restart mysqld
方式二:rpm依赖安装(速度快)
注意:这种方式没有默认密码,安装成功后需要设置跳过密码验证,进入到mysql设置初始密码

//先查看是否安装mysql
#yum search MySQL
1.下载安装包5.7.18
到官网https://dev.mysql.com/downloads/file/?id=469456选择对应安装包。
wget https://cdn.mysql.com//archives/mysql-5.7/mysql-5.7.18-1.el7.x86_64.rpm-bundle.tar
2.解压安装包
tar -xvf mysql-5.7.18-1.el7.x86_64.rpm-bundle.tar
//解压后文件列表:
mysql-community-embedded-devel-5.7.18-1.el7.x86_64.rpm
mysql-community-devel-5.7.18-1.el7.x86_64.rpm
mysql-community-client-5.7.18-1.el7.x86_64.rpm
mysql-community-common-5.7.18-1.el7.x86_64.rpm
mysql-community-embedded-5.7.18-1.el7.x86_64.rpm
mysql-community-embedded-compat-5.7.18-1.el7.x86_64.rpm
mysql-community-libs-5.7.18-1.el7.x86_64.rpm
mysql-community-server-minimal-5.7.18-1.el7.x86_64.rpm
mysql-community-test-5.7.18-1.el7.x86_64.rpm
mysql-community-minimal-debuginfo-5.7.18-1.el7.x86_64.rpm
mysql-community-libs-compat-5.7.18-1.el7.x86_64.rpm
3.按次序安装依赖
按common–>libs–>client–>server的顺序安装:
多的文件不需要管
# rpm -ivh mysql-community-common-5.7.18-1.el7.x86_64.rpm
# rpm -ivh mysql-community-libs-5.7.18-1.el7.x86_64.rpm
# rpm -ivh mysql-community-client-5.7.18-1.el7.x86_64.rpm
# rpm -ivh mysql-community-server-5.7.18-1.el7.x86_64.rpm
# rpm -ivh mysql-community-devel-5.7.18-1.el7.x86_64.rpm
//CDH搭建需要安装下面包,否则Hue安装报连接错误
# rpm -ivh  mysql-community-libs-compat-5.7.18-1.el7.x86_64.rpm
4.libs依赖报错处理
centos7在上述依赖安装中第二个依赖可能报错,可以先执行下面语句
//安装libaio
# yum install libaio
//卸载mariadb-libs
# yum remove mariadb-libs
5.启动数据库服务
//启动mysql
# systemctl start mysqld
//查看状态:
# systemctl status mysqld
6.设置初始密码
这种方式安装成功后无法查看初始密码,需要自己配置。
(1)先修改配置文件/etc/my.cnf令MySQL跳过登录时的权限检验,在[mysqld]下加入一行:
skip-grant-tables
(2)重启MySQL
#service mysqld restart
(3)免密码登录MySQL。
#mysql
(4)mysql客户端执行如下命令,修改root密码
mysql>  use mysql;
mysql> UPDATE user SET authentication_string = password('your-password') WHERE host = 'localhost' AND user = 'root';
mysql> select host,user, authentication_string, password_expired from user;
mysql> update user set password_expired='N' where password_expired='Y' //密码不过期
mysql> update user set host='%' where user='root' and host='localhost'; //远程可访问
mysql> flush privileges; //刷新权限
mysql> exit;//退出
(5)、修改配置文件/etc/my.cnf删除此前新增那一行skip-grant-tables,并重启MySQL(这一步非常重要,不执行可能导致严重的安全问题)
#service mysqld restart //重启 Mysql
方式三 :rpm分步安装(较慢)
1.创建文件夹,安装wget
# mkdir mysql57
# yum install wget
2.官方下载依赖
wget https://dev.mysql.com/get/Downloads/MySQL-5.7/mysql-community-common-5.7.22-1.el7.x86_64.rpm
wget https://dev.mysql.com/get/Downloads/MySQL-5.7/mysql-community-libs-5.7.22-1.el7.x86_64.rpm

wget https://dev.mysql.com/get/Downloads/MySQL-5.7/mysql-community-client-5.7.22-1.el7.x86_64.rpm

wget https://dev.mysql.com/get/Downloads/MySQL-5.7/mysql-community-server-5.7.22-1.el7.x86_64.rpm
3.安装依赖
按common–>libs–>client–>server的顺序安装:
# $ rpm -ivh mysql-community-common-5.7.19-1.el6.x86_64.rpm

# $ rpm -ivh mysql-community-libs-5.7.19-1.el6.x86_64.rpm

# $ rpm -ivh mysql-community-clients-5.7.19-1.el6.x86_64.rpm

# $ rpm -ivh mysql-community-server-5.7.19-1.el6.x86_64.rpm
后面步骤就跟方法二一样了
4.libs依赖报错处理
centos7在上述依赖安装中第二个依赖可能报错,可以先执行下面语句
//安装libaio
# yum install libaio
//卸载mariadb-libs
# yum remove mariadb-libs
5.启动数据库服务
//启动mysql
# systemctl start mysqld
//查看状态:
# systemctl status mysqld
6.设置初始密码
这种方式安装成功后无法查看初始密码,需要自己配置。
(1)先修改配置文件/etc/my.cnf令MySQL跳过登录时的权限检验,在[mysqld]下加入一行:
skip-grant-tables
(2)重启MySQL
#service mysqld restart
(3)免密码登录MySQL。
#mysql
(4)mysql客户端执行如下命令,修改root密码
mysql>  use mysql;
mysql> UPDATE user SET authentication_string = password('your-password') WHERE host = 'localhost' AND user = 'root';
mysql> select host,user, authentication_string, password_expired from user;
mysql> update user set password_expired='N' where password_expired='Y' //密码不过期
mysql> update user set host='%' where user='root' and host='localhost'; //远程可访问
mysql> flush privileges; //刷新权限
mysql> exit;//退出
(5)、修改配置文件/etc/my.cnf删除此前新增那一行skip-grant-tables,并重启MySQL(这一步非常重要,不执行可能导致严重的安全问题)
#service mysqld restart //重启 Mysql
