1.Gradle其他模块
1.1 Settings类
这个Setting类我们之前可能没见过,但是settings.gradle我们见到过好多次了

那这个setttings.gradle和我们的Settings.java有啥关系呢?我们回想下我们之前的Project,它里面有个默认的文件名就叫build.gradle,也就是我们每个Project的初始化都是通过这个build.gradle来初始化Project的实体对象,在这里我们这个settings.gradle和Settings类是一样的,通过settings.gradle中配置来对Settings进行初始化的,他们的核心功能就是决定哪些工程需要被gradle处理的
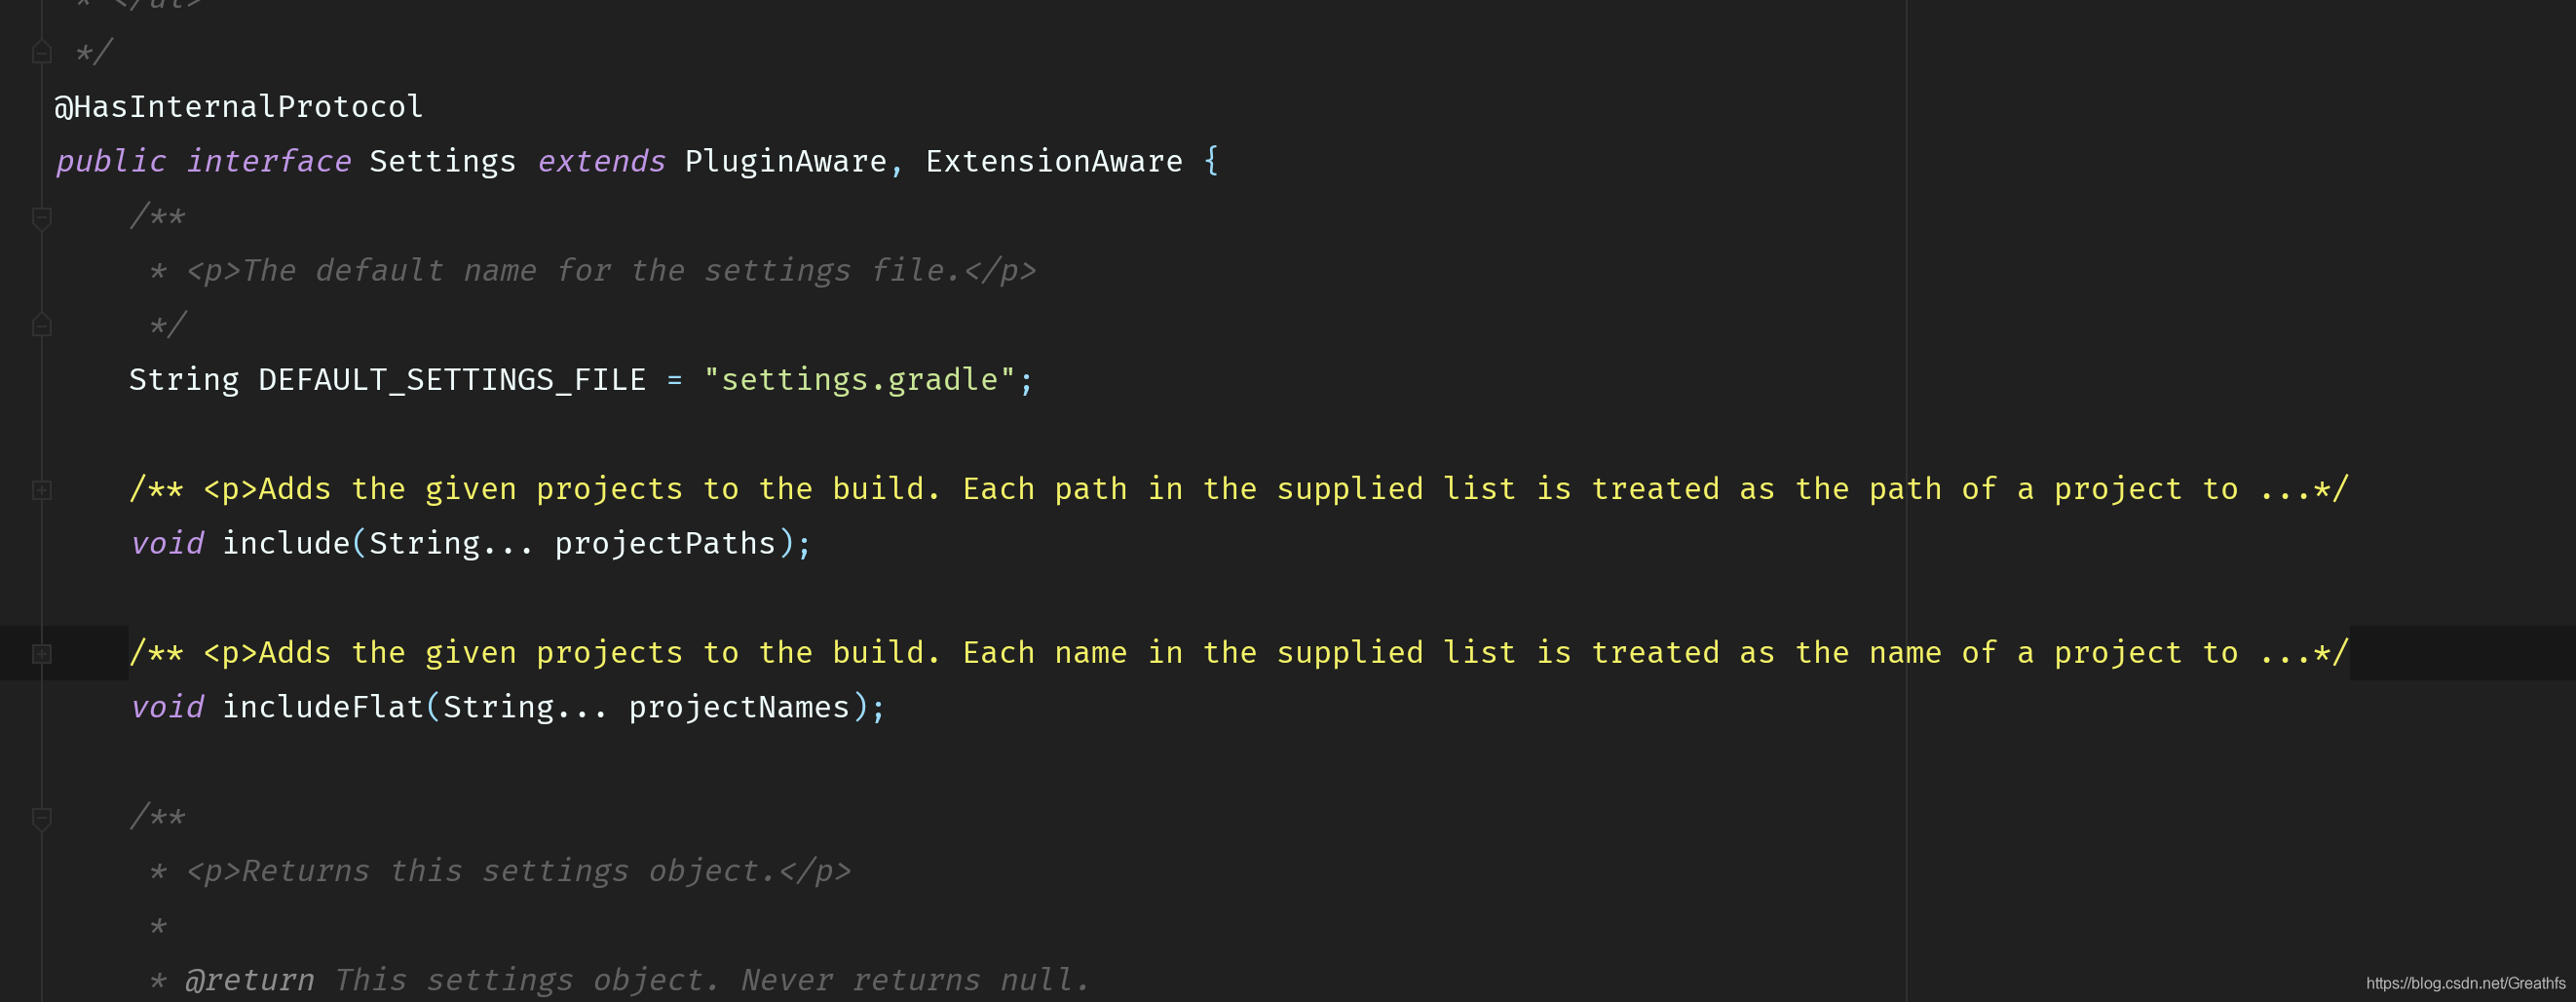
Settings类中最主要的就是这个inclue方法了,通过这个方法就可以将我们新建的工程引入进来,这个settings,gradle对我们开发人员来说很简单,但是它本省不简单.它占用了整个gradle生命周期的三分之一,就是`初始化阶段。
1.2 SourceSet类

我们知道我们工程师在src/main/java目录下写源码并且最终编译为字节码文件,src/main/res目录下存放我们的资源文件,这是我们gradle默认约定好了的,这也是我们sourceSet最大的作用.管理我们源码,资源,库等存放的位置.既然有默认,那么我们能不能进行更改呢?答案是可以的,首先我们看下AndroidSourceSet这个类的源码,看看我们都能更改哪些内容
public interface AndroidSourceSet {


    /**
     * Configures the Java resources for this set.
     *
     * <p>The given closure is used to configure the {@link AndroidSourceDirectorySet} which
     * contains the java resources.
     *
     * @param configureClosure The closure to use to configure the javaResources.
     * @return this
     */
    @NonNull
    AndroidSourceSet resources(Closure configureClosure);


    /**
     * Configures the Java source for this set.
     *
     * <p>The given closure is used to configure the {@link AndroidSourceDirectorySet} which
     * contains the Java source.
     *
     * @param configureClosure The closure to use to configure the Java source.
     * @return this
     */
    @NonNull
    AndroidSourceSet java(Closure configureClosure);


    /**
     * Configures the location of the Android Manifest for this set.
     *
     * <p>The given closure is used to configure the {@link AndroidSourceFile} which contains the
     * manifest.
     *
     * @param configureClosure The closure to use to configure the Android Manifest.
     * @return this
     */
    @NonNull
    AndroidSourceSet manifest(Closure configureClosure);

    /**
     * Configures the location of the Android Resources for this set.
     *
     * <p>The given closure is used to configure the {@link AndroidSourceDirectorySet}
     * which contains the resources.
     *
     * @param configureClosure The closure to use to configure the Resources.
     * @return this
     */
    @NonNull
    AndroidSourceSet res(Closure configureClosure);


    /**
     * Configures the location of the Android Assets for this set.
     *
     * <p>The given closure is used to configure the {@link AndroidSourceDirectorySet}
     * which contains the assets.
     *
     * @param configureClosure The closure to use to configure the Assets.
     * @return this
     */
    @NonNull
    AndroidSourceSet assets(Closure configureClosure);


    /**
     * Configures the location of the Android AIDL source for this set.
     *
     * <p>The given closure is used to configure the {@link AndroidSourceDirectorySet}
     * which contains the AIDL source.
     *
     * @param configureClosure The closure to use to configure the AIDL source.
     * @return this
     */
    @NonNull
    AndroidSourceSet aidl(Closure configureClosure);


    /**
     * Configures the location of the Android RenderScript source for this set.
     *
     * <p>The given closure is used to configure the {@link AndroidSourceDirectorySet}
     * which contains the Renderscript source.
     *
     * @param configureClosure The closure to use to configure the Renderscript source.
     * @return this
     */
    @NonNull
    AndroidSourceSet renderscript(Closure configureClosure);


    /**
     * Configures the location of the Android JNI source for this set.
     *
     * <p>The given closure is used to configure the {@link AndroidSourceDirectorySet}
     * which contains the JNI source.
     *
     * @param configureClosure The closure to use to configure the JNI source.
     * @return this
     */
    @NonNull
    AndroidSourceSet jni(Closure configureClosure);


    /**
     * Configures the location of the Android JNI libs for this set.
     *
     * <p>The given closure is used to configure the {@link AndroidSourceDirectorySet}
     * which contains the JNI libs.
     *
     * @param configureClosure The closure to use to configure the JNI libs.
     * @return this
     */
    @NonNull
    AndroidSourceSet jniLibs(Closure configureClosure);


    /**
     * Configures the location of the Android shaders for this set.
     *
     * <p>The given closure is used to configure the {@link AndroidSourceDirectorySet}
     * which contains the shaders.
     *
     * @param configureClosure The closure to use to configure the shaders.
     * @return this
     */
    @NonNull
    AndroidSourceSet shaders(Closure configureClosure);

    /**
     * Sets the root of the source sets to a given path.
     *
     * All entries of the source set are located under this root directory.
     *
     * @param path the root directory.
     * @return this
     */
    @NonNull
    AndroidSourceSet setRoot(String path);
}
这里呢我把所有的get方法都去除了,我们只关心设置.
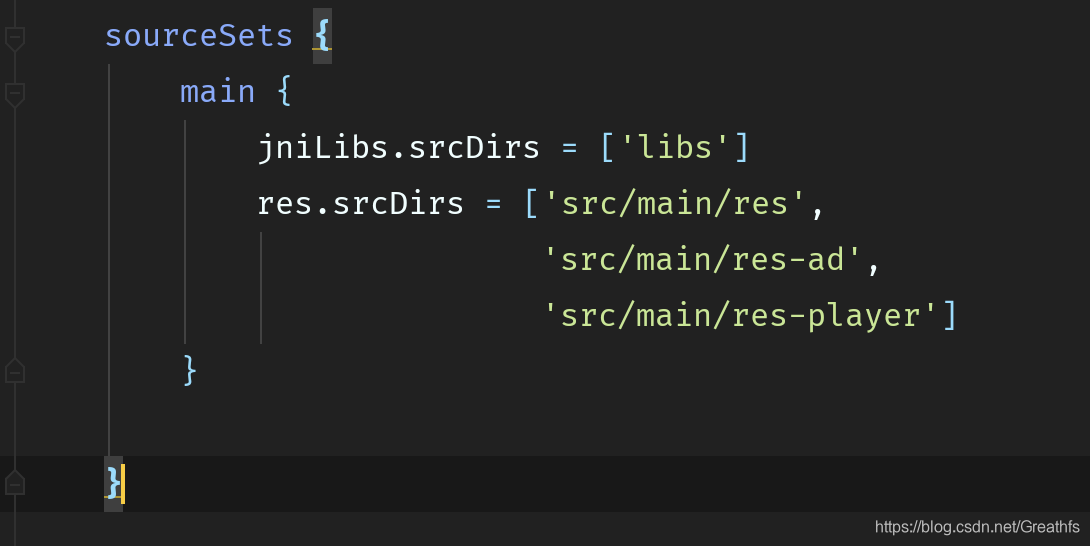
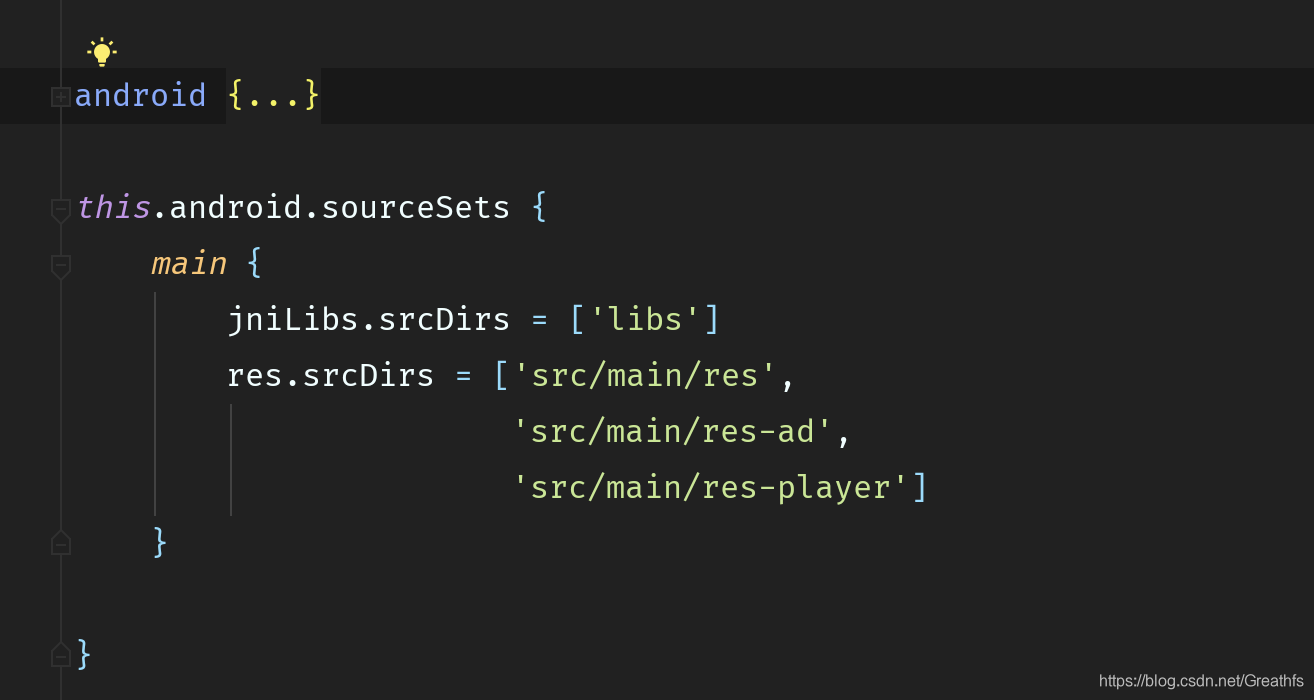
第一个例子:修改我们默认存放的so文件位置
我们AS工程默认存放位置为src/main/jniLibs下,我们呢想把它存放在我们的libs目录下
 sourceSets {
        main {
            jniLibs.srcDirs = ['libs']
        }
    }
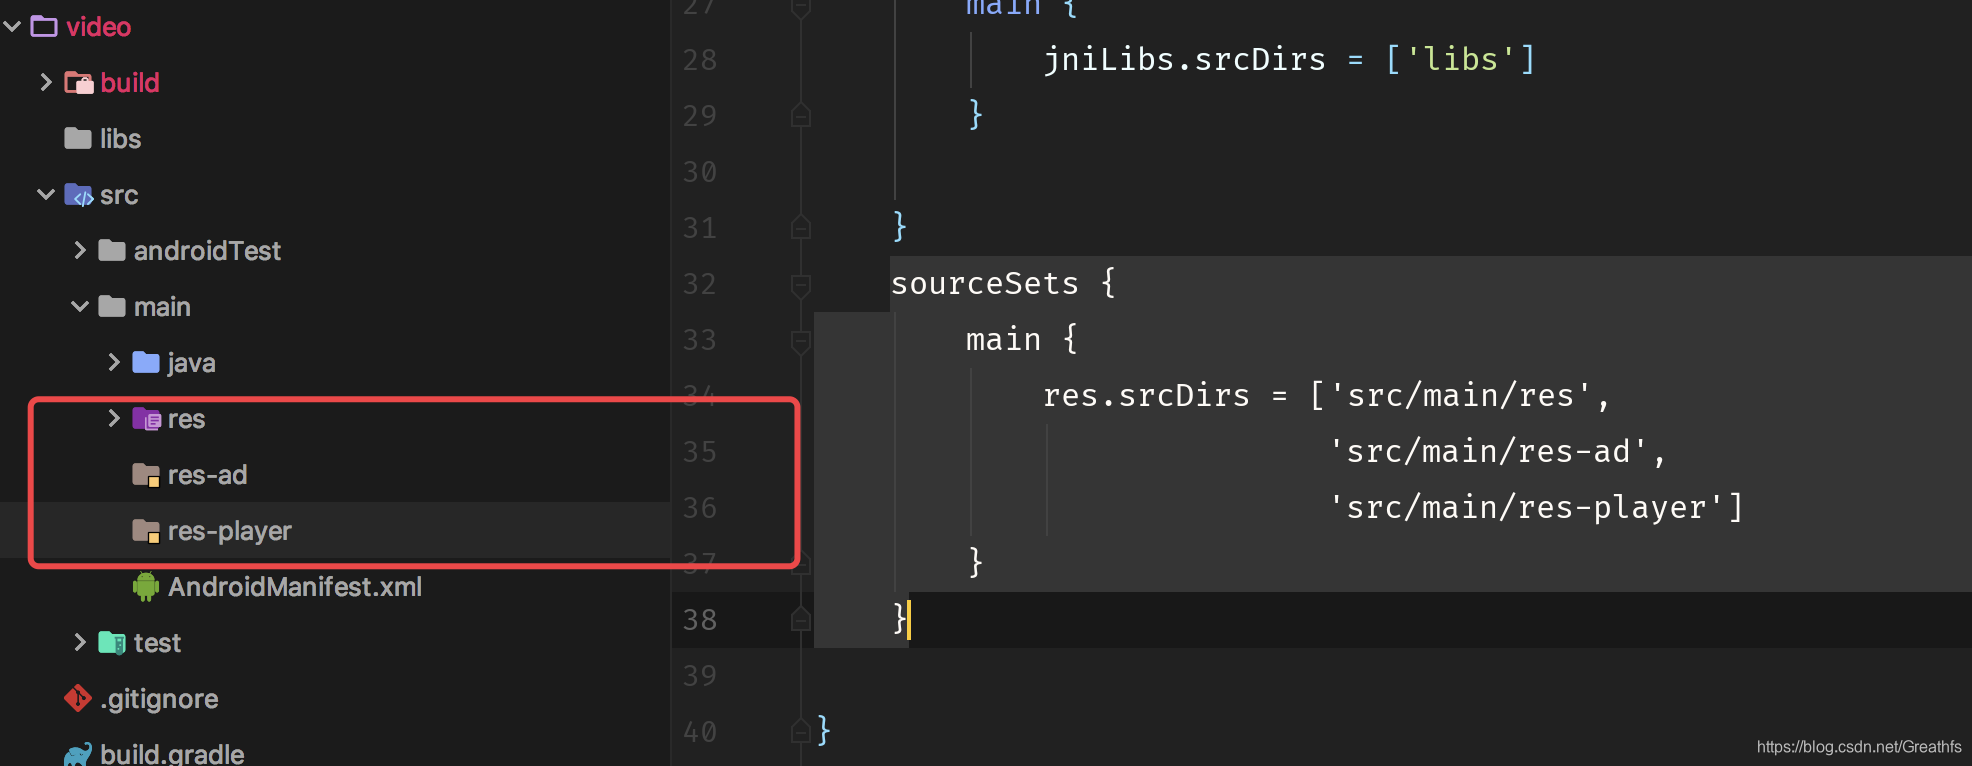
第二个例子:res分包,像我们的java代码一样
这里我们先创建几个文件夹,跟我们的res同级
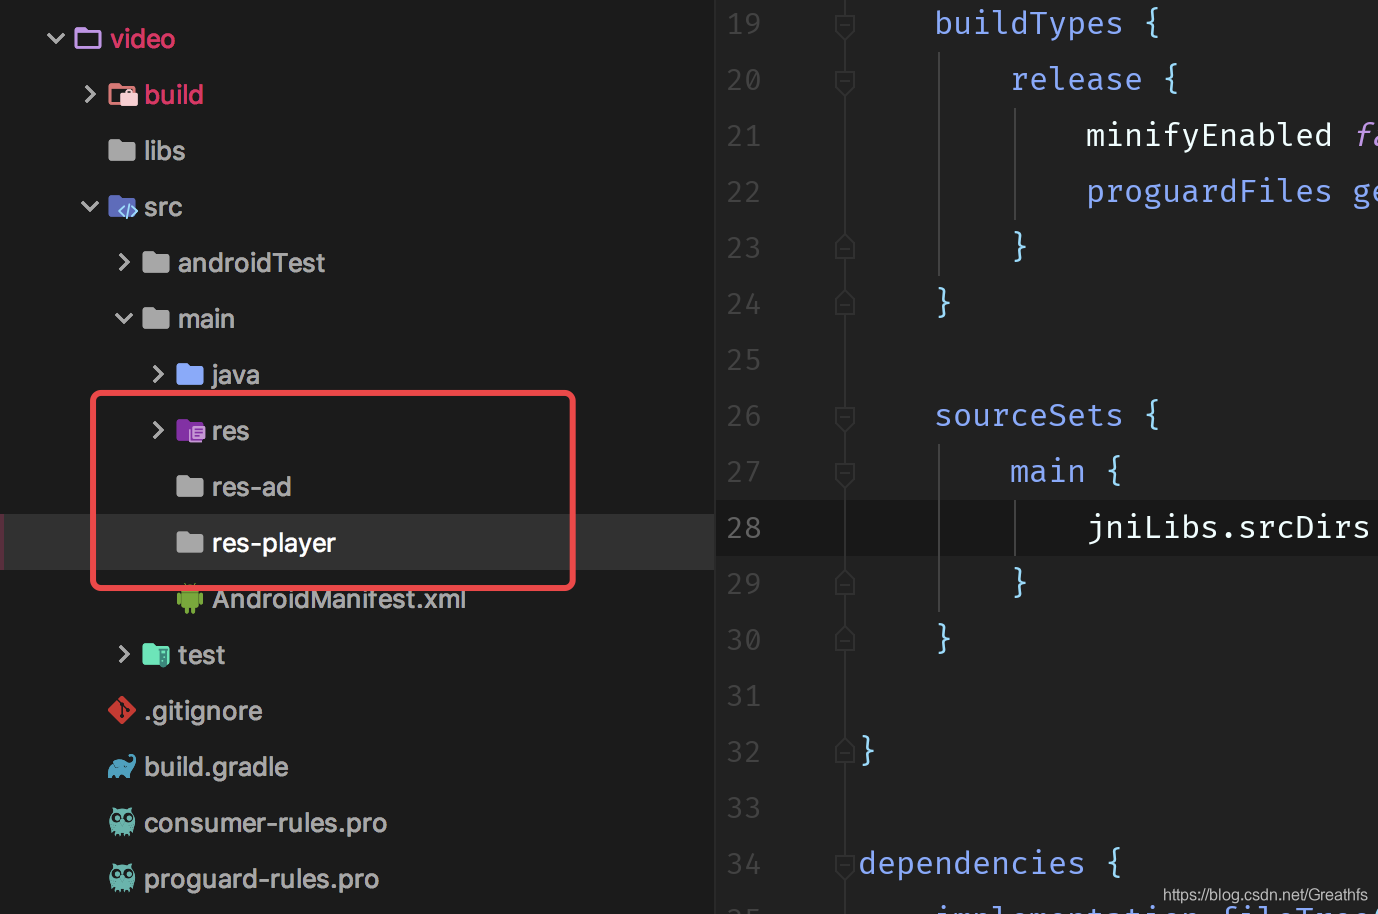
这里我们发现我们新增加的这两个文件夹和我们的res还是不太一样的,就是普通的文件夹,接下来我们就把这两个文件夹添加到我们的sourceSets中
sourceSets {
        main {
            res.srcDirs = ['src/main/res',
                           'src/main/res-ad',
                           'src/main/res-player']
        }
    }
同步一下后我们在看下
我们也可以将我们上面的两个例子的代码写在一个sourceSets中
同样也可以拿到android外面
2.Gradle的Plugin实战
2.1 Plugin的定义
Gradle中的Plugin是对完成指定功能的Task的封装,只要工程依赖了某个Plugin,就能执行该Plugin中所有的功能,例如:使用Java插件就可以打出jar包,使用Android插件,就可以生成apk、aar。
2.2 创建一个Plugin
2.2.1 创建插件工程
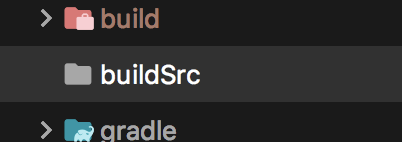
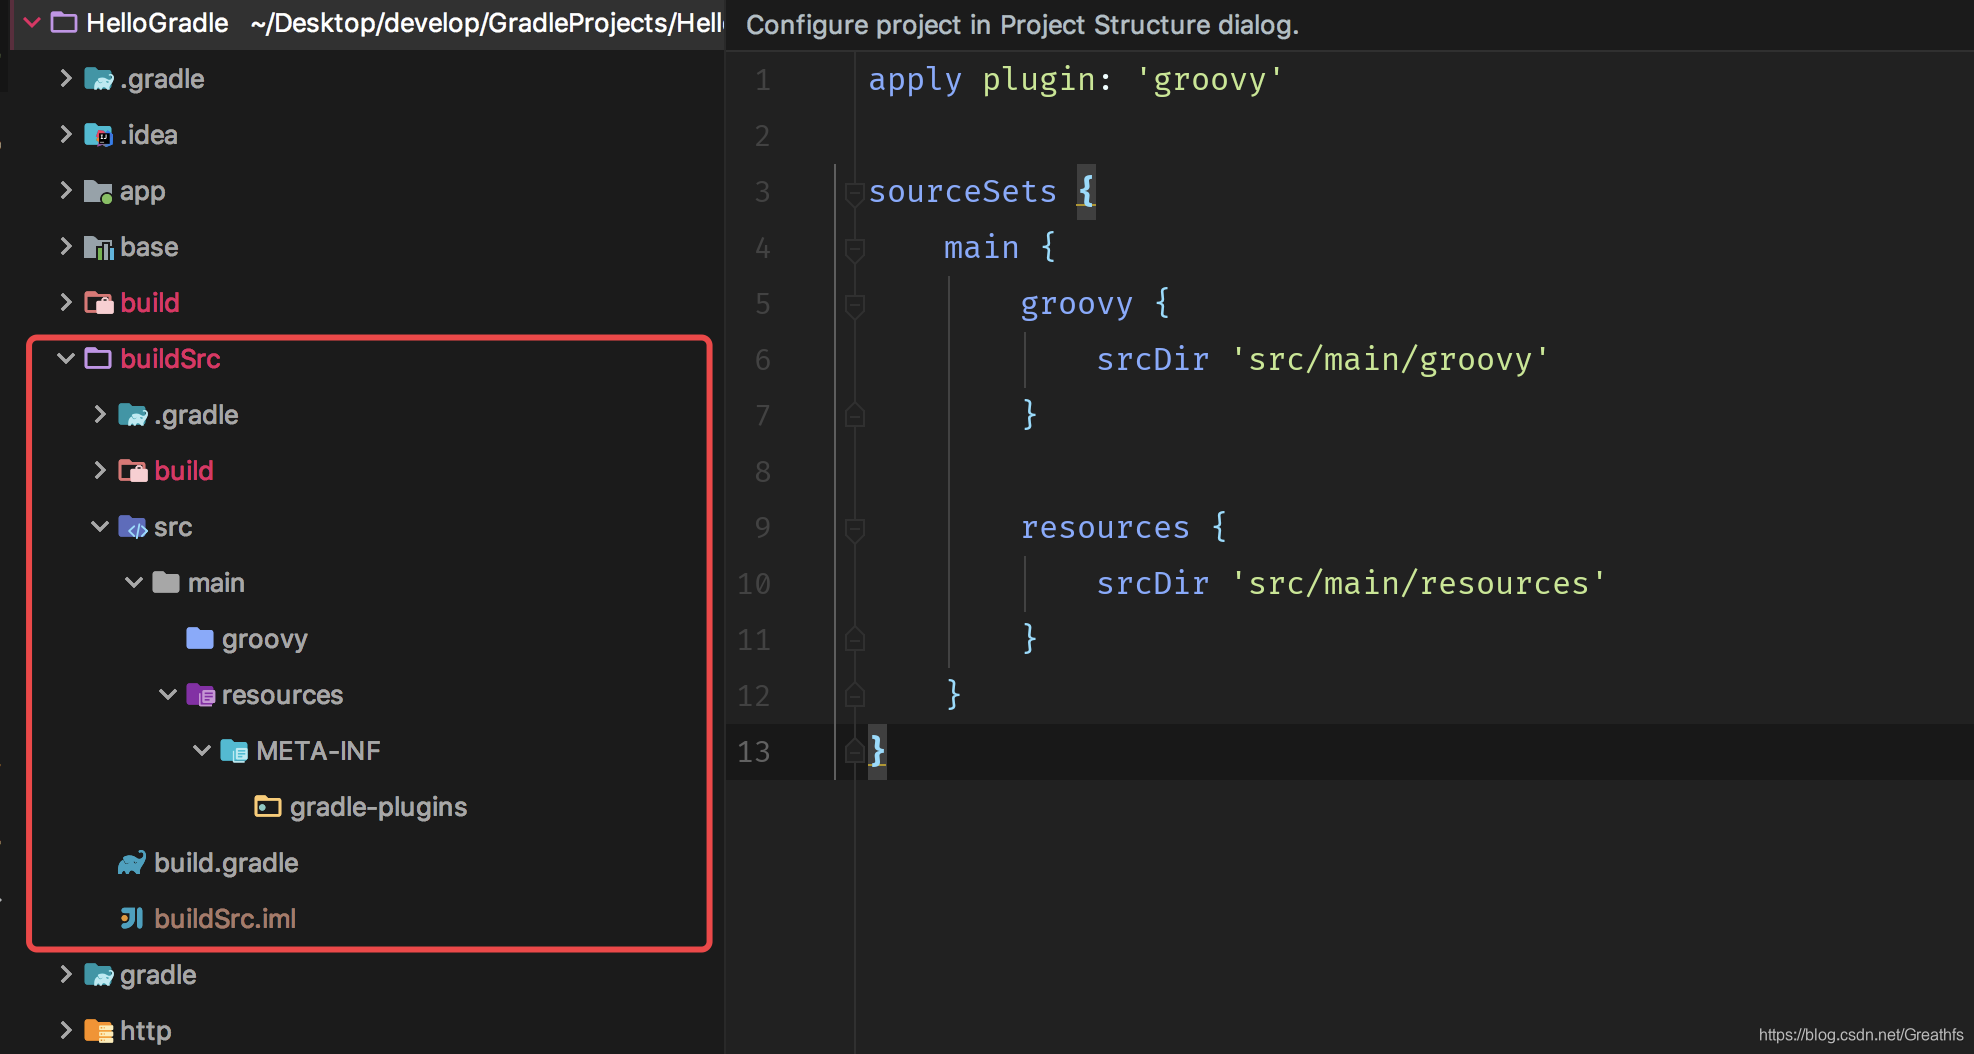
- 在我们工程目录下创建
buildSrc文件夹。
- 在
buildSrc目录下,创建src/main文件夹和build.gradle文件。
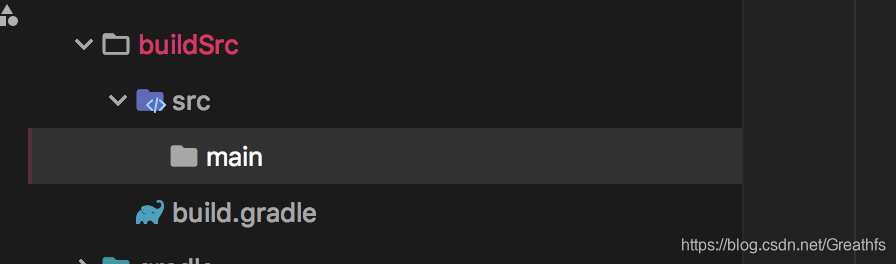
- 在
main文件夹下创建groovy和resources文件夹

- 在
resources创建一个META-INF文件夹,再在META-INF中创建一个gradle-plugins文件夹。
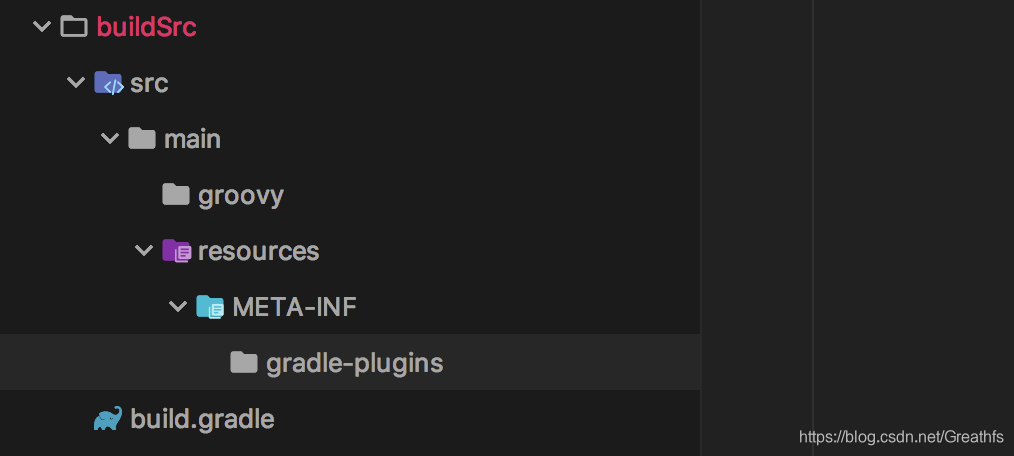
- 在
build.gradle文件中输入如下脚本:
apply plugin: 'groovy'

sourceSets {
    main {
        groovy {
            srcDir 'src/main/groovy'
        }

        resources {
            srcDir 'src/main/resources'
        }
    }
}
- 编译一下
2.2.2 创建插件类
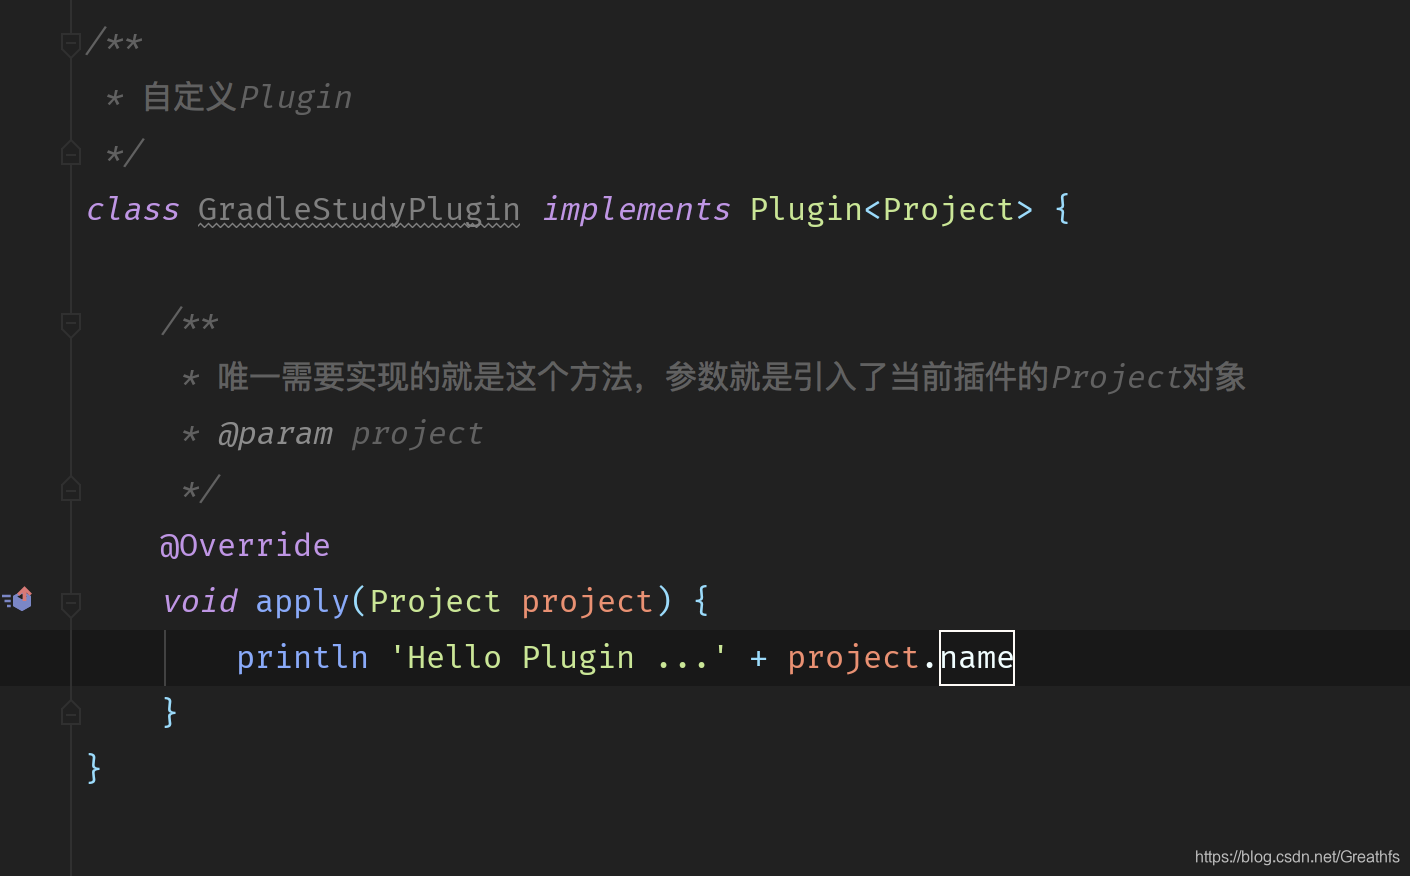
这个和我们的Java基本上是一样的,我们在我们的groovy文件夹下创建一个com.hfs.gradle.study文件夹,这个就相当于我们的包名

然后我们在study文件夹下创建一个插件类GradleStudyPlugin,注意,这里的GradleStudyPlugin是以.groovy为后缀的,不是.java,因为我们创建的是一个插件,所以我们还需要把这个类实现Gradle提供的接口
2.2.3 指定插件入口
我们接下来就是要声明别人如何使用我们的插件,那么在哪里声明呢?我们需要先在META-INF.gradle-plugins目录下创建一个properties文件,这个properties我们一般用插件类的包名来定义
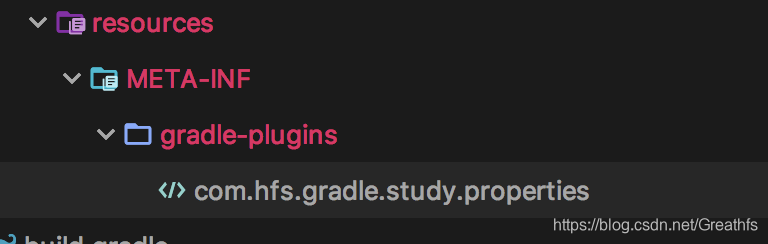
里面的内容很简单,就一句话

2.2.4 使用自定义插件
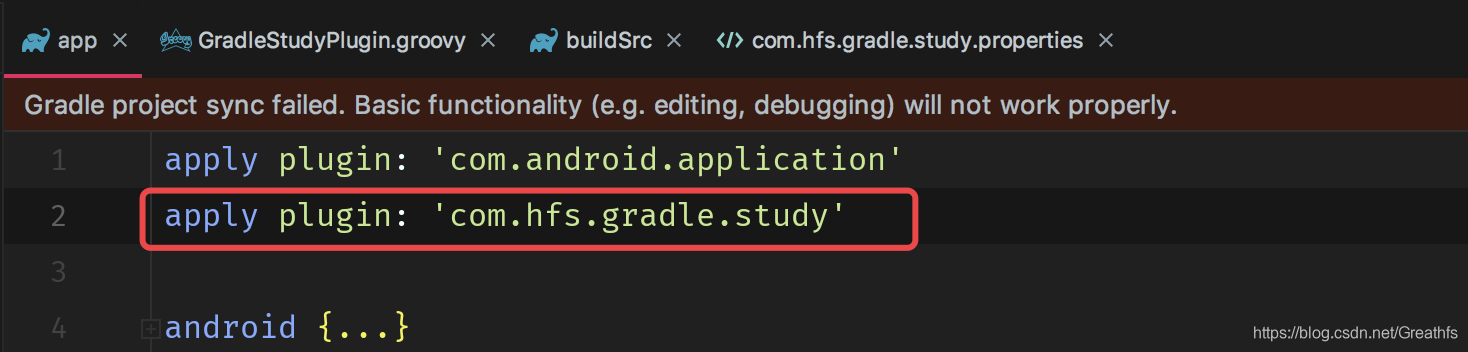
接下来就是使用了,很简单,apply plugin:加上我们的插件的包名,比如我们的app工程需要引入这个插件,打开app的build.gradle文件,加上这句话
2.2.5 创建扩展属性
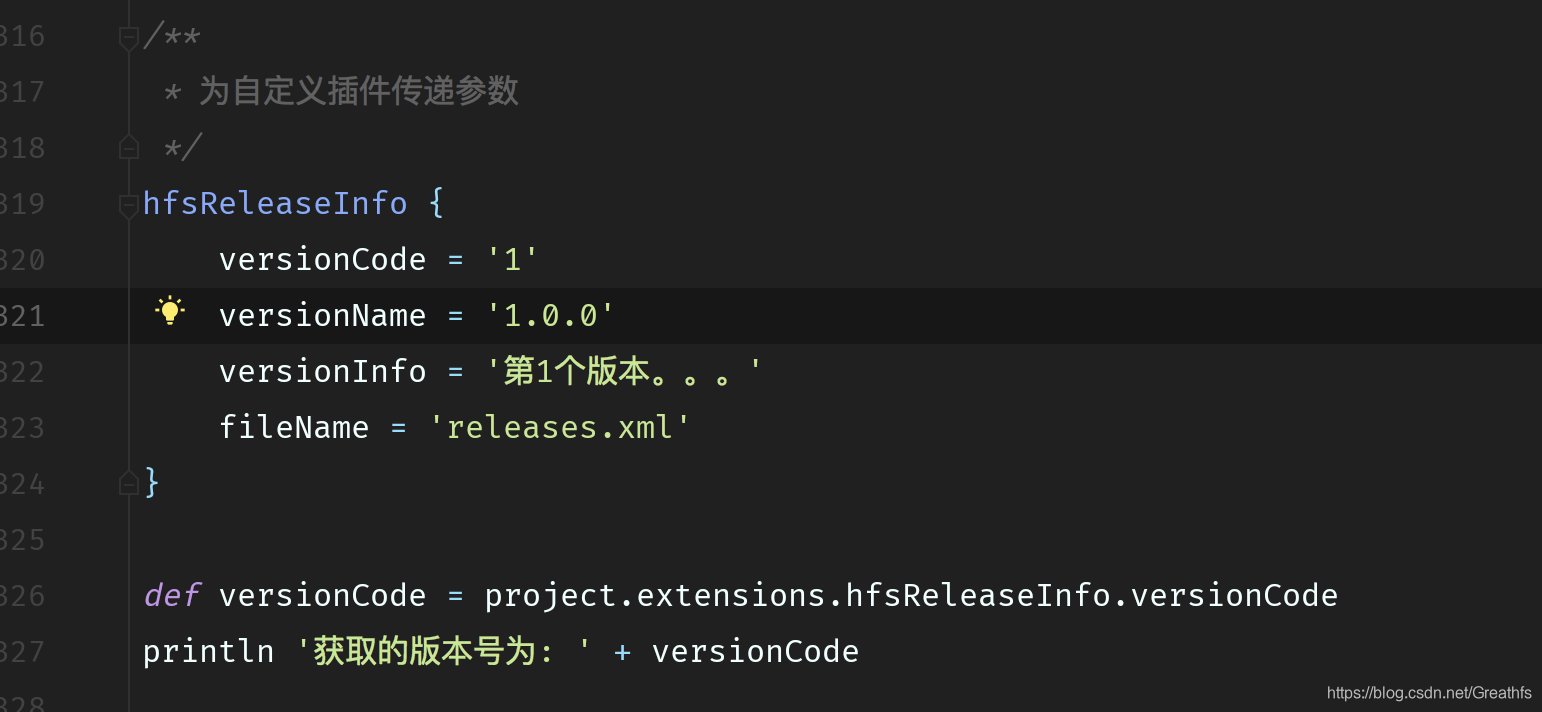
1.创建一个实体类用于接收gradle中配置的参数,类似我们Java中的类,但是以.groovy为后缀
package com.hfs.gradle.study
/**
 * 与自定义Plugin进行参数传递
 */
class ReleaseInfoExtension {

    /**
     * 版本号
     */
    String versionCode
    /**
     * 版本名字
     */
    String versionName
    /**
     * 版本信息
     */
    String versionInfo
    /**
     * 文件路径
     */
    String fileName

    ReleaseInfoExtension() {

    }

    @Override
    String toString() {
        """| versionCode = ${versionCode}
           | versionName = ${versionName}
           | versionInfo = ${versionInfo}
           | fileName = ${fileName}
        """.stripMargin()
    }
}
2.在自定义插件中进行创建
/**
 * 自定义Plugin
 */
class GradleStudyPlugin implements Plugin<Project> {

    /**
     * 唯一需要实现的就是这个方法,参数就是引入了当前插件的Project对象
     * @param project
     */
    @Override
    void apply(Project project) {
        //创建扩展属性
        project.extensions.create('hfsReleaseInfo', ReleaseInfoExtension)
    }

}
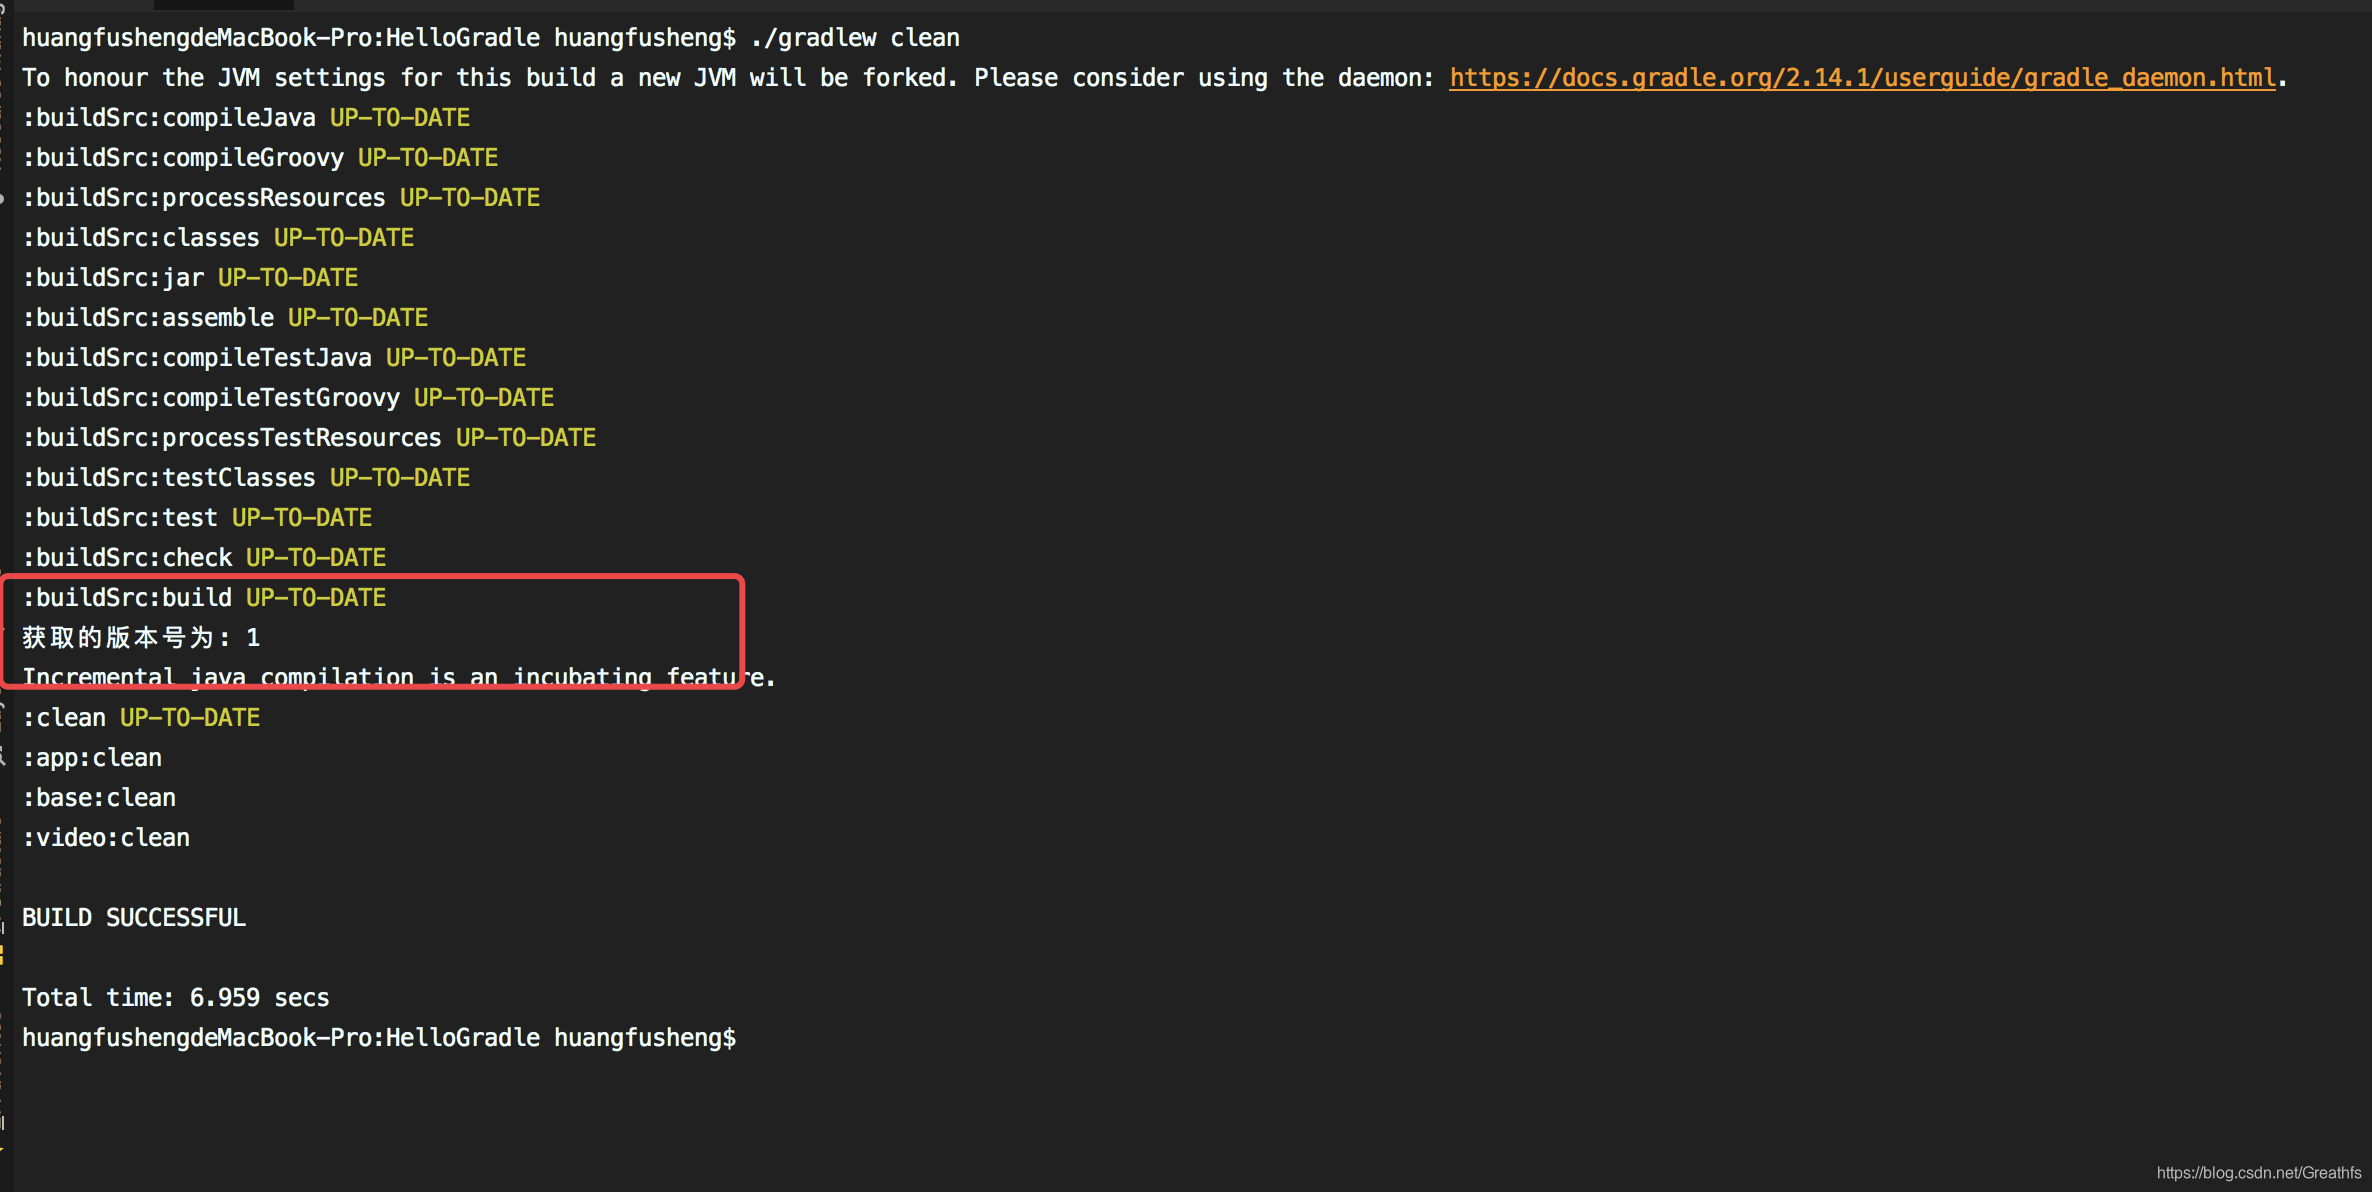
在app的build.gradle中进行使用
执行下
2.2.6 创建扩展Task
package com.hfs.gradle.study
import groovy.xml.MarkupBuilder
import org.gradle.api.DefaultTask
import org.gradle.api.tasks.TaskAction
/**
* 自定义Task,实现维护版本信息功能
*/
class ReleaseInfoTask extends DefaultTask {
ReleaseInfoTask() {
// 指定分组
group = 'hfs'
//说明信息
description = 'update the release info'
}
/**
* 使用TaskAction注解,可以让方法在gradle的执行阶段去执行。
* doFirst其实就是在外部为@TaskAction的最前面添加执行逻辑。
* 而doLast则是在外部为@TaskAction的最后面添加执行逻辑。
*/
@TaskAction
void doAction() {
updateInfo()
}
//真正的将Extension类中的信息呢,写入指定文件中
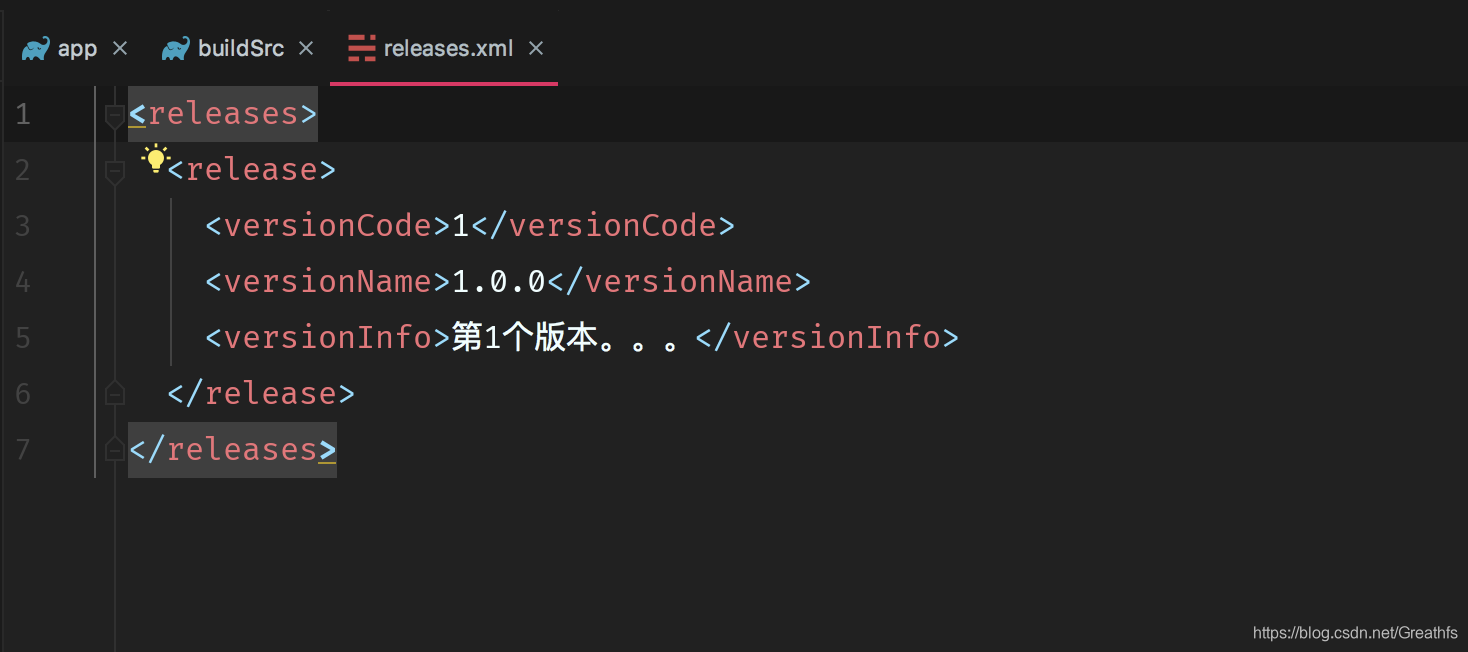
private void updateInfo() {
//获取将要写入的信息
String versionCodeMsg = project.extensions.
hfsReleaseInfo.versionCode
String versionNameMsg = project.extensions.
hfsReleaseInfo.versionName
String versionInfoMsg = project.extensions.
hfsReleaseInfo.versionInfo
String fileName = project.extensions.
hfsReleaseInfo.fileName
def file = project.file(fileName)
if (file != null && !file.exists()) {
file.createNewFile()
}
//将实体对象写入到xml文件中
def sw = new StringWriter()
def xmlBuilder = new MarkupBuilder(sw)
if (file.text != null && file.text.size() <= 0) {
//没有内容
xmlBuilder.releases {
release {
versionCode(versionCodeMsg)
versionName(versionNameMsg)
versionInfo(versionInfoMsg)
}
}
//直接写入
file.withWriter { writer -> writer.append(sw.toString())
}
} else {
//已有其它版本内容
xmlBuilder.release {
versionCode(versionCodeMsg)
versionName(versionNameMsg)
versionInfo(versionInfoMsg)
}
//插入到最后一行前面
def lines = file.readLines()
def lengths = lines.size() - 1
file.withWriter { writer ->
lines.eachWithIndex { line, index ->
if (index != lengths) {
writer.append(line + '\r\n')
} else if (index == lengths) {
writer.append('\r\r\n' + sw.toString() + '\r\n')
writer.append(lines.get(lengths))
}
}
}
}
}
}
和自定义属性一样,需要在自定义插件中创建
/**
 * 自定义Plugin
 */
class GradleStudyPlugin implements Plugin<Project> {

    /**
     * 唯一需要实现的就是这个方法,参数就是引入了当前插件的Project对象
     * @param project
     */
    @Override
    void apply(Project project) {
        //创建扩展属性
        project.extensions.create('hfsReleaseInfo', ReleaseInfoExtension)

        //创建Task
        project.tasks.create('hfsReleaseInfoTask', ReleaseInfoTask)
    }

}
同步下,会在gradle中看见这个task
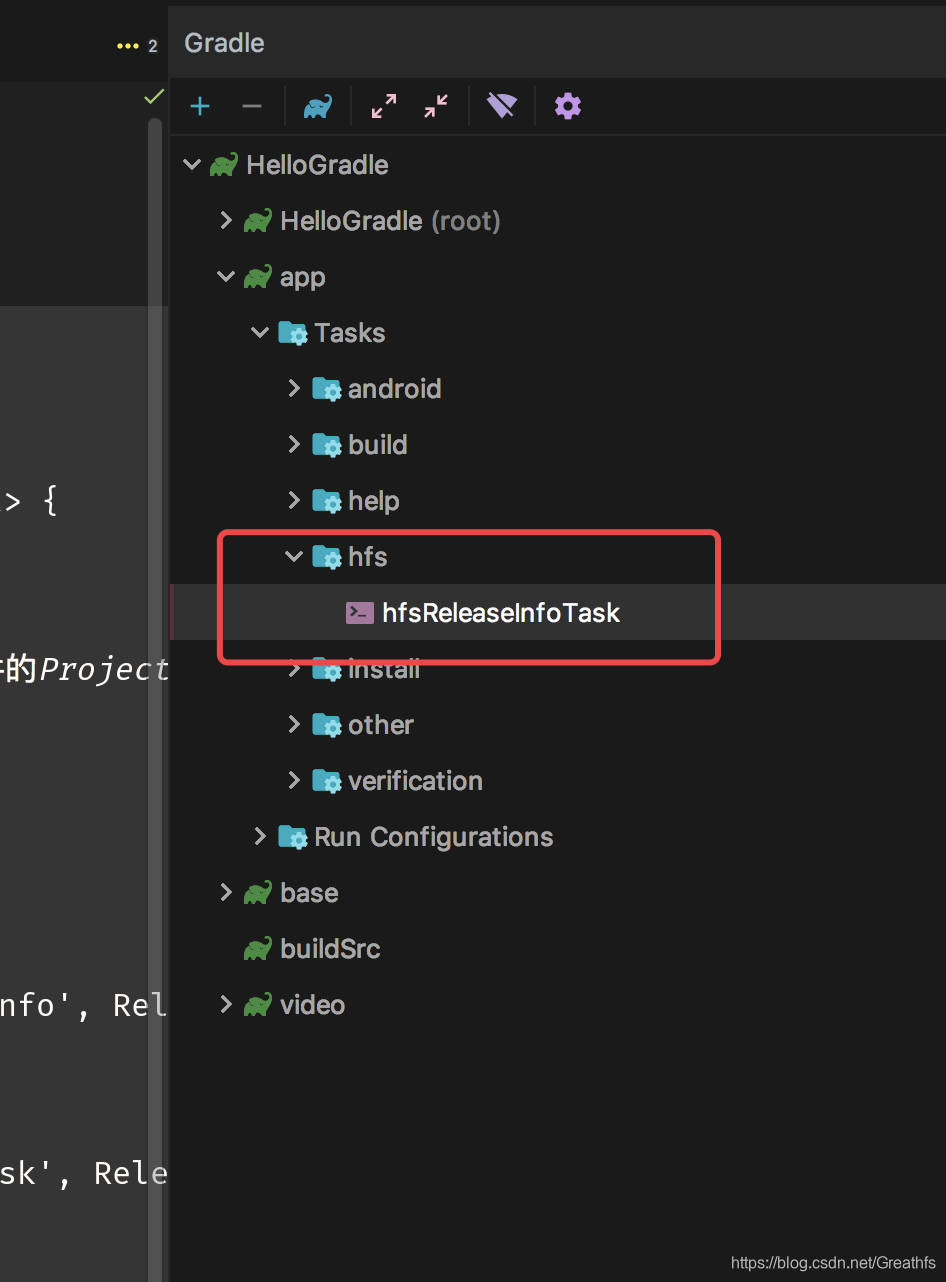
执行下这个task
3.android插件对gradle扩展
我这里取一个项目中app的build.gradle来看下android闭包中都有哪些东西
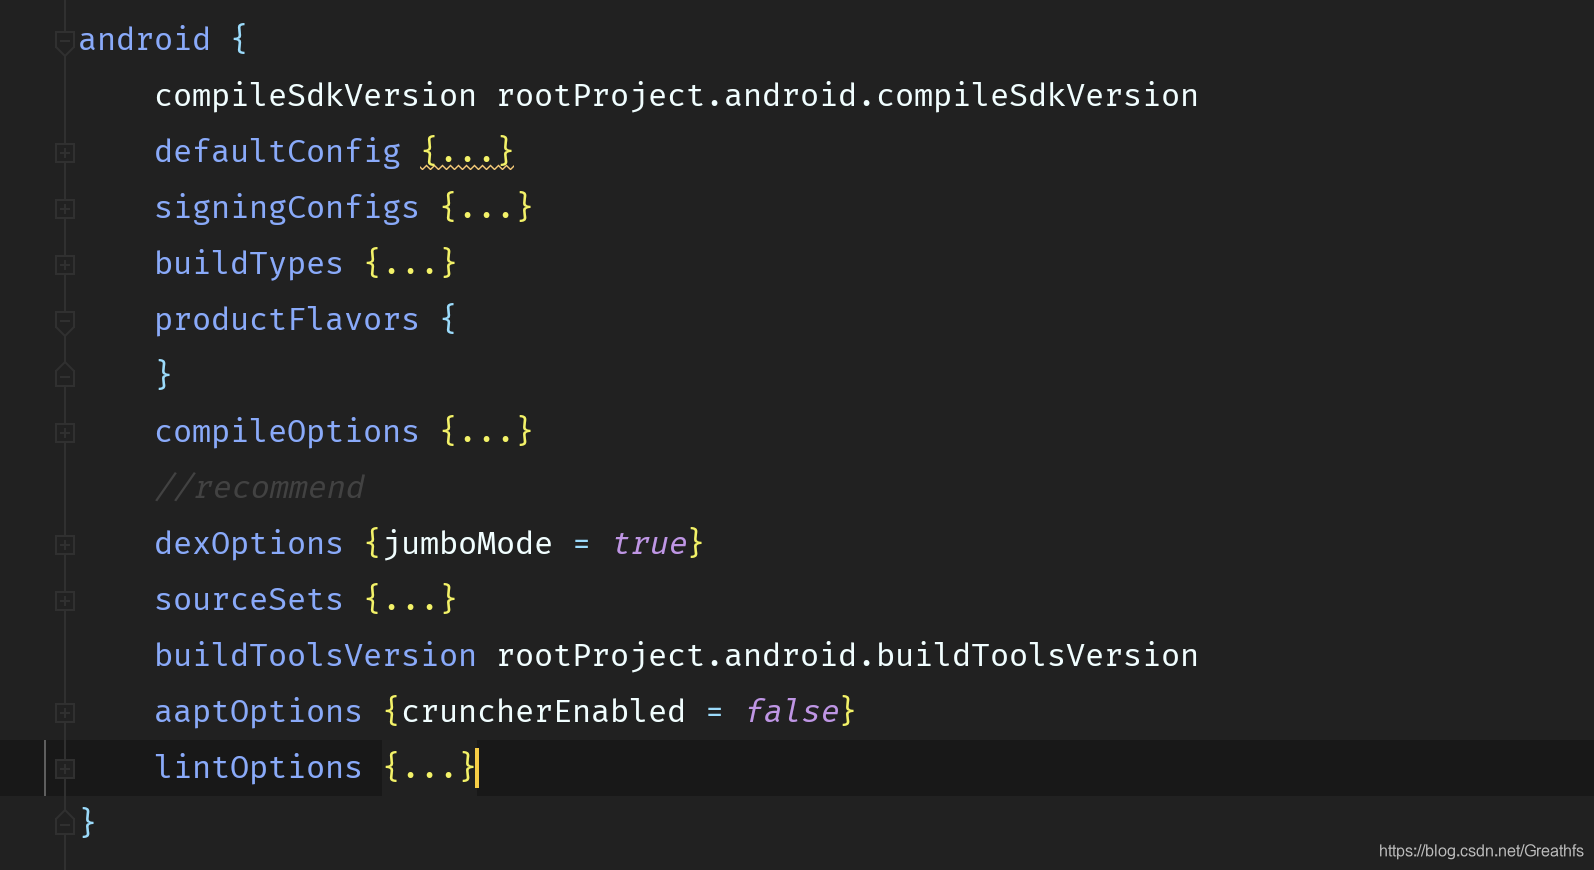
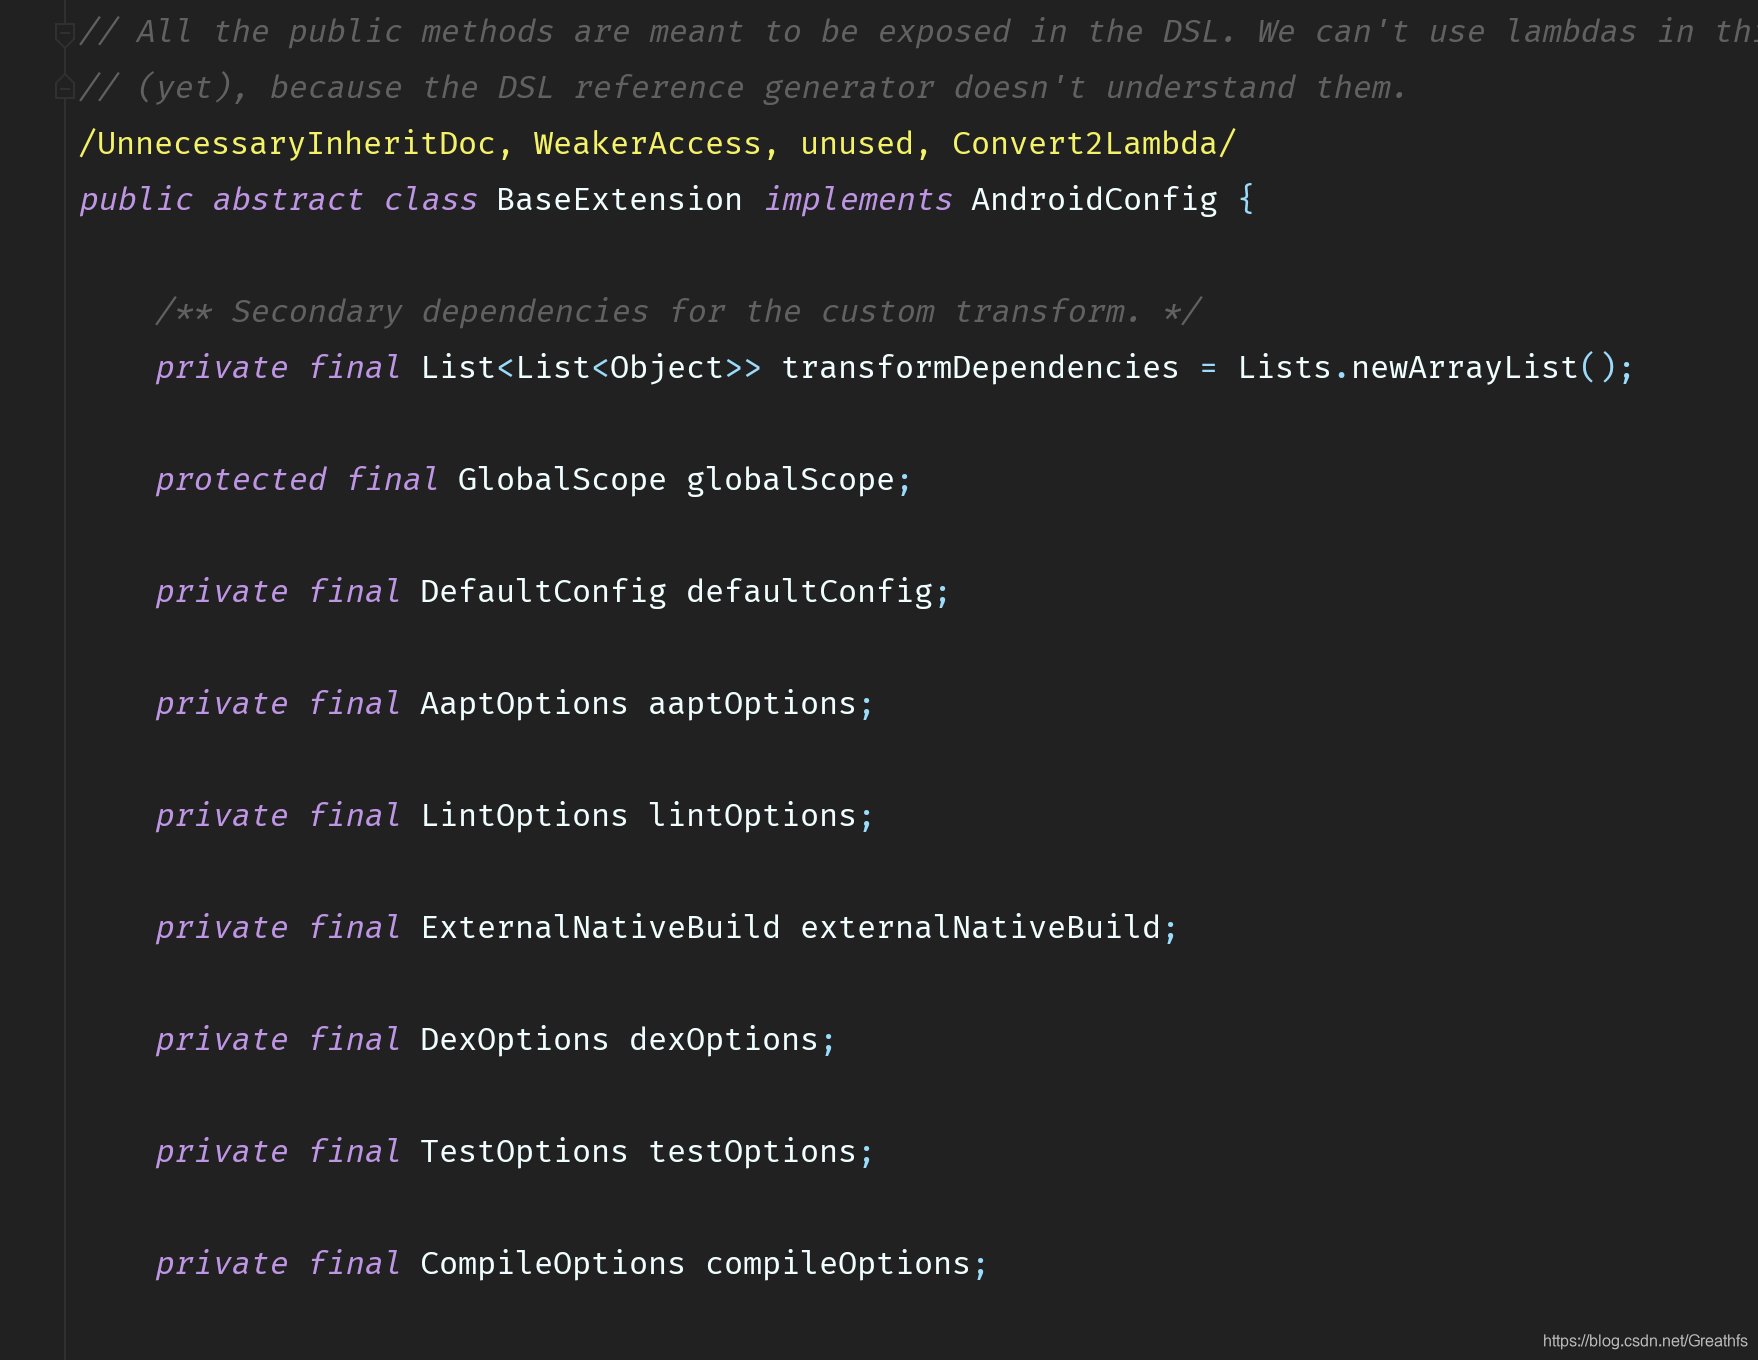
那这里面都能配置什么呢?主要看下BaseExtension这个类
BaseExtension官方具体解释
那么android引入的task都在哪里呢?主要看下BaseVariant这个类
/**
 * A Build variant and all its public data. This is the base class for items common to apps,
 * test apps, and libraries
 */
public interface BaseVariant {
    /**
     * Returns the name of the variant. Guaranteed to be unique.
     */
    @NonNull
    String getName();
    /**
     * Returns a description for the build variant.
     */
    @NonNull
    String getDescription();
    /**
     * Returns a subfolder name for the variant. Guaranteed to be unique.
     *
     * This is usually a mix of build type and flavor(s) (if applicable).
     * For instance this could be:
     * "debug"
     * "debug/myflavor"
     * "release/Flavor1Flavor2"
     */
    @NonNull
    String getDirName();
    /**
     * Returns the base name for the output of the variant. Guaranteed to be unique.
     */
    @NonNull
    String getBaseName();
    /**
     * Returns the output file for this build variants. Depending on the configuration, this could
     * be an apk (regular and test project) or a bundled library (library project).
     *
     * If it's an apk, it could be signed, or not; zip-aligned, or not.
     */
    @NonNull
    File getOutputFile();
    void setOutputFile(@NonNull File outputFile);
    /**
     * Returns the Manifest processing task.
     */
    @NonNull
    ProcessManifest getProcessManifest();
    /**
     * Returns the AIDL compilation task.
     */
    @NonNull
    AidlCompile getAidlCompile();
    /**
     * Returns the Renderscript compilation task.
     */
    @NonNull
    RenderscriptCompile getRenderscriptCompile();
    /**
     * Returns the resource merging task.
     */
    @Nullable
    MergeResources getMergeResources();
    /**
     * Returns the asset merging task.
     */
    @Nullable
    MergeAssets getMergeAssets();
    /**
     * Returns the Android Resources processing task.
     */
    @NonNull
    ProcessAndroidResources getProcessResources();
    /**
     * Returns the BuildConfig generation task.
     */
    @Nullable
    GenerateBuildConfig getGenerateBuildConfig();
    /**
     * Returns the Java Compilation task.
     */
    @NonNull
    JavaCompile getJavaCompile();
    /**
     * Returns the Java resource processing task.
     */
    @NonNull
    Copy getProcessJavaResources();
    /**
     * Returns the assemble task.
     */
    @Nullable
    Task getAssemble();
}
文档
上面的文档里面有详细的介绍
接下来我们就来实践下自定义apk输出路径和名字
this.afterEvaluate {
  this.android.applicationVariants.all { variant ->
    def output = variant.outpus.first()
    def apkName = "app-${variant.baseName}-${variant.versionName}.apk"
    output.outputFile = new File(output.outputFile.parent, apkName)
  }
}
