使用k3s测试Cilium,安装步骤可以参见官方文档
Cilium安装使用
docker安装
使用如下命令安装最新版本的docker
yum install -y yum-utils \
  device-mapper-persistent-data \
  lvm2

yum-config-manager \
    --add-repo \
    https://download.docker.com/linux/centos/docker-ce.repo

yum install docker-ce docker-ce-cli containerd.io
启动docker
service docker start
内核更新
Cilium要求的内核版本比较高,需要对内核进行升级,否则会运行失败。错误日志如minimal supported kernel version is 4.8.0; kernel version that is running is: 3.10.0"
1、导入key
rpm --import https://www.elrepo.org/RPM-GPG-KEY-elrepo.org

2、安装elrepo的yum源
rpm -Uvh http://www.elrepo.org/elrepo-release-7.0-2.el7.elrepo.noarch.rpm

3、安装内核
在yum的ELRepo源中,有mainline颁布的,可以这样安装:
yum --enablerepo=elrepo-kernel install  kernel-ml-devel kernel-ml -y
为了让新安装的内核成为默认启动选项,需要如下修改 GRUB 配置,打开并编辑 /etc/default/grub 并设置 GRUB_DEFAULT=0。意思是 GRUB 初始化页面的第一个内核将作为默认内核
# cat /etc/default/grub
GRUB_TIMEOUT=1
GRUB_DISTRIBUTOR="$(sed 's, release .*$,,g' /etc/system-release)"
GRUB_DEFAULT=0
GRUB_DISABLE_SUBMENU=true
GRUB_TERMINAL_OUTPUT="console"
GRUB_CMDLINE_LINUX="crashkernel=auto spectre_v2=retpoline rhgb quiet net.ifnames=0 console=tty0 console=ttyS0,11520                                                  0n8 noibrs"
GRUB_DISABLE_RECOVERY="true"
接下来运行下面的命令来重新创建内核配置.
# grub2-mkconfig -o /boot/grub2/grub.cfg
重启机器并查看内核版本
# uname -a
Linux iZt4n3pfp2quf7ld2pln01Z 5.6.5-1.el7.elrepo.x86_64 #1 SMP Thu Apr 16 14:02:22 EDT 2020 x86_64 x86_64 x86_64 GNU/Linux
安装k3s
安装master
curl -sfL https://get.k3s.io | INSTALL_K3S_EXEC='--flannel-backend=none --no-flannel' sh -
安装node(可选)
curl -sfL https://get.k3s.io | INSTALL_K3S_EXEC='--no-flannel' K3S_URL='https://${MASTER_IP}:6443' K3S_TOKEN=${NODE_TOKEN}
挂载BPF文件系统
sudo mount bpffs -t bpf /sys/fs/bpf
安装Cilium
kubectl create -f https://raw.githubusercontent.com/cilium/cilium/1.7.2/install/kubernetes/quick-install.yaml
查看安装结果
# kubectl -n kube-system get pods --watch
NAME                                      READY   STATUS      RESTARTS   AGE
cilium-operator-774d8f6d67-8mht6          1/1     Running     0          2m24s
metrics-server-6d684c7b5-qjmd5            1/1     Running     0          2m55s
local-path-provisioner-58fb86bdfd-xmx2r   1/1     Running     0          2m55s
helm-install-traefik-wx88l                0/1     Completed   0          2m55s
cilium-md26c                              1/1     Running     0          2m24s
svclb-traefik-g4mq5                       2/2     Running     0          55s
coredns-6c6bb68b64-gtqm5                  1/1     Running     0          2m55s
traefik-7b8b884c8-79v79                   1/1     Running     0          55s
部署连接测试
该步骤部署一系列deployment,这些deployment将使用各种连接路径相互连接。连接路径包括有/无service负载平衡以及各种网络策略组合。pod名称表示连接变量,readiness和liveness gate表示测试的成功或失败:
kubectl apply -f https://raw.githubusercontent.com/cilium/cilium/1.7.2/examples/kubernetes/connectivity-check/connectivity-check.yaml
安装Hubble
Hubble是一个完全分布式的网络和安全的观测平台,用于云本地工作负载。它构建在Cilium和eBPF之上,可以通过完全透明的方式深入了解服务以及网络基础设施的通信和行为。Visit Hubble Github page。
安装helm
wget https://get.helm.sh/helm-v3.1.2-linux-amd64.tar.gz
tar -zxvf helm-v3.1.2-linux-amd64.tar.gz
mv linux-amd64/helm /usr/local/bin/helm
安装Hubble
git clone https://github.com/cilium/hubble.git
cd hubble/install/kubernetes

helm template hubble \
    --namespace kube-system \
    --set metrics.enabled="{dns,drop,tcp,flow,port-distribution,icmp,http}" \
    --set ui.enabled=true \
> hubble.yaml

kubectl apply -f hubble.yaml
如果需要通过nodeport的方式访问,可以创建如下service,访问http://{$Externap_IP}:32000即可看到相关的策略
apiVersion: v1
kind: Service
metadata:
  name: hubble-ui-node
  namespace: kube-system
spec:
  ports:
  - name: http
    port: 12000
    protocol: TCP
    targetPort: 12000
    nodePort: 35000
  selector:
    k8s-app: hubble-ui
  sessionAffinity: None
  type: NodePort
Cilium的网络模型
同节点访问
同节点内部的容器之间的连通性依赖内核协议栈二层转发和BPF程序,不会经过像OVS或Linux bridge这样的二层设备。这部分功能由Cilium Agent负责,使用BPF规则进行流量的管控。简单示意图如下:
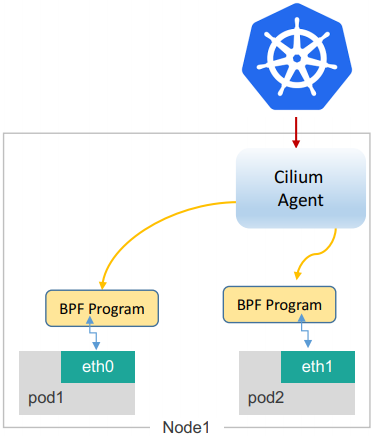
官方示意图如下:
可以看到,同节点的容器之间通信直接走BPF规则即可;不同节点的容器的通信需要通过各个节点上的cilium_host接口进行转发

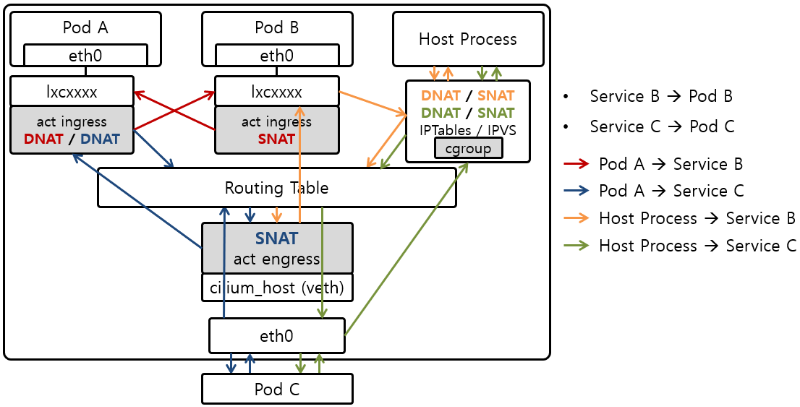
容器和所在节点的通信走节点内部的三层路由和BPF转发,BPF程序连接容器的veth pair和它的网关设备。如下路由中,将cilium_host作为容器的默认网关。容器和容器所在的节点的通信需要经过cilium_host接口
容器:
# ip route
default via 10.42.0.79 dev eth0 mtu 1450
10.42.0.79 dev eth0 scope link

节点:
[root@iZt4n3pfp2quf7ld2pln01Z ~]# ip route
default via 172.21.239.253 dev eth0
10.42.0.0/24 via 10.42.0.79 dev cilium_host src 10.42.0.79 mtu 1450
10.42.0.79 dev cilium_host scope link
169.254.0.0/16 dev eth0 scope link metric 1002
172.21.224.0/20 dev eth0 proto kernel scope link src 172.21.239.198
cilium_host涉及的iptables表项如下,可以看到对源地址为127.0.0.1的报文进行了SNAT。
Chain CILIUM_POST_nat (1 references)
 pkts bytes target     prot opt in     out     source               destination
 1977  119K MASQUERADE  all  --  *      !cilium_+  10.42.0.0/24        !10.42.0.0/24         /* cilium masquerade non-cluster */
 1521 95679 RETURN     all  --  *      !cilium_host  0.0.0.0/0            0.0.0.0/0            /* exclude non-cilium_host traffic from masquerade */
    0     0 ACCEPT     all  --  *      *       0.0.0.0/0            0.0.0.0/0            mark match 0xa00/0xe00 /* exclude proxy return traffic from masquarade */
    0     0 SNAT       all  --  *      cilium_host !10.42.0.79          !10.42.0.0/24         /* cilium host->cluster masquerade */ to:10.42.0.79
    0     0 SNAT       all  --  *      cilium_host  127.0.0.1            0.0.0.0/0            /* cilium host->cluster from 127.0.0.1 masquerade */ to:10.42.0.79
跨节点网络
下面是使用Host L3进行跨节点通信的流程图
下面是使用vxlan进行跨节点通信的流程图

Cilium cli
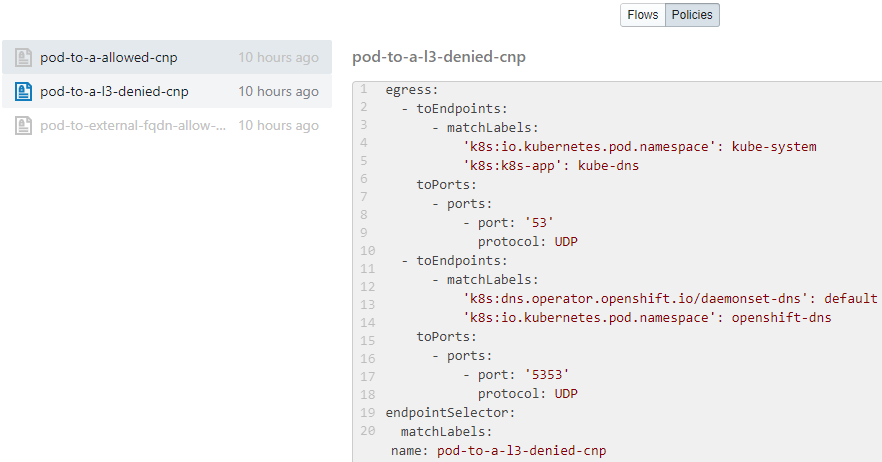
使用Cilium后,不会再使用kube-proxy,它会从Kubernetes API服务器获得Service信息,并存入BPF。可以使用cilium命令行查看相关的信息。如使用# cilium node list查看当前的node节点信息,使用# cilium service list查看service信息等。对于策略的获取,可以通过命令行# cilium policy get,也可以通过Hubble UI查看,如下:
参考: