目录
一 认识SparkSQL
1.1 什么是SparkSQL
spark SQL是spark的一个模块,主要用于进行结构化数据的处理。它提供的最核心的编程抽象就是DataFrame。
1.2 SparkSQL的作用
提供一个编程抽象(DataFrame) 并且作为分布式 SQL 查询引擎
DataFrame:它可以根据很多源进行构建,包括:结构化的数据文件,hive中的表,外部的关系型数据库,以及RDD
1.3 运行原理
将 Spark SQL 转化为 RDD, 然后提交到集群执行
1.4 特点
(1)容易整合
(2)统一的数据访问方式
(3)兼容 Hive
(4)标准的数据连接
1.5 SparkSession
SparkSession是Spark 2.0引如的新概念。SparkSession为用户提供了统一的切入点,来让用户学习spark的各项功能。
在spark的早期版本中,SparkContext是spark的主要切入点,由于RDD是主要的API,我们通过sparkcontext来创建和操作RDD。对于每个其他的API,我们需要使用不同的context。例如,对于Streming,我们需要使用StreamingContext;对于sql,使用sqlContext;对于Hive,使用hiveContext。但是随着DataSet和DataFrame的API逐渐成为标准的API,就需要为他们建立接入点。所以在spark2.0中,引入SparkSession作为DataSet和DataFrame API的切入点,SparkSession封装了SparkConf、SparkContext和SQLContext。为了向后兼容,SQLContext和HiveContext也被保存下来。
SparkSession实质上是SQLContext和HiveContext的组合(未来可能还会加上StreamingContext),所以在SQLContext和HiveContext上可用的API在SparkSession上同样是可以使用的。SparkSession内部封装了sparkContext,所以计算实际上是由sparkContext完成的。
特点:
---- 为用户提供一个统一的切入点使用Spark 各项功能
    ---- 允许用户通过它调用 DataFrame 和 Dataset 相关 API 来编写程序

    ---- 减少了用户需要了解的一些概念,可以很容易的与 Spark 进行交互

    ---- 与 Spark 交互之时不需要显示的创建 SparkConf, SparkContext 以及 SQlContext,这些对象已经封闭在 SparkSession 中
1.6 DataFrames
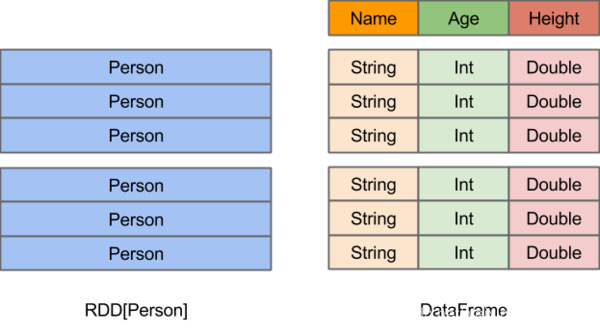
在Spark中,DataFrame是一种以RDD为基础的分布式数据集,类似于传统数据库中的二维表格。DataFrame与RDD的主要区别在于,前者带有schema元信息,即DataFrame所表示的二维表数据集的每一列都带有名称和类型。这使得Spark SQL得以洞察更多的结构信息,从而对藏于DataFrame背后的数据源以及作用于DataFrame之上的变换进行了针对性的优化,最终达到大幅提升运行时效率的目标。反观RDD,由于无从得知所存数据元素的具体内部结构,Spark Core只能在stage层面进行简单、通用的流水线优化。
二 RDD转换为Dataframe
方式一:通过 case class 创建 DataFrames(反射)
//定义case class,相当于表结构
case class People(var name:String,var age:Int)
object TestDataFrame1 {
  def main(args: Array[String]): Unit = {
    val conf = new SparkConf().setAppName("RDDToDataFrame").setMaster("local")
    val sc = new SparkContext(conf)
    val context = new SQLContext(sc)
    // 将本地的数据读入 RDD, 并将 RDD 与 case class 关联
    val peopleRDD = sc.textFile("E:\\666\\people.txt")
      .map(line => People(line.split(",")(0), line.split(",")(1).trim.toInt))
    import context.implicits._
    // 将RDD 转换成 DataFrames
    val df = peopleRDD.toDF
    //将DataFrames创建成一个临时的视图
    df.createOrReplaceTempView("people")
    //使用SQL语句进行查询
    context.sql("select * from people").show()
  }
}
方式二:通过 structType 创建 DataFrames(编程接口)
object TestDataFrame2 {
  def main(args: Array[String]): Unit = {
    val conf = new SparkConf().setAppName("TestDataFrame2").setMaster("local")
    val sc = new SparkContext(conf)
    val sqlContext = new SQLContext(sc)
    val fileRDD = sc.textFile("E:\\666\\people.txt")
    // 将 RDD 数据映射成 Row,需要 import org.apache.spark.sql.Row
    val rowRDD: RDD[Row] = fileRDD.map(line => {
      val fields = line.split(",")
      Row(fields(0), fields(1).trim.toInt)
    })
    // 创建 StructType 来定义结构
    val structType: StructType = StructType(
      //字段名,字段类型,是否可以为空
      StructField("name", StringType, true) ::
        StructField("age", IntegerType, true) :: Nil
    )
    /**
      * rows: java.util.List[Row],
      * schema: StructType
      * */
    val df: DataFrame = sqlContext.createDataFrame(rowRDD,structType)
    df.createOrReplaceTempView("people")
    sqlContext.sql("select * from people").show()
  }
}
方式三:通过 json 文件创建 DataFrames
object TestDataFrame3 {
  def main(args: Array[String]): Unit = {
    val conf = new SparkConf().setAppName("TestDataFrame2").setMaster("local")
    val sc = new SparkContext(conf)
    val sqlContext = new SQLContext(sc)
    val df: DataFrame = sqlContext.read.json("E:\\666\\people.json")
    df.createOrReplaceTempView("people")
    sqlContext.sql("select * from people").show()
  }
}
三、DataFrame的read和save和savemode
3.1 数据的读取
object TestRead {
  def main(args: Array[String]): Unit = {
    val conf = new SparkConf().setAppName("TestDataFrame2").setMaster("local")
    val sc = new SparkContext(conf)
    val sqlContext = new SQLContext(sc)
    //方式一
    val df1 = sqlContext.read.json("E:\\666\\people.json")
    val df2 = sqlContext.read.parquet("E:\\666\\users.parquet")
    //方式二
    val df3 = sqlContext.read.format("json").load("E:\\666\\people.json")
    val df4 = sqlContext.read.format("parquet").load("E:\\666\\users.parquet")
    //方式三,默认是parquet格式
    val df5 = sqlContext.load("E:\\666\\users.parquet")
  }
}
3.2 数据的保存
object TestSave {
  def main(args: Array[String]): Unit = {
    val conf = new SparkConf().setAppName("TestDataFrame2").setMaster("local")
    val sc = new SparkContext(conf)
    val sqlContext = new SQLContext(sc)
    val df1 = sqlContext.read.json("E:\\666\\people.json")
    //方式一
    df1.write.json("E:\\111")
    df1.write.parquet("E:\\222")
    //方式二
    df1.write.format("json").save("E:\\333")
    df1.write.format("parquet").save("E:\\444")
    //方式三
    df1.write.save("E:\\555")

  }
}
3.3 数据源是MySQL
object TestMysql {
  def main(args: Array[String]): Unit = {
    val conf = new SparkConf().setAppName("TestMysql").setMaster("local")
    val sc = new SparkContext(conf)
    val sqlContext = new SQLContext(sc)

    val url = "jdbc:mysql://192.168.123.102:3306/hivedb"
    val table = "dbs"
    val properties = new Properties()
    properties.setProperty("user","root")
    properties.setProperty("password","root")
    //需要传入Mysql的URL、表明、properties(连接数据库的用户名密码)
    val df = sqlContext.read.jdbc(url,table,properties)
    df.createOrReplaceTempView("dbs")
    sqlContext.sql("select * from dbs").show()

  }
}
