1.1 问题
配置SSH免密登录
安装依赖包
配置MySQL一主多从结构
1.2 方案
准备5台虚拟机,角色规划如图-1所示。
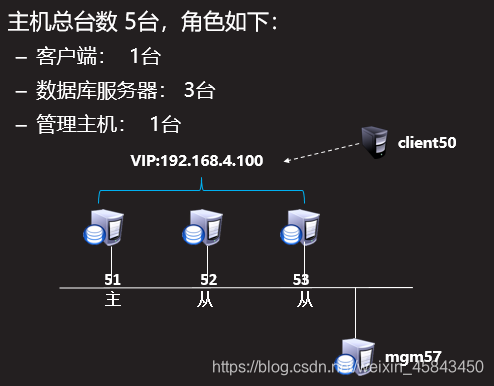
图-1
IP规划,如图-2所示:
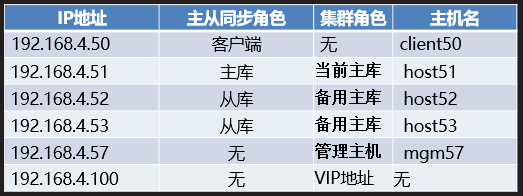
图-2
1.3 步骤
实现此案例需要按照如下步骤进行。
步骤一: 配置ssh免密登录
1)配置数据库服务器192.168.4.51
[root@host51 ~]# ssh-keygen //创建秘钥对
Generating public/private rsa key pair.
Enter file in which to save the key (/root/.ssh/id_rsa): //回车
Enter passphrase (empty for no passphrase): //回车
Enter same passphrase again:
Your identification has been saved in /root/.ssh/id_rsa.
Your public key has been saved in /root/.ssh/id_rsa.pub.
The key fingerprint is:
SHA256:qb7EZByHad3Jadr+zkiEbo7ZKGmCNlctgp+Wfp3Yad0 root@pxcnode71
The key’s randomart image is:
±–[RSA 2048]----+
| |
| + o o |
| = o * |
| o o * |
| . = S o |
| . . * + o |
| … =.O * + |
|.o.*+= & o E |
|. =+…B.o …+ |
±—[SHA256]-----+
[root@host51 ~]#
[root@host51 ~]# ssh-copy-id [email protected] //传递公钥给host52主机
/usr/bin/ssh-copy-id: INFO: Source of key(s) to be installed: “/root/.ssh/id_rsa.pub”
/usr/bin/ssh-copy-id: INFO: attempting to log in with the new key(s), to filter out any that are already installed
/usr/bin/ssh-copy-id: INFO: 1 key(s) remain to be installed – if you are prompted now it is to install the new keys
[email protected]’s password: //输入host52主机系统管理员root用户密码
Number of key(s) added: 1
Now try logging into the machine, with: “ssh ‘[email protected]’”
and check to make sure that only the key(s) you wanted were added.
[root@host51 ~]#
[root@host51 ~]# ssh-copy-id [email protected] //传递公钥给host53主机
/usr/bin/ssh-copy-id: INFO: Source of key(s) to be installed: “/root/.ssh/id_rsa.pub”
/usr/bin/ssh-copy-id: INFO: attempting to log in with the new key(s), to filter out any that are already installed
/usr/bin/ssh-copy-id: INFO: 1 key(s) remain to be installed – if you are prompted now it is to install the new keys
[email protected]’s password: //输入host53主机系统管理员root用户密码
Number of key(s) added: 1
Now try logging into the machine, with: “ssh ‘[email protected]’”
and check to make sure that only the key(s) you wanted were added.
[root@host51 ~]#
[root@host51 ~]# ssh [email protected] //可以无密码连接52主机
Last login: Fri Jun 21 13:21:39 2019 from 192.168.4.254
.-"""-.
/ .===. \
/ 6 6 /
( ___/ )
ooo_/__________
/ \
| I am Virtual Host ! ! ! |
_______________ooo/
| | |
|_ | _|
| | |
|||
/-‘Y’-\
(__/ __)
[root@host52 ~]#
[root@host52 ~]# exit //断开连接
登出
Connection to 192.168.4.52 closed.
[root@host51 ~]#
[root@host51 ~]# ssh [email protected] //可以无密码连接52主机
Last login: Fri Jun 21 09:01:15 2019 from 192.168.4.254
.-"""-.
/ .===. \
/ 6 6 /
( ___/ )
ooo_/__________
/ \
| I am Virtual Host ! ! ! |
_______________ooo/
| | |
|_ | _|
| | |
|||
/-‘Y’-\
(__/ __)
[root@host53 ~]# exit//断开连接
登出
Connection to 192.168.4.53 closed.
[root@host51 ~]#
2)配置数据库服务器192.168.4.52
[root@host52 ~]# ssh-keygen //创建秘钥对
Generating public/private rsa key pair.
Enter file in which to save the key (/root/.ssh/id_rsa): //回车
Enter passphrase (empty for no passphrase): //回车
Enter same passphrase again:
Your identification has been saved in /root/.ssh/id_rsa.
Your public key has been saved in /root/.ssh/id_rsa.pub.
The key fingerprint is:
SHA256:qb7EZByHad3Jadr+zkiEbo7ZKGmCNlctgp+Wfp3Yad0 root@pxcnode71
The key’s randomart image is:
±–[RSA 2048]----+
| |
| + o o |
| = o * |
| o o * |
| . = S o |
| . . * + o |
| … =.O * + |
|.o.*+= & o E |
|. =+…B.o …+ |
±—[SHA256]-----+
[root@host52 ~]#
[root@host52 ~]# ssh-copy-id [email protected] //传递公钥给host51主机
/usr/bin/ssh-copy-id: INFO: Source of key(s) to be installed: “/root/.ssh/id_rsa.pub”
/usr/bin/ssh-copy-id: INFO: attempting to log in with the new key(s), to filter out any that are already installed
/usr/bin/ssh-copy-id: INFO: 1 key(s) remain to be installed – if you are prompted now it is to install the new keys
[email protected]’s password: //输入host51主机系统管理员root用户密码
Number of key(s) added: 1
Now try logging into the machine, with: “ssh ‘[email protected]’”
and check to make sure that only the key(s) you wanted were added.
[root@host52 ~]#
[root@host52 ~]# ssh-copy-id [email protected] //传递公钥给host53主机
/usr/bin/ssh-copy-id: INFO: Source of key(s) to be installed: “/root/.ssh/id_rsa.pub”
/usr/bin/ssh-copy-id: INFO: attempting to log in with the new key(s), to filter out any that are already installed
/usr/bin/ssh-copy-id: INFO: 1 key(s) remain to be installed – if you are prompted now it is to install the new keys
[email protected]’s password: //输入host53主机系统管理员root用户密码
Number of key(s) added: 1
Now try logging into the machine, with: “ssh ‘[email protected]’”
and check to make sure that only the key(s) you wanted were added.
[root@host52 ~]#
[root@host52 ~]# ssh [email protected] //可以无密码连接51主机
Last login: Fri Jun 21 13:21:39 2019 from 192.168.4.254
.-"""-.
/ .===. \
/ 6 6 /
( ___/ )
ooo_/__________
/ \
| I am Virtual Host ! ! ! |
_______________ooo/
| | |
|_ | _|
| | |
|||
/-‘Y’-\
(__/ __)
[root@host51 ~]#
[root@host51 ~]# exit //断开连接
登出
Connection to 192.168.4.52 closed.
[root@host52 ~]#
[root@host52 ~]# ssh [email protected] //可以无密码连接53主机
Last login: Fri Jun 21 09:01:15 2019 from 192.168.4.254
.-"""-.
/ .===. \
/ 6 6 /
( ___/ )
ooo_/__________
/ \
| I am Virtual Host ! ! ! |
_______________ooo/
| | |
|_ | _|
| | |
|||
/-‘Y’-\
(__/ __)
[root@host53 ~]# exit//断开连接
登出
Connection to 192.168.4.53 closed.
[root@host52 ~]#
3)配置数据库服务器192.168.4.53
[root@host53 ~]# ssh-keygen //创建秘钥对
Generating public/private rsa key pair.
Enter file in which to save the key (/root/.ssh/id_rsa): //回车
Enter passphrase (empty for no passphrase): //回车
Enter same passphrase again:
Your identification has been saved in /root/.ssh/id_rsa.
Your public key has been saved in /root/.ssh/id_rsa.pub.
The key fingerprint is:
SHA256:qb7EZByHad3Jadr+zkiEbo7ZKGmCNlctgp+Wfp3Yad0 root@pxcnode71
The key’s randomart image is:
±–[RSA 2048]----+
| |
| + o o |
| = o * |
| o o * |
| . = S o |
| . . * + o |
| … =.O * + |
|.o.*+= & o E |
|. =+…B.o …+ |
±—[SHA256]-----+
[root@host53 ~]#
[root@host53 ~]# ssh-copy-id [email protected] //传递公钥给host51主机
/usr/bin/ssh-copy-id: INFO: Source of key(s) to be installed: “/root/.ssh/id_rsa.pub”
/usr/bin/ssh-copy-id: INFO: attempting to log in with the new key(s), to filter out any that are already installed
/usr/bin/ssh-copy-id: INFO: 1 key(s) remain to be installed – if you are prompted now it is to install the new keys
[email protected]’s password: //输入host51主机系统管理员root用户密码
Number of key(s) added: 1
Now try logging into the machine, with: “ssh ‘[email protected]’”
and check to make sure that only the key(s) you wanted were added.
[root@host53 ~]#
[root@host53 ~]# ssh-copy-id [email protected] //传递公钥给host52主机
/usr/bin/ssh-copy-id: INFO: Source of key(s) to be installed: “/root/.ssh/id_rsa.pub”
/usr/bin/ssh-copy-id: INFO: attempting to log in with the new key(s), to filter out any that are already installed
/usr/bin/ssh-copy-id: INFO: 1 key(s) remain to be installed – if you are prompted now it is to install the new keys
[email protected]’s password: //输入host52主机系统管理员root用户密码
Number of key(s) added: 1
Now try logging into the machine, with: “ssh ‘[email protected]’”
and check to make sure that only the key(s) you wanted were added.
[root@host53 ~]#
[root@host53 ~]# ssh [email protected] //可以无密码连接51主机
Last login: Fri Jun 21 13:21:39 2019 from 192.168.4.254
.-"""-.
/ .===. \
/ 6 6 /
( ___/ )
ooo_/__________
/ \
| I am Virtual Host ! ! ! |
_______________ooo/
| | |
|_ | _|
| | |
|||
/-‘Y’-\
(__/ __)
[root@host51 ~]#
[root@host51 ~]# exit //断开连接
登出
Connection to 192.168.4.51 closed.
[root@host53 ~]#
[root@host53 ~]# ssh [email protected] //可以无密码连接52主机
Last login: Fri Jun 21 09:01:15 2019 from 192.168.4.254
.-"""-.
/ .===. \
/ 6 6 /
( ___/ )
ooo_/__________
/ \
| I am Virtual Host ! ! ! |
_______________ooo/
| | |
|_ | _|
| | |
|||
/-‘Y’-\
(__/ __)
[root@host52 ~]# exit//断开连接
登出
Connection to 192.168.4.52 closed.
[root@host53 ~]#
4)配置管理服务器192.168.4.57
[root@mgm57 ~]# ssh-keygen //创建秘钥对
Generating public/private rsa key pair.
Enter file in which to save the key (/root/.ssh/id_rsa): //回车
Enter passphrase (empty for no passphrase): //回车
Enter same passphrase again:
Your identification has been saved in /root/.ssh/id_rsa.
Your public key has been saved in /root/.ssh/id_rsa.pub.
The key fingerprint is:
SHA256:qb7EZByHad3Jadr+zkiEbo7ZKGmCNlctgp+Wfp3Yad0 root@pxcnode71
The key’s randomart image is:
±–[RSA 2048]----+
| |
| + o o |
| = o * |
| o o * |
| . = S o |
| . . * + o |
| … =.O * + |
|.o.*+= & o E |
|. =+…B.o …+ |
±—[SHA256]-----+
[root@mgm57 ~]#
[root@mgm57 ~]# ssh-copy-id [email protected] //传递公钥给host51主机
/usr/bin/ssh-copy-id: INFO: Source of key(s) to be installed: “/root/.ssh/id_rsa.pub”
/usr/bin/ssh-copy-id: INFO: attempting to log in with the new key(s), to filter out any that are already installed
/usr/bin/ssh-copy-id: INFO: 1 key(s) remain to be installed – if you are prompted now it is to install the new keys
[email protected]’s password: //输入host51主机系统管理员root用户密码
Number of key(s) added: 1
Now try logging into the machine, with: “ssh ‘[email protected]’”
and check to make sure that only the key(s) you wanted were added.
[root@mgm57 ~]#
[root@mgm57 ~]# ssh-copy-id [email protected] //传递公钥给host52主机
/usr/bin/ssh-copy-id: INFO: Source of key(s) to be installed: “/root/.ssh/id_rsa.pub”
/usr/bin/ssh-copy-id: INFO: attempting to log in with the new key(s), to filter out any that are already installed
/usr/bin/ssh-copy-id: INFO: 1 key(s) remain to be installed – if you are prompted now it is to install the new keys
[email protected]’s password: //输入host52主机系统管理员root用户密码
Number of key(s) added: 1
Now try logging into the machine, with: “ssh ‘[email protected]’”
and check to make sure that only the key(s) you wanted were added.
[root@mgm57 ~]#
[root@mgm57 ~]# ssh-copy-id [email protected] //传递公钥给host52主机
/usr/bin/ssh-copy-id: INFO: Source of key(s) to be installed: “/root/.ssh/id_rsa.pub”
/usr/bin/ssh-copy-id: INFO: attempting to log in with the new key(s), to filter out any that are already installed
/usr/bin/ssh-copy-id: INFO: 1 key(s) remain to be installed – if you are prompted now it is to install the new keys
[email protected]’s password: //输入host53主机系统管理员root用户密码
Number of key(s) added: 1
Now try logging into the machine, with: “ssh ‘[email protected]’”
and check to make sure that only the key(s) you wanted were added.
[root@mgm57 ~]
[root@mgm57 ~]# ssh [email protected] //可以无密码连接51主机
Last login: Fri Jun 21 13:21:39 2019 from 192.168.4.254
.-"""-.
/ .===. \
/ 6 6 /
( ___/ )
ooo_/__________
/ \
| I am Virtual Host ! ! ! |
_______________ooo/
| | |
|_ | _|
| | |
|||
/-‘Y’-\
(__/ __)
[root@host51 ~]#
[root@host51 ~]# exit //断开连接
登出
Connection to 192.168.4.51 closed.
[root@mgm57 ~]#
[root@mgm57 ~]# ssh [email protected] //可以无密码连接52主机
Last login: Fri Jun 21 09:01:15 2019 from 192.168.4.254
.-"""-.
/ .===. \
/ 6 6 /
( ___/ )
ooo_/__________
/ \
| I am Virtual Host ! ! ! |
_______________ooo/
| | |
|_ | _|
| | |
|||
/-‘Y’-\
(__/ __)
[root@host52 ~]# exit//断开连接
登出
Connection to 192.168.4.52 closed.
[root@mgm57 ~]# ssh [email protected] //可以无密码连接53主机
Last login: Fri Jun 21 09:01:15 2019 from 192.168.4.254
.-"""-.
/ .===. \
/ 6 6 /
( ___/ )
ooo_/__________
/ \
| I am Virtual Host ! ! ! |
_______________ooo/
| | |
|_ | _|
| | |
|||
/-‘Y’-\
(__/ __)
[root@host53 ~]# exit//断开连接
登出
Connection to 192.168.4.53 closed.
步骤二: 安装依赖包
1)配置数据库服务器192.168.4.51
[root@host51 ~]# yum -y install perl-* //安装系统自带的perl软件包
[root@host51 ~]# cd mha-soft-student
[root@host51 ~]# yum –y install perl-* //安装共享的perl软件包
2)配置数据库服务器192.168.4.52
[root@host52 ~]# yum  -y  install   perl-*  //安装系统自带的perl软件包
[root@host52 ~]#  cd  mha-soft-student
[root@host52 ~]#  yum  –y  install  perl-*  //安装共享的perl软件包[root@localhost
3)配置数据库服务器192.168.4.53
[root@host53 ~]# yum -y install perl-* //安装系统自带的perl软件包
[root@host53 ~]# cd mha-soft-student
[root@host53 ~]# yum –y install perl-* //安装共享的perl软件包
4)配置管理服务器192.168.4.57
[root@mgm57 ~]# yum -y install perl-* //安装系统自带的perl软件包
[root@mgm57 ~]# cd mha-soft-student
[root@mgm57 ~]# yum –y install perl-* //安装共享的perl软件包
步骤三: 配置MySQL一主多从结构
1)配置主服务器192.168.4.51
[root@host51 ~]# vim /etc/my.cnf
[mysqld]
log-bin=master51 //日志名
server_id=51 //指定server_id
:wq
[root@host51 ~]# systemctl  restart  mysqld
[root@host51 ~]# mysql  -uroot  -p123qqq…A
    mysql> grant  replication slave  on  *.*  to repluser@"%"  identified by “123qqq…A"; //添加从服务器同步数据连接用户
mysql> show master status; //查看日志信息
mysql: [Warning] Using a password on the command line interface can be insecure.
+-----------------+----------+--------------+------------------+-------------------+
| File            | Position | Binlog_Do_DB | Binlog_Ignore_DB | Executed_Gtid_Set |
+-----------------+----------+--------------+------------------+-------------------+
| master51.000001 |     441 |              |                  |                   |
+-----------------+----------+--------------+------------------+-------------------+
[root@host51 ~]#
2)配置从服务器192.168.4.52
[root@host52 ~]# vim /etc/my.cnf
[mysqld]
server_id=52 //指定server_id
:wq
[root@host52 ~]# systemctl restart mysqld //重启数据库服务
[root@host52 ~]# mysql -uroot –p123qqq…A //数据库管理员登录
mysql> change master to //指定主服务器信息
master_host=“192.168.4.51”, //IP地址
master_user=“repluser”, //授权用户
master_password=“123qqq…A”, //授权用户密码
master_log_file=“master51.000001”, //binlog日志
master_log_pos=441; //偏移量
mysql> start slave; //启动slave进程
mysql> exit ; //断开连接
[root@host52 ~]# mysql -uroot –p123qqq…A –e “show slave status\G” | grep 192.168.4.51
Master_Host: 192.168.4.51 //主服务器Ip地址
[root@host52 ~]# mysql -uroot –p123qqq…A –e “show slave status\G” | grep –i yes
Slave_IO_Running: Yes //I0线程正常
Slave_SQL_Running: Yes //SQL线程正常
3)配置从服务器192.168.4.53
[root@host53 ~]# vim /etc/my.cnf
[mysqld]
server_id=53 //指定server_id
:wq
[root@host53 ~]# systemctl restart mysqld //重启数据库服务
[root@host53 ~]# mysql -uroot –p123qqq…A //数据库管理员登录
mysql> change master to //指定主服务器信息
master_host=“192.168.4.51”, //IP地址
master_user=“repluser”, //授权用户
master_password=“123qqq…A”, //授权用户密码
master_log_file=“master51.000001”, //binlog日志
master_log_pos=441; //偏移量
mysql> start slave; //启动slave进程
mysql> exit ; //断开连接
[root@host53 ~]# mysql -uroot –p123qqq…A –e “show slave status\G” | grep 192.168.4.51
Master_Host: 192.168.4.51 //主服务器Ip地址
[root@host53 ~]# mysql -uroot –p123qqq…A –e “show slave status\G” | grep –i yes
Slave_IO_Running: Yes //I0线程正常
Slave_SQL_Running: Yes //SQL线程正常
