目录
1.简介
本文介绍了Ambari2.7.4在CentOS7.5中使用本地镜像方式进行加速部署。
Ambari
Apache Ambari是一种基于Web的工具,支持Apache Hadoop集群的供应、管理和监控。Ambari已支持大多数Hadoop组件,包括HDFS、MapReduce、Hive、Pig、 Hbase、Zookeeper、Sqoop和Hcatalog等。
详细官方说明内容参见
2.环境准备
节点IP及映射
192.168.21.129 master
192.168.21.130 node1
192.168.21.131 node2
4台均安装好jdk
yum install -y java-1.8.0-openjdk


vi /etc/profile

export JAVA_HOME=/usr/lib/jvm/java-1.8.0-openjdk-1.8.0.232.b09-0.el7_7.x86_64/jre

export PATH=$PATH:$JAVA_HOME/bin

export CLASSPATH=.:$JAVA_HOME/lib/tools.jar:$JAVA_HOME/lib/dt.jar


source /etc/profile


for a in {1..2} ; do scp /etc/profile node$a:/etc/profile ; done

for a in {1..2}; do ssh root@node$a source /etc/profile; done
系统初始化参数
cat >> /etc/sysctl.conf << EOF
fs.file-max=1000000
net.ipv4.tcp_max_tw_buckets = 6000
net.ipv4.tcp_sack = 1
net.ipv4.tcp_window_scaling = 1
net.ipv4.tcp_rmem = 4096 87380 4194304
net.ipv4.tcp_wmem = 4096 16384 4194304
net.ipv4.tcp_max_syn_backlog = 16384
net.core.netdev_max_backlog = 32768
net.core.somaxconn = 32768
net.core.wmem_default = 8388608
net.core.rmem_default = 8388608
net.core.rmem_max = 16777216
net.core.wmem_max = 16777216
net.ipv4.tcp_timestamps = 1
net.ipv4.tcp_fin_timeout = 20
net.ipv4.tcp_synack_retries = 2
net.ipv4.tcp_syn_retries = 2
net.ipv4.tcp_syncookies = 1
#net.ipv4.tcp_tw_len = 1
net.ipv4.tcp_tw_reuse = 1
net.ipv4.tcp_mem = 94500000 915000000 927000000
net.ipv4.tcp_max_orphans = 3276800
net.ipv4.ip_local_port_range = 1024 65000
net.nf_conntrack_max = 6553500
net.netfilter.nf_conntrack_max = 6553500
net.netfilter.nf_conntrack_tcp_timeout_close_wait = 60
net.netfilter.nf_conntrack_tcp_timeout_fin_wait = 120
net.netfilter.nf_conntrack_tcp_timeout_time_wait = 120
net.netfilter.nf_conntrack_tcp_timeout_established = 3600
net.ipv6.conf.all.disable_ipv6 = 1
net.ipv6.conf.default.disable_ipv6 = 1
kernel.numa_balancing = 0
kernel.shmmax = 68719476736
kernel.printk = 5
kernel.sysrq = 1
vm.overcommit_memory = 0
vm.swappiness = 0
EOF
文件描述符和用户最大进程数
### 调整文件描述符
cat >> /etc/security/limits.conf <<EOF
* soft nproc 65535
* hard nproc 65535
* soft nofile 65535
* hard nofile 65535
EOF
##用户进程限制
cat >> /etc/security/limits.d/20-nproc.conf <<EOF
* soft nproc 8192
root soft nproc unlimited
EOF
网络配置
修改 hostname
master执行
hostnamectl set-hostname master依次修改所有节点 node[1-2]上分别执行
hostnamectl set-hostname node1vi /etc/hosts增加如下内容
192.168.21.129 master
192.168.21.130 node1
192.168.21.131 node2
for a in {1..2} ; do scp /etc/hosts node$a:/etc/hosts ; done3.SSH 免密码登录
1.在集群master的 /etc/ssh/sshd_config 文件去掉以下选项的注释
vi /etc/ssh/sshd_config
RSAAuthentication yes #开启私钥验证 PubkeyAuthentication yes #开启公钥验证
2.将集群master 修改后的 /etc/ssh/sshd_config 通过 scp 命令复制发送到集群的每一个节点
for a in {1..2} ; do scp /etc/ssh/sshd_config node$a:/etc/ssh/sshd_config ; done
3.生成公钥、私钥
1.在集群的每一个节点节点输入命令 ssh-keygen -t rsa -P '',生成 key,一律回车
ssh-keygen -t rsa -P ''
4.在集群的master 节点输入命令
将集群每一个节点的公钥id_rsa.pub放入到自己的认证文件中authorized_keys;
ssh root@master cat /root/.ssh/id_rsa.pub >> /root/.ssh/authorized_keys
for a in {1..2}; do ssh root@node$a cat /root/.ssh/id_rsa.pub >> /root/.ssh/authorized_keys; done
5.在集群的master 节点输入命令
将自己的认证文件 authorized_keys 通过 scp 命令复制发送到每一个节点上去: /root/.ssh/authorized_keys`
for a in {1..2}; do scp /root/.ssh/authorized_keys root@node$a:/root/.ssh/authorized_keys ; done
6.在集群的每一个节点节点输入命令
接重启ssh服务
sudo systemctl restart sshd.service
7.验证 ssh 无密登录
开一个其他窗口测试下能否免密登陆
例如:在node3
ssh root@node2
exit 退出
4.服务环境
关闭SELINUX
vi /etc/selinux/config
将 SELINUX=enforcing 改为 SELINUX=disabled
设置后需要重启才能生效
PS 我是修改node1 的 /etc/selinux/config 后,把配置文件复制到其他节点
for a in {1..2}; do scp /etc/selinux/config root@node$a:/etc/selinux/config ; done关闭防火墙(各台均执行)
systemctl stop firewalld.service

systemctl disable firewalld
安装配置 MySql
yum install -y wget

wget -i -c http://dev.mysql.com/get/mysql57-community-release-el7-10.noarch.rpm

rpm -ivh mysql57-community-release-el7-10.noarch.rpm

yum -y install mysql-community-server

systemctl enable mysqld

systemctl start mysqld.service

systemctl status mysqld.service

grep "password" /var/log/mysqld.log

mysql -uroot -p
set global validate_password_policy=0;

set global validate_password_length=1;

set global validate_password_special_char_count=0;

set global validate_password_mixed_case_count=0;

set global validate_password_number_count=0;

select @@validate_password_number_count,@@validate_password_mixed_case_count,@@validate_password_number_count,@@validate_password_length;


ALTER USER 'root'@'localhost' IDENTIFIED BY 'password';

grant all privileges on *.* to 'root'@'%' identified by 'password' with grant option;

flush privileges;

exit
yum -y remove mysql57-community-release-el7-10.noarch下载mysql驱动,放到三台的
/opt/ambari/mysql-connector-java-5.1.48.jar
5.本地源搭建
下载repo
yum install -y wget

wget -nv http://public-repo-1.hortonworks.com/ambari/centos7/2.x/updates/2.7.4.0/ambari.repo -O /etc/yum.repos.d/ambari.repo

wget -nv http://public-repo-1.hortonworks.com/HDP/centos7/3.x/updates/3.1.4.0/hdp.repo -O /etc/yum.repos.d/hdp.repo
安装httpd本地源
yum -y install httpd

systemctl restart httpd

systemctl enable httpd
此时浏览器访问http://ip/即可看到站点首页
网站目录为/var/www/html/,目前为空
下载
http://public-repo-1.hortonworks.com/HDP/centos7/3.x/updates/3.1.4.0/HDP-3.1.4.0-centos7-rpm.tar.gz
mkdir /var/www/html/ambari

mkdir /var/www/html/hdp

mkdir /var/www/html/hdp/HDP-UTILS-1.1.0.22

tar -zxvf ambari-2.7.4.0-centos7.tar.gz -C /var/www/html/ambari/

tar -zxvf HDP-3.1.4.0-centos7-rpm.tar.gz -C /var/www/html/hdp/

tar -zxvf HDP-GPL-3.1.4.0-centos7-gpl.tar.gz -C /var/www/html/hdp/

tar -zxvf HDP-UTILS-1.1.0.22-centos7.tar.gz -C /var/www/html/hdp/HDP-UTILS-1.1.0.22/
修改
vi /etc/yum.repos.d/ambari.repo#VERSION_NUMBER=2.7.4.0-118
[ambari-2.7.4.0]
#json.url = http://public-repo-1.hortonworks.com/HDP/hdp_urlinfo.json
name=ambari Version - ambari-2.7.4.0
baseurl=http://192.168.21.129/ambari/ambari/centos7/2.7.4.0-118
gpgcheck=1
gpgkey=http://192.168.21.129/ambari/ambari/centos7/2.7.4.0-118/RPM-GPG-KEY/RPM-GPG-KEY-Jenkins
enabled=1
priority=1
6.安装
yum install ambari-server
ambari-server setup
不推荐直接用内嵌的postgresql,因为其他服务还要用mysql
[root@localhost download]# ambari-server setup
Using python  /usr/bin/python
Setup ambari-server
Checking SELinux...
SELinux status is 'enabled'
SELinux mode is 'permissive'
WARNING: SELinux is set to 'permissive' mode and temporarily disabled.
OK to continue [y/n] (y)? y
Customize user account for ambari-server daemon [y/n] (n)? y
Enter user account for ambari-server daemon (root):
Adjusting ambari-server permissions and ownership...
Checking firewall status...
Checking JDK...
[1] Oracle JDK 1.8 + Java Cryptography Extension (JCE) Policy Files 8
[2] Custom JDK
==============================================================================
Enter choice (1): 2
WARNING: JDK must be installed on all hosts and JAVA_HOME must be valid on all hosts.
WARNING: JCE Policy files are required for configuring Kerberos security. If you plan to use Kerberos,please make sure JCE Unlimited Strength Jurisdiction Policy Files are valid on all hosts.
Path to JAVA_HOME: /usr/lib/jvm/java-1.8.0-openjdk-1.8.0.242.b08-0.el7_7.x86_64/jre
Validating JDK on Ambari Server...done.
Check JDK version for Ambari Server...
JDK version found: 8
Minimum JDK version is 8 for Ambari. Skipping to setup different JDK for Ambari Server.
Checking GPL software agreement...
GPL License for LZO: https://www.gnu.org/licenses/old-licenses/gpl-2.0.en.html
Enable Ambari Server to download and install GPL Licensed LZO packages [y/n] (n)? y
Completing setup...
Configuring database...
Enter advanced database configuration [y/n] (n)? y
Configuring database...
==============================================================================
Choose one of the following options:
[1] - PostgreSQL (Embedded)
[2] - Oracle
[3] - MySQL / MariaDB
[4] - PostgreSQL
[5] - Microsoft SQL Server (Tech Preview)
[6] - SQL Anywhere
[7] - BDB
==============================================================================
Enter choice (1): 3
Hostname (localhost):
Port (3306):
Database name (ambari):
Username (ambari):
Enter Database Password (bigdata):
Configuring ambari database...
Enter full path to custom jdbc driver: /opt/ambari/mysql-connector-java-5.1.48.jar
Copying /opt/ambari/mysql-connector-java-5.1.48.jar to /usr/share/java
Configuring remote database connection properties...
WARNING: Before starting Ambari Server, you must run the following DDL directly from the database shell to create the schema: /var/lib/ambari-server/resources/Ambari-DDL-MySQL-CREATE.sql
Proceed with configuring remote database connection properties [y/n] (y)? y
Extracting system views...
.....
Ambari repo file contains latest json url http://public-repo-1.hortonworks.com/HDP/hdp_urlinfo.json, updating stacks repoinfos with it...
Adjusting ambari-server permissions and ownership...
Ambari Server 'setup' completed successfully.
初始化数据库
mysql -uroot -pcreate database ambari;
use ambari
source /var/lib/ambari-server/resources/Ambari-DDL-MySQL-CREATE.sql
CREATE USER 'ambari'@'localhost' IDENTIFIED BY 'bigdata';
CREATE USER 'ambari'@'%' IDENTIFIED BY 'bigdata';
GRANT ALL PRIVILEGES ON ambari.* TO 'ambari'@'localhost';
GRANT ALL PRIVILEGES ON ambari.* TO 'ambari'@'%';
FLUSH PRIVILEGES;7.启动
仅从master机器上启动即可:
ambari-server start出现Server started listening on 8080
表示成功
如果主机启动监听8080,但超时失败,需要netstat -tunlp找到8080端口的进程号,kill -9 pid停掉已启动的占用端口进程方可。
8.Web页面部署服务
进入web页面继续部署
访问
用户名密码都是admin
点击 “LAUNCH INSTALL WIZARD”,开始创建一个集群
起一个名字 下一步
Repositories里移除掉其他系统,只保留redhat7,修改为本地源,下一步
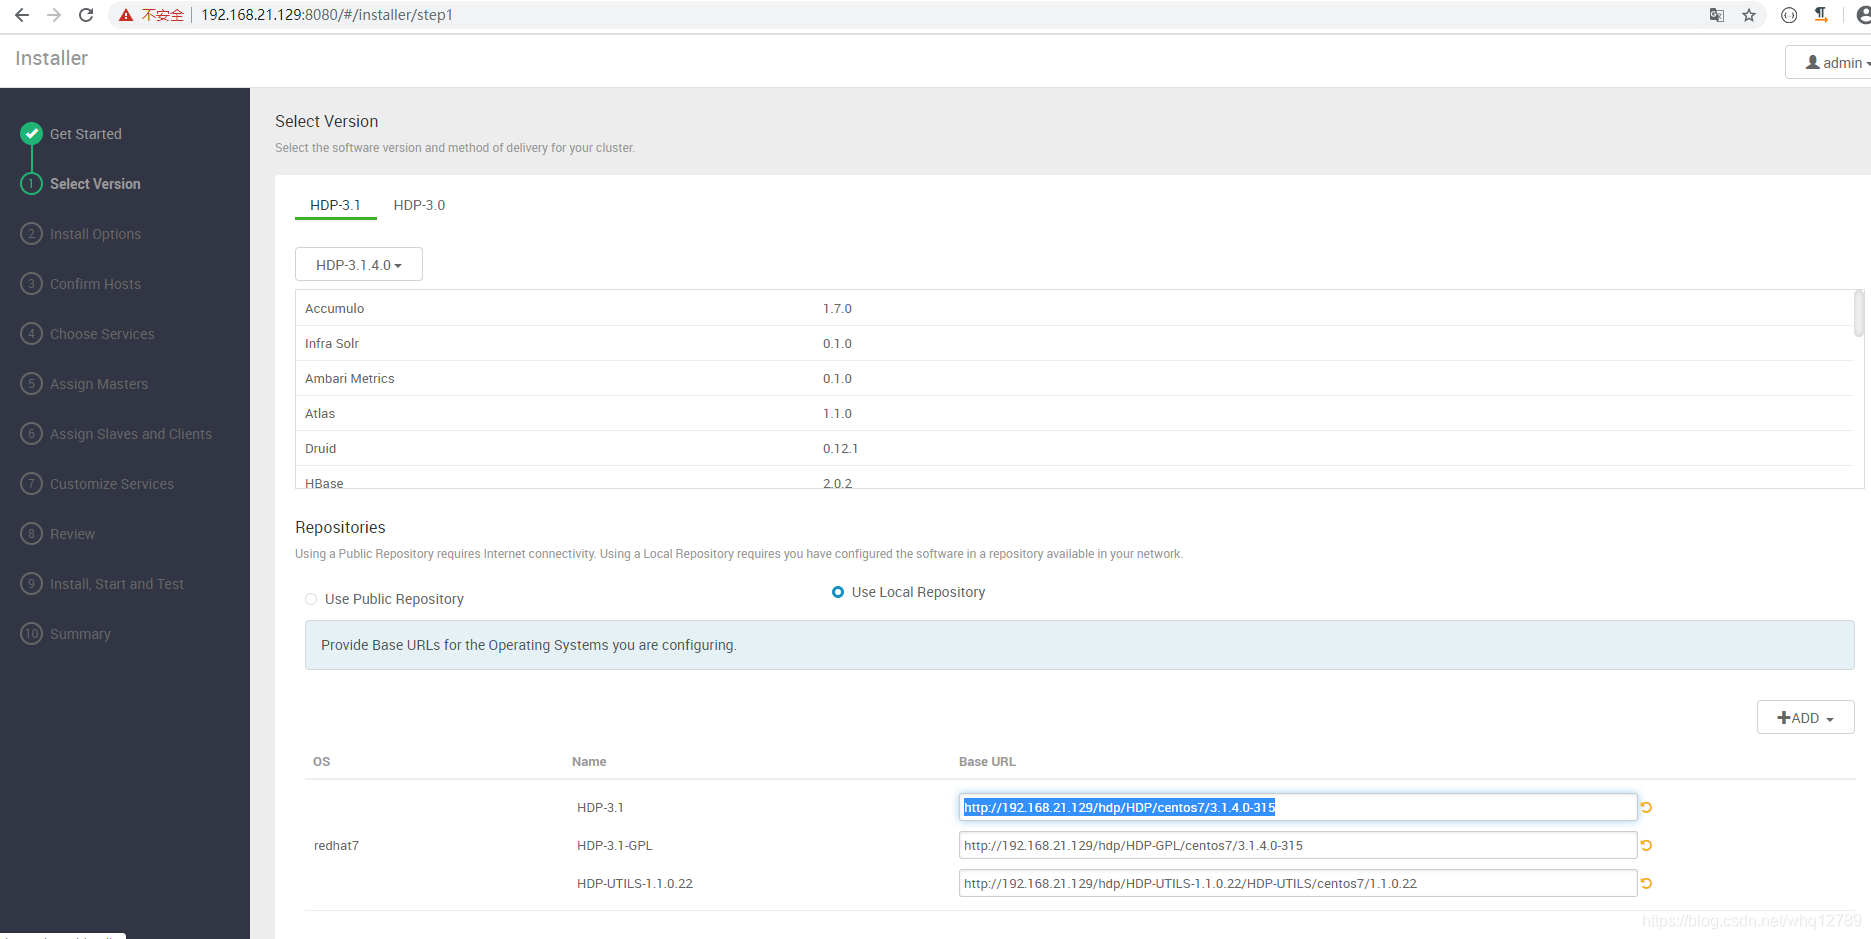
http://192.168.21.129/hdp/HDP/centos7/3.1.4.0-315
http://192.168.21.129/hdp/HDP-GPL/centos7/3.1.4.0-315
http://192.168.21.129/hdp/HDP-UTILS-1.1.0.22/HDP-UTILS/centos7/1.1.0.22
Target Hosts里填写其他IP,如
master
node1
node2
SSH Private Key这个文本框里,把cat /root/.ssh/id_rsa 的内容拷贝过来
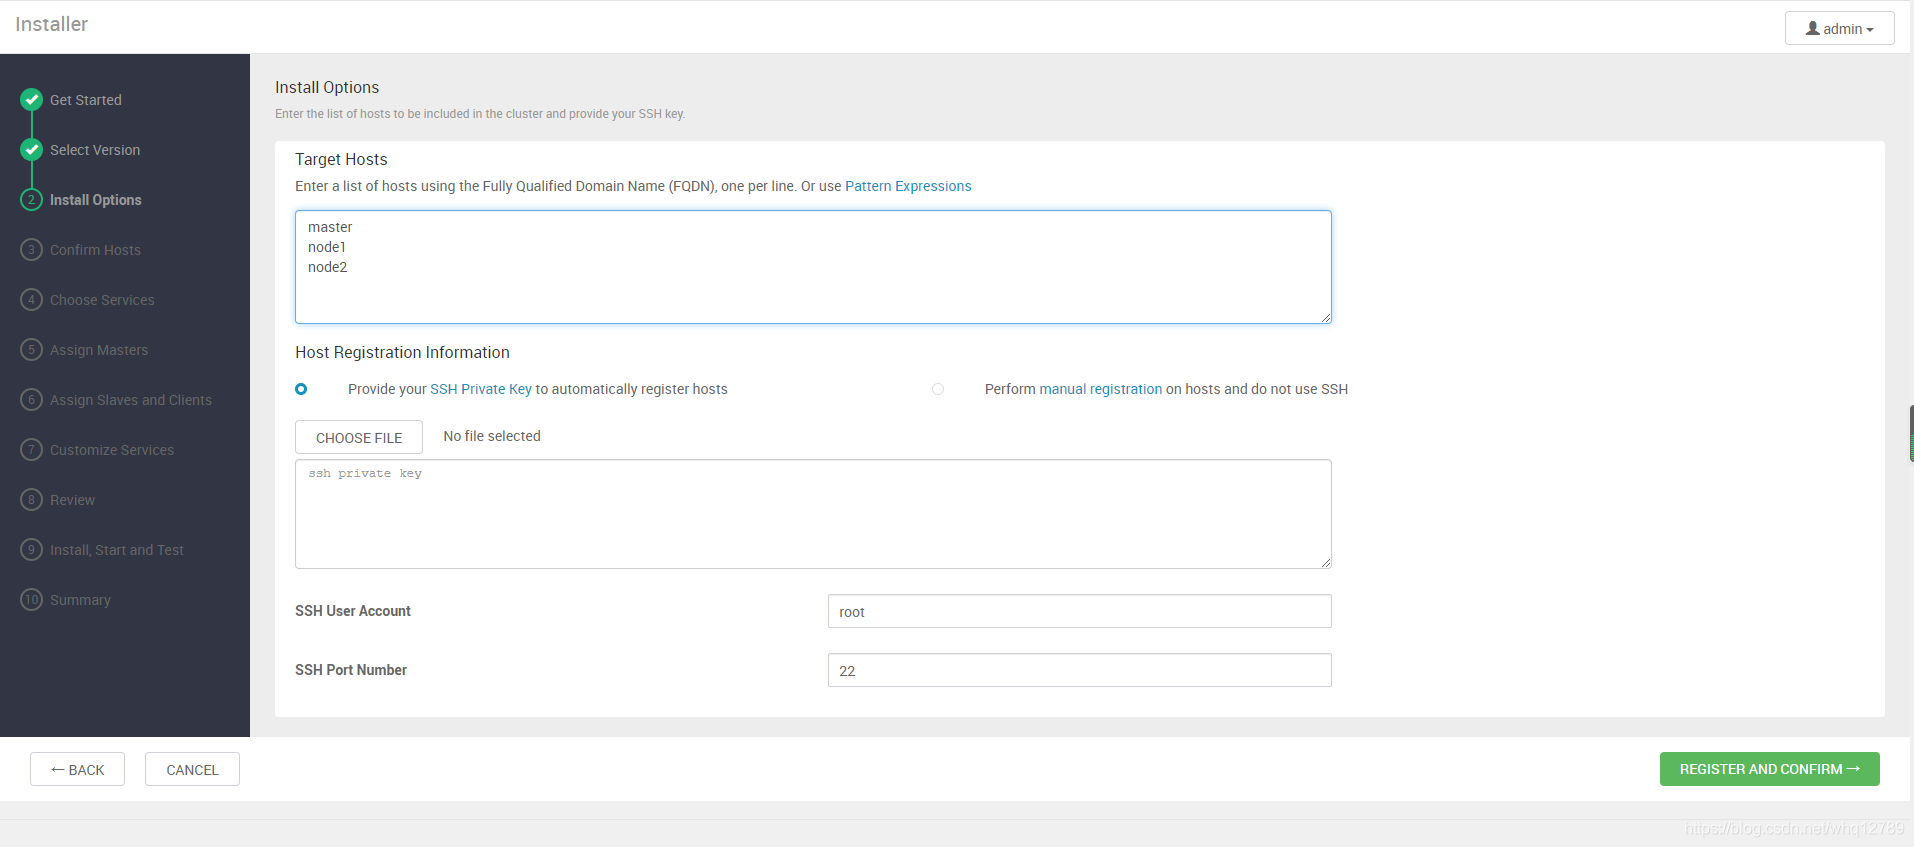
下一步等待安装
安装第一次有可能失败,
从机报错
Host registration aborted. Ambari Agent host cannot reach Ambari Server 'localhost:8080'. Please check the network connectivity between the Ambari Agent host and the Ambari Server
看上面日志,scp拷贝/usr/lib/ambari-server/lib/ambari_server/setupAgent.py这个文件,然后执行
vi /usr/lib/ambari-server/lib/ambari_server/setupAgent.py
编辑下这个文件
(expected_hostname, passPhrase, hostname, user_run_as, projectVersion, server_port) = retcode["parsed_args"]
hostname="192.168.21.129"
server_port=8080
retcode = checkServerReachability(hostname, server_port)
添加标红一行,指定hostname
再retry一次就好了
报错
Ambari agent machine hostname (localhost.localdomain) does not match expected ambari server hostname (node1). Aborting registration. Please check hostname, hostname -f and /etc/hosts file to confirm your hostname is setup correctly
一台主机名不对(漏掉了),改名即可
#三台从机上会出现/var/lib/ambari-agent/目录
下一步选择需要安装的服务,此步骤选择一些自己需要的服务,

下一步下一步输入密码再下一步
适当的分配下服务器上的服务,下一步
各种下一步……Install, Start and Test界面等待安装
Hive Client安装报错
Failed to download file from http://master:8080/resources/mysql-connector-java.jar due to HTTP error: HTTP Error 404: Not Found
解决
cd /var/lib/ambari-server/resources/
ln /opt/ambari/mysql-connector-java-5.1.48.jar mysql-connector-java.jar
安装完毕如下

下一步进入系统页面

维护
重启系统后ambari-server和ambari-agent会自动启动
查看状态
ambari-server status
ambari-agent status
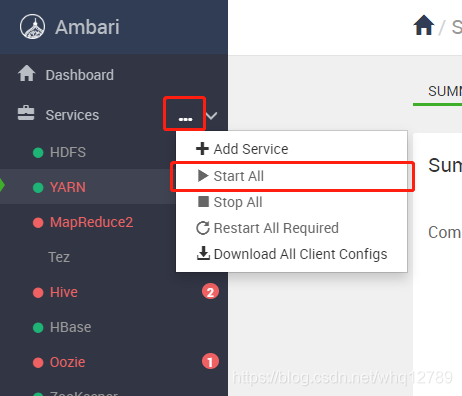
但是内部其他服务可能会启动失败,一片红
可以沿着服务依赖关系启动
Zookeeper——HDFS——……
或者直接StartAll启动所有服务