前言
通过B站视频和一些童鞋的文章结合Git源码阅读来理解vuex的实现原理
话不多说,我们直接上源码
首先来看一下vuex的源码目录,众所周知,主要工程一般都在 src 下,所以我们直接从这里开始
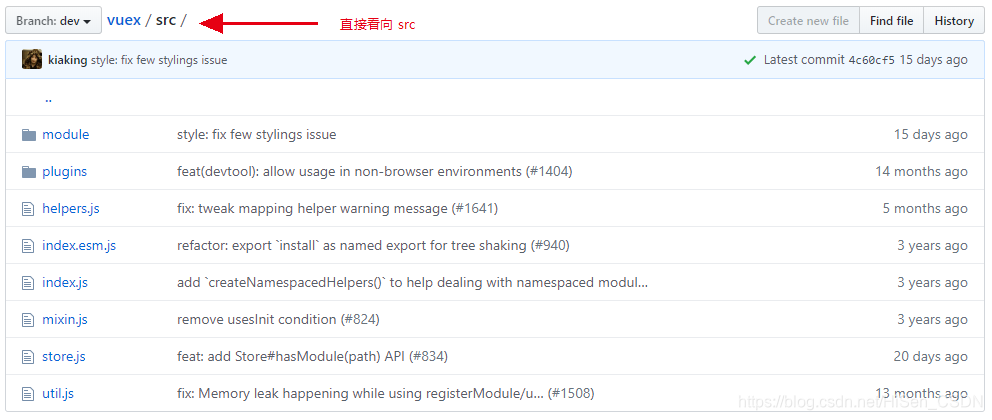
- module:模块构造函数和模块集合管理
- plugins:插件,调试 dvtools 日志记录吧 logger
- helpers:集成语法糖
mapState, mapMutations, mapGetters, mapActions, createNamespacedHelpers - index:入口文件,导出 store , install , 及以上 语法糖 ↑
- mixin:混入,初始化 vuex , 并挂载在 Vue 根实例上
- store:vuex 构造函数,实现功能的主体函数
- utils:一些工具方法吧
好了,基本就是这些东西;通过官方文档我们知道,每一个vue插件都需要有一个公开的install方法,vuex也不例外。我们一步步分析
src/index.js
import { Store, install } from './store'  // 导入并执行 install 初始化
import { mapState, mapMutations, mapGetters, mapActions, createNamespacedHelpers } from './helpers'
export default {
  Store,
  install,
  version: '__VERSION__',
  mapState,
  mapMutations,
  mapGetters,
  mapActions,
  createNamespacedHelpers
}
整个js文件里没有什么多余的东西,就是导入和导出,我们回头想一下,使用第三方插件是不是都需要安装啊,其实就是那句 Vue.use(插件) 这里不过多解释Vue.use() 具体做了哪些事儿,只需要知道,执行这句代码,会安装插件,并且执行插件的默认公开 install 方法。ok ,走进 install 初始化
src/store.js 523行 store.js 代码量挺大,我就不一一罗列,用到哪里,就截出对应代码,好吧
export function install (_Vue) { // 导出 install
  if (Vue && _Vue === Vue) {
    if (process.env.NODE_ENV !== 'production') { // 环境判断
      console.error(
        '[vuex] already installed. Vue.use(Vuex) should be called only once.'
      )
    }
    return
  }
  Vue = _Vue
  /*
  vue 指当前跟实例  src/store.js 13行 constructor 中有一句
   if (!Vue && typeof window !== 'undefined' && window.Vue) {
      install(window.Vue)
    }
  */
  applyMixin(Vue)
}
好,顺藤摸瓜,我们走进 applyMixin
src/mixins.js
export default function (Vue) { // 传入 vue 实例
  const version = Number(Vue.version.split('.')[0])
  if (version >= 2) {
    Vue.mixin({ beforeCreate: vuexInit }) // 生命周期创建前,混入挂载 vuex
  } else {
    const _init = Vue.prototype._init // 挂载在根实例上
    Vue.prototype._init = function (options = {}) {
      options.init = options.init
        ? [vuexInit].concat(options.init)
        : vuexInit
      _init.call(this, options)
    }
  }
  // 初始化 vuex 方法
  function vuexInit () {
    const options = this.$options
    // store injection
    if (options.store) {
      this.$store = typeof options.store === 'function'
        ? options.store()
        : options.store
    } else if (options.parent && options.parent.$store) {
      this.$store = options.parent.$store
    }
  }
}
初始化过后,我们回过头来看看 vuex 在日常开发中到底是怎么使用的,如下代码
import Vue from 'vue' // 导入 vue 实例
import Vuex from 'vuex' // 导入 状态管理 vuex
Vue.use(Vuex) // 安装初始化 vuex
const store = new Vuex.Store({ // 使用
    state:{},  // 状态存储的位置
    getters:{}, // 获取状态
    mutations:{}, // 定义同步修改state的地方,唯一的途径
    actions:{}, // 异步修改state的地方,提交了一个mutaions
    modules:{} // 模块分发
});
可以看到到在使用中主要就是如上五个知识点,也就是说 store 构造函数里边分别初始化和集成了对应的属性和方法;
constructor 里边的初始化声明
// 初始化一些参数
 this._committing = false                             // 是否在进行提交状态标识
 this._actions = Object.create(null)                  // acitons 操作对象
 this._actionSubscribers = []                         // action 订阅列表
 this._mutations = Object.create(null)                // mutations操作对象
 this._wrappedGetters = Object.create(null)           // 封装后的 getters 集合对象
 this._modules = new ModuleCollection(options)        // vuex 支持 store 分模块传入,存储分析后的 modules
 this._modulesNamespaceMap = Object.create(null)      // 模块命名空间 map
 this._subscribers = []                               // 订阅函数集合
 this._watcherVM = new Vue()                          // Vue 组件用于 watch 监视变化

// 替换 this 中的 dispatch, commit 方法,将 this 指向 store
 const store = this
 const { dispatch, commit } = this
 this.dispatch = function boundDispatch (type, payload) {
   return dispatch.call(store, type, payload)
 }
 this.commit = function boundCommit (type, payload, options) {
   return commit.call(store, type, payload, options)
 }
 // 是否使用严格模式
 this.strict = strict
 // 状态树
 const state = this._modules.root.state
 // 初始化模块
 installModule(this, state, [], this._modules.root)
 // 抛开一切声明,我们看向下边这句代码 ↓ 重置虚拟 vm
 resetStoreVM(this, state) // 重点 , 重点, 重点, 整个 vuex 的功能实现方法
 // 依次载入插件
 plugins.forEach(plugin => plugin(this))
 // 调试工具
 if (Vue.config.devtools) {
   devtoolPlugin(this)
 }
resetStoreVM 重置 store 实例
function resetStoreVM (store, state, hot) {
  const oldVm = store._vm  // 复制旧的实例
  store.getters = {}   // 设置 getters 属性
  const wrappedGetters = store._wrappedGetters  // 储存封装后的 getters 集合对象
  const computed = {}
  // 遍历 wrappedGetters 对象
  forEachValue(wrappedGetters, (fn, key) => {
   // 给 computed 对象添加 getter 对象属性
   // 这里的 store.getters.xx 其实是访问了 store._vm[xx] , (store._vm看下边,是新建的vue实例 )
   // 给 computed 依次添加 getter 里的属性方法,方便 store._vm 新vue实例使用
    computed[key] = partial(fn, store)
    /*
     export function partial (fn, arg) {
		 return function () {
		    return fn(arg)
		 }
	 }
	*/
    // 为每一个getters 对象重写 get 方法 , 进行一个
    Object.defineProperty(store.getters, key, {
      get: () => store._vm[key],
      enumerable: true  // for local getters
    })
  })

  // 创建Vue实例来保存state,同时让state变成响应式, vue 组件本身的响应式原理
  // store._vm._data.$$state = store.state
  store._vm = new Vue({
    data: {
      $$state: state
    },
    computed   // 计算属性为上边 wrappedGetters(getter集合对象) 里的每一个属性方法
  })

  // 只能通过commit方式更改状态
  if (store.strict) {
    enableStrictMode(store)
  }
}
总结
Vuex的state状态是响应式,是借助vue的data是响应式,将state存入新建vue实例组件的data中;
Vuex的getters则是借助vue的计算属性computed实现数据实时监听。
全部源码解读:参考
vuex中的store本质就是没有template的vue组件
