一、在商品录入界面实现多图片上传(配置)
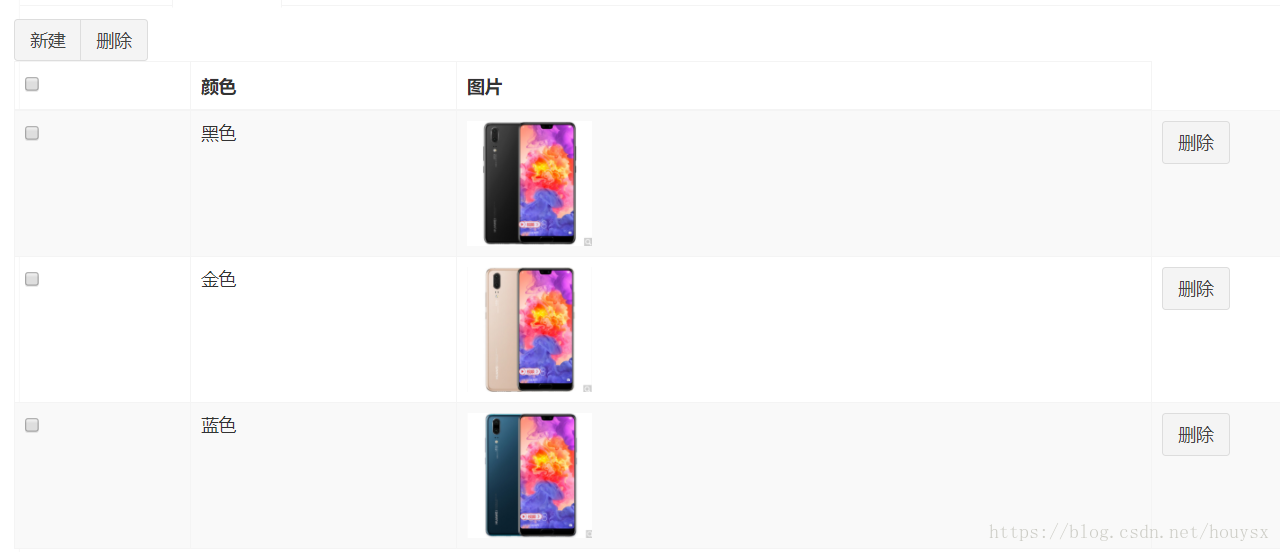
当用户点击新建按钮,弹出上传窗口
1.导入依赖( pom.xml 引入依赖)
<!-- 文件上传 -->
        <dependency>
            <groupId>commons-fileupload</groupId>
            <artifactId>commons-fileupload</artifactId>
        </dependency>

        <dependency>
            <groupId>org.csource.fastdfs</groupId>
            <artifactId>fastdfs</artifactId>
        </dependency>
    </dependencies>
2.springMVC、配置文件上传解析器
    <!-- 设置文件上传解析器
          id="multipartResolver" :这里id必须这样设置
          defaultEncoding:注入编码格式
          maxUploadSize:注入最大上传大小
    -->
    <bean id="multipartResolver"
        class="org.springframework.web.multipart.commons.CommonsMultipartResolver">

        <property name="defaultEncoding" value="UTF-8"></property>
        <property name="maxUploadSize" value="5242880"></property>
    </bean>
3、fdfs_client.conf配置文件、配置文件服务器ip和端口
tracker_server=192.168.88.88:221224、在application.properties 文件、配置上传服务器ip、以便图片回显时引用
FILE_SERVER_URL=http://192.168.88.88/二、服务端代码
import org.springframework.beans.factory.annotation.Value;
import org.springframework.web.bind.annotation.RequestMapping;
import org.springframework.web.bind.annotation.RestController;
import org.springframework.web.multipart.MultipartFile;

import com.pyg.common.utils.FastDFSClient;
import com.pyg.common.utils.PygResult;

@RestController()
@RequestMapping("/upload")
public class uploadController {
    //注入文件服务器ip常量
    @Value("${IMAGE_SERVER_URL}")
    private String IMAGE_SERVER_URL;

    @RequestMapping("img")
    //文件名必须保持和前端一致
    public PygResult uploadImg(MultipartFile file) {

        // 获取上传文件名
        String extName = file.getOriginalFilename();
        // 获取上传文件扩展名称
        extName = extName.substring(extName.lastIndexOf(".") + 1);
        PygResult pygResult = null;
        try {
            //创建上传工具类对象,将文件服务器配置以构造方式传入
            FastDFSClient fastDFSClient = new FastDFSClient("classpath:conf/client.conf");
            //调用工具类方法,上传文件,传入参数文件的字节码和文件的扩展名
            String url = fastDFSClient.uploadFile(file.getBytes(), extName);
            // 上传成功,拼接主机ip
            url = IMAGE_SERVER_URL + url;
            //结果回显,封装在文件服务器上的路径
            pygResult = new PygResult(true, url);

        } catch (Exception e) {
            pygResult = new PygResult(false, "上传失败");
            e.printStackTrace();

        }

        return pygResult;
    }

}
简单的文件上传工具类
import org.csource.common.NameValuePair;
import org.csource.fastdfs.ClientGlobal;
import org.csource.fastdfs.StorageClient1;
import org.csource.fastdfs.StorageServer;
import org.csource.fastdfs.TrackerClient;
import org.csource.fastdfs.TrackerServer;

public class FastDFSClient {

    private TrackerClient trackerClient = null;
    private TrackerServer trackerServer = null;
    private StorageServer storageServer = null;
    private StorageClient1 storageClient = null;

    public FastDFSClient(String conf) throws Exception {
        if (conf.contains("classpath:")) {
            conf = conf.replace("classpath:", this.getClass().getResource("/").getPath());
        }
        ClientGlobal.init(conf);
        trackerClient = new TrackerClient();
        trackerServer = trackerClient.getConnection();
        storageServer = null;
        storageClient = new StorageClient1(trackerServer, storageServer);
    }

    /**
     * 上传文件方法
     * <p>Title: uploadFile</p>
     * <p>Description: </p>
     * @param fileName 文件全路径
     * @param extName 文件扩展名,不包含(.)
     * @param metas 文件扩展信息
     * @return
     * @throws Exception
     */
    public String uploadFile(String fileName, String extName, NameValuePair[] metas) throws Exception {
        String result = storageClient.upload_file1(fileName, extName, metas);
        return result;
    }

    public String uploadFile(String fileName) throws Exception {
        return uploadFile(fileName, null, null);
    }

    public String uploadFile(String fileName, String extName) throws Exception {
        return uploadFile(fileName, extName, null);
    }

    /**
     * 上传文件方法
     * <p>Title: uploadFile</p>
     * <p>Description: </p>
     * @param fileContent 文件的内容,字节数组
     * @param extName 文件扩展名
     * @param metas 文件扩展信息
     * @return
     * @throws Exception
     */
    public String uploadFile(byte[] fileContent, String extName, NameValuePair[] metas) throws Exception {

        String result = storageClient.upload_file1(fileContent, extName, metas);
        return result;
    }

    public String uploadFile(byte[] fileContent) throws Exception {
        return uploadFile(fileContent, null, null);
    }

    public String uploadFile(byte[] fileContent, String extName) throws Exception {
        return uploadFile(fileContent, extName, null);
    }
}
三、前端代码
1、上传文件服务
/**
 * 上传文件服务
 */
app.service('uploadService', function($http) {
    // 表单方式上传文件的服务方法
    this.uploadFile = function() {
        //1创建表单对象
        var formData = new FormData();
        //2向表单对象中添加文件、文件名必须和html表单一致
        formData.append("file", file.files[0]);
        //3发送请求,并提提交表单数据
        return $http({
            //请求方式必须为post
            method : 'POST',
            url : "../upload/img",
            //上传数据
            data : formData,
            //'Content-Type' : undefined : angularJS自动识别类型,自动识别multipart/formdata
            headers : {
                'Content-Type' : undefined
            },
            //angular.identity:将会把表单数据进行序列化 key=value&key=value
            transformRequest : angular.identity
        });
    }

})
2、控制层方法
//图片上传//////////////////////////////////////////////////////////////////
    // 上传图片
    $scope.uploadFile=function(){
        uploadService.uploadFile().success(function(data){

            // 上传成功
            if (data.success) {
                // 保存回显的文件存放url地址
                $scope.image_entity.url=data.message;
            } else {
                // 上传失败
                alert(data.message);
            }

        });

    };

    //保存图片的方法(将图片放到商品图片属性的数组中)
    $scope.addIMG=function(){
        var i = 1;
        $scope.entity.tbGoodsDesc.itemImages.push($scope.image_entity);

    }

    //删除图片(将图片从数组中删除,只删除url地址)
    $scope.remove_img=function(index){

        $scope.entity.tbGoodsDesc.itemImages.splice(index,1);
    };
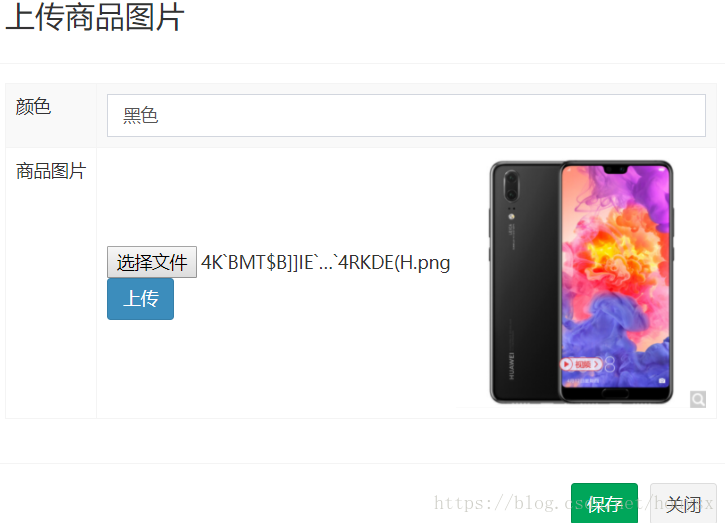
3、html页面代码
<div class="modal-header">
    <button type="button" class="close" data-dismiss="modal"
                          aria-hidden="true">×</button>
    <h3 id="myModalLabel">上传商品图片</h3>
</div>
<div class="modal-body">

 <table class="table table-bordered table-striped">
  <tr>
    <td>颜色</td>
    <td><input class="form-control" placeholder="颜色" ng-model="image_entity.color">     </td>
  </tr>
  <tr>
    <td>商品图片</td>
    <td>
     <table>
      <tr>
      <!--
        type="file" ;和方法中的名称一致
        ng-click="uploadFile()":点击调用上传方法
      -->
          <td><input type="file" id="file" />

          <button class="btn btn-primary" type="button" ng-click="uploadFile()">上传</button></td>
         <td><img ng-if="image_entity.url!=1" src="{{image_entity.url}}" width="200px"
                                            height="200px"></td>
      </tr>
    </table>
   </td>
  </tr>
 </table>

</div>
<div class="modal-footer">
    <!--  ng-click="addIMG()" :点击调用添加图片到数组的方法 -->
    <button class="btn btn-success" ng-click="addIMG()"
                        data-dismiss="modal" aria-hidden="true" >保存</button>
    <button class="btn btn-default" data-dismiss="modal"
                        aria-hidden="true">关闭</button>
</div>