目录
0. 引言
随着最近疫情的爆发,各个单位可能会要求大家每天填写健康问卷以确保健康安全。这些问卷的答案都是一样的,但是需要定时填写打卡,很容易某天就忘记了。因此,我们可以用python写一个脚本,让Windows每天自动帮我们填写。
一个问卷示例:

1. 用selenium写一个自动填写表单的脚本
先上代码。
from selenium import webdriver
import selenium.webdriver.support.ui as ui
from selenium.common.exceptions import TimeoutException
from selenium.webdriver.common.by import By
import selenium.webdriver.support.expected_conditions as EC

def filling():
    driver = webdriver.Chrome("chromedriver.exe")
    driver.get(r"https://表单链接")

    #    日期
    is_visible(driver, 'xpath_value1') #eg:'//*[@id="root"]/div/form/div[3]/div/div[2]/div/div[2]/div/div/span/div/div/input'
    driver.find_element_by_xpath('xpath_value1').click()
    is_visible(driver, 'xpath_value2')
    driver.find_element_by_xpath('xpath_value2').click()

    #    姓名
    driver.find_element_by_xpath('xpath_value3').send_keys("你的姓名")

    #    学号
    driver.find_element_by_xpath('xpath_value4').send_keys("你的学号")

    #    身体状况
    if driver.find_element_by_xpath('xpath_value5').is_selected():
        pass
    else:
        driver.find_element_by_xpath('xpath_value5').click()

    #    位置
    is_visible(driver, 'xpath_value6')
    driver.find_element_by_xpath('xpath_value6').click()
    is_visible(driver, 'xpath_value7')
    driver.find_element_by_xpath('xpath_value7').click()
    is_visible(driver, 'xpath_value8')
    driver.find_element_by_xpath('xpath_value8').click()
    is_visible(driver, 'xpath_value9')
    driver.find_element_by_xpath('xpath_value9').click()

    #    现居地址类型
    if driver.find_element_by_xpath('xpath_value10').is_selected():
        pass
    else:
        driver.find_element_by_xpath('xpath_value10').click()

    #    接触史
    if driver.find_element_by_xpath('xpath_value11').is_selected():
        pass
    else:
        driver.find_element_by_xpath('xpath_value11').click()

    #    本人联系方式
    driver.find_element_by_xpath('xpath_value12').send_keys("本人手机号")

    #    家长联系方式
    driver.find_element_by_xpath('xpath_value13').send_keys("家长手机号")

    #    校外居住地址
    if driver.find_element_by_xpath('xpath_value14').is_selected():
        pass
    else:
        driver.find_element_by_xpath('xpath_value14').click()

    #    提交
    driver.find_element_by_xpath('xpath_value15').click()

    #    关闭浏览器
    is_visible(driver, 'xpath_value16')
    driver.close()

def is_visible(driver, locator, timeout=10):
    try:
        ui.WebDriverWait(driver, timeout).until(EC.visibility_of_element_located((By.XPATH, locator)))
        return True
    except TimeoutException:
        return False


if __name__ == "__main__":
    filling()
1.1 环境设置
python 3.7.0 + chrome + chromedriver 81.0.4044.69 + selenium
首先下载chromedriver并设置环境变量。chromedriver要与chrome的版本相对应。打开chrome浏览器,在chrome://settings/help中即可查看chrome的当前版本。

我的版本为81.0.4044.92,因此需要下载对应的chromedriver.
chromedriver下载地址为https://chromedriver.storage.googleapis.com/index.html,里面可以看到对应各个版本chrome的文件夹。
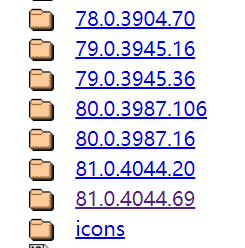
目前最新的版本为81.0.4044.69,下载windows的版本,得到chromedriver.exe文件。将chromedriver.exe放置在chrome安装目录下,默认目录为C:\Program Files (x86)\Google\Chrome\Application。

下一步将该目录添加到环境变量中。右击‘此电脑’-属性-高级系统设置-环境变量,在下面的系统变量中找到Path,双击打开,新建一项变量,将刚刚的目录添加进去。默认应该是C:\Program Files (x86)\Google\Chrome\Application。添加之后确定保存,chromedriver就设置好了。

接下来安装selenium,直接pip install selenium就好了。
1.2 使用selenium编写脚本
首先我们打开需要填写表单的页面。
from selenium import webdriver

driver = webdriver.Chrome("chromedriver.exe")
driver.get(r"网页链接")
这样,我们就能通过对driver的操作来填写表单啦!
我们来看看网页中有哪些需要填写的问题。
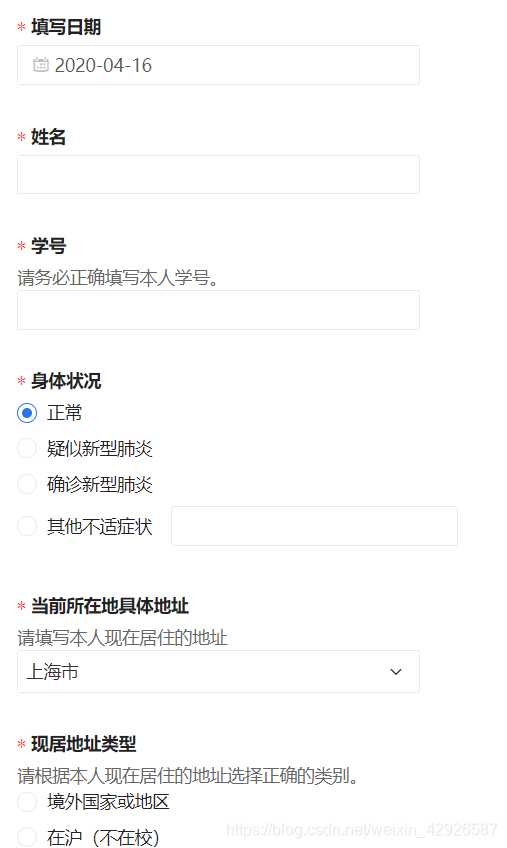
总的来说,问题可以分为两种类型:需要点击选择的,和需要输入内容的。这两种问题分别对应两种操作:click()和send_keys()。我们将在之后详细解释。来看看第一个日期该怎么填吧!
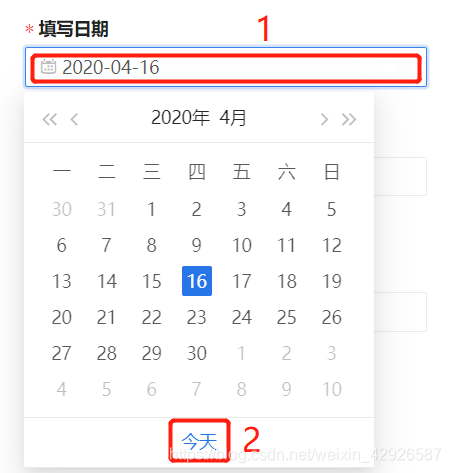
日期一栏可以认为是包含再次点击的操作:先点击日期一栏,然后点击‘今天’。
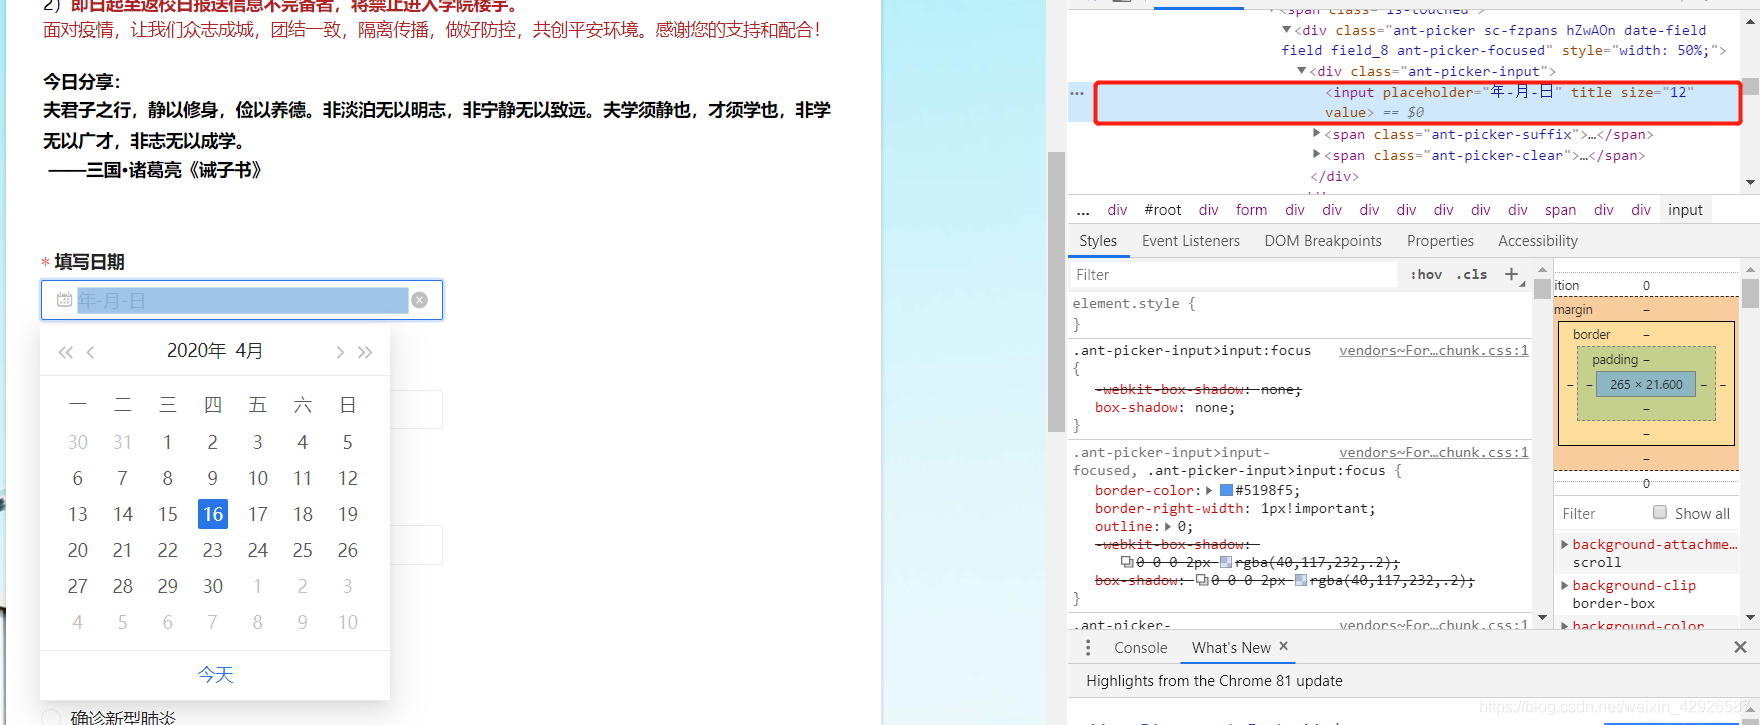
第一步是定位出我们需要点击的两个元素。我们用chrome打开问卷页面,按下Ctrl+Shift+C,即可查看页面中的元素。
这样,我们就找到了这个元素。selenium提供了多种定位方法:
通过id定位元素:find_element_by_id(“id_vaule”)
通过name定位元素:find_element_by_name(“name_vaule”)
通过tag_name定位元素:find_element_by_tag_name(“tag_name_vaule”)
通过class_name定位元素:find_element_by_class_name(“class_name”)
通过css定位元素:find_element_by_css_selector();
通过xpath定位元素:find_element_by_xpath(“xpath”)
通过link定位:find_element_by_link_text(“text_vaule”)或者find_element_by_partial_link_text()
我们发现这个元素能为我们提供的定位方式很少,所以这里选择了xpath定位。关于xpath,可以在http://www.w3school.com.cn/xpath/index.asp中详细了解。
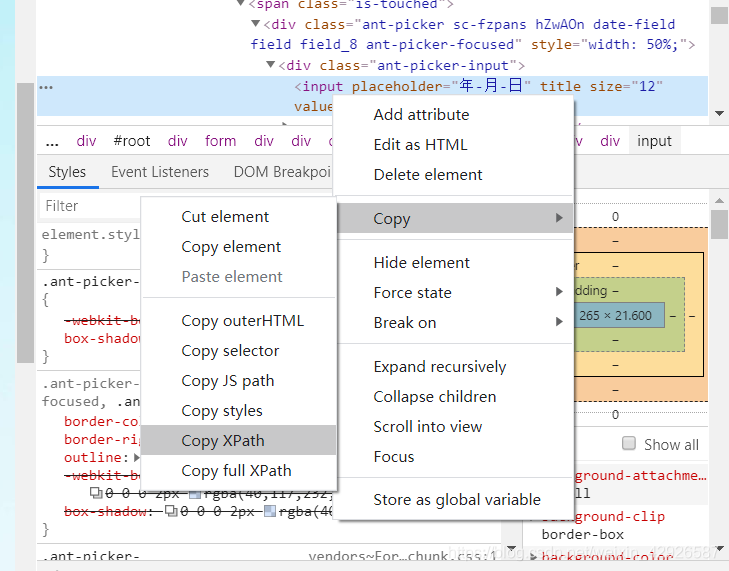
回到刚刚的元素,右击-Copy-Copy XPath,这样我们就得到了这个元素的xpath,可以用selenium来定位啦!
所以,我们填写日期的过程就是:通过xpath定位日期栏-点击-通过xpath定位‘今天’按钮-点击。获得元素‘今天’的xpath的方法与刚刚相同,不再赘述。这部分的代码如下:
driver.find_element_by_xpath('xpath_value1').click()
driver.find_element_by_xpath('xpath_value2').click()
以上,便完成了日期的选择。
但是,在实际中可能会遇到这样的问题:
ElementClickInterceptedException: element click intercepted: Element … is not clickable.
这是因为,‘今天’元素仅在日期栏被点击了之后才会出现,而当这两个操作连在一起时,由于操作的速度太快,点击了日期栏后,日期还没来得及出现的时候就进行了下一个点击操作。这个时候程序会找不到‘今天’的元素,也就会出现上面的错误。
为了解决这个问题,最简单的方法是让程序在执行这两个操作之间间隔一段时间。比如:
import time

driver.find_element_by_xpath('xpath_value1').click()
time.sleep(5)
driver.find_element_by_xpath('xpath_value2').click()
这样,程序会间隔5秒后再执行下一个点击的操作。但是缺点也很明显:由于这个时间是人为设定的,程序会显得很死板。聪明的程序应该能自动判别下一个元素有没有出现,如果出现了,就继续执行操作;如果没有出现,就等待,直到下一个元素的出现。而当下一个元素一直没有出现的时候,我们也可以设定一个timeout的值,当时间超过了这个值,就不再等待。
基于以上思路,可以写一个is_visible()的函数。
import selenium.webdriver.support.ui as ui
from selenium.webdriver.common.by import By
import selenium.webdriver.support.expected_conditions as EC
from selenium.common.exceptions import TimeoutException

def is_visible(driver, locator, timeout=10):
    try:
        ui.WebDriverWait(driver, timeout).until(EC.visibility_of_element_located((By.XPATH, locator)))
        return True
    except TimeoutException:
        return False
locator传入一个xpath的值,当locator的元素出现时,执行下一个操作,否则一直等待,直到timeout.
使用is_visible()改进后的代码如下。
is_visible(driver, 'xpath_value1')
driver.find_element_by_xpath('xpath_value1').click()
is_visible(driver, 'xpath_value2')
driver.find_element_by_xpath('xpath_value2').click()
因为在第一次点击前要确保网页加载出来了,所以在第一次点击前也添加了is_visible()函数。
第二个问题是要我们填写姓名,这是一个要填写内容的操作,我们可以使用send_keys()。同样,先用xpath进行定位,然后再输入内容。
driver.find_element_by_xpath('xpath_value3').send_keys("你的名字")
其他的填写大同小异,均可使用click()和send_keys()进行操作。
在有的情况下,chrome会保存我们填写过的表单,自动帮我们已经勾选好了选项。比如在刚打开chrome时,可能发现有的选项上已经有了勾。

如果我们直接点击的话,已有的勾会被取消,在提交的时候就会发生错误。因此,我们需要先用一个if语句判断,如果这里本来就被选中,我们就不进行操作;如果没有选中,则再勾选。
if driver.find_element_by_xpath('xpath_value5').is_selected():
        pass
    else:
        driver.find_element_by_xpath('xpath_value5').click()
在点击提交后,如果出现‘提交成功’的元素,则关闭浏览器。
is_visible(driver, 'xpath_value16')
driver.close()
按照以上思路,完成python代码。
2. 用pyinstaller将.py打包成.exe
安装pyinstaller
pip install pyinstaller
打包
pyinstaller -F auto_covid19.py
其中,-F表示打包成单独的.exe 文件。打包完成后,在同目录下生成的dist文件夹中就能看到打包好的auto_covid19.exe啦!
3. 把.exe添加到win10的计划任务中
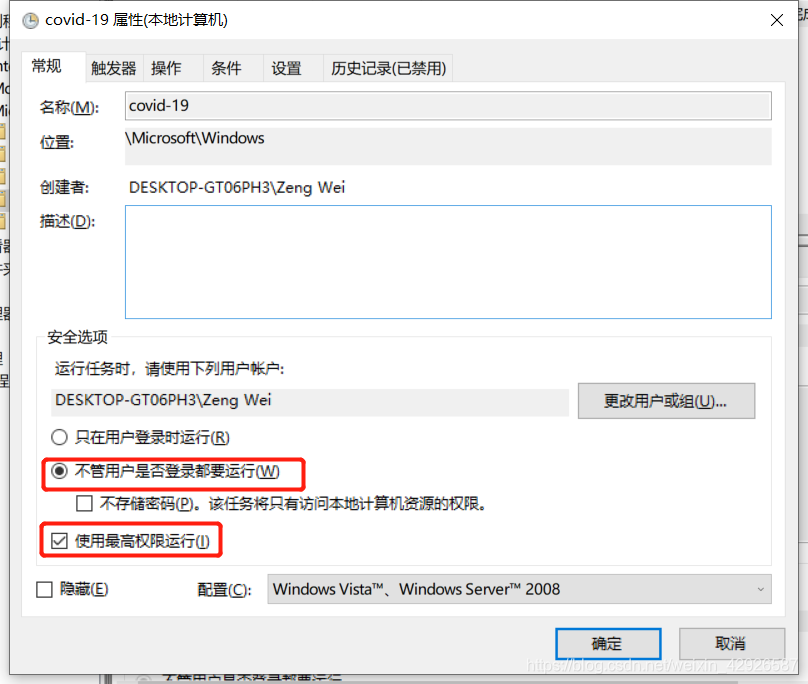
右击‘此电脑’-管理-任务计划程序-任务计划程序库-Microsoft-Windows,在右边创建一个任务。

常规中设置
触发器新建一个任务
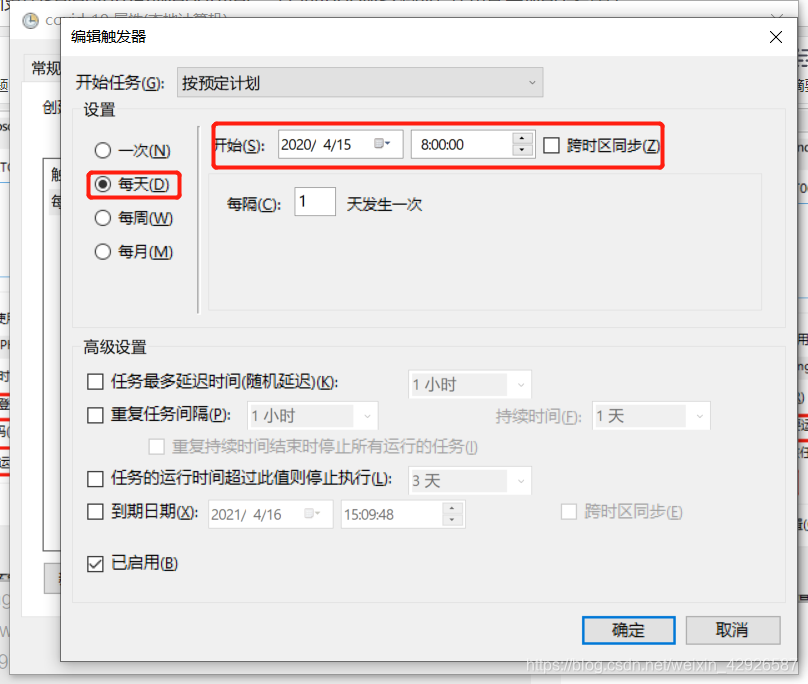
我想让他在每天的8:00被执行一次。你也可以根据你的需求进行设置。
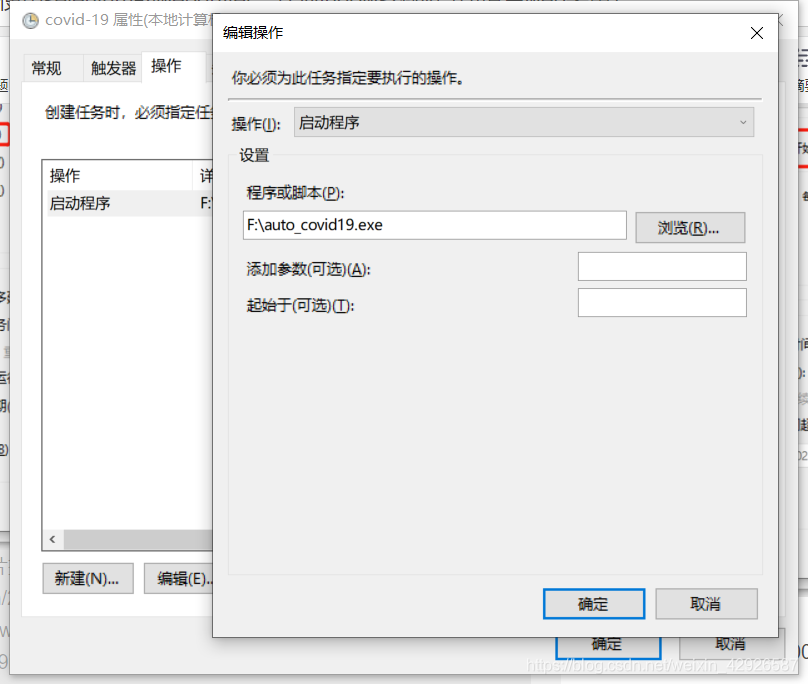
在操作中新建一项,并选择刚刚生成的.exe程序。
条件/设置中还有更多的选项,可以根据自己的需求进行设置。
到这里,整个流程就设置好啦!
4. 参考资料
python+selenium 自动填写表单并提交
【python】用selenium webdriver做简单的表格提交
python selenium中等待元素出现及等待元素消失操作
selenium中isEnable()、isDisplayed()和isSelected()
如何将 Python 程序打包成 .exe 文件?
Win10下定时启动程序或脚本
小蔡
