https://blog.csdn.net/kmyhy/article/details/77994011
如果你用过 Snapchat 的“镜头”功能,你使用的就是增强现实+面部识别技术。
增强现实——AR——是一种技术——它是一个令人印象深刻的名称,简单地说,它在真实世界的图像的基础上覆盖以计算机生成的图像。而面部识别,对于人类来说轻而易举,但对于计算机来说面部识别仍然是一个新技术,特别对于移动设备来说尤其如此。
一般来说,要编写带 AR 和面部识别的 app 需要高深的编程能力,但通过 Google 的移动视觉套件和 Face API,却使事情变得简单。
在本教程中,你将编写一个类似 Snapchat 镜头的 app,叫做 FaceSpotter。它会在镜头视野中绘制出一个卡通人物。
在这篇教程中,你将学到:
- 在自己的 app 中集成 Google 的 Face API。
- 在拍照画面中通过代码识别和跟踪人的面部。
- 识别面部的兴趣点,比如眼睛、耳朵、鼻子和嘴。
- 在拍照画面绘制文本和图像。
注意:本教程假设你熟悉 Android+Java 开发。如果你是一个新手,不知道 Andriod Studio,请阅读我们的 Android 教程。
Google Face API 是什么?
Google 的 Face API 用于面部检测,从图片中找出人的面部,以及位置(它们在图片中的位置)以及朝向(它们面朝何方,相对于镜头而言)。它可以检测出特征点(面部五官),进行分析,判断眼睛是睁着的还是闭着的,以及是不是笑脸。Face API 还能在移动图片中检测并跟随面孔,即面部跟踪。
注意 Face API 仅限于侦测人类的面孔。“猫播们”,不好意思了……

Face API 不能用于面部识别,面部识别会将指定的面孔进行唯一标识。它无法想 Facebook 一样从图片中侦测出面孔并找出它是谁。
一旦你从图片中侦测出面孔及其特征点,你就可以用你自己的现实来增强这张图片!想精灵宝可梦这样的 app,或者 Snapchat,能够用用户的相机通过增强现实制造出一种有趣的效果,你也可以!
开始
从这里下载 FaceSpotter 的开始项目,然后用 Android Studio 打开它。Build & run,它会向你询问相机权限。

点击 ALLOW,将镜头对准某个家伙的面孔。
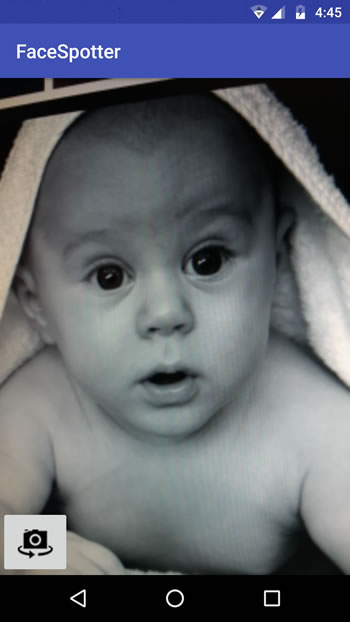
app 左下角的按钮可以在前置和后置摄像头之间切换。
项目已经准备就绪,方便你快速进入面部侦测和跟踪。我们先来看看项目中有些什么。
项目依赖
打开项目的 build.gradle (Module: app):
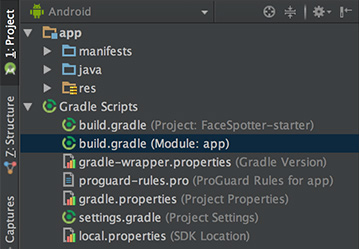
在 dependencies 节的最后,你会看到:
compile 'com.google.android.gms:play-services-vision:10.2.0'
compile 'com.android.support:design:25.2.0'- 1
- 2
第一句导入了 Android Vision API,它支持的不仅仅是面部侦测,也包括了二维码侦测和文字识别。
第二句导入了 Android Design 支持库,它提供了 Snackbar widget,用于通知用户这个 app 需要访问相机。
使用相机
FaceSpotter 在 AndroidManifest.xml 中声明需要使用相机并请求用户许可:
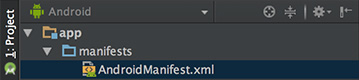
<uses-feature android:name="android.hardware.camera" />
<uses-permission android:name="android.permission.CAMERA" />- 1
- 2
预定义的类
开始项目包含了几个预定义的类:
- FaceActivity: app 的主 activity,用于显示相机预览视图。
- FaceTracker: 跟随拍照界面中的面孔,采集它们的位置和特征点。
- FaceGraphic: 在拍照界面中的面孔上绘制计算机生成的图片。
- FaceData: 一个数据类,用于从 FaceTracker 传递数据给 FaceGraphic。当脸移动时, AR 眼珠会显示动画
- EyePhysics: 一个来自 github 上的 Google Mobile Vision 示例 app 中的类,它是一个简单的物理引擎,能够让 AR 随面孔一起移动。
- CameraSourcePreview: 来自于 Google 的另一个类。它将相机中的实时图片显示到一个 view。
- GraphicOverlay: 来自于 Google 的再一个类。 FaceGraphic 继承了它。
让我们看一下如何使用它们。
FaceActivity 定义了这个 app 唯一的 activity,用于处理触摸事件,在运行时请求相机权限(支持 Android 6.0 以上)。FaceActivity 还创建了两个 FaceSpotter 会用到的对象 CameraSource 和 FaceDetector。
打开 FaceActivity.java 找到 createCameraSource 方法:
private void createCameraSource() {
  Context context = getApplicationContext();

  // 1
  FaceDetector detector = createFaceDetector(context);

  // 2
  int facing = CameraSource.CAMERA_FACING_FRONT;
  if (!mIsFrontFacing) {
    facing = CameraSource.CAMERA_FACING_BACK;
  }

  // 3
  mCameraSource = new CameraSource.Builder(context, detector)
    .setFacing(facing)
    .setRequestedPreviewSize(320, 240)
    .setRequestedFps(60.0f)
    .setAutoFocusEnabled(true)
    .build();
}- 1
- 2
- 3
- 4
- 5
- 6
- 7
- 8
- 9
- 10
- 11
- 12
- 13
- 14
- 15
- 16
- 17
- 18
- 19
- 20
代码解释如下:
- 创建一个 FaceDetector 对象,用于侦测来自于相机数据流图片中的面孔。
- 判断当前摄像头是哪一个。
用前两步的结果,以 Builder 模式创建一个 camera source。这些 builder 方法分别是:
- setFacing:指定要使用的镜头方向。
- setRequestdPreviewSize:设置相机预览图的分辨率。分辨率越低(比如 320x240)在低端机上工作得越好同时面部侦测的速度越快。分辨率越高(640x480 以上)适用于高端机,对小面孔和面部特征的侦测效果越好。请尝试不同的设置。
- setRequestFps:设置相机的帧率。帧率越高意味着更好的面部跟踪,但需要更多的处理器能力。请尝试不同的帧率。
- setAutoFocusEnabled:开启/关闭自动对焦。设为 true 能够提供更好的面部侦测和用户体验。如果设备部支持自动聚焦,这个设置无效。
然后看一下 createFaceDetector 方法:
@NonNull
private FaceDetector createFaceDetector(final Context context) {
  // 1
  FaceDetector detector = new FaceDetector.Builder(context)
    .setLandmarkType(FaceDetector.ALL_LANDMARKS)
    .setClassificationType(FaceDetector.ALL_CLASSIFICATIONS)
    .setTrackingEnabled(true)
    .setMode(FaceDetector.FAST_MODE)
    .setProminentFaceOnly(mIsFrontFacing)
    .setMinFaceSize(mIsFrontFacing ? 0.35f : 0.15f)
    .build();

  // 2
  MultiProcessor.Factory<Face> factory = new MultiProcessor.Factory<Face>() {
    @Override
    public Tracker<Face> create(Face face) {
      return new FaceTracker(mGraphicOverlay, context, mIsFrontFacing);
    }
  };

  // 3
  Detector.Processor<Face> processor = new MultiProcessor.Builder<>(factory).build();
  detector.setProcessor(processor);

  // 4
  if (!detector.isOperational()) {
    Log.w(TAG, "Face detector dependencies are not yet available.");

    // Check the device's storage.  If there's little available storage, the native
    // face detection library will not be downloaded, and the app won't work,
    // so notify the user.
    IntentFilter lowStorageFilter = new IntentFilter(Intent.ACTION_DEVICE_STORAGE_LOW);
    boolean hasLowStorage = registerReceiver(null, lowStorageFilter) != null;

    if (hasLowStorage) {
      Log.w(TAG, getString(R.string.low_storage_error));
      DialogInterface.OnClickListener listener = new DialogInterface.OnClickListener() {
        public void onClick(DialogInterface dialog, int id) {
          finish();
        }
      };
      AlertDialog.Builder builder = new AlertDialog.Builder(this);
      builder.setTitle(R.string.app_name)
        .setMessage(R.string.low_storage_error)
        .setPositiveButton(R.string.disappointed_ok, listener)
        .show();
    }
  }
  return detector;
}- 1
- 2
- 3
- 4
- 5
- 6
- 7
- 8
- 9
- 10
- 11
- 12
- 13
- 14
- 15
- 16
- 17
- 18
- 19
- 20
- 21
- 22
- 23
- 24
- 25
- 26
- 27
- 28
- 29
- 30
- 31
- 32
- 33
- 34
- 35
- 36
- 37
- 38
- 39
- 40
- 41
- 42
- 43
- 44
- 45
- 46
- 47
- 48
- 49
- 50
代码解释如下:
以 Builder 模式创建一个 FaceDetector 对象,并设置如下属性:
- setLandMarkType:如果不需要侦测面部特征,设置为 NO_LANDMARKS(这会让面部侦测更快)。如果需要面部特征侦测,设置为 ALL_LANDMARKS。
- setClassificationType: 如果不想侦测眼睛是否睁开或闭着以及是否为笑脸,设置为 NO_CLASSIFICATIONS,否则设置为ALL_CLASSIFICATIONS。
- setTrackingEnabled: 开启/关闭面部跟踪,它会为每个面孔在每一帧维护一个一致的 ID。因为你需要在录像中跟踪多个面孔,请设置为 true。
- setMode: 设为 FAST_MODE ,侦测更少的面孔 (速度快), 设为 ACCURATE_MODE 侦测更多的面孔 (速度慢) 同时侦测面孔的欧拉 Y 角(后面介绍)。
- setProminentFaceOnly: 设为 true 只侦测每一帧中位置最前的面孔。
- setMinFaceSize: 指定允许被侦测的最小面孔尺寸,用面孔宽度相对于图片宽度的百分比表示。
创建一个工厂类,用于生成新 FaceTracker 实例。
- 一个 face detector 在侦测到一个面孔时,它会将结果返回给一个处理器,这个处理器定义了需要执行的动作。如果你只需要一次处理一个面孔,你可以使用单个处理器的示例。在这个 app 中,你将处理多个面孔,因此创建了一个 MultiProcessor 实例,用它为每个侦测到的面孔创建一个 FaceTracker 实例。然后,我们会将这个处理器绑定到 face detector。
- 面部检测库在 app 安装时下载。它很大,很可能在用户第一次运行 app 时它还没有下载完。这段代码用于处理设备空间不足以下载这个库的情况。
介绍完背景知识之后,我们来试着检测几个面孔!
查找面孔
首先添加一个 view 用于绘制面部侦测数据。
打开 FaceGraphic.java。你会看到 mFace 的变量用关键字 volatile 声明。mFace 用于保存 FaceTracker 发送来的面孔数据,可能被许多线程写入。将它标记为 volatile 保证你每次读它的值时,总是会得到最后被“写入”的结果。这很关键,因为面孔数据会修改得比较频繁。
从 FaceGraphic 中删除 draw() 方法,添加方法:
// 1
void update(Face face) {
  mFace = face;
  postInvalidate(); // Trigger a redraw of the graphic (i.e. cause draw() to be called).
}

@Override
public void draw(Canvas canvas) {
  // 2
  // Confirm that the face and its features are still visible
  // before drawing any graphics over it.
  Face face = mFace;
  if (face == null) {
    return;
  }

  // 3
  float centerX = translateX(face.getPosition().x + face.getWidth() / 2.0f);
  float centerY = translateY(face.getPosition().y + face.getHeight() / 2.0f);
  float offsetX = scaleX(face.getWidth() / 2.0f);
  float offsetY = scaleY(face.getHeight() / 2.0f);

  // 4
  // Draw a box around the face.
  float left = centerX - offsetX;
  float right = centerX + offsetX;
  float top = centerY - offsetY;
  float bottom = centerY + offsetY;

  // 5
  canvas.drawRect(left, top, right, bottom, mHintOutlinePaint);

  // 6
  // Draw the face's id.
  canvas.drawText(String.format("id: %d", face.getId()), centerX, centerY, mHintTextPaint);
}- 1
- 2
- 3
- 4
- 5
- 6
- 7
- 8
- 9
- 10
- 11
- 12
- 13
- 14
- 15
- 16
- 17
- 18
- 19
- 20
- 21
- 22
- 23
- 24
- 25
- 26
- 27
- 28
- 29
- 30
- 31
- 32
- 33
- 34
- 35
- 36
代码解释如下:
- 当 FaceTracker 对象获得所跟踪的面孔的更新,它调用对应的 FaceGraphic 实例的 update 方法,并传入面孔信息。这个方法将这个信息保存到 mFace 并调用 FaceGraphic 父类的 postInvalidate 方法,这个方法强制视图重绘。
- 在面孔周围绘制方框之前,draw 方法检查这个面孔是否仍然被跟踪,如果是,mFace 应当不为空。
- 计算面孔的中心坐标 x 和 y。FaceTracker 提供了相机坐标,但绘制 FaceGraphics 用的是视图坐标,因此调用 GrahpicOverlay 的
translateX 和 translateY 方法将 mFace 的相机坐标转换为画布中的视图坐标。 - 用 x-offset 和 y-offset 是算出方框的上、下、左、右。因为相机和视图坐标系统不同,需要将面孔的宽高用 GraphicOverlay 的 scaleX 和 scaleY 方法进行转换。
- 用计算出来的中心和偏移量,将面孔绘制一个方框框起来。
- 在面孔的中心用一个面孔的 id 进行标识。
在 FaceActivity 中,face detector 将它从相机数据流中侦测到的面孔数据发送给绑定的 multiprocessor。每当接收到一个面孔,multiprocessor 会生成一个新的 FaceTracker 实例。
在 FaceTracker.java 的构造函授后面添加下列方法:
// 1
@Override
public void onNewItem(int id, Face face) {
  mFaceGraphic = new FaceGraphic(mOverlay, mContext, mIsFrontFacing);
}

// 2
@Override
public void onUpdate(FaceDetector.Detections<Face> detectionResults, Face face) {
  mOverlay.add(mFaceGraphic);
  mFaceGraphic.update(face);
}

// 3
@Override
public void onMissing(FaceDetector.Detections<Face> detectionResults) {
  mOverlay.remove(mFaceGraphic);
}

@Override
public void onDone() {
  mOverlay.remove(mFaceGraphic);
}- 1
- 2
- 3
- 4
- 5
- 6
- 7
- 8
- 9
- 10
- 11
- 12
- 13
- 14
- 15
- 16
- 17
- 18
- 19
- 20
- 21
- 22
- 23
代码解释如下:
- onNewItem: 当侦测到新的面孔并且开始跟踪时调用。这个方法用于创建一个新的 FaceGraphic 实例,简单说:当侦测到一个新面孔,你都会创建一个新的 AR 图形显示出来。
- onUpdate: 当所跟踪的面孔的某些属性(比如位置、角度或状态)发生改变时调用这个方法。用这个方法将 FaceGraphic 实例添加到 GraphicOverlay 并调用 FaceGraphic 的 update 方法,将所跟踪的面孔数据传递给它。
- onMissing 和 onDone: 当所跟踪的面孔即将临时或永久消失时调用对应方法。这两个方法都会从 overlay 中删除 FaceGraphic 实例。
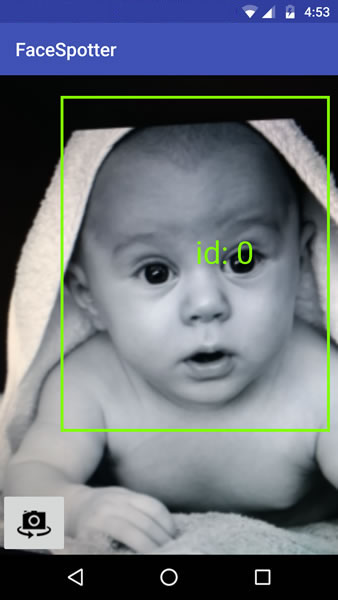
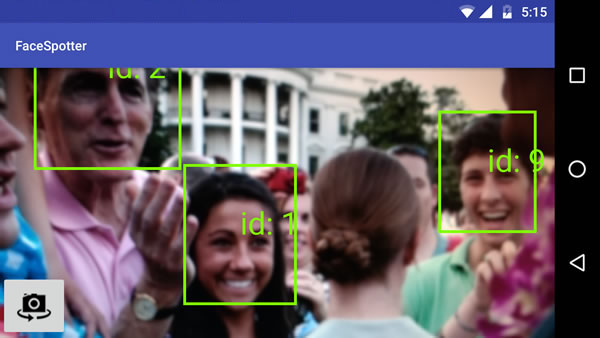
运行 app。它会在每个检测到的面孔上添加一个框,并加上一个 ID 号:
Landmarks 你好
Face API 可以识别面部特征。

接下来将修改 app 以便它能识别所跟踪的面孔的下列部位:
- 左眼
- 右眼
- 鼻底
- 左嘴角
- 下唇
- 右嘴角
这个信息保存在 FaceData 对象中,而不是 Face 对象。
对于面部特征来说,左和右引用的是目标的左和右。从前置摄像头看,目标的右眼位于屏幕的右边,但从后置摄像头看,则位于左边。
打开 FaceTracker.java 修改 onUpdate() 方法。调用 update() 的那句会有一个编译错误,因为我们还没有完成为了让 app 使用 FaceData 模型的修改,你会在后面再来解决它。
@Override
public void onUpdate(FaceDetector.Detections detectionResults, Face face) {
  mOverlay.add(mFaceGraphic);

  // Get face dimensions.
  mFaceData.setPosition(face.getPosition());
  mFaceData.setWidth(face.getWidth());
  mFaceData.setHeight(face.getHeight());

  // Get the positions of facial landmarks.
  updatePreviousLandmarkPositions(face);
  mFaceData.setLeftEyePosition(getLandmarkPosition(face, Landmark.LEFT_EYE));
  mFaceData.setRightEyePosition(getLandmarkPosition(face, Landmark.RIGHT_EYE));
  mFaceData.setMouthBottomPosition(getLandmarkPosition(face, Landmark.LEFT_CHEEK));
  mFaceData.setMouthBottomPosition(getLandmarkPosition(face, Landmark.RIGHT_CHEEK));
  mFaceData.setNoseBasePosition(getLandmarkPosition(face, Landmark.NOSE_BASE));
  mFaceData.setMouthBottomPosition(getLandmarkPosition(face, Landmark.LEFT_EAR));
  mFaceData.setMouthBottomPosition(getLandmarkPosition(face, Landmark.LEFT_EAR_TIP));
  mFaceData.setMouthBottomPosition(getLandmarkPosition(face, Landmark.RIGHT_EAR));
  mFaceData.setMouthBottomPosition(getLandmarkPosition(face, Landmark.RIGHT_EAR_TIP));
  mFaceData.setMouthLeftPosition(getLandmarkPosition(face, Landmark.LEFT_MOUTH));
  mFaceData.setMouthBottomPosition(getLandmarkPosition(face, Landmark.BOTTOM_MOUTH));
  mFaceData.setMouthRightPosition(getLandmarkPosition(face, Landmark.RIGHT_MOUTH));

  mFaceGraphic.update(mFaceData);
}- 1
- 2
- 3
- 4
- 5
- 6
- 7
- 8
- 9
- 10
- 11
- 12
- 13
- 14
- 15
- 16
- 17
- 18
- 19
- 20
- 21
- 22
- 23
- 24
- 25
- 26
注意你现在在 FaceGraphic 的 update 方法中传入的是一个 FaceData 而不是从 onUpdate 参数得来的 Face 对象了。
这允许你定义传递给 FaceTracker 的面部信息,反过来当面孔移动得太快时你可以用一些计算技巧,根据面部特征的最后一次的位置推断它们当前的位置。你将用 mPreviousLandmarkPositions、getLandmarkPosition 方法和 updatePreviousLandmarkPositions 方法实现这个目的。
然后打开 FaceGraphic.java。
首先,因为从 FaceTracker 中接收到的是 FaceData 对象而不是 Face 对象,你需要将一个:
private volatile Face mFace;
- 1
- 2
修改为:
private volatile FaceData mFaceData;
- 1
- 2
修改 update() 方法为:
void update(FaceData faceData) {
  mFaceData = faceData;
  postInvalidate(); // Trigger a redraw of the graphic (i.e. cause draw() to be called).
}- 1
- 2
- 3
- 4
最后,需要修改 draw() 方法,在跟踪的面孔上面画一些点和文字标记出面部特征:
@Override
public void draw(Canvas canvas) {
  final float DOT_RADIUS = 3.0f;
  final float TEXT_OFFSET_Y = -30.0f;

  // Confirm that the face and its features are still visible before drawing any graphics over it.
  if (mFaceData == null) {
    return;
  }

  // 1
  PointF detectPosition = mFaceData.getPosition();
  PointF detectLeftEyePosition = mFaceData.getLeftEyePosition();
  PointF detectRightEyePosition = mFaceData.getRightEyePosition();
  PointF detectNoseBasePosition = mFaceData.getNoseBasePosition();
  PointF detectMouthLeftPosition = mFaceData.getMouthLeftPosition();
  PointF detectMouthBottomPosition = mFaceData.getMouthBottomPosition();
  PointF detectMouthRightPosition = mFaceData.getMouthRightPosition();
  if ((detectPosition == null) ||
      (detectLeftEyePosition == null) ||
      (detectRightEyePosition == null) ||
      (detectNoseBasePosition == null) ||
      (detectMouthLeftPosition == null) ||
      (detectMouthBottomPosition == null) ||
      (detectMouthRightPosition == null)) {
    return;
  }

  // 2
  float leftEyeX = translateX(detectLeftEyePosition.x);
  float leftEyeY = translateY(detectLeftEyePosition.y);
  canvas.drawCircle(leftEyeX, leftEyeY, DOT_RADIUS, mHintOutlinePaint);
  canvas.drawText("left eye", leftEyeX, leftEyeY + TEXT_OFFSET_Y, mHintTextPaint);

  float rightEyeX = translateX(detectRightEyePosition.x);
  float rightEyeY = translateY(detectRightEyePosition.y);
  canvas.drawCircle(rightEyeX, rightEyeY, DOT_RADIUS, mHintOutlinePaint);
  canvas.drawText("right eye", rightEyeX, rightEyeY + TEXT_OFFSET_Y, mHintTextPaint);

  float noseBaseX = translateX(detectNoseBasePosition.x);
  float noseBaseY = translateY(detectNoseBasePosition.y);
  canvas.drawCircle(noseBaseX, noseBaseY, DOT_RADIUS, mHintOutlinePaint);
  canvas.drawText("nose base", noseBaseX, noseBaseY + TEXT_OFFSET_Y, mHintTextPaint);

  float mouthLeftX = translateX(detectMouthLeftPosition.x);
  float mouthLeftY = translateY(detectMouthLeftPosition.y);
  canvas.drawCircle(mouthLeftX, mouthLeftY, DOT_RADIUS, mHintOutlinePaint);
  canvas.drawText("mouth left", mouthLeftX, mouthLeftY + TEXT_OFFSET_Y, mHintTextPaint);

  float mouthRightX = translateX(detectMouthRightPosition.x);
  float mouthRightY = translateY(detectMouthRightPosition.y);
  canvas.drawCircle(mouthRightX, mouthRightY, DOT_RADIUS, mHintOutlinePaint);
  canvas.drawText("mouth right", mouthRightX, mouthRightY + TEXT_OFFSET_Y, mHintTextPaint);

  float mouthBottomX = translateX(detectMouthBottomPosition.x);
  float mouthBottomY = translateY(detectMouthBottomPosition.y);
  canvas.drawCircle(mouthBottomX, mouthBottomY, DOT_RADIUS, mHintOutlinePaint);
  canvas.drawText("mouth bottom", mouthBottomX, mouthBottomY + TEXT_OFFSET_Y, mHintTextPaint);
}- 1
- 2
- 3
- 4
- 5
- 6
- 7
- 8
- 9
- 10
- 11
- 12
- 13
- 14
- 15
- 16
- 17
- 18
- 19
- 20
- 21
- 22
- 23
- 24
- 25
- 26
- 27
- 28
- 29
- 30
- 31
- 32
- 33
- 34
- 35
- 36
- 37
- 38
- 39
- 40
- 41
- 42
- 43
- 44
- 45
- 46
- 47
- 48
- 49
- 50
- 51
- 52
- 53
- 54
- 55
- 56
- 57
- 58
- 59
注意这些地方:
- 因为面部数据的改变非常频繁,必须进行检查以防止从 mFaceData 中读取的对象为空。否则 app 会崩溃。
- 这部分有点繁琐,但很简单:从所跟踪的面孔上抽取每个特征点的坐标,绘制圆点和文本。
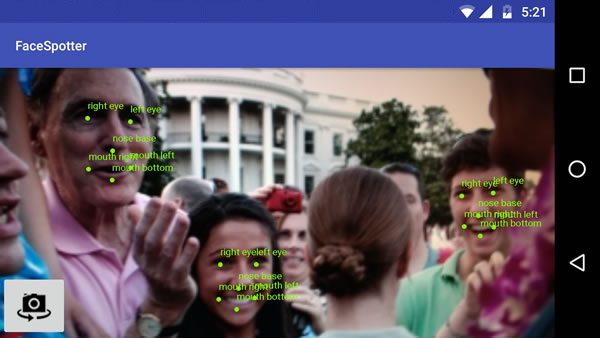
运行 app。你会看到:
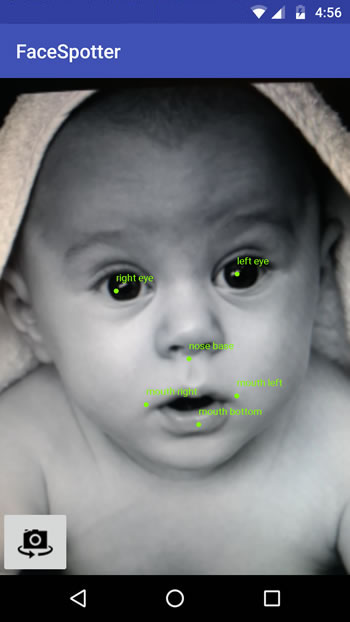
多张面孔是这个样子:
你已经识别出面孔上的特征点了,接下来开开始画卡通图片吧!但首先,我们要来学习表情类型。
表情类型
Face 类提供了这些和表情类型有关的方法:
- getIsLeftEyeOpenProbability 和 getIsRightEyeOpenProbability: 某只眼是睁还是闭的可能性,以及
- getIsSmilingProbability: 面孔是否在笑的可能性。
两者都会返回 0(非常不可能)到 1(肯定)之间的小数。你可以将这个结果用于判断眼睛是否睁着以及面孔是否在笑,并将这些信息传递给 FaceGraphic。
修改 FaceTracker 使它支持表情分类。首先,在 FaceTracker 中添加两个新实例变量用于保存眼睛的上一次状态。在使用面部特征时,当对象在快速移动时,face detector 有可能检测眼睛状态失败,这时提供一个之前的状态会方便许多:
private boolean mPreviousIsLeftEyeOpen = true;
private boolean mPreviousIsRightEyeOpen = true;- 1
- 2
onUpdate 也要修改:
@Override
public void onUpdate(FaceDetector.Detections<Face> detectionResults, Face face) {
  mOverlay.add(mFaceGraphic);
  updatePreviousLandmarkPositions(face);

  // Get face dimensions.
  mFaceData.setPosition(face.getPosition());
  mFaceData.setWidth(face.getWidth());
  mFaceData.setHeight(face.getHeight());

  // Get the positions of facial landmarks.
  mFaceData.setLeftEyePosition(getLandmarkPosition(face, Landmark.LEFT_EYE));
  mFaceData.setRightEyePosition(getLandmarkPosition(face, Landmark.RIGHT_EYE));
  mFaceData.setMouthBottomPosition(getLandmarkPosition(face, Landmark.LEFT_CHEEK));
  mFaceData.setMouthBottomPosition(getLandmarkPosition(face, Landmark.RIGHT_CHEEK));
  mFaceData.setNoseBasePosition(getLandmarkPosition(face, Landmark.NOSE_BASE));
  mFaceData.setMouthBottomPosition(getLandmarkPosition(face, Landmark.LEFT_EAR));
  mFaceData.setMouthBottomPosition(getLandmarkPosition(face, Landmark.LEFT_EAR_TIP));
  mFaceData.setMouthBottomPosition(getLandmarkPosition(face, Landmark.RIGHT_EAR));
  mFaceData.setMouthBottomPosition(getLandmarkPosition(face, Landmark.RIGHT_EAR_TIP));
  mFaceData.setMouthLeftPosition(getLandmarkPosition(face, Landmark.LEFT_MOUTH));
  mFaceData.setMouthBottomPosition(getLandmarkPosition(face, Landmark.BOTTOM_MOUTH));
  mFaceData.setMouthRightPosition(getLandmarkPosition(face, Landmark.RIGHT_MOUTH));

  // 1
  final float EYE_CLOSED_THRESHOLD = 0.4f;
  float leftOpenScore = face.getIsLeftEyeOpenProbability();
  if (leftOpenScore == Face.UNCOMPUTED_PROBABILITY) {
    mFaceData.setLeftEyeOpen(mPreviousIsLeftEyeOpen);
  } else {
    mFaceData.setLeftEyeOpen(leftOpenScore > EYE_CLOSED_THRESHOLD);
    mPreviousIsLeftEyeOpen = mFaceData.isLeftEyeOpen();
  }
  float rightOpenScore = face.getIsRightEyeOpenProbability();
  if (rightOpenScore == Face.UNCOMPUTED_PROBABILITY) {
    mFaceData.setRightEyeOpen(mPreviousIsRightEyeOpen);
  } else {
    mFaceData.setRightEyeOpen(rightOpenScore > EYE_CLOSED_THRESHOLD);
    mPreviousIsRightEyeOpen = mFaceData.isRightEyeOpen();
  }

  // 2
  // See if there's a smile!
  // Determine if person is smiling.
  final float SMILING_THRESHOLD = 0.8f;
  mFaceData.setSmiling(face.getIsSmilingProbability() > SMILING_THRESHOLD);

  mFaceGraphic.update(mFaceData);
}- 1
- 2
- 3
- 4
- 5
- 6
- 7
- 8
- 9
- 10
- 11
- 12
- 13
- 14
- 15
- 16
- 17
- 18
- 19
- 20
- 21
- 22
- 23
- 24
- 25
- 26
- 27
- 28
- 29
- 30
- 31
- 32
- 33
- 34
- 35
- 36
- 37
- 38
- 39
- 40
- 41
- 42
- 43
- 44
- 45
- 46
- 47
- 48
- 49
有几个地方需要修改:
- FaceGraphic 的职责是在脸上画图,而不是基于 face detector 提供的可能性来判断眼睛是闭还是睁。这意味着 FaceTracker 应该进行这些计算并为 FaceGraphic 在 FaceData 对象中准备好立马可以用的数据。这些计算包括从getIsLeftEyeOpenProbability 和 getIsRightEyeOpenProbability 方法获得结果并转换成简单的 true/false 值。如果 face detector 认为眼睛有超过 40% 的可能是睁着的,则认为它就是睁着的。
- 对 getIsSmilingProbability 来说也是同样的,但更严格一点。如果 face detector 认为有超过 80% 的可能是一张笑脸,则判定为这是笑脸。
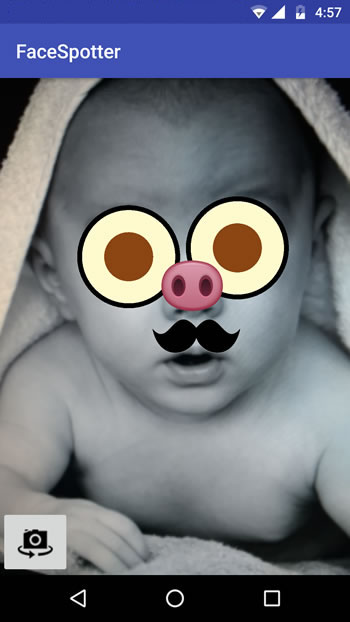
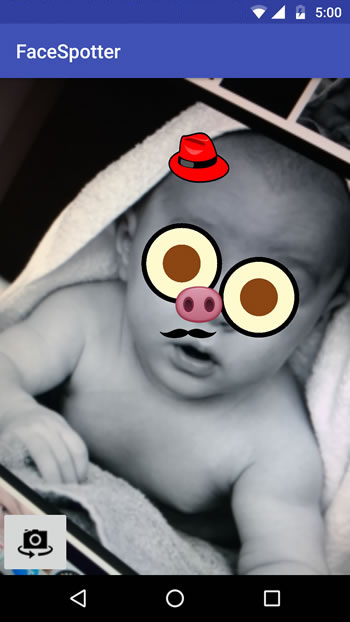
对面部进行卡通化处理
现在,你已经获得了面部特征点和表情分类,可以用一些卡通图片贴在所跟踪的脸上了:
- 在眼睛上贴一张卡通眼睛,每个卡通眼都需要反映真眼的睁闭状态
- 在鼻子上贴一张猪鼻子
- 一个卡通胡须
- 如果脸部表情是笑着的,卡通眼中是一个微笑的星星
FaceGraphic 的 draw 方法需要修改为:
@Override
public void draw(Canvas canvas) {
  final float DOT_RADIUS = 3.0f;
  final float TEXT_OFFSET_Y = -30.0f;

  // Confirm that the face and its features are still visible
  // before drawing any graphics over it.
  if (mFaceData == null) {
    return;
  }

  PointF detectPosition = mFaceData.getPosition();
  PointF detectLeftEyePosition = mFaceData.getLeftEyePosition();
  PointF detectRightEyePosition = mFaceData.getRightEyePosition();
  PointF detectNoseBasePosition = mFaceData.getNoseBasePosition();
  PointF detectMouthLeftPosition = mFaceData.getMouthLeftPosition();
  PointF detectMouthBottomPosition = mFaceData.getMouthBottomPosition();
  PointF detectMouthRightPosition = mFaceData.getMouthRightPosition();

  if ((detectPosition == null) ||
      (detectLeftEyePosition == null) ||
      (detectRightEyePosition == null) ||
      (detectNoseBasePosition == null) ||
      (detectMouthLeftPosition == null) ||
      (detectMouthBottomPosition == null) ||
      (detectMouthRightPosition == null)) {
    return;
  }

  // Face position and dimensions
  PointF position = new PointF(translateX(detectPosition.x),
                               translateY(detectPosition.y));
  float width = scaleX(mFaceData.getWidth());
  float height = scaleY(mFaceData.getHeight());

  // Eye coordinates
  PointF leftEyePosition = new PointF(translateX(detectLeftEyePosition.x),
    translateY(detectLeftEyePosition.y));
  PointF rightEyePosition = new PointF(translateX(detectRightEyePosition.x),
    translateY(detectRightEyePosition.y));

  // Eye state
  boolean leftEyeOpen = mFaceData.isLeftEyeOpen();
  boolean rightEyeOpen = mFaceData.isRightEyeOpen();

  // Nose coordinates
  PointF noseBasePosition = new PointF(translateX(detectNoseBasePosition.x),
    translateY(detectNoseBasePosition.y));

  // Mouth coordinates
  PointF mouthLeftPosition = new PointF(translateX(detectMouthLeftPosition.x),
    translateY(detectMouthLeftPosition.y));
  PointF mouthRightPosition = new PointF(translateX(detectMouthRightPosition.x),
    translateY(detectMouthRightPosition.y));
  PointF mouthBottomPosition = new PointF(translateX(detectMouthBottomPosition.x),
    translateY(detectMouthBottomPosition.y));

  // Smile state
  boolean smiling = mFaceData.isSmiling();

  // Calculate the distance between the eyes using Pythagoras' formula,
  // and we'll use that distance to set the size of the eyes and irises.
  final float EYE_RADIUS_PROPORTION = 0.45f;
  final float IRIS_RADIUS_PROPORTION = EYE_RADIUS_PROPORTION / 2.0f;
  float distance = (float) Math.sqrt(
    (rightEyePosition.x - leftEyePosition.x) * (rightEyePosition.x - leftEyePosition.x) +
      (rightEyePosition.y - leftEyePosition.y) * (rightEyePosition.y - leftEyePosition.y));
  float eyeRadius = EYE_RADIUS_PROPORTION * distance;
  float irisRadius = IRIS_RADIUS_PROPORTION * distance;

  // Draw the eyes.
  drawEye(canvas, leftEyePosition, eyeRadius, leftEyePosition, irisRadius, leftEyeOpen, smiling);
  drawEye(canvas, rightEyePosition, eyeRadius, rightEyePosition, irisRadius, rightEyeOpen, smiling);

  // Draw the nose.
  drawNose(canvas, noseBasePosition, leftEyePosition, rightEyePosition, width);

  // Draw the mustache.
  drawMustache(canvas, noseBasePosition, mouthLeftPosition, mouthRightPosition);
}- 1
- 2
- 3
- 4
- 5
- 6
- 7
- 8
- 9
- 10
- 11
- 12
- 13
- 14
- 15
- 16
- 17
- 18
- 19
- 20
- 21
- 22
- 23
- 24
- 25
- 26
- 27
- 28
- 29
- 30
- 31
- 32
- 33
- 34
- 35
- 36
- 37
- 38
- 39
- 40
- 41
- 42
- 43
- 44
- 45
- 46
- 47
- 48
- 49
- 50
- 51
- 52
- 53
- 54
- 55
- 56
- 57
- 58
- 59
- 60
- 61
- 62
- 63
- 64
- 65
- 66
- 67
- 68
- 69
- 70
- 71
- 72
- 73
- 74
- 75
- 76
- 77
- 78
- 79
- 80
下面是画眼睛、鼻子和胡须的方法:
private void drawEye(Canvas canvas,
                     PointF eyePosition, float eyeRadius,
                     PointF irisPosition, float irisRadius,
                     boolean eyeOpen, boolean smiling) {
  if (eyeOpen) {
    canvas.drawCircle(eyePosition.x, eyePosition.y, eyeRadius, mEyeWhitePaint);
    if (smiling) {
      mHappyStarGraphic.setBounds(
        (int)(irisPosition.x - irisRadius),
        (int)(irisPosition.y - irisRadius),
        (int)(irisPosition.x + irisRadius),
        (int)(irisPosition.y + irisRadius));
      mHappyStarGraphic.draw(canvas);
    } else {
      canvas.drawCircle(irisPosition.x, irisPosition.y, irisRadius, mIrisPaint);
    }
  } else {
    canvas.drawCircle(eyePosition.x, eyePosition.y, eyeRadius, mEyelidPaint);
    float y = eyePosition.y;
    float start = eyePosition.x - eyeRadius;
    float end = eyePosition.x + eyeRadius;
    canvas.drawLine(start, y, end, y, mEyeOutlinePaint);
  }
  canvas.drawCircle(eyePosition.x, eyePosition.y, eyeRadius, mEyeOutlinePaint);
}

private void drawNose(Canvas canvas,
                      PointF noseBasePosition,
                      PointF leftEyePosition, PointF rightEyePosition,
                      float faceWidth) {
  final float NOSE_FACE_WIDTH_RATIO = (float)(1 / 5.0);
  float noseWidth = faceWidth * NOSE_FACE_WIDTH_RATIO;
  int left = (int)(noseBasePosition.x - (noseWidth / 2));
  int right = (int)(noseBasePosition.x + (noseWidth / 2));
  int top = (int)(leftEyePosition.y + rightEyePosition.y) / 2;
  int bottom = (int)noseBasePosition.y;

  mPigNoseGraphic.setBounds(left, top, right, bottom);
  mPigNoseGraphic.draw(canvas);
}

private void drawMustache(Canvas canvas,
                          PointF noseBasePosition,
                          PointF mouthLeftPosition, PointF mouthRightPosition) {
  int left = (int)mouthLeftPosition.x;
  int top = (int)noseBasePosition.y;
  int right = (int)mouthRightPosition.x;
  int bottom = (int)Math.min(mouthLeftPosition.y, mouthRightPosition.y);

  if (mIsFrontFacing) {
    mMustacheGraphic.setBounds(left, top, right, bottom);
  } else {
    mMustacheGraphic.setBounds(right, top, left, bottom);
  }
  mMustacheGraphic.draw(canvas);
}- 1
- 2
- 3
- 4
- 5
- 6
- 7
- 8
- 9
- 10
- 11
- 12
- 13
- 14
- 15
- 16
- 17
- 18
- 19
- 20
- 21
- 22
- 23
- 24
- 25
- 26
- 27
- 28
- 29
- 30
- 31
- 32
- 33
- 34
- 35
- 36
- 37
- 38
- 39
- 40
- 41
- 42
- 43
- 44
- 45
- 46
- 47
- 48
- 49
- 50
- 51
- 52
- 53
- 54
- 55
- 56
- 57
运行 app,将镜头对准脸。对于两只眼睛都是睁着,且没有笑的脸来说,你会看到:
这是我在眨右眼(因此它显示为闭着的)同时微笑(因此我的眼中有一个微笑的小星星)的样子:
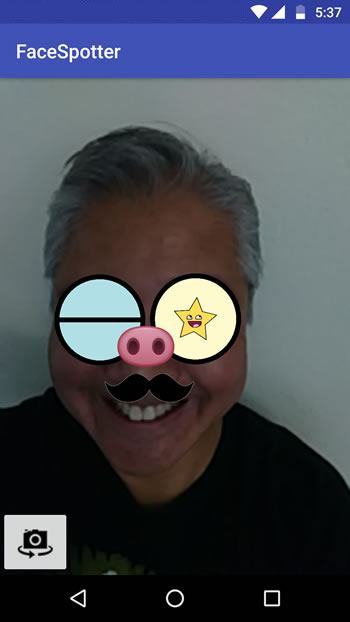
这个 app 同时在几张脸上画卡通图形…
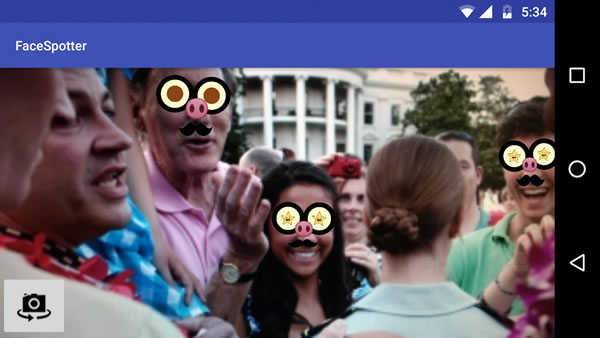
甚至是在插图上,只要它足够真实:
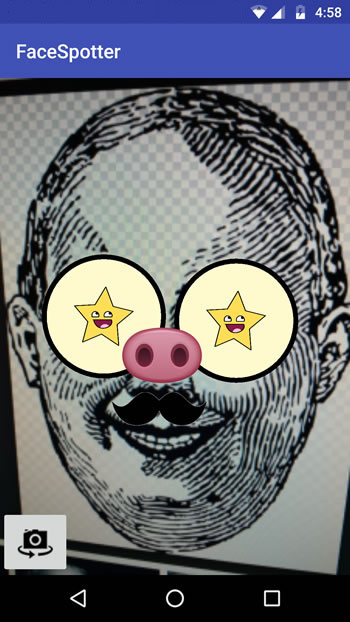
它现在和 Snapchat 更像了!
角度
Face API 提供另一个数据:欧拉角。
“欧拉”一词及发音来自于数学家 Leonhard Euler,它用于描述侦测的脸的方向。这个 API 使用 x、y、z 坐标系:
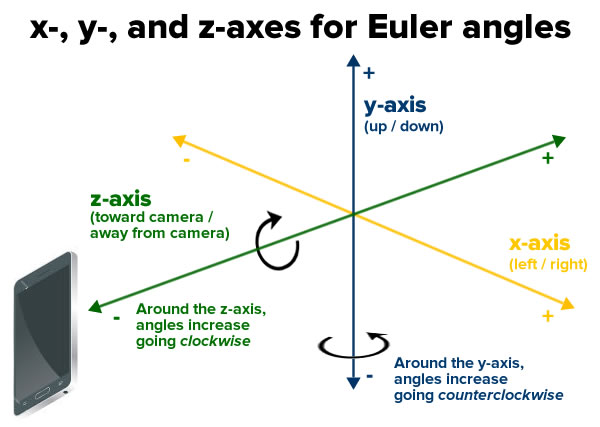
并报告每张脸的下列欧拉角。
- 欧拉 y 角,沿 y 轴进行旋转的角度。当你摇头表示说 no 的时候,你让你的头沿 y 轴来回旋转。只有 face detector 被设置为 ACCURATE_MODE 的时候才能检测出这个角度。

- 欧拉 z 角,沿 z 轴进行旋转的角度。当你将头从一边歪到另一边的时候,你的头就在沿 z 轴来回旋转。

打开 FaceTracker.java ,在 onUpdate() 方法中添加这两行代码以支持欧拉角:
// Get head angles.
mFaceData.setEulerY(face.getEulerY());
mFaceData.setEulerZ(face.getEulerZ());- 1
- 2
- 3
你用欧拉 z 角去修改 FaceGraphic ,让它画一顶帽子在面孔头上,当欧拉 z 角倾斜到任何一边的角度大于 20 度时。
打开 FaceGraphic.java,在 draw 方法最后添加代码:
// Head tilt
float eulerY = mFaceData.getEulerY();
float eulerZ = mFaceData.getEulerZ();

// Draw the hat only if the subject's head is titled at a sufficiently jaunty angle.
final float HEAD_TILT_HAT_THRESHOLD = 20.0f;
if (Math.abs(eulerZ) > HEAD_TILT_HAT_THRESHOLD) {
  drawHat(canvas, position, width, height, noseBasePosition);
}- 1
- 2
- 3
- 4
- 5
- 6
- 7
- 8
- 9
然后添加一个 drawHat 方法:
private void drawHat(Canvas canvas, PointF facePosition, float faceWidth, float faceHeight, PointF noseBasePosition) {
  final float HAT_FACE_WIDTH_RATIO = (float)(1.0 / 4.0);
  final float HAT_FACE_HEIGHT_RATIO = (float)(1.0 / 6.0);
  final float HAT_CENTER_Y_OFFSET_FACTOR = (float)(1.0 / 8.0);

  float hatCenterY = facePosition.y + (faceHeight * HAT_CENTER_Y_OFFSET_FACTOR);
  float hatWidth = faceWidth * HAT_FACE_WIDTH_RATIO;
  float hatHeight = faceHeight * HAT_FACE_HEIGHT_RATIO;

  int left = (int)(noseBasePosition.x - (hatWidth / 2));
  int right = (int)(noseBasePosition.x + (hatWidth / 2));
  int top = (int)(hatCenterY - (hatHeight / 2));
  int bottom = (int)(hatCenterY + (hatHeight / 2));
  mHatGraphic.setBounds(left, top, right, bottom);
  mHatGraphic.draw(canvas);
}- 1
- 2
- 3
- 4
- 5
- 6
- 7
- 8
- 9
- 10
- 11
- 12
- 13
- 14
- 15
- 16
- 17
运行 app。现在当头倾斜到一顶角度后,一顶帅气的帽子出现了:
眼珠弹动
最后用一个简单的物理引擎让眼珠滴溜溜地弹动。只需要对 FaceGraphic 做一点简单修改。首先,你需要声明两个实例变量,为每只眼睛各提供一个物理引擎。在 Drawable 变量下增加:
// We want each iris to move independently, so each one gets its own physics engine.
private EyePhysics mLeftPhysics = new EyePhysics();
private EyePhysics mRightPhysics = new EyePhysics();- 1
- 2
- 3
第二处需要改变的地方是调用 FaceGraphic 的 draw 方法。目前,你将眼珠的位置设置为眼睛的同一位置。
现在,修改 draw 方法中 “draw the eyes” 一段的代码,使用物理引擎去计算眼珠的位置:
// Draw the eyes.
PointF leftIrisPosition = mLeftPhysics.nextIrisPosition(leftEyePosition, eyeRadius, irisRadius);
drawEye(canvas, leftEyePosition, eyeRadius, leftIrisPosition, irisRadius, leftEyeOpen, smiling);
PointF rightIrisPosition = mRightPhysics.nextIrisPosition(rightEyePosition, eyeRadius, irisRadius);
drawEye(canvas, rightEyePosition, eyeRadius, rightIrisPosition, irisRadius, rightEyeOpen, smiling);- 1
- 2
- 3
- 4
- 5
运行 app,现在每个人都有一双曲棍球式(googly,谷歌式,双关语)的眼睛!

结束
你可以从这里下载完成后的项目。
现在,你虽然不能说从一支增强现实和面部侦测的新手变成了老鸟,但总算知道如何在 Android app 中使用二者了吧!
现在,你已经完成了这个 app 的几个迭代,从最初的版本到完成版本,你应该很容易理解这张 FaceSpotter 对象关系图了吧:

接下来你应该浏览 Google 的移动视觉网站,尤其是 Face API 一节。
阅读他人代码是一种好的学习方式,Google 的 android-vision GitHub repository是一座引发无数想法和代码的宝藏。
如果你有任何问题和评论,请在下面留言。