1 直接上代码吧
本篇文章主要展示一个客户端开发Demo。
1.1 maven
maven中需要的配置是直接从官网拷贝的。
<dependency>
   <groupId>com.rabbitmq</groupId>
   <artifactId>amqp-client</artifactId>
   <version>5.8.0</version>
</dependency>
1.2 配置类
主要是放入一些RabbitMQ的参数信息。
public class RabbitMqConstant {

    public static final String HOST = "127.0.0.1";

    public static final int PORT = 5672;

    public static final String VIRTUAL_HOST = "/";

    public static final String USERNAME = "demouser";

    public static final String PASSWORD = "demopassword";

    public static final String EXCHANGE = "demo_exchange";

    public static final String ROUTING_KEY = "demo_rountingkey";

    public static final String QUEUE = "demo_queue";
}
1.3 生产者测试代码
public class Producer {

    public static void main(String[] args) throws IOException, TimeoutException {
        // 创建一个 ConnectionFactory
        ConnectionFactory factory = new ConnectionFactory();
        // 设置相关的配置信息
        factory.setHost(RabbitMqConstant.HOST);
        factory.setPort(RabbitMqConstant.PORT);
        factory.setVirtualHost(RabbitMqConstant.VIRTUAL_HOST);
        factory.setUsername(RabbitMqConstant.USERNAME);
        factory.setPassword(RabbitMqConstant.PASSWORD);
        // 创建连接
        Connection conn = factory.newConnection();
        // 创建 Channel
        Channel channel = conn.createChannel();
        String message = "hello world";
        channel.basicPublish(RabbitMqConstant.EXCHANGE, RabbitMqConstant.ROUTING_KEY,
                MessageProperties.PERSISTENT_TEXT_PLAIN, message.getBytes());
        //关闭资源
        channel.close();
        conn.close();
    }
}
这里没有声明交换器和队列是因为我在Web管理页面声明好了,其实也可以通过Channel类下的方法来声明。
1.4 生产者运行结果
可以看到,消息队列中多了一条消息。

可以看到,消息已经进入队列中了。
1.5 消费者测试代码
public class MqConsumer {

    public static void main(String[] args) throws IOException, TimeoutException {
        // 创建一个 ConnectionFactory
        ConnectionFactory factory = new ConnectionFactory();
        // 设置相关的配置信息
        factory.setHost(RabbitMqConstant.HOST);
        factory.setPort(RabbitMqConstant.PORT);
        factory.setVirtualHost(RabbitMqConstant.VIRTUAL_HOST);
        factory.setUsername(RabbitMqConstant.USERNAME);
        factory.setPassword(RabbitMqConstant.PASSWORD);
        // 创建连接
        Connection conn = factory.newConnection();
        // 创建Channel
        Channel channel = conn.createChannel();

        Consumer consumer = new DefaultConsumer(channel) {
            @Override
            public void handleDelivery(String consumerTag, Envelope envelope,
                                       AMQP.BasicProperties properties, byte[] body) throws IOException {
                System.out.println("消费信息;" + new String(body));
                channel.basicAck(envelope.getDeliveryTag(), false);
            }
        };
        channel.basicConsume(RabbitMqConstant.QUEUE, consumer);
        try {
        	// 这里休眠的原因是:main线程是用户线程,而消费线程是守护线程。
        	// 有可能main线程已经结束了,而消费线程还没来得及消费。
            TimeUnit.SECONDS.sleep(3);
        } catch (InterruptedException e) {
            e.printStackTrace();
        }
        channel.close();
        conn.close();
    }
}
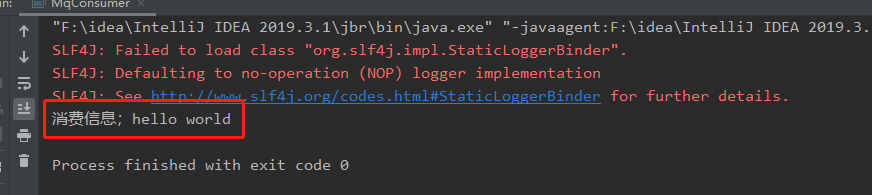
1.6 消费者运行结果
控制台成功打印出了信息
而消息队列的消息也被消费掉了。

参考
- 电子工业出版社,朱忠华 著, 《RabbitMQ实战指南》
