springboot整合多数据源解决分布式事务
一、前言
springboot整合多数据源解决分布式事务。
1.多数据源采用分包策略
2.全局分布式事务管理:jta-atomikos。
在此记录下,分享给大家。
二、springboot整合多数据源解决分布式事务

1、pom文件 依赖引入
    <parent>
        <groupId>org.springframework.boot</groupId>
        <artifactId>spring-boot-starter-parent</artifactId>
        <version>2.1.8.RELEASE</version>
        <relativePath />
    </parent>

    <dependencies>
        <!-- SpringBoot 测试 -->
        <dependency>
            <groupId>org.springframework.boot</groupId>
            <artifactId>spring-boot-starter-test</artifactId>
            <scope>test</scope>
        </dependency>

        <!-- SpringBoot web组件 -->
        <dependency>
            <groupId>org.springframework.boot</groupId>
            <artifactId>spring-boot-starter-web</artifactId>
        </dependency>

        <!-- mybatis 支持 SpringBoot -->
        <dependency>
            <groupId>org.mybatis.spring.boot</groupId>
            <artifactId>mybatis-spring-boot-starter</artifactId>
            <version>1.1.1</version>
        </dependency>

        <!-- mysql 驱动 -->
        <dependency>
            <groupId>mysql</groupId>
            <artifactId>mysql-connector-java</artifactId>
            <version>5.1.38</version>
        </dependency>

        <!-- 全局事务集中管理 解决分布式事务 -->
        <dependency>
            <groupId>org.springframework.boot</groupId>
            <artifactId>spring-boot-starter-jta-atomikos</artifactId>
        </dependency>

        <!-- SpringBoot 自动配置 -->
        <dependency>
            <groupId>org.springframework.boot</groupId>
            <artifactId>spring-boot-configuration-processor</artifactId>
            <optional>true</optional>
        </dependency>

        <!-- 注解式 插入/构建/优雅代码 -->
        <dependency>
            <groupId>org.projectlombok</groupId>
            <artifactId>lombok</artifactId>
            <version>1.18.4</version>
        </dependency>
    </dependencies>
2、 application.yml 新增配置
spring:
  datasource:
    ## 用户数据库
    user:
      url: jdbc:mysql://127.0.0.1:3306/yys_user
      username: root
      password: 123456
      borrowConnectionTimeout: 30
      loginTimeout: 30
      maintenanceInterval: 60
      maxIdleTime: 60
      maxLifetime: 20000
      maxPoolSize: 25
      minPoolSize: 3
      uniqueResourceName: userDataSource
      testQuery: select 1
    ## 订单数据库
    order:
      url: jdbc:mysql://127.0.0.1:3306/yys_order
      username: root
      password: 123456
      borrowConnectionTimeout: 30
      loginTimeout: 30
      maintenanceInterval: 60
      maxIdleTime: 60
      maxLifeTime: 20000
      maxPoolSize: 25
      minPoolSize: 3
      uniqueResourceName: orderDataSource
      testQuery: select 1
3、userConfig.java
@ConfigurationProperties(prefix = "spring.datasource.user")
@Data
public class UserConfig {

    private String url;

    private String userName;

    private String password;

    private int minPoolSize;

    private int maxPoolSize;

    private int maxLifeTime;

    private int maxIdleTime;

    private int loginTimeout;

    private int maintenanceInterval;

    private int borrowConnectionTimeout;

    private String testQuery;

    private String uniqueResourceName;

}
4、userDataSourceConfig.java
/**
 * 用户数据源
 *      Config
 * @author yys
 */
@Configuration
@MapperScan(basePackages = "com.yys.user.mapper", sqlSessionTemplateRef = "userSqlSessionTemplate")
public class UserDataSourceConfig {

    /**
     * 创建 XADataSource
     * @return
     */
    @Bean("userDataSource")
    public DataSource userDataSource(UserConfig userConfig) throws SQLException {
        // 1、创建Mysql XADataSource
        MysqlXADataSource mysqlXaDataSource = new MysqlXADataSource();
        mysqlXaDataSource.setUrl(userConfig.getUrl());
        mysqlXaDataSource.setPinGlobalTxToPhysicalConnection(true);
        mysqlXaDataSource.setPassword(userConfig.getPassword());
        mysqlXaDataSource.setUser(userConfig.getUserName());
        mysqlXaDataSource.setPinGlobalTxToPhysicalConnection(true);

        // 2、将本地事务注册到 Atomikos 全局事务
        AtomikosDataSourceBean xaDataSource = new AtomikosDataSourceBean();
        xaDataSource.setXaDataSource(mysqlXaDataSource);
        xaDataSource.setUniqueResourceName(userConfig.getUniqueResourceName());
        xaDataSource.setMinPoolSize(userConfig.getMinPoolSize());
        xaDataSource.setMaxPoolSize(userConfig.getMaxPoolSize());
        xaDataSource.setMaxLifetime(userConfig.getMaxLifeTime());
        xaDataSource.setBorrowConnectionTimeout(userConfig.getBorrowConnectionTimeout());
        xaDataSource.setLoginTimeout(userConfig.getLoginTimeout());
        xaDataSource.setMaintenanceInterval(userConfig.getMaintenanceInterval());
        xaDataSource.setMaxIdleTime(userConfig.getMaxIdleTime());
        xaDataSource.setTestQuery(userConfig.getTestQuery());

        return xaDataSource;
    }

    /**
     * 创建 SQL会话工厂
     * @param dataSource
     * @return
     * @throws Exception
     */
    @Bean("userSqlSessionFactory")
    public SqlSessionFactory userSqlSessionFactory(@Qualifier("userDataSource") DataSource dataSource) throws Exception {
        SqlSessionFactoryBean sqlSessionFactoryBean = new SqlSessionFactoryBean();
        sqlSessionFactoryBean.setDataSource(dataSource);
        return sqlSessionFactoryBean.getObject();
    }

    /**
     * 创建用户 SqlSession模板
     * @param sqlSessionFactory
     * @return
     */
    @Bean("userSqlSessionTemplate")
    public SqlSessionTemplate userSqlSessionTemplate(@Qualifier("userSqlSessionFactory") SqlSessionFactory sqlSessionFactory) {
        return new SqlSessionTemplate(sqlSessionFactory);
    }

}
5、orderConfig.java
@ConfigurationProperties(prefix = "spring.datasource.order")
@Data
public class OrderConfig {

    private String url;

    private String userName;

    private String password;

    private int minPoolSize;

    private int maxPoolSize;

    private int maxLifeTime;

    private int maxIdleTime;

    private int loginTimeout;

    private int maintenanceInterval;

    private int borrowConnectionTimeout;

    private String testQuery;

    private String uniqueResourceName;

}
6、orderDataSourceConfig.java
/**
 * 订单数据源
 *      Config
 * @author yys
 */
@Configuration
@MapperScan(basePackages = "com.yys.order.mapper", sqlSessionTemplateRef = "orderSqlSessionTemplate")
public class OrderDataSourceConfig {

    /**
     * 创建 XADataSource
     * @return
     */
    @Bean("orderDataSource")
    public DataSource orderDataSource(OrderConfig orderConfig) throws SQLException {

        // 1、创建Mysql XADataSource
        MysqlXADataSource mysqlXaDataSource = new MysqlXADataSource();
        mysqlXaDataSource.setUrl(orderConfig.getUrl());
        mysqlXaDataSource.setPinGlobalTxToPhysicalConnection(true);
        mysqlXaDataSource.setPassword(orderConfig.getPassword());
        mysqlXaDataSource.setUser(orderConfig.getUserName());
        mysqlXaDataSource.setPinGlobalTxToPhysicalConnection(true);

        // 2、将本地事务注册到 Atomikos 全局事务
        AtomikosDataSourceBean xaDataSource = new AtomikosDataSourceBean();
        xaDataSource.setXaDataSource(mysqlXaDataSource);
        xaDataSource.setUniqueResourceName(orderConfig.getUniqueResourceName());
        xaDataSource.setMinPoolSize(orderConfig.getMinPoolSize());
        xaDataSource.setMaxPoolSize(orderConfig.getMaxPoolSize());
        xaDataSource.setMaxLifetime(orderConfig.getMaxLifeTime());
        xaDataSource.setBorrowConnectionTimeout(orderConfig.getBorrowConnectionTimeout());
        xaDataSource.setLoginTimeout(orderConfig.getLoginTimeout());
        xaDataSource.setMaintenanceInterval(orderConfig.getMaintenanceInterval());
        xaDataSource.setMaxIdleTime(orderConfig.getMaxIdleTime());
        xaDataSource.setTestQuery(orderConfig.getTestQuery());

        return xaDataSource;
    }

    /**
     * 创建 SQL会话工厂
     * @param dataSource
     * @return
     * @throws Exception
     */
    @Bean("orderSqlSessionFactory")
    public SqlSessionFactory orderSqlSessionFactory(@Qualifier("orderDataSource") DataSource dataSource) throws Exception {
        SqlSessionFactoryBean sqlSessionFactoryBean = new SqlSessionFactoryBean();
        sqlSessionFactoryBean.setDataSource(dataSource);
        return sqlSessionFactoryBean.getObject();
    }

    /**
     * 创建订单 SqlSession模板
     * @param sqlSessionFactory
     * @return
     */
    @Bean("orderSqlSessionTemplate")
    public SqlSessionTemplate orderSqlSessionTemplate(@Qualifier("orderSqlSessionFactory") SqlSessionFactory sqlSessionFactory) {
        return new SqlSessionTemplate(sqlSessionFactory);
    }

}
7、MybatisController.java
/**
 * 多数据源解决分布式事务测试
 *      Controller
 * @author yys
 */
@RestController
@RequestMapping("/add")
public class MybatisController {

    @Autowired
    private UserService userService;

    @Autowired
    private OrderService orderService;

    /**
     * 新增用户并生成订单(解决分布式事务问题)
     * @return
     */
    @RequestMapping("/user")
    public String addUser(String name, Integer age, Double amount, String address) {
        return userService.addUser(name, age, amount, address) ? "success" : "fail";
    }

}
8、UserService.java
/**
 * 用户管理
 *      Service
 * @author yys
 */
@Service
public class UserService {

    @Autowired
    private UserMapper userMapper;

    @Autowired
    private OrderMapper orderMapper;

    // 全局事务处理器
    // 事务底层原理采用aop技术做增强
    // 无需再指定某个事务管理器,全交给 Atomikos 全局事务
    @Transactional
    public Boolean addUser(String name, Integer age, Double amount, String address) {

        // 操作用户库
        int i = userMapper.addUser(name, age);
        // 操作订单库
        int j = orderMapper.addOrder(amount, address);

        // 测试事务回滚(age = 0:回滚;age > 0:事务提交)
        int flag = 1 / age;

        return i > 0 && j > 0;
    }

}
9、UserMapper.java
/**
 * 用户管理
 *      Mapper
 * @author yys
 */
public interface UserMapper {

    @Insert("INSERT INTO user VALUES (NULL, #{name}, #{age}, 1, NOW(), NOW())")
    int addUser(@Param("name") String name, @Param("age") Integer age);

}
10、OrderMapper.java
/**
 * 订单管理
 *      Mapper
 * @author yys
 */
public interface OrderMapper {

    // order为数据库关键字,记得使用``
    @Insert("INSERT INTO `order` VALUES (NULL, #{amount}, #{address}, 1, NOW(), NOW())")
    int addOrder(@Param("amount") Double amount, @Param("address") String address);

}
11、启动类
@SpringBootApplication
@MapperScan("com.yys.mapper")
public class YysApp {

    public static void main(String[] args) {
        SpringApplication.run(YysApp.class, args);
    }

}
12、初始化sql文件
-- Database:yys_user

DROP TABLE IF EXISTS `user`;
CREATE TABLE `user` (
  `id` bigint(11) NOT NULL AUTO_INCREMENT COMMENT 'ID,自增列',
  `name` varchar(32) NOT NULL COMMENT '用户名',
  `age` int(11) NOT NULL COMMENT '用户年龄',
  `status` tinyint(2) NOT NULL DEFAULT '1' COMMENT '状态:-1-删除;1-正常;',
  `create_time` datetime NOT NULL COMMENT '创建时间',
  `update_time` timestamp NOT NULL DEFAULT CURRENT_TIMESTAMP ON UPDATE CURRENT_TIMESTAMP COMMENT '更新时间',
  PRIMARY KEY (`id`)
) ENGINE=InnoDB AUTO_INCREMENT=4 DEFAULT CHARSET=utf8mb4;


-- Database:yys_order

DROP TABLE IF EXISTS `order`;
CREATE TABLE `order` (
  `id` bigint(11) NOT NULL AUTO_INCREMENT COMMENT 'ID,自增列',
  `amount` double(11,2) NOT NULL COMMENT '订单金额',
  `address` varchar(32) NOT NULL COMMENT '地址',
  `status` tinyint(2) NOT NULL DEFAULT '1' COMMENT '状态:-1-删除;1-正常;',
  `create_time` datetime NOT NULL COMMENT '创建时间',
  `update_time` timestamp NOT NULL DEFAULT CURRENT_TIMESTAMP ON UPDATE CURRENT_TIMESTAMP COMMENT '更新时间',
  PRIMARY KEY (`id`)
) ENGINE=InnoDB AUTO_INCREMENT=4 DEFAULT CHARSET=utf8mb4;
13、测试
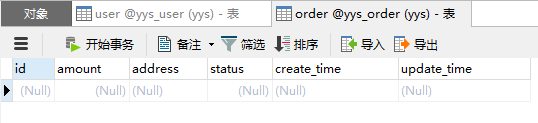
http://localhost:8080/add/user?name=古猿&age=0&amount=12.02&address=南方a、页面结果 - 如下图所示 :

b、数据库结果 - 如下图所示 :

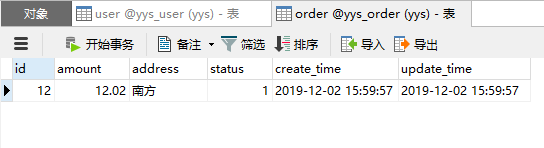
http://localhost:8080/add/user?name=古猿&age=18&amount=12.02&address=南方a、页面结果 - 如下图所示 :

b、数据库结果 - 如下图所示 :

Now ~ ~ ~写到这里,就写完了,如果有幸帮助到你,请记得关注我,共同一起见证我们的成长。
