报警可以分为邮箱报警,钉钉报警,微信报警以及手机短信报警
第一步:
创建一个用户,
一 邮箱报警
第一种
1.1 先安装 mailx
[root@zabbix]# yum install mailx -y
1.1.2、编辑配置文件在最后一行添加
[root@zabbix]# vim /etc/mail.rc
set bsdcompat
set sendcharsets=iso-8859-1,utf-8
set from=邮箱
set smtp=smtp://smtp.exmail.qq.com
set smtp-auth-user=邮箱
set smtp-auth-password=邮箱密码
set smtp-auth=login
1.1.3、测试邮件发送是否正常
[root@zabbix]# echo "zabbix test mail" |mail -s "zabbix" 邮箱
1.1.4、编写发邮件脚本
[root@zabbix alertscripts]# cd /usr/lib/zabbix/alertscripts
[root@zabbix alertscripts]# vi mail.sh
#!/bin/bash
#send mail

messages=echo $3 | tr '\r\n' '\n'
subject=echo $2 | tr '\r\n' '\n'
echo "${messages}" | mail -s "${subject}" $1 >>/var/mailx.log 2>&1
1.1.5、修改权限
touch /var/mailx.log
chown -R zabbix.zabbix /var/mailx.log
chmod +x /usr/lib/zabbix/alertscripts/mailx.sh
chown -R zabbix.zabbix /usr/lib/zabbix/
1.1.6、测试脚本发送邮件
[root@zabbix alertscripts]# echo "hello world" | mail -s "testmail" 你的邮箱

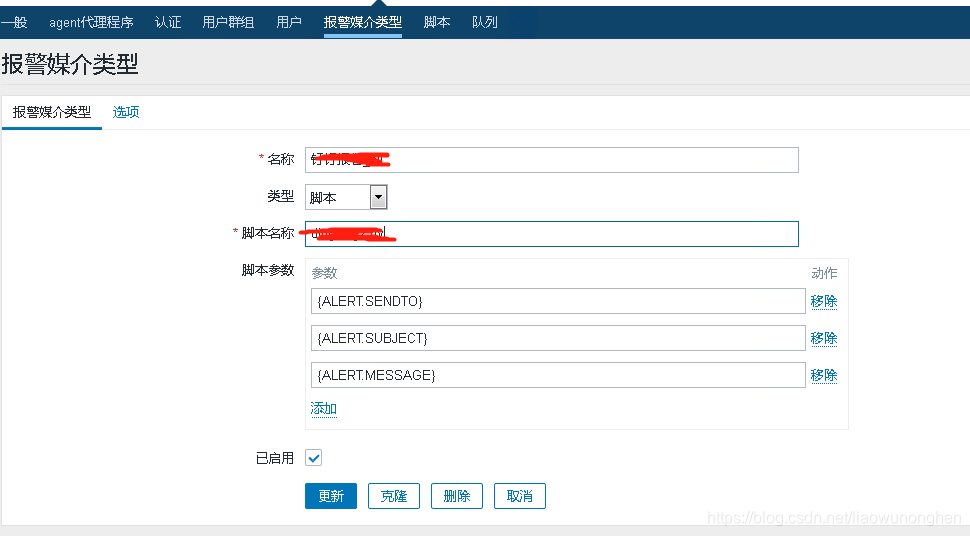
添加三个脚本参数
{ALERT.SENDTO}
{ALERT.SUBJECT}
{ALERT.MESSAGE}
进行报警设置


第二种 postfox邮箱设置
1.2 install postfix
yum install postfix #安装postfix
1.2.2 安装sasldb、saslauthd
#提供smtp的虚拟账户和密码服务
yum install cyrus-sasl*
#sasldb2包含在saslauthd中
1.2.3当前mta查看
alternatives --display mta
1.2.4 设置mta
/usr/sbin/alternatives --set mta /usr/sbin/sendmail.postfix
1.2.5 再次查看mta
alternatives --display mta
#输出结果最后一行会有类似如下的提示:mta即设置完毕
#Current `best' version is /usr/sbin/sendmail.postfix.
1.2.6 postfix开机启动设置
因为采用sasldb2提供postfix的smtp账户和密码,无需saslauthd服务运行
systemctl enable postfix
systemctl start postfix
1.2.7 postfix配置并启用smtp
主要修改的配置文件为:/etc/postfix/main.cf,
配置说明详见代码段
cat  /etc/postfix/main.cf #
 #找到如下配置项酌情修改

######
myhostname =  mail.test.com.
#postfix主机名,修改成你的域名 此项需要添加A记录并指向postfix所在主机公网IP
mydomain   =  test.com.
#域名
myorigin   =  $mydomain
#本机postfix的邮箱域名后最 此项默认值使用myhostname
#此处使用了前项mydomain 也就是说本机postfix邮箱后缀为:@jjonline.com.cn
inet_interfaces = localhost
#指定postfix系统监听的网络接口 此处必须是localhost或127.0.0.1或内网ip
#若注释或填入公网ip  服务器的25端口将对公网开放
#默认值为all 即监听所有网络接口
#此项指定localhost后 本机postfix就只能发邮件不能接收邮件
inet_protocols = ipv4
#网络协议 ipv6在国内还不怎么普及 这里ipv4即可
mydestination = $myhostname, localhost.$mydomain, localhost
#指定postfix接收邮件时收件人的域名,换句话说,也就是你的postfix系统要接收什么样的邮件。
#此项配置中$myhostname表示postfix接受@$myhostname为后缀的邮箱的邮件 逗号分割支持指多项
#此项默认值使用myhostname
local_recipient_maps =
#此项制定接收邮件的规则 可以是hash文件 此项对本次配置无意义 可以直接注释
mynetworks = x.x.x.x, 192.158.xxx.xxx, 127.0.0.1
#指定你所在的网络的网络地址

#依据实际情况修改
smtpd_banner = test.com ESMTP Server
#指定MUA通过smtp连接postfix时返回的header头信息
#原始配置附带有postfix版本号 去掉即可,此项酌情处理
#SMTP Config
broken_sasl_auth_clients = yes
#指定postfix兼容MUA使用不规则的smtp协议--主要针对老版本的outlook  此项对于本次配置无意义
mynetworks_style = host
relay_domains = $mydestination


#smtp 一下进行添加
#========================================================================
smtpd_client_restrictions = permit_sasl_authenticated
#指定可以向postfix发起SMTP连接的客户端的主机名或ip地址
#此处permit_sasl_authenticated意思是允许通过sasl认证(也就是smtp链接时通过了账号、密码效验的用户)的所有用户
smtpd_recipient_restrictions = permit_mynetworks, permit_sasl_authenticated, reject_unauth_destination
#发件人在执行RCPT TO命令时提供的地址进行限制规则  此处照搬复制即可
smtpd_sasl_auth_enable = yes
#指定postfix使用sasl验证 通俗的将就是启用smtp并要求进行账号、密码效验
smtpd_sasl_local_domain = $mydomain
#指定SMTP认证的本地域名  本次配置可以使用 smtpd_sasl_local_domain = '' 或干脆注释掉 默认为空
smtpd_sasl_security_options = noanonymous
#取消smtp的匿名登录  此项默认值为noanonymous smtp若能匿名登录危害非常大 此项请务必指定为noanonymous
message_size_limit = 5242880
#指定通过postfix发送邮件的体积大小 此处表示5M
1.2.8 sasldb2建立smtp用户和密码
 编辑通过sasl启用smtp账号密码效验的配置
vi /etc/sasl2/smtpd.conf #vi写入或编辑内容如下:
pwcheck_method: saslauthd
mech_list: plain login
#注意:这个配置文件的位置是64位机器上的,32位机器应该在:/usr/lib/sasl2/smtpd.conf
1.2.9 创建smtp账号
saslpasswd2 -c -u `postconf -h mydomain` test #回车会要求输入密码,连续两次
#表示创建test@$mydomain的邮箱账号(也是smtp的账号)和密码
#本例就是创建test@test.com账号和密码
#此处注意的是smtp登录用的账号并不是单纯的用户名  而是整个邮箱地址字符串
#假设此处设置的smtp账号test@test.com.密码为test 下方测试时要用到
1.2.10 查看sasldb2的用户和密码
sasldblistusers2
#此命令进用户查看sasldb的用户情况
#此命令回车后会输出诸如这样的内容:[email protected]: userPassword
每次添加smtp用户完毕之后需重启postfix或reload
二 钉钉报警
cd /usr/lib/zabbix/alertscripts #这个目录进行存放脚本``
此脚本,需要自己进行修改,测试
#!/usr/bin/python
#-*- coding: utf-8 -*-
import requests,time
import json,sys,re,os
zabbixserver_url = 'http://39.104.84.241:80/index.php'
#具体地址
auth = 'aaaaa'
#认证的参数
def get_itemid():
a=re.findall(r"ITEM ID: \d+",info2)
i=str(a)
itemid=re.findall(r"\d+",i)
return int("".join(itemid).lstrip('[\'').rstrip('\']'))
def get_picture(itemID,pname):
myRequests = requests.Session()
try:
loginHeaders = {
"Host": '39.104.84.241:80',
"Accept":"text/html,application/xhtml+xml,application/xml;q=0.9,image/webp,image/apng,*/*;q=0.8",
"user-Agent":"Mozilla/6.0 (Windows NT 10.0; Win64; x64) AppleWebKit/537.36 (KHTML, like Gecko) Chrome/71.0.3578.91 Safari/537.36"
}
# 构建登录所需的信息
playLoad = {
"name": "Admin",
"password": 'admin',
"autologin": "1",
"enter": "Sign in",
}
myRequests.post(zabbixserver_url, headers=loginHeaders, data=playLoad)
testUrl = "http://39.104.84.241/chart.php"
testUrlplayLoad = {
"itemids": itemID,
"from": "now-2h",
"to":"now",
"width": "700",
}
testGraph = myRequests.get(url=testUrl,params=testUrlplayLoad)
IMAGEPATH = os.path.join('/usr/share/nginx/html/dingding_pic/', pname)
f = open(IMAGEPATH, 'wb')
f.write(testGraph.content)
f.close()
pname_url = 'http://39.104.84.241:80/dingding_pic/' + pname
return pname_url
except Exception as e:
print e
return False
def send_msg(pname_url):
headers = {'Content-Type': 'application/json;charset=utf-8'}
data = {
"msgtype": "markdown",
"markdown": {
"title": info1,
"text": info3+"[外链图片转存失败,源站可能有防盗链机制,建议将图片保存下来直接上传(img-2O-aaa)(%s)]\n"%(pname_url)
},
"at":{
"atMobiles": reminders,
"isAtAll": False,
},
}
r = requests.post(webhook_url,data=json.dumps(data),headers=headers)
def info_text():
new_text = ""
x = info2.split('\n')
for i in x:
if re.search('ITEM ID',str(i)):
pass
else:
new_text += "- "+str(i)+('\n')
return new_text
if __name__ == '__main__':
os.system("echo hello >> /tmp/syslog.md")
pname = str(int(time.time()))+'.png'
info1 = str(sys.argv[2])
info2 = str(sys.argv[3])
info3 = info_text()
with open('/tmp/syslog.md','a') as f:
f.write(info1)
f.write(info2)
#f.writelines(sys.argv[1])
#f.writelines(sys.argv[2])
f.close()
reminders = []
webhook_url = 'https://oapi.dingtalk.com/robot/send?access_token=232284dd1b239f3e05c'
itemid = get_itemid()
print itemid
pname_url=get_picture(itemid,pname)
print pname_url
send_msg(pname_url)```
三 微信报警
脚本
[root@kd-zabbix alertscripts]# cat weixin.py
#!/usr/bin/python
#_*_coding:utf-8 _*_


import urllib,urllib2
import json
import sys
import simplejson

reload(sys)
sys.setdefaultencoding('utf-8')


def gettoken(corpid,corpsecret):
    gettoken_url = 'https://weixin.qq.com/cgi-bin/gettoken?corpid=' + corpid + '&corpsecret=' + corpsecret
    print  gettoken_url
    try:
        token_file = urllib2.urlopen(gettoken_url)
    except urllib2.HTTPError as e:
        print e.code
        print e.read().decode("utf8")
        sys.exit()
    token_data = token_file.read().decode('utf-8')
    token_json = json.loads(token_data)
    token_json.keys()
    token = token_json['access_token']
    return token


def senddata(access_token,user,subject,content):

    send_url = 'https://weixin.qq.com/cgi-bin/message/send?access_token=' + access_token
    send_values = {
        "touser":"@all",
        "toparty":"2",
        "msgtype":"text",
        "agentid":"107",
        "text":{
            "content":subject + '\n' + content
           },
        "safe":"0"
        }
#    send_data = json.dumps(send_values, ensure_ascii=False)
    send_data = simplejson.dumps(send_values, ensure_ascii=False).encode('utf-8')
    send_request = urllib2.Request(send_url, send_data)
    response = json.loads(urllib2.urlopen(send_request).read())
    print str(response)


if __name__ == '__main__':
    user = str(sys.argv[1])
    subject = str(sys.argv[2])
    content = str(sys.argv[3])

    corpid =  'Aww3'
    corpsecret = 'AaI6YaWMM4'
    accesstoken = gettoken(corpid,corpsecret)
    senddata(accesstoken,user,subject,content)

四 设置告警动作
当有事件发生,我们可以根据事件来执行相应的动作,根据事件来源可以分为触发器动作,自动发现动作,自动注册动作,内部事件动作,自动发现动作在之前的自动发现那里讲过了,这里介绍一下触发器动作,当触发器事件达到执行动作的必要条件,会执行相应的动作
4.1 动作

4.2 操作

4.3 恢复操作

完成后,添加动作就可。
