1.表视图 UITableView
作用:实现以一列多行的形式来显示大量的数据的一种视图,父类是UIScrollView
表格的样式:
-行之间没有间距,普通样式 Plain 样式
-可以将行分组(区),分组样式Group样式
表格的组成
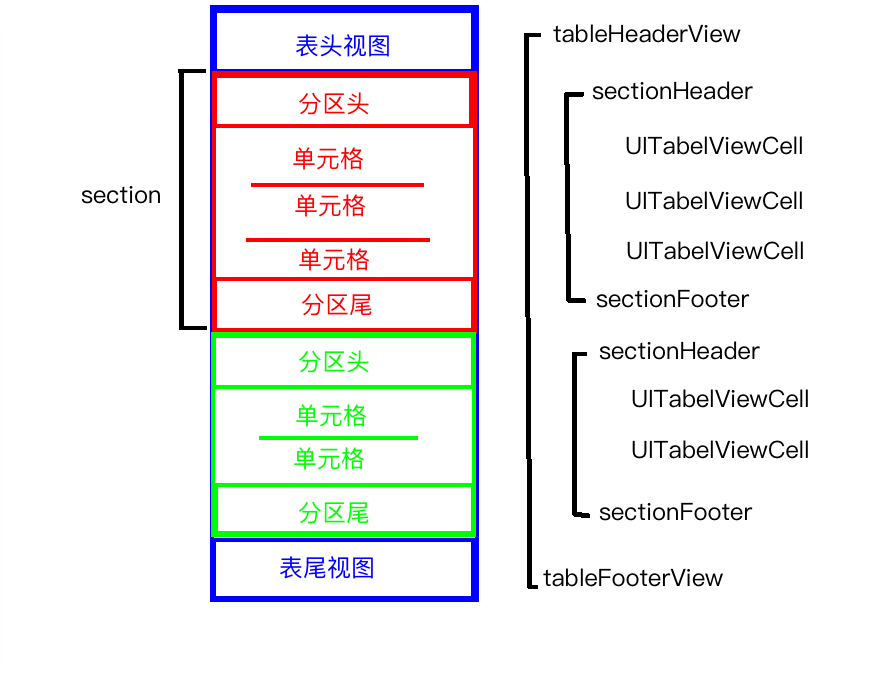
如何使用UITableView
-1.创建实例 并设置 frame 及 样式
-2.添加到 父视图中
-3.设置 tableView的DataSource代理
–三问:
—问1:有几个分区
—-numberOfSectionsInTableView
—问2:每个分区有多少行
—-numberOfRowsInSection
—问3:每行长什么样子
—-cellForRowAtIndexPath
-4.设置 tableView的Delegate代理
-一答:
–点中某行如何处理
–didSelectRowAtIndexPath
- (void)viewDidLoad {
    [super viewDidLoad];
    UITableView *tableView = [[UITableView alloc]initWithFrame:self.view.frame style:UITableViewStylePlain];

    //设置表头视图
    UIView *headerView = [[UIView alloc]initWithFrame:CGRectMake(0, 0, 0, 200)];
    headerView.backgroundColor = [UIColor redColor];
    tableView.tableHeaderView = headerView;
    //设置表尾视图
    UIView *footerView = [[UIView alloc]initWithFrame:CGRectMake(0, 0, 0, 200)];
    footerView.backgroundColor = [UIColor blueColor];
    tableView.tableFooterView = footerView;

    //设置tableView的数据源
    tableView.dataSource = self;
    //设置tableView的Delegate
    tableView.delegate = self;

    [self.view addSubview:tableView];
}

//答一 点中某行如何出来
//点中 tableView 某行时会调用该方法 (Delegate 的代理方法)
-(void)tableView:(UITableView *)tableView didSelectRowAtIndexPath:(NSIndexPath *)indexPath {
    NSLog(@"点中了%ld分区的%ld行单元格",indexPath.section,indexPath.row);
}

//某一行 被反选时调用 (Delegate 的代理方法)
-(void)tableView:(UITableView *)tableView didDeselectRowAtIndexPath:(NSIndexPath *)indexPath {
     NSLog(@"%ld分区的%ld行单元格 被反选了",indexPath.section,indexPath.row);
}

//问一 有多少个分区  (DataSource 的代理方法)
-(NSInteger)numberOfSectionsInTableView:(UITableView *)tableView {
    return 2;
}
//问二 每个分区有多少行  (DataSource 的代理方法)
-(NSInteger)tableView:(UITableView *)tableView numberOfRowsInSection:(NSInteger)section {
    if (section == 0)return 8;
    return 10;
}
//问三 每行长什么样  (DataSource 的代理方法)
-(UITableViewCell *)tableView:(UITableView *)tableView cellForRowAtIndexPath:(NSIndexPath *)indexPath {
//    indexPath 该参数中 存了 分区号 和 行号
    UITableViewCell *cell = [[UITableViewCell alloc]init];
    if (indexPath.section == 0) {
        if (indexPath.row == 0) {
            cell.textLabel.text = @"你好吗??";
        }else {
            cell.textLabel.text = @"这是一个单元格";
        }
        return cell;
    }
    // 分区号 为 1 的分区
    if (indexPath.row == 0) {
        cell.textLabel.text = @"我不好!!!!";
    }else {
        cell.textLabel.text = @"这是第二个分区";
    }
    return cell;
}

////设置分区头的 文本内容  (DataSource 的代理方法)
//-(NSString*)tableView:(UITableView *)tableView titleForHeaderInSection:(NSInteger)section{
//    if (section == 0) {
//        return @"这是第一个分区头";
//    }
//    return @"这是第二个分区头";
//}
////设置分区尾的 文本内容 (DataSource 的代理方法)
//- (NSString*)tableView:(UITableView *)tableView titleForFooterInSection:(NSInteger)section {
//    if (section == 0) {
//        return @"这是第一个分区尾";
//    }
//    return @"这是第二个分区尾";
//}


//设置分区头的 视图  (Delegate 的代理方法)
-(UIView*)tableView:(UITableView *)tableView viewForHeaderInSection:(NSInteger)section {
    UIView *view = [[UIView alloc]init];
    view.frame = CGRectMake(0, 0, tableView.frame.size.width, 60);
    view.backgroundColor = [UIColor greenColor];

    UILabel *label = [[UILabel alloc]initWithFrame:view.frame];
    label.font = [UIFont systemFontOfSize:30];
    label.textColor = [UIColor redColor];
    label.textAlignment = NSTextAlignmentCenter;
    label.text = [NSString stringWithFormat:@"这是第%ld个分区", section + 1];

    [view addSubview:label];

    return view;
}

//设置 分区头的高度
-(CGFloat)tableView:(UITableView *)tableView heightForHeaderInSection:(NSInteger)section {
    return 60;
}
2.表视图控制 UITableViewController
使用:
新建一个类,继承UITableViewController,只需要关注三问一答
3.UITableViewCell的组成
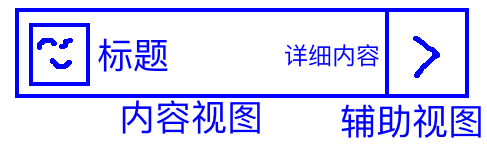
内容视图
-系统版
–已经提供了三个可用的控件,用于显示文字或图片,可以通过cell的
—-textLabel
—-detailTextLabel
—-imageView
创建cell时,通过style参数限定三个控件的摆放位置
-四款:
—-Default:没有详细
—-Value1: 详细在右边
—-Value2: 没有imageview
—-subtitle:详细在下面
-自定义:
–辅助视图
–系统版
–通过cell的accessoryType属性设置
-四款
—-checkmark 对勾
—-disclosureIndicator 大于号
—-detailButton 圆圈i
—-detailDisclosureButton 圆圈i + 大于号
-自定义
3.单元格的重用
重用方式一:
核心:如果没有取出,自己创建
原理:系统会将那么超出屏幕,看不见的单元格对象回到到tableView的一个队列中存储,在需要一个cell对象先尝试从队列中取,看有没有已经回收的cell,如果有把这个cell从队列中取出继续使用,如果没有没有我们就创建新的cell
- (UITableViewCell *)tableView:(UITableView *)tableView cellForRowAtIndexPath:(NSIndexPath *)indexPath {
    //从tableView 的空闲队列中 取出名字叫张三的 cell
    UITableViewCell *cell = [tableView dequeueReusableCellWithIdentifier:@"Identifier"];
    //如果没有取到 就自己创建一个
    if (cell == nil) {
        static int i = 0;
        NSLog(@"i = %d",i++);
        cell = [[UITableViewCell alloc]initWithStyle:UITableViewCellStyleDefault reuseIdentifier:@"Identifier"];
    }
    cell.textLabel.text = @"这是一个单元格";
    return cell;
}