一、RemoteViews的应用
RemoteViews在实际的开发中,主要用在通知栏和桌面小部件的开发过程中。通知栏每个人都不陌生,主要是通过NotificationManager的notify方法去实现的,它除了默认效果外,还可以另外自定义布局。桌面小部件则是通过AppWidgetProvider来实现的,AppWidgetProvider本质上就是一个广播。通知栏和桌面小部件的开发过程中都会用到RemoteViews,它们在更新界面时无法像在Activity里面那样直接更新View,这是因为两者的界面都运行在其它进程中,确切来说是系统的SystemService进程。为了跨进程更新界面,RemoteViews提供了一系列的set方法,并且这些方法只是View全部方法的子集,另外RemoteViews中所支持的View类型也是有限的。
下面简单介绍下RemoteViews在通知栏和桌面小部件中的使用方法。
1.RemoteViews在通知栏上的应用
首先来看下通知栏,我们先了解一下系统默认的样式
String title = "通知标题";
String content = "通知内容";
String id = "channel_id_01";
String name="channel_id_01_name";
Context context = getApplication();
NotificationManager notificationManager = (NotificationManager) context.getSystemService(Context.NOTIFICATION_SERVICE);
Notification notification = null;
if (Build.VERSION.SDK_INT >= Build.VERSION_CODES.O) {//解决android9.0上通知不显示的问题。
NotificationChannel mChannel = new NotificationChannel(id, name, NotificationManager.IMPORTANCE_LOW);
notificationManager.createNotificationChannel(mChannel);
Intent intent = new Intent(this, testCustomViewActivity.class);
PendingIntent pendingIntent = PendingIntent.getActivity(this, 0, intent, PendingIntent.FLAG_UPDATE_CURRENT);
//新的sdk中找不到这个方法了。会报错
//notification.setLatestEventInfo(this, "Test", "This is Notification", pendingIntent);
notification = new Notification.Builder(context)
.setChannelId(id)
.setContentTitle(title)
.setContentText(content)
.setContentIntent(pendingIntent)//设置跳转到指定的activity
.setAutoCancel(true)//设置点击跳转后自动清除消息
.setSmallIcon(R.mipmap.ic_launcher).build();
} else {
NotificationCompat.Builder notificationBuilder = new NotificationCompat.Builder(context)
.setContentTitle(title)
.setContentText(content)
.setSmallIcon(R.mipmap.ic_launcher)
.setOngoing(true);
notification = notificationBuilder.build();
}
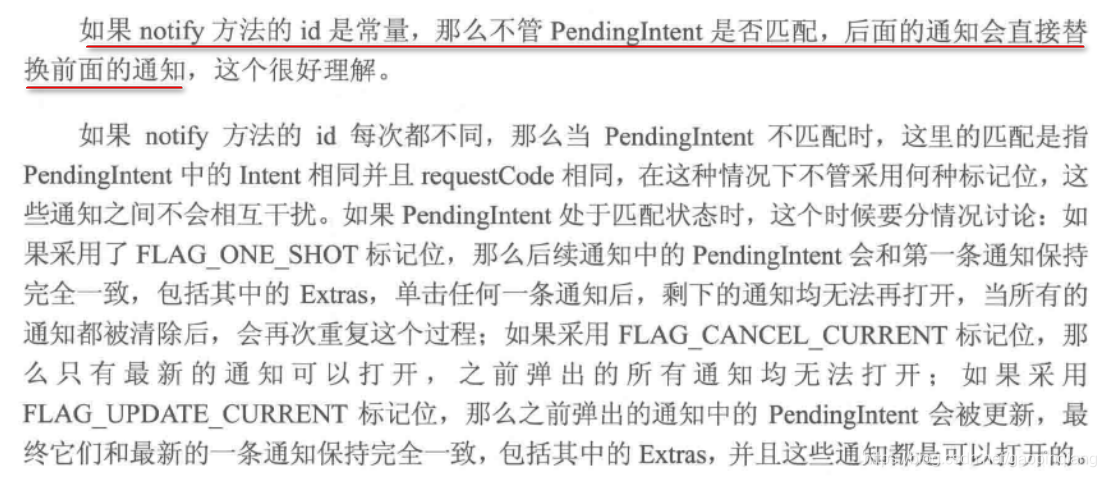
notificationManager.notify(1008, notification);//注意第一个参数如果是一个常量,那么每次通知都覆盖。如果每次都不同,在通知栏就会出现多个消息
上面会弹出一个系统的默认的通知(兼容了android9.0)。点击通知的时候会跳转到指定的activity,并且清除本身。
效果如下:

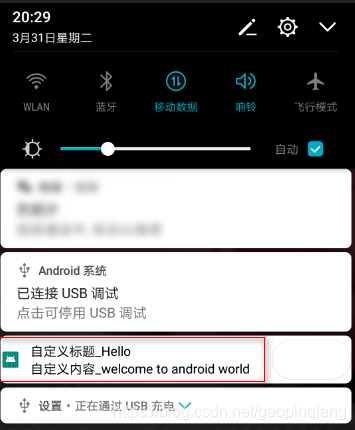
为了满足个性化需求,我们还可能会用到自定义通知。自定义通知也很简单,首先我们要提供一个布局文件,然后通过RemoteViews来加载这个布局文件改变通知的样式,代码如下所示:
		String id = "channel_id_01";
        String name="channel_id_01_name";
        Context context = getApplication();
        NotificationManager notificationManager = (NotificationManager) context.getSystemService(Context.NOTIFICATION_SERVICE);
        Notification notification = null;
        if (Build.VERSION.SDK_INT >= Build.VERSION_CODES.O) {//解决android9.0上通知不显示的问题。
            NotificationChannel mChannel = new NotificationChannel(id, name, NotificationManager.IMPORTANCE_LOW);
            notificationManager.createNotificationChannel(mChannel);

            /** 生成跳转的intent */
            Intent intent = new Intent(this, testCustomViewActivity.class);
            PendingIntent pendingIntent = PendingIntent.getActivity(this, 0, intent, PendingIntent.FLAG_UPDATE_CURRENT);

            /** 构造RemoteView */
            RemoteViews remoteViews = new RemoteViews(getPackageName(),R.layout.layout_notification);
            remoteViews.setTextViewText(R.id.tv_title,"自定义标题_Hello");
            remoteViews.setTextViewText(R.id.tv_content,"自定义内容_welcome to android world");
            remoteViews.setImageViewResource(R.id.iv_img,R.mipmap.ic_launcher);
            remoteViews.setOnClickPendingIntent(R.id.bt_confirm,pendingIntent);//给自定义view的按钮设置一个跳转监听,如果不设置,点击按钮就跳转不了

            notification = new Notification.Builder(context)
                    .setChannelId(id)
                    .setCustomContentView(remoteViews)//设置自定义的布局
                    .setContentIntent(pendingIntent)//设置跳转到指定的activity。这个和上面那个按钮的跳转都是生效的。
                    .setAutoCancel(true)//设置点击跳转后自动清除消息
                    .setSmallIcon(R.mipmap.ic_launcher).build();
        } else {

            /** 生成跳转的intent */
            Intent intent = new Intent(this, testCustomViewActivity.class);
            PendingIntent pendingIntent = PendingIntent.getActivity(this, 0, intent, PendingIntent.FLAG_UPDATE_CURRENT);

            /** 构造RemoteView */
            RemoteViews remoteViews = new RemoteViews(getPackageName(),R.layout.layout_notification);
            remoteViews.setTextViewText(R.id.tv_title,"自定义标题_Hello");
            remoteViews.setTextViewText(R.id.tv_content,"自定义内容_welcome to android world");
            remoteViews.setImageViewResource(R.id.iv_img,R.mipmap.ic_launcher);
            remoteViews.setOnClickPendingIntent(R.id.bt_confirm,pendingIntent);//给自定义view的按钮设置一个跳转监听,如果不设置,点击按钮就跳转不了

            NotificationCompat.Builder notificationBuilder = new NotificationCompat.Builder(context)
                    .setSmallIcon(R.mipmap.ic_launcher)
                    .setAutoCancel(true)//设置点击跳转后自动清除消息
                    .setCustomContentView(remoteViews)//设置自定义的布局
                    .setOngoing(true);
            notification = notificationBuilder.build();
        }

        /** 发送通知 */
        notificationManager.notify(1008, notification);
布局文件layout_notification.xml:
<?xml version="1.0" encoding="utf-8"?>
<LinearLayout xmlns:android="http://schemas.android.com/apk/res/android"
	android:id="@+id/ll_nf"
	android:layout_width="match_parent"
	android:layout_height="match_parent"
	android:gravity="center_vertical"
	android:orientation="horizontal">

	<ImageView
		android:id="@+id/iv_img"
		android:layout_width="20dp"
		android:layout_height="20dp"
		android:background="@mipmap/ic_launcher"
		/>

	<LinearLayout
		android:layout_width="0dp"
		android:layout_height="wrap_content"
		android:layout_weight="1"
		android:gravity="center_vertical"
		android:orientation="vertical"
		android:paddingLeft="10dp">

		<TextView
			android:id="@+id/tv_title"
			android:layout_width="wrap_content"
			android:layout_height="wrap_content"
			android:textColor="@android:color/black" />

		<TextView
			android:id="@+id/tv_content"
			android:layout_width="wrap_content"
			android:layout_height="wrap_content"
			android:textColor="@android:color/black" />


	</LinearLayout>
	<Button
		android:id="@+id/bt_confirm"
		android:layout_width="wrap_content"
		android:layout_height="wrap_content"
		android:text="OK"
		/>

</LinearLayout>
以上代码在Android9.0上测试通过。
注意:点击按钮跳转的时候,通知并不会自动清除。
效果如下:
关于PendingIntent,它表示的是一种待定的Intent,这个Intent中所包含的意图必须由用户来触发。为什么更新RemoteViews如此复杂呢?
直观原因是因为RemoteViews没有提供和View类似的findViewById这个方法,因此我们无法获取到RemoteViews中的子View,当然实际原因绝非如此,具体会在下面分析。
2.RemoteViews 在桌面小部件的应用
AppWidgetProvider是Android提供给的用于实现桌面小部件的类,其本质也就是一个广播,即BroadcastReceived。所以实际使用中把他看成一个广播即可,我们来看下怎么去具体的实现一个小部件。
1.定义小部件的界面
在res/layout下我们先写个widget.xml这里就是小部件的视图,内容如下:
<?xml version="1.0" encoding="utf-8"?>
<LinearLayout xmlns:android="http://schemas.android.com/apk/res/android"
android:layout_width="match_parent"
android:layout_height="wrap_content"
android:orientation="horizontal"
android:background="#ffffff"
>
<ImageView
android:id="@+id/iv1"
android:layout_width="wrap_content"
android:layout_height="30dp"
android:src="@mipmap/ic_launcher"
android:layout_marginTop="4dp"
/>
<LinearLayout
android:layout_width="match_parent"
android:layout_height="wrap_content"
android:orientation="vertical"
android:layout_marginLeft="8dp"
android:layout_marginTop="2dp"
android:layout_marginBottom="2dp"
>
<TextView
android:id="@+id/tv_singer"
android:layout_width="wrap_content"
android:layout_height="wrap_content"
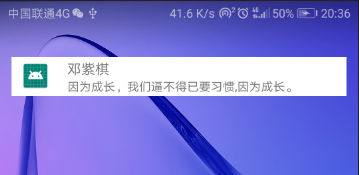
android:text="邓紫棋"
android:textSize="14dp" />
<TextView
android:id="@+id/tv_lyric"
android:layout_width="match_parent"
android:layout_height="wrap_content"
android:text="因为成长,我们逼不得已要习惯,因为成长。"
android:textSize="12dp"
/>
</LinearLayout>
</LinearLayout>
2.定义小部件配置信息
在res/xml/下中新建一个appwidget_provider_info.xml文件(名称是随意的,只要和后面的AndroidManifest中配置对应好就行)
<?xml version="1.0" encoding="utf-8"?>
<appwidget-provider xmlns:android="http://schemas.android.com/apk/res/android"
    android:initialLayout="@layout/widget"
    android:minWidth="250dp"
    android:minHeight="40dp"
    android:updatePeriodMillis="86400000">

</appwidget-provider>
上面的几个参数的含义很明确,android:initialLayout就是加载布局,其它两个就是最小的高宽,而updatePeriodMillis就是更新小组件的时间周期。
特别注意:这里的宽高比就是在桌面添加的比例(例如:4 x 1)
3.定义小部件的实现类
这个类需要继承AppWidgetProvider,代码如下(已经在android9.0上测试通过):
package com.example.appWidgetProvider;

import android.app.PendingIntent;
import android.appwidget.AppWidgetManager;
import android.appwidget.AppWidgetProvider;
import android.content.ComponentName;
import android.content.Context;
import android.content.Intent;
import android.graphics.Bitmap;
import android.graphics.BitmapFactory;
import android.graphics.Matrix;
import android.os.SystemClock;
import android.util.Log;
import android.widget.RemoteViews;
import android.widget.Toast;

import com.example.test.R;

public class MyAppWidgetProvider extends AppWidgetProvider {
    public static final String TAG = "MWP";
    public static final String CLICK_ACTION = "com.example.test.action.CLICK";

    private AppWidgetManager appWidgetManage;
    private float degree;
    private Bitmap bitmap;

    public MyAppWidgetProvider() {
        super();
    }


    @Override
    public void onReceive(final Context context, Intent intent) {
        super.onReceive(context, intent);
        String action = intent.getAction();
        Log.i(TAG, "onReceive , action:" + action);

        if (CLICK_ACTION.equals(action)) {
            Toast.makeText(context, "小部件接收到了自定义的点击事件,onReceive调用", Toast.LENGTH_SHORT).show();

            new Thread(new Runnable() {
                @Override
                public void run() {
                    bitmap = BitmapFactory.decodeResource(context.getResources(), R.mipmap.ic_launcher);

                    appWidgetManage = AppWidgetManager.getInstance(context);
                    for (int i = 0; i < 37; i++) {
                        degree = (i * 10) % 360;
                        RemoteViews remoteViews = new RemoteViews(context.getPackageName(), R.layout.widget);
                        remoteViews.setImageViewBitmap(R.id.iv1, rotateBitmap(bitmap,degree));
                        Intent intentClick = new Intent();
                        intentClick.setClass(context,MyAppWidgetProvider.class);
                        intentClick.setAction(CLICK_ACTION);
                        PendingIntent pendingIntent = PendingIntent.getBroadcast(context, 0, intentClick, 0);
                        remoteViews.setOnClickPendingIntent(R.id.iv1, pendingIntent);
                        appWidgetManage.updateAppWidget(new ComponentName(context, MyAppWidgetProvider.class), remoteViews);
                        SystemClock.sleep(30);
                    }
                }
            }).start();

        }
    }

    //每次更新都会调用
    @Override
    public void onUpdate(Context context, AppWidgetManager appWidgetManager, int[] appWidgetIds) {
        super.onUpdate(context, appWidgetManager, appWidgetIds);
        Log.i(TAG, "onUpdate");

        RemoteViews remoteViews = new RemoteViews(context.getPackageName(), R.layout.widget);
        Intent intentClick = new Intent();
        intentClick.setClass(context,MyAppWidgetProvider.class);//必须要添加这个,否则点击发送不了广播
        intentClick.setAction(CLICK_ACTION);
        PendingIntent pendingIntent = PendingIntent.getBroadcast(context, 0, intentClick, 0);//发送广播
//        Intent intent = new Intent(context, testCustomViewActivity.class);//跳转到指定的activity
//        PendingIntent pendingIntent = PendingIntent.getActivity(context, 0, intent, PendingIntent.FLAG_UPDATE_CURRENT);
        Log.d(TAG,"pendingIntent = " + pendingIntent);
        remoteViews.setOnClickPendingIntent(R.id.iv1, pendingIntent);

        appWidgetManage = AppWidgetManager.getInstance(context);
        appWidgetManage.updateAppWidget(new ComponentName(context, MyAppWidgetProvider.class), remoteViews);

    }

    //动画
    private Bitmap rotateBitmap(Bitmap srcBitmap ,float degree) {
        Bitmap temBitmap = null;
        try {
            Matrix matrix = new Matrix();
            matrix.reset();
            matrix.setRotate(degree);
            temBitmap = Bitmap.createBitmap(srcBitmap, 0, 0, srcBitmap.getWidth(), srcBitmap.getHeight(), matrix, true);
        } catch (Exception e) {
            Log.e(TAG,"error = " + e.getMessage());
        }
        return temBitmap;
    }

}
上面的代码实现一个类似歌词的页面,点击图标可以触发对应的点击事件。
4.在清单文件中声明小部件
最后一步,因为桌面小部件本质是一个广播组件,因此必须要在AndroidManifest中注册,如下:
<!--小部件 AppWidgetProvider-->
<receiver android:name="com.example.appWidgetProvider.MyAppWidgetProvider">
	<meta-data
		android:name="android.appwidget.provider"
		android:resource="@xml/appwidget_provider_info" />

	<intent-filter>
		<action android:name="com.example.test.action.CLICK" />
		<action android:name="android.appwidget.action.APPWIDGET_UPDATE" />
	</intent-filter>
</receiver>
上面的代码有两个Action,其中第一个是识别小部件的动作,第二个就是他的标识,必须存在,这是系统的规范
运行的效果如下:
我们还可以在activity中发送广播来更新小部件的View,例如我们在主页点击下按钮发送一个广播:
Intent intent = new Intent();
intent.setClass(this, MyAppWidgetProvider.class);
intent.setAction("com.example.test.action.CLICK");
sendBroadcast(intent);
实际测试,小部件中的onReceive可以正常回调
在实现小部件的过程中遇到过几个小地方需要注意下(在android9.0上,可能低版本不存在)
注意点:
1、在AndroidStudio中,默认创建的工程项目中有/res/mipmap-anydpi-v26这个文件夹 这个会导致 bitmap
= BitmapFactory.decodeResource(context.getResources(), R.mipmap.ic_launcher); 返回一个null,导致app挂掉。不能继续点击了。 解决方法:暂时把这个文件夹删除就OK了。
2、点击不能正常发送广播(onReceived不能回调) Intent intentClick = new Intent();
intentClick.setClass(context,MyAppWidgetProvider.class);//需要设置这个,书中的写法实际测试无效。
intentClick.setAction(CLICK_ACTION);
3、部件占用的宽高设置 在appwidget_provider_info.xml的宽高比例,决定了小部件在桌面上的
android:minWidth=“250dp”
android:minHeight=“40dp” 例如设置成上面比例,就是4 x 1
AppWidgetProvider 除了最常用的onUpdate方法,还有其他几个方法,onEnabled,onDisabled,onDeleted以及onReceive。这些方法都会被onReceive在适当的时候调用,所以含义如下:
- onEnabled:当该窗口小部件第一次添加到桌面的时候调用该方法,可添加多次但是只有第一次调用。
- onUpdate:小部件被添加或者第一次更新的时候都会调用一次该方法,小部件的更新机制由
- updatePeriodMillis来指定,每个周期小部件都会自动更新一次。
- onDeleted:每删除一次小部件就会调用一次。
- onDisabled:当最后一个该类型的桌面小部件被删除时调用该方法,注意是最后一个。
- onReceiver:这是广播的内置方法,用于分发具体的事件给其它方法。
关于AppWidgetProvider 的onReceiver方法的具体分发过程,可以参看源码中的实现,如下所示:
public void onReceive(Context context, Intent intent) {
	// Protect against rogue update broadcasts (not really a security issue,
	// just filter bad broacasts out so subclasses are less likely to crash).
	String action = intent.getAction();
	if (AppWidgetManager.ACTION_APPWIDGET_UPDATE.equals(action)) {
		Bundle extras = intent.getExtras();
		if (extras != null) {
			int[] appWidgetIds = extras.getIntArray(AppWidgetManager.EXTRA_APPWIDGET_IDS);
			if (appWidgetIds != null && appWidgetIds.length > 0) {
				this.onUpdate(context, AppWidgetManager.getInstance(context), appWidgetIds);
			}
		}
	} else if (AppWidgetManager.ACTION_APPWIDGET_DELETED.equals(action)) {
		Bundle extras = intent.getExtras();
		if (extras != null && extras.containsKey(AppWidgetManager.EXTRA_APPWIDGET_ID)) {
			final int appWidgetId = extras.getInt(AppWidgetManager.EXTRA_APPWIDGET_ID);
			this.onDeleted(context, new int[] { appWidgetId });
		}
	} else if (AppWidgetManager.ACTION_APPWIDGET_OPTIONS_CHANGED.equals(action)) {
		Bundle extras = intent.getExtras();
		if (extras != null && extras.containsKey(AppWidgetManager.EXTRA_APPWIDGET_ID)
				&& extras.containsKey(AppWidgetManager.EXTRA_APPWIDGET_OPTIONS)) {
			int appWidgetId = extras.getInt(AppWidgetManager.EXTRA_APPWIDGET_ID);
			Bundle widgetExtras = extras.getBundle(AppWidgetManager.EXTRA_APPWIDGET_OPTIONS);
			this.onAppWidgetOptionsChanged(context, AppWidgetManager.getInstance(context),
					appWidgetId, widgetExtras);
		}
	} else if (AppWidgetManager.ACTION_APPWIDGET_ENABLED.equals(action)) {
		this.onEnabled(context);
	} else if (AppWidgetManager.ACTION_APPWIDGET_DISABLED.equals(action)) {
		this.onDisabled(context);
	} else if (AppWidgetManager.ACTION_APPWIDGET_RESTORED.equals(action)) {
		Bundle extras = intent.getExtras();
		if (extras != null) {
			int[] oldIds = extras.getIntArray(AppWidgetManager.EXTRA_APPWIDGET_OLD_IDS);
			int[] newIds = extras.getIntArray(AppWidgetManager.EXTRA_APPWIDGET_IDS);
			if (oldIds != null && oldIds.length > 0) {
				this.onRestored(context, oldIds, newIds);
				this.onUpdate(context, AppWidgetManager.getInstance(context), newIds);
			}
		}
	}
}
上面描述了开发一个桌面小部件的典型过程 ,例子比较简单,实际开发过程中会稍微复杂一些,但是开发流程都是一样的。
可以发现,桌面小部件在界面上的操作都要通过RemoteViews,不管是小部件的界面初始化还是界面更新都必须依赖它。
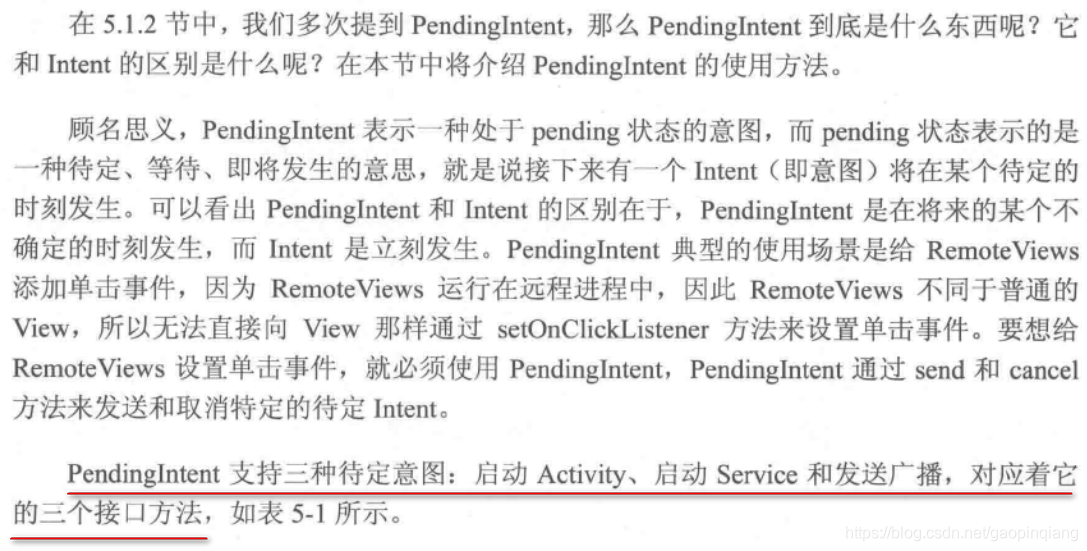
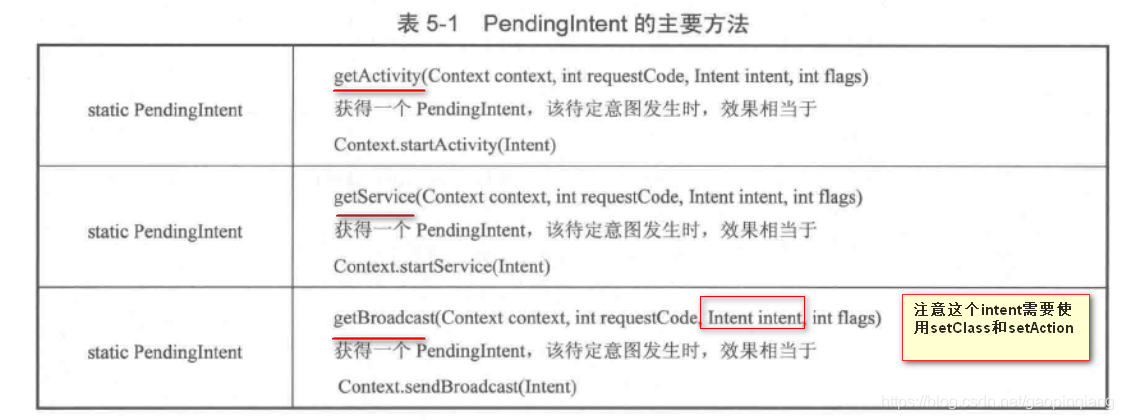
3.PendingIntent概述
如图中所示,这三个方法的参数都是一样的,主要理解的是第二个参数requstCode和第四个参数flags,code代表的是发送码,多数情况下为0,而且code会影响到flag,flag常见的有几种我们下面会说,其实最主要是理解匹配规则,
PendingIntent的匹配规则为:如果两个PendingIntent他们内部的Intent相同并且requstCode也相同的话,那么PendingIntent就是相同的,code比较好理解,那什么情况下Intent相同呢,Intent的匹配规则是:如果两个Intent的ComponentName的匹配过程,只要Intent之间的ComponentName和intent-filter相同,那么这两个intent就相同,需要注意的是Extras不参与匹配过程,只要intent之间的name和intent-filter相同就行,我们再来说下flags的参数含义
- FLAG_ONE_SHOT
当前描述的PendingIntent只能被使用一次,然后他就会被cancel,如果后续还有相同的PendingIntent,那么他的send方法就会失败,对于通知栏的消息来说,如果采用此标记位,那么同类的通知只能使用一次,后续将无法打开
- FLAG_NO_CREATE
当前描述的PendingIntent不会主动去创建,如果当前PendingIntent之前不存在,那么getActivity等方法都会直接返回null,即获取PendingIntent失败,这个标记位很少见,他无法单独使用,因此在日常开发当中,并没有太多的意义,这里就不过多的介绍了
- FLAG_CANCEL_CURRENT
当前描述的PendingIntent如果已经存在,那么就会被cancel,然后系统创建一个新的PendingIntent,对于通知栏来说,那些被cancel的消息将无法被打开
- FLAG_UPDATE_CURRENT
当前描述的PendingIntent如果已经存在的话,那么他们就会被更新,他们的intent中的extras会被替换成新的