学习Springboot 中,现在看到了Springboot的自动配置。感觉摸到了一点点门路。现在记录一下。附带一个 jedis 的自动配置。因为 redis 已经有了 redis-template-starter。所以自己搞了个jedis-stater . (●’◡’●)
自动配置原理
我们Spring boot 项目启动的时候。 主程序类 上有 @SpringBootApplication 注解。这个注解中存在
@Target({ElementType.TYPE})
@Retention(RetentionPolicy.RUNTIME)
@Documented
@Inherited
@SpringBootConfiguration
@EnableAutoConfiguration
@ComponentScan(
    excludeFilters = {@Filter(
    type = FilterType.CUSTOM,
    classes = {TypeExcludeFilter.class}
), @Filter(
    type = FilterType.CUSTOM,
    classes = {AutoConfigurationExcludeFilter.class}
)}
)
@EnableAutoConfiguration 注解。 这个注解,贴一段官方文档的话。
11.3.2 The @EnableAutoConfiguration Annotation
The second class-level annotation is @EnableAutoConfiguration. This annotation tells Spring Boot to “guess” how you want to configure Spring, based on the jar dependencies that you have added. Since spring-boot-starter-web added Tomcat and Spring MVC, the auto-configuration assumes that you are developing a web application and sets up Spring accordingly.
Starters and Auto-configuration
Auto-configuration is designed to work well with “Starters”, but the two concepts are not directly tied. You are free to pick and choose jar dependencies outside of the starters. Spring Boot still does its best to auto-configure your application.
使用谷歌翻译。翻译出来的大概意思就是
这个注解会根据你引入的 jar 依赖来猜测您所需要的配置
启动器和自动配置
自动配置旨在与“启动器”配合使用,但是这两个概念并没有直接联系在一起。您可以在启动程序之外自由选择jar依赖项。Spring Boot仍会尽其所能自动配置您的应用程序。
其实意思就是,SpringBoot 会根据你引入的spring-boot-starter-xxx 这种类。进行一个自动配置。
那么我们来看一看这个@EnableAutoConfiguration 注解中有什么吧?
@Target({ElementType.TYPE})
@Retention(RetentionPolicy.RUNTIME)
@Documented
@Inherited
@AutoConfigurationPackage
@Import({AutoConfigurationImportSelector.class})
AutoConfigurationPackage注解的作用是将 添加该注解的类所在的package 作为 自动配置package 进行管理。
那么 @Import 注解的作用是引入 AutoConfigurationImportSelectort.class 作为一个配置类。类似于平时Spring 中的 xml 配置
这个类 实现了DeferredImportSelector 类。 这个 类呢又继承了 ImportSelector . 那么我们知道 这个接口中有一个 selectImports 方法, 返回值为 一个 数组。 这个接口的作用就是 如果通过 @Import 这个注解引入一个 实现了 ImportSelector 的类, 那么就会往 IOC 容器中注入这个 方法返回值String 数组的的所有 bean 对象
我们回到 AutoConfigurationImportSelector 类下。 找到 selectImports ,发现调用了getAutoConfigurationEntry 方法。
public String[] selectImports(AnnotationMetadata annotationMetadata) {
        if (!this.isEnabled(annotationMetadata)) {
            return NO_IMPORTS;
        } else {
            AutoConfigurationMetadata autoConfigurationMetadata = AutoConfigurationMetadataLoader.loadMetadata(this.beanClassLoader);
            AutoConfigurationImportSelector.AutoConfigurationEntry autoConfigurationEntry = this.getAutoConfigurationEntry(autoConfigurationMetadata, annotationMetadata);
            return StringUtils.toStringArray(autoConfigurationEntry.getConfigurations());
        }
    }
打开 getAutoConfigurationEntry

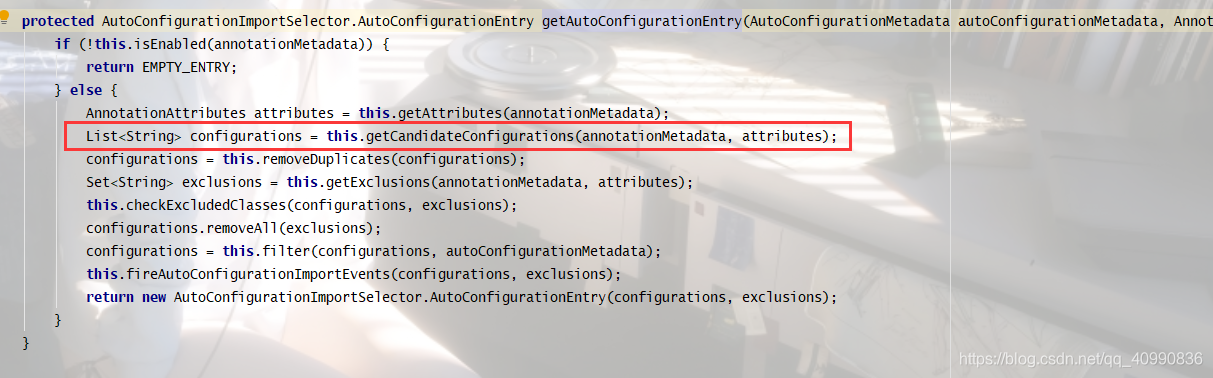
找到getCandidateConfigurations 方法
    protected List<String> getCandidateConfigurations(AnnotationMetadata metadata, AnnotationAttributes attributes) {
        List<String> configurations = SpringFactoriesLoader.loadFactoryNames(this.getSpringFactoriesLoaderFactoryClass(), this.getBeanClassLoader());
        Assert.notEmpty(configurations, "No auto configuration classes found in META-INF/spring.factories. If you are using a custom packaging, make sure that file is correct.");
        return configurations;
    }
在return configurations 打上端点, configurations 是一个集合。 运行 启动类。
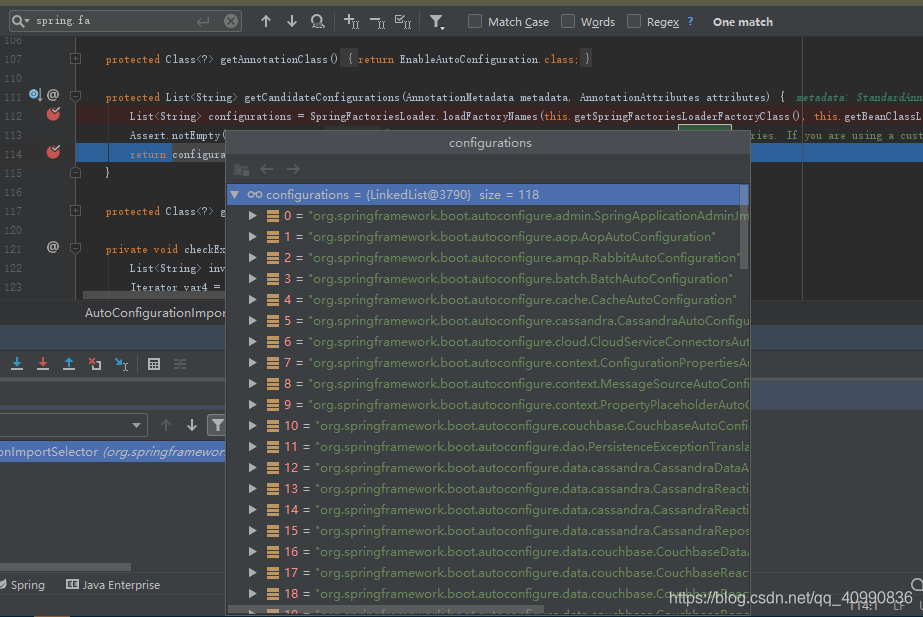
发现这个集合中存在 118 个可以自动配置的类。那么这么多在哪里呢?
我们找到maven的依赖中有一个 有一个
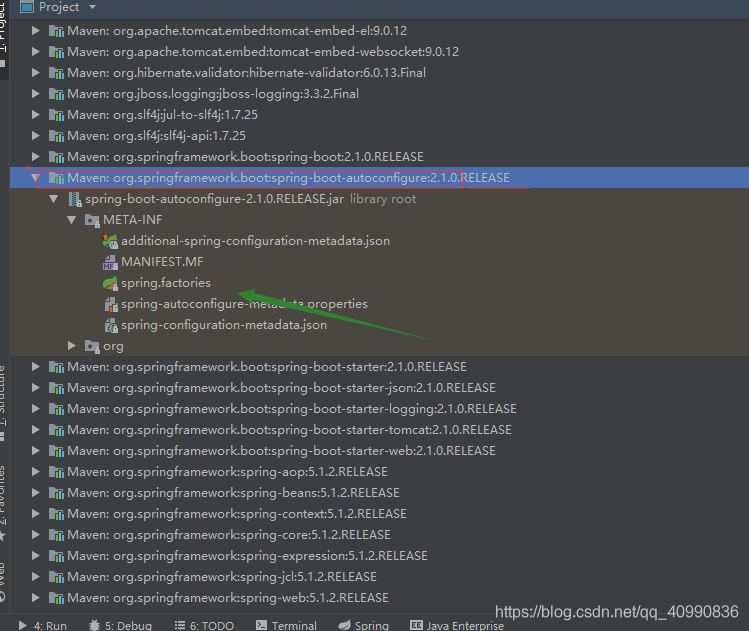
spring.factories 点开这个文件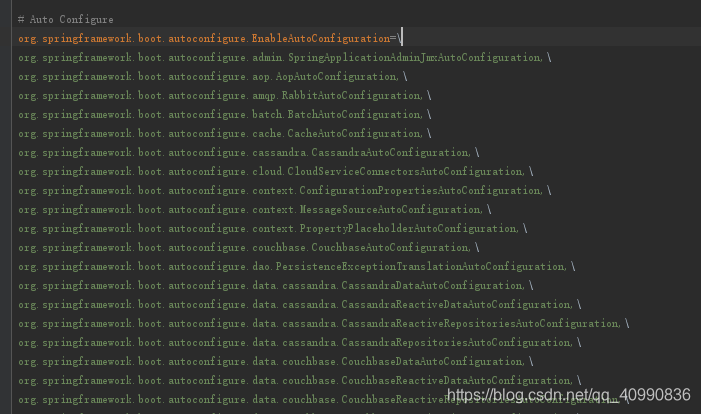
发现有一个注解类下面的就是我们刚才集合中获取到的这么多 自动配置类。
我们随便找一个自动配置类进行看看什么样子的吧
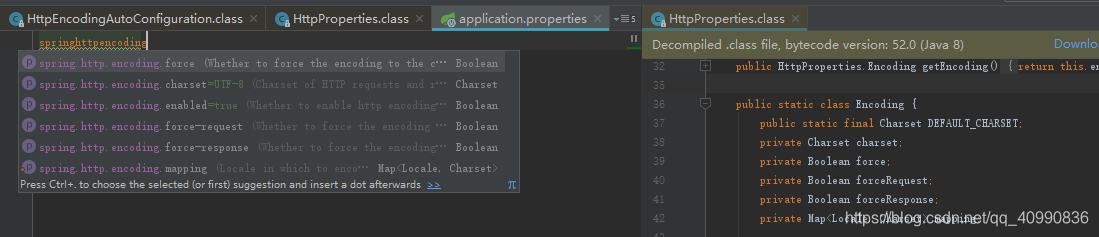
HttpEncodingAutoConfiguration.class
@Configuration
@EnableConfigurationProperties({HttpProperties.class})
@ConditionalOnWebApplication(
    type = Type.SERVLET
)
@ConditionalOnClass({CharacterEncodingFilter.class})
@ConditionalOnProperty(
    prefix = "spring.http.encoding",
    value = {"enabled"},
    matchIfMissing = true
)
@Configuration表示这是一个配置类。
@EnableConfigurationProperties({HttpProperties.class}) 表示指定类的ConfigurationProperties功能,将配置文件中的值和HttpProperties对应起来。并且把这个Properties类加入到容器中
下面的 @ConditionalOn 都是条件类型的注解
我们来点开这个 Properties类中都有什么属性。
@ConfigurationProperties(
    prefix = "spring.http"
)
这个注解表明。该Properties下的类的属性都以spring.http.为前缀
public class HttpProperties {
    private boolean logRequestDetails;
    private final HttpProperties.Encoding encoding = new HttpProperties.Encoding();

    public static class Encoding {
        public static final Charset DEFAULT_CHARSET;
        private Charset charset;
        private Boolean force;
        private Boolean forceRequest;
        private Boolean forceResponse;
        private Map<Locale, Charset> mapping;

        public static enum Type {
            REQUEST,
            RESPONSE;

            private Type() {
            }
        }
    }
}
类中的 get,set以及其他的方法我去掉了。根据这些属性我们就可以知道应该在 application.properties 和 application.yml 中配置什么东西了。

大概明白了之后。那么我们是否可以自己配置一个 starter 启动器呢?
下面我们来自己手动配置一个 jedis 的配置。需要配置的一些配置项是我从网上找来的。(●’◡’●)
首先创建一个 空的项目工程。
然后创建一个 module , 名称叫做 jedis-spring-boot-starter-autoconfigurer.
pom.xml 引入
    <dependencies>
        <!-- https://mvnrepository.com/artifact/redis.clients/jedis -->
        <dependency>
            <groupId>redis.clients</groupId>
            <artifactId>jedis</artifactId>
            <version>3.0.1</version>
        </dependency>
        <dependency>
            <groupId>org.springframework.boot</groupId>
            <artifactId>spring-boot-configuration-processor</artifactId>
            <optional>true</optional>
        </dependency>
        <dependency>
            <groupId>org.springframework.boot</groupId>
            <artifactId>spring-boot-starter</artifactId>
        </dependency>
    </dependencies>
只有引入了 configuration-processor 依赖,才会在配置文件中出现提示功能
创建JedisPoolProperties.java
@ConfigurationProperties(prefix = "jedis.cache")
public class JedisPoolProperties {

    private String host = "localhost";
    private Integer port = 5671;
    private Integer maxTotal = 500;
    private Integer minIdle = 100;
    private Integer maxIdle = 100;
    private Integer maxWaitMillis = 3*1000;
    private boolean testOnBorrow = true;
    private boolean testOnReturn = true;
    private Integer minEvictableIdleTimeMillis = 500;
    private Integer softMinEvictableIdleTimeMillis = 1000;
    private Integer timeBetweenEvictionRunsMillis = 1000;
    private boolean testOnCreate = false;
    private Integer numTestsPerEvictionRun = 100;
    private Boolean testWhileIdle = true;

    public Boolean getTestWhileIdle() {
        return testWhileIdle;
    }
}
省略 get set 方法
创建JedisAutoConfiguration.java
@Configuration
@ConditionalOnWebApplication
@EnableConfigurationProperties(JedisPoolProperties.class)
public class JedisPoolConfiguration {
    @Autowired
    JedisPoolProperties jedisPoolProperties;
    @Bean
    public JedisPool jedisPool(){
        JedisPoolConfig poolConfig = new JedisPoolConfig();
        poolConfig.setMaxTotal(jedisPoolProperties.getMaxTotal());
        //控制一个pool最多有多少个状态为idle(空闲的)的jedis实例。
        poolConfig.setMaxIdle(jedisPoolProperties.getMaxIdle());
        poolConfig.setMinIdle(jedisPoolProperties.getMinIdle());
        //表示当borrow(引入)一个jedis实例时,最大的等待时间,如果超过等待时间,则直接抛出JedisConnectionException;
        poolConfig.setMaxWaitMillis(jedisPoolProperties.getMaxWaitMillis());
        // 在borrow一个jedis实例时,是否提前进行alidate操作;如果为true,则得到的jedis实例均是可用的;
        poolConfig.setTestOnBorrow(jedisPoolProperties.getTestOnBorrow());
        // 在还会给pool时,是否提前进行validate操作
        poolConfig.setTestOnReturn(jedisPoolProperties.getTestOnReturn());
        poolConfig.setTestWhileIdle(jedisPoolProperties.getTestWhileIdle());
        poolConfig.setMinEvictableIdleTimeMillis(jedisPoolProperties.getMinEvictableIdleTimeMillis());
        poolConfig.setSoftMinEvictableIdleTimeMillis(jedisPoolProperties.getSoftMinEvictableIdleTimeMillis());
        poolConfig.setTimeBetweenEvictionRunsMillis(jedisPoolProperties.getTimeBetweenEvictionRunsMillis());
        poolConfig.setTestOnCreate(jedisPoolProperties.getTestOnCreate());
        poolConfig.setNumTestsPerEvictionRun(jedisPoolProperties.getNumTestsPerEvictionRun());
        return new JedisPool(poolConfig,jedisPoolProperties.getHost(),jedisPoolProperties.getPort());
    }
}
在resource下创建 META-INF文件夹,然后在创建 spring.factories
通过 maven 工具将 moudle 打成 jar 包
在创建一个moudle jedis-spring-boot-starter
pom.xml
    <dependencies>
        <dependency>
            <groupId>com.fllday.starter</groupId>
            <artifactId>jedis-spring-boot-starter-autoconfigurer</artifactId>
            <version>1.0-SNAPSHOT</version>
        </dependency>
    </dependencies>
只需要引入 刚刚的打的 install 依赖就可以了。 然后在你需要的项目工程中。
只能是本地哦。
你需要的项目中添加依赖
<dependency>
   <groupId>com.fllday.starter</groupId>
   <artifactId>jedis-spring-boot-starter</artifactId>
   <version>1.0-SNAPSHOT</version>
</dependency>
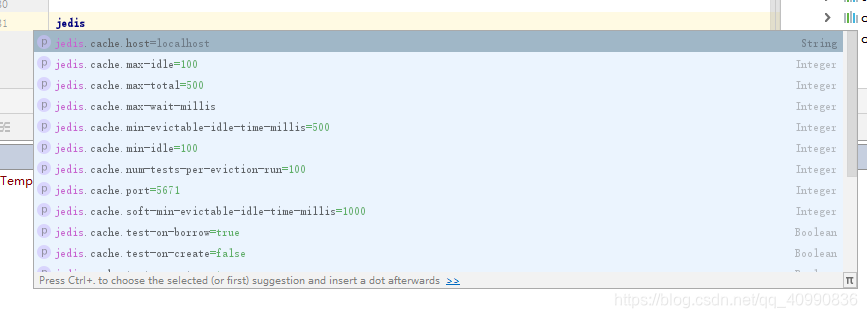
然后在你项目中的 配置文件中就会出现你刚刚配置的哪些东西拉。 我的 默认端口 设置的是 5671, 但是 redis 的默认端口是 6379 好像是。 你启动以下,看看是否报错。就知道啦。
自动配置就这结束啦。谢谢看的小伙伴
