Rabbit MQ
RabbitMQ是一个消息代理:它接受和转发消息。 你可以把它想象成一个邮局,RabbitMQ是邮箱,邮局和邮递员。
几个重要概念
- 生产者(Producer):消息发送者即为生产者
- 消息队列(Queue):本质上是一个消息缓冲区,可以理解成邮箱,容量受限于主机内存和磁盘;多个生产者可以往同一个消息队列发消息,多个消费者可以从同一个消息队列接收消息
- 消费者(Consumer):消息接收者即为消费者
- 代理(Broker):中间人,它接受消息,转发消息
通常情况下,Producer,Consumer,Broker它们都不在同一台主机上。
Tutorial 1 - Hello Rabbit MQ
本例使用:rabbitmq_server-3.7.4, Intellij Idea; 并且Producer,Broker,Consumer都在统一电脑上。
(1)Broker:直接使用本机,Rabbit MQ Server安装(见下面安装部分)完成后,直接从开始菜单“RabbitMQ Service - start”启动服务。(2)实现Publisher,通过一个线程,每隔5s发送一条消息到Broker。(3)实现Consumer,从Broker接收消息。
Rabbit MQ安装
下载并安装Erlang
添加环境变量:ERLANG_HOME=D:\Program Files\erl9.3
path添加:%ERLANG_HOME%\bin
下载安装Rabbit MQ
- 确保Erlang cookie一致:
To ensure Erlang cookie files contain the same string, copy the .erlang.cookie file from the Windows service directory [%USERPROFILE%.erlang.cookie (usually C:\WINDOWS\system32\config\systemprofile)] to replace the user .erlang.cookie[%HOMEDRIVE%%HOMEPATH%.erlang.cookie (usually C:\Users\%USERNAME%.erlang.cookie for user %USERNAME%)].
注意它们俩之间的版本对应关系。
Rabbit MQ Service运行
安装完成之后,在开始菜单上有常用命令的快捷方式:
RabbitMQ Service - start
RabbitMQ Service - stop
RabbitMQ Command Prompt(sbin dir)
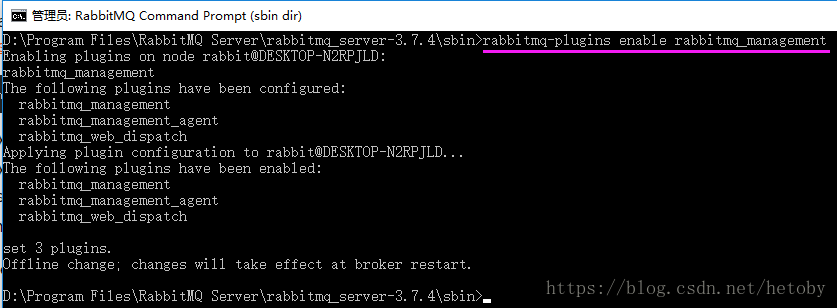
通过RabbitMQ Command Prompt(sbin dir)开启management plugin:rabbitmq-plugins enable rabbitmq_management
PS: 装该plugin遇到过:
问题1 - “Failed to create cookie file ‘h:/.erlang.cookie’: enoent”这样的问题,解决方案,设置cookie所在的目录,如下:
//我这里是:C:\Users\%USERNAME%
set HOMEDRIVE=[location of ".erlang.cookie"]
rabbitmq-plugins.bat enable rabbitmq_management
问题2 - 运行rabbitmqctl status命令,报错:*empd reports: node ‘rabbit’ not running at all no other nodes on XXX.
解决方案步骤如下:
1)停止rabbitmq服务
2)清空c:\user\%USERNAME%\AppData\Roaming\RabbitMQ\log
3)重启rabbitmq服务
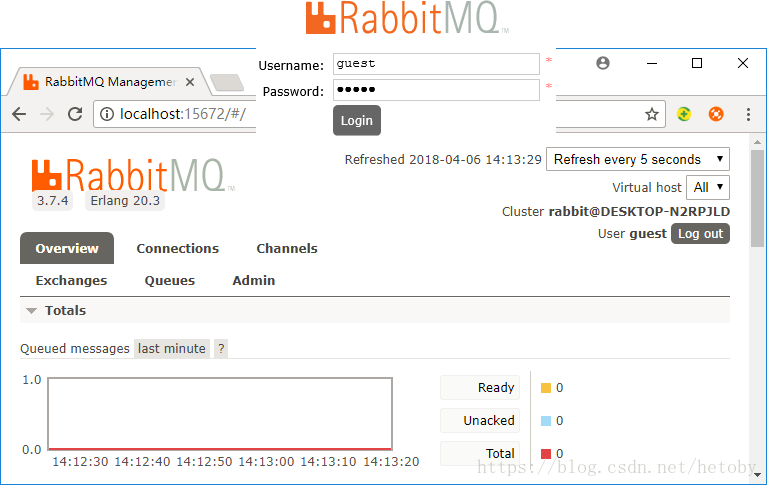
这样就可以通过http://localhost:15672使用RabbitMQ management
使用默认的user=guest,password=guest登录
想要了解RabbitMQ使用的相关端口,参见http://www.rabbitmq.com/install-windows.html页面。
通过 RabbitMQ Service - start启动服务,这就相当于把代理(broker)运行起来了,Producer就可以往它发送message,而Consumer也可以从它接收message。
实现Publisher(Publisher往Broker发送消息)
- 运行Intellij Idea 创建一个maven的quickstart类型的项目
POM.xml依赖如下

<!--
    rabbit mq client depend on SLF4J API and SLF4J Simple
    Please note SLF4J Simple is enough for these tutorials
    but you should use a full-blown logging library
    like Logback in production.
-->
<dependencies>
    <dependency>
      <groupId>com.rabbitmq</groupId>
      <artifactId>amqp-client</artifactId>
      <version>5.2.0</version>
    </dependency>
    <dependency>
      <groupId>org.slf4j</groupId>
      <artifactId>slf4j-api</artifactId>
      <version>1.7.25</version>
    </dependency>
    <dependency>
      <groupId>org.slf4j</groupId>
      <artifactId>slf4j-log4j12</artifactId>
      <version>1.7.25</version>
    </dependency>
</dependencies>- 新加一个Send类和一个线程实现类用于发送消息
代码实现如下,详细步骤见代码注释
import com.rabbitmq.client.Channel;
import com.rabbitmq.client.Connection;
import com.rabbitmq.client.ConnectionFactory;
//Publisher发送完消息就结束
//The publisher(MySendTask) will connect to RabbitMQ,
// send message per 5 seconds,
// until the thread stopped and then exit.
public class MySendTask implements Runnable {
//define name of the queue
private final static String QUEUE_NAME = "hello";
//connection to the server(broker)
private Connection rbtMqConn;
//
private Channel rbtMqChnl;
private boolean isStop = false;
public void setIsStop(boolean stop){
this.isStop = stop;
}
@Override
public void run() {
try{
//1.create a connection to the server
//The connection abstracts the socket connection,
//and takes care of protocol version negotiation
//and authentication and so on for us.
ConnectionFactory factory = new ConnectionFactory();
//Here we connect to a broker on the
//local machine - hence the localhost.
//consumer也从这个broker接收消息,也可以使用其它主机,比如172.16.21.10
factory.setHost("localhost");
rbtMqConn = factory.newConnection();
//2.we create a channel, which is where most of the
//API for getting things done resides.
rbtMqChnl = rbtMqConn.createChannel();
//3.To send, we must declare a queue for us to send to;
// then we can publish a message to the queue
//Consumer也需要指定使用该名字的channel
rbtMqChnl.queueDeclare(QUEUE_NAME, false, false, false, null);
//message to send
String message = "Hello Rabbit MQ!";
//send message per 5s
while (!isStop){
rbtMqChnl.basicPublish("", QUEUE_NAME, null, message.getBytes("UTF-8"));
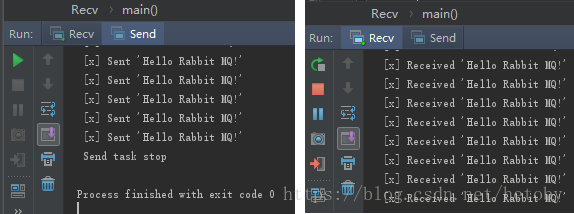
System.out.println(" [x] Sent '" + message + "'");
Thread.sleep(5000);
}
//4.Lastly, we close the channel and the connection;
rbtMqChnl.close();
rbtMqConn.close();
}catch(Exception ex){
System.out.println(ex.getMessage());
}
System.out.println(" Send task stop");
}
}
//message publisher
public class Send {
public static void main(String[] argv) throws Exception {
MySendTask sendTask = new MySendTask();
Thread thread = new Thread(sendTask);
thread.start();
//let the thread run 60 seconds
Thread.sleep(60000);
sendTask.setIsStop(true);
}
}实现Consumer(Consumer从Broker接收消息)
和Publisher类似,Consumer也要打开链接和通道(channel),并且要和Publisher匹配。步骤见如下代码。
import com.rabbitmq.client.*;
import java.io.IOException;

//consumer和publisher不一样,它一直运行,监听接收消息
//Our consumer is pushed messages from RabbitMQ,
// so unlike the publisher which publishes some messages and stop,
// we'll keep it running to listen for messages and print them out.
public class Recv {

    private final static String QUEUE_NAME = "hello";

    public static void main(String[] argv) throws Exception {
        //we open a connection and a channel,
        // and declare the queue from which we're going to consume.
        // Note this matches up with the queue that send publishes to.
        ConnectionFactory factory = new ConnectionFactory();
        factory.setHost("localhost");
        Connection connection = factory.newConnection();
        Channel channel = connection.createChannel();

        //Note that we declare the queue here, as well.
        // Because we might start the consumer before the publisher,
        // we want to make sure the queue exists before we try to consume messages from it.
        channel.queueDeclare(QUEUE_NAME, false, false, false, null);
        System.out.println(" [*] Waiting for messages. To exit press CTRL+C");

        //Since it will push us messages asynchronously,
        // we provide a callback in the form of an object
        // that will buffer the messages until we're ready to use them.
        // That is what a DefaultConsumer subclass does.
        Consumer consumer = new DefaultConsumer(channel) {
            @Override
            public void handleDelivery(String consumerTag, Envelope envelope, AMQP.BasicProperties properties, byte[] body)
                    throws IOException {
                String message = new String(body, "UTF-8");
                System.out.println(" [x] Received '" + message + "'");
            }
        };
        channel.basicConsume(QUEUE_NAME, true, consumer);
    }
}