一、安装redis单节点
官网下载二进制源码包安装,包里面为预编译过的,解压后可以直接二进制安装:
[root@localhost ~]# tar -zxf redis
[root@localhost ~]# cd redis
[root@localhost ~]# make && make install
安装完成后,会出现一句提示:
Hint: To run 'make test' is a good idea ;
此时若执行make test,又会报错:
You need tcl 8.5 or newer in order to run the Redis test
make: ***[test] Error_1
这个时候我们可以通过yum安装tcl工具:
[root@localhost ~]# yum install -y tcl
然后再执行make test即可,命令执行完成后,若出现以下内容,则表示redis安装完成:
\o/ All tests passed without errors!

Cleanup: may take some time... OK
make[1]: Leaving directory `/root/redis-3.2.3/src'
接着进入redis目录下的src目录,src目录下这些文件作用如下
redis-server:Redis服务器的daemon启动程序
redis-cli:Redis命令行操作工具.你也可以用telnet根据其纯文本协议来操作
redis-benchmark:Redis性能测试工具,测试Redis在你的系统及你的配置下的读写性能.
redis-stat:Redis状态检测工具,可以检测Redis当前状态参数及延迟状况(部分版本没有此文件)
修改配置文件,一般需要把daemonize no 改为 daemonize yes,bind后的IP改为0.0.0.0,其他的看需要修改:
[root@localhost ~]# vim /usr/local/redis/etc/redis.conf
daemonize yes
bind 0.0.0.0
启动redis:
redis-server redis.conf
二、配置redis单机多实例
上面配置完成单节点redis,下面尝试配置redis集群。
redis安装完成后,创建redis_cluster目录,并分别创建6379/7000/7001/7002/7003节点目录:
[root@localhost ~]#cd /usr/local/
[root@localhost ~]#mkdir -p redis-cluster/{6379,7000,7001,7002,7003,7004}
在每个节点目录里创建redis.conf配置文件,以6379节点为例:
port  6379
bind 0.0.0.0
protected-mode no
daemonize  yes
pidfile  /usr/local/redis-cluster/6379/redis_6379.pid
cluster-enabled  yes
cluster-config-file  nodes_6379.conf
cluster-node-timeout  15000
appendonly  yes
其余各节点只需修改6379为各自端口号即可。
启动redis主节点和其余节点:
[root@localhost redis-cluster]# cd 6379
[root@localhost redis-cluster]# redis-server redis.conf
[root@localhost redis-cluster]# cd ../7000/
[root@localhost redis-cluster]# redis-server redis.conf
[root@localhost redis-cluster]# cd ../7001/
[root@localhost redis-cluster]# redis-server redis.conf
[root@localhost redis-cluster]# cd ../7002/
[root@localhost redis-cluster]# redis-server redis.conf
[root@localhost redis-cluster]# cd ../7003/
[root@localhost redis-cluster]# redis-server redis.conf
检查节点状态:
[root@localhost redis-cluster]# ps -ef|grep redis
root       7216   7160  0 14:42 pts/0    00:00:01 redis-server 0.0.0.0:6379 [cluster]
root       7223      1  0 14:43 ?        00:00:01 redis-server 0.0.0.0:7003 [cluster]
root       7649      1  0 14:53 ?        00:00:00 redis-server 0.0.0.0:7000 [cluster]
root       7656      1  0 14:53 ?        00:00:00 redis-server 0.0.0.0:7001 [cluster]
root       7664      1  0 14:53 ?        00:00:00 redis-server 0.0.0.0:7002 [cluster]
root       8205   7160  0 15:04 pts/0    00:00:00 grep --color=auto redis
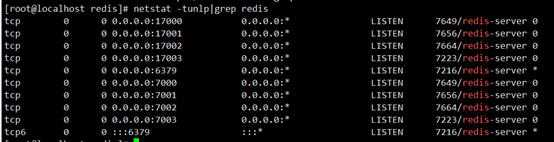
检查端口监听状态:
三、配置redis集群
多实例启动后,将6379,7000,7001三个节点加入集群:
[root@localhost redis]# redis-cli --cluster create 0.0.0.0:6379 0.0.0.0:7000 0.0.0.0:7001
>>> Performing hash slots allocation on 3 nodes...
Master[0] -> Slots 0 - 5460
Master[1] -> Slots 5461 - 10922
Master[2] -> Slots 10923 - 16383
M: 2d8e54a3fc4c2632474722a320e9dc7a8a2349f4 0.0.0.0:6379
   slots:[0-5460] (5461 slots) master
M: 49176096844060888167f3387c99864267052795 0.0.0.0:7000
   slots:[5461-10922] (5462 slots) master
M: 511544e9e1927c837046e08dd70c682b8fdb40d3 0.0.0.0:7001
   slots:[10923-16383] (5461 slots) master
Can I set the above configuration? (type 'yes' to accept): yes 此处输入yes
>>> Nodes configuration updated
>>> Assign a different config epoch to each node
>>> Sending CLUSTER MEET messages to join the cluster
Waiting for the cluster to join
.
>>> Performing Cluster Check (using node 0.0.0.0:6379)
M: 2d8e54a3fc4c2632474722a320e9dc7a8a2349f4 0.0.0.0:6379
   slots:[0-5460] (5461 slots) master
M: 511544e9e1927c837046e08dd70c682b8fdb40d3 127.0.0.1:7001
   slots:[10923-16383] (5461 slots) master
M: 49176096844060888167f3387c99864267052795 127.0.0.1:7000
   slots:[5461-10922] (5462 slots) master
[OK] All nodes agree about slots configuration.
>>> Check for open slots...
>>> Check slots coverage...
[OK] All 16384 slots covered.
上面末尾两处OK表示集群创建完成,检查集群包含哪些节点:
[root@localhost redis-cluster]# redis-cli -c -p 6379
127.0.0.1:6379> cluster nodes
b50501be9ebdb65fa578db646f1757ef576f8e2a 127.0.0.1:7001@17001 master - 0 1559698214519 3 connected 10923-16383
1e7ade8bce59701be8414992a8770e3a0923984e 127.0.0.1:7000@17000 master - 0 1559698215550 2 connected 5461-10922
bb4420d545da00b16991a05fcef06c707fa7ca5c 127.0.0.1:6379@16379 myself,master - 0 1559698213000 1 connected 0-5460
127.0.0.1:6379>
上面可以看到三个节点全为master节点。
添加新的节点:
把7002节点加入集群:
[root@localhost 7002]# redis-cli --cluster add-node 0.0.0.0:7002 0.0.0.0:6379
>>> Adding node 0.0.0.0:7002 to cluster 0.0.0.0:6379
>>> Performing Cluster Check (using node 0.0.0.0:6379)
M: bb4420d545da00b16991a05fcef06c707fa7ca5c 0.0.0.0:6379
   slots:[0-5460] (5461 slots) master
M: b50501be9ebdb65fa578db646f1757ef576f8e2a 127.0.0.1:7001
   slots:[10923-16383] (5461 slots) master
M: 1e7ade8bce59701be8414992a8770e3a0923984e 127.0.0.1:7000
   slots:[5461-10922] (5462 slots) master
[OK] All nodes agree about slots configuration.
>>> Check for open slots...
>>> Check slots coverage...
[OK] All 16384 slots covered.
>>> Send CLUSTER MEET to node 0.0.0.0:7002 to make it join the cluster.
[OK] New node added correctly.
删除节点:
把7002节点从集群中删除,删除后,7002节点也会被关闭:
[root@localhost 7002]# redis-cli --cluster del-node 0.0.0.0:7002 ec5cab90576342aaa2b24cf605f7132dccbfbbd0
>>> Removing node ec5cab90576342aaa2b24cf605f7132dccbfbbd0 from cluster 0.0.0.0:7002
>>> Sending CLUSTER FORGET messages to the cluster...
>>> SHUTDOWN the node.
添加新的节点作为现有master节点的slave节点:
[root@localhost src]# redis-cli --cluster add-node 0.0.0.0:7002 0.0.0.0:6379 --cluster-slave
>>> Adding node 0.0.0.0:7002 to cluster 0.0.0.0:6379
>>> Performing Cluster Check (using node 0.0.0.0:6379)
M: fc32d234190b0a235dffb68e7c0d01135d32a2d8 0.0.0.0:6379
   slots:[0-16383] (16384 slots) master
[OK] All nodes agree about slots configuration.
>>> Check for open slots...
>>> Check slots coverage...
[OK] All 16384 slots covered.
Automatically selected master 0.0.0.0:6379
>>> Send CLUSTER MEET to node 0.0.0.0:7002 to make it join the cluster.
Waiting for the cluster to join

>>> Configure node as replica of 0.0.0.0:6379.
[OK] New node added correctly.
Configure node as replica of 0.0.0.0:6379.表示7002节点已经作为6379的slave节点添加进来了。
再次查看集群信息:
红圈处信息:salve后面的圈起来的ID是master节点的ID,表示是哪个master节点的slave节点:
 检查节点健康情况:
[root@localhost 7002]# redis-cli -c -p 6379
127.0.0.1:6379> info
# Server
redis_version:5.0.4
redis_mode:cluster
multiplexing_api:epoll
process_id:7480
run_id:6cc2c12a1a41e009ad6caf838cdc60825045ae96
tcp_port:6379
executable:/usr/local/redis-cluster/6379/redis-server#启动路径
config_file:/usr/local/redis-cluster/6379/redis.conf#配置文件路径

# Clients
connected_clients:1
client_recent_max_input_buffer:2
client_recent_max_output_buffer:0
blocked_clients:0

# Persistence
aof_enabled:0 #当前aof是关闭的,如需开启,需在配置文件中把appendonly no改为appendonly yes

# Replication
role:master
connected_slaves:1
slave0:ip=127.0.0.1,port=7002,state=online,offset=42,lag=1
master_replid:1f9e9610ebe3d32afb66b0cb8c5a4642fbd985dc
master_replid2:0000000000000000000000000000000000000000
master_repl_offset:42
second_repl_offset:-1
repl_backlog_active:1
repl_backlog_size:1048576
repl_backlog_first_byte_offset:1
repl_backlog_histlen:42

# Cluster
cluster_enabled:1
问题记录:
1、[ERR] Not all 16384 slots are covered by nodes
此时检查6379节点slots插槽是否完全覆盖:
[root@localhost src]# redis-cli --cluster check 0.0.0.0:6379
处理未完全覆盖的情况:
[root@localhost src]# redis-cli --cluster fix 0.0.0.0:6379
2、ruby安装:
步骤1.安装RVM
使用以下命令在系统上安装最新稳定版本的RVM。此命令将自动下载所有所需的文件并在系统上安装。
    # curl -sSL https://rvm.io/mpapis.asc | gpg --import -
    # curl -L get.rvm.io | bash -s stable
此外,运行以下命令加载rvm环境。
    # source /etc/profile.d/rvm.sh
    # rvm reload
步骤2.验证依赖关系
现在使用以下命令验证所有依赖项是否已正确安装。
    # rvm requirements run
    Checking requirements for centos.
    Requirements installation successful.
步骤3.安装Ruby 2.4
完成RVM环境设置后,可以使用以下命令安装Ruby语言。
    # rvm list known
    # rvm install 2.4.0
步骤4.切换到Ruby 2.4
    #rvm use 2.4.0 --default
    #rvm list 查看已安装的ruby版本
四、redis基本使用
config命令:
[root@localhost redis]# redis-cli -c -p 6379
127.0.0.1:6379> config get appendonly #config get 查看指定某个配置项
1) "appendonly"
2) "no"
127.0.0.1:6379> config set appendonly yes #set 是将某个配置项修改为新的内容
OK
127.0.0.1:6379> config get appendonly
1) "appendonly"
2) "yes"
127.0.0.1:6379> config get * # *表示查看所有的配置项
数据类型:
string字符串,是redis最基本的数据类型,最大支持512M,每个key对应一个value string是二进制的,可以包含任何数据,包括图像或序列化的对象
[root@localhost redis]# redis-cli -c -p 6379
127.0.0.1:6379>set name zll
>OK
127.0.0.1:6379>get name
>”zll”
hash是一个键值的集合,包含了key和value;
添加hash之前先把上面创建的zll删掉,不然会报错:(error) WRONGTYPE Operation against a key holding the wrong kind of value
redis 127.0.0.1:6379> DEL name
(integer) 1
127.0.0.1:6379> HMSET myhash field1 'hello' field2 'world'
OK
127.0.0.1:6379> HGET myhash field1
"hello"
127.0.0.1:6379> HGET myhash field2
"world"
实例中我们使用了 Redis HMSET, HGET 命令,HMSET 设置了两个 field=>value 对, HGET 获取对应 field 对应的 value。
每个 hash 可以存储 232 -1 键值对(40多亿)
备份与恢复:
redis备份使用save命令,备份完成后会在文件目录中出现dump.rdb文件,备份文件存放位置可使用CONFIG get dir 来查看。创建 redis 备份文件也可以使用命令 BGSAVE,该命令在后台执行。
[root@localhost redis]# redis-cli -c -p 6379
127.0.0.1:6379>save
OK
127.0.0.1:6379>CONFIG get dir
1) "dir"
2) "/usr/local/redis-cluster/6379" #此为redis节点安装位置,也是数据库文件存放路径
127.0.0.1:6379> BGSAVE
Background saving started
127.0.0.1:6379>
如果需要恢复数据,只需将备份文件 (dump.rdb) 移动到 redis 安装目录并启动服务即可。
redis配置密码:
[root@localhost redis]# redis-cli -c -p 6379
127.0.0.1:6379> config get requirepass   #查看是否设置密码
1) "requirepass"
2) ""   #当前为空,说明未设置密码
127.0.0.1:6379> config set requirepass '123456'   #此处设置密码
OK
127.0.0.1:6379> config get requirepass
(error) NOAUTH Authentication required.   #此处提示已经设置了密码,需要输入密码
127.0.0.1:6379> auth '123456'   #输入密码的方式为 auth ‘密码’
OK
127.0.0.1:6379> config get requirepass
1) "requirepass"
2) "123456"
127.0.0.1:6379>
redis性能测试:
redis性能测试使用的命令格式为:
redis-benchmark [option] [option value]
该命令在服务器模式下执行,不是在redis上执行:
[root@localhost 6379]# redis-benchmark -n 10000  -q
PING_INLINE: 53475.93 requests per second
PING_BULK: 50505.05 requests per second
SET: 48309.18 requests per second
GET: 49019.61 requests per second
INCR: 47846.89 requests per second
LPUSH: 49019.61 requests per second
RPUSH: 44843.05 requests per second
LPOP: 49019.61 requests per second
RPOP: 49261.09 requests per second
SADD: 47846.89 requests per second
HSET: 46728.97 requests per second
SPOP: 53763.44 requests per second
LPUSH (needed to benchmark LRANGE): 51546.39 requests per second
LRANGE_100 (first 100 elements): 52631.58 requests per second
LRANGE_300 (first 300 elements): 52631.58 requests per second
LRANGE_500 (first 450 elements): 54347.82 requests per second
LRANGE_600 (first 600 elements): 49751.24 requests per second
MSET (10 keys): 45045.04 requests per second
