grub介绍
存放于MBR的前446字节中,grub分为stage1/stage1.5/stage2。
- stage1:主要负责BIOS和GRUB之间的交接,载入存放于各个分区中的开机文件
- stage1.5:让stage1中的bootloader能识别stage2所在的分区上的文件系统;
- stage2:配置参数,加载内核,ramfs
grub模式下常用操作说明
e: 编辑模式,用于编辑菜单;
c: 命令模式,交互式接口;用户查看命令获取帮助
设置grub
1、设置临时根 之后的文件查找都是在临时根下面 可以自动补全 (这就是为什么boot要分区的原因,简单的文件系统)
把/boot当作临时根
(hd#,#)
    hd#: 磁盘编号,用数字表示;从0开始编号
    #: 分区编号,用数字表示; 从0开始编号
2、设置内核文件
设定本次启动时用到的内核文件;额外还可以添加许多内核支持使用的cmdline参数;
最常用参数
只读:ro
根:root=/device (这个root地址是真正的根指向的分区)
单用户模式 1, s, S或single都可以,用来忘记密码修改密码
还有写init=/sbin/init 之类很多
kernel /PATH/TO/KERNEL_FILE ro root=/dev.... quiet
3、设置initramfs
上述的配置都是从 /boot/grub/grub.conf 这里读取的
[root@node1 grub]# cat /boot/grub/grub.conf
# grub.conf generated by anaconda
#
# Note that you do not have to rerun grub after making changes to this file
# NOTICE: You have a /boot partition. This means that
# all kernel and initrd paths are relative to /boot/, eg.
# root (hd0,0)
# kernel /vmlinuz-version ro root=/dev/mapper/vg0-LogVol01
# initrd /initrd-[generic-]version.img
#boot=/dev/sda
default=0
timeout=5
splashimage=(hd0,0)/grub/splash.xpm.gz
hiddenmenu
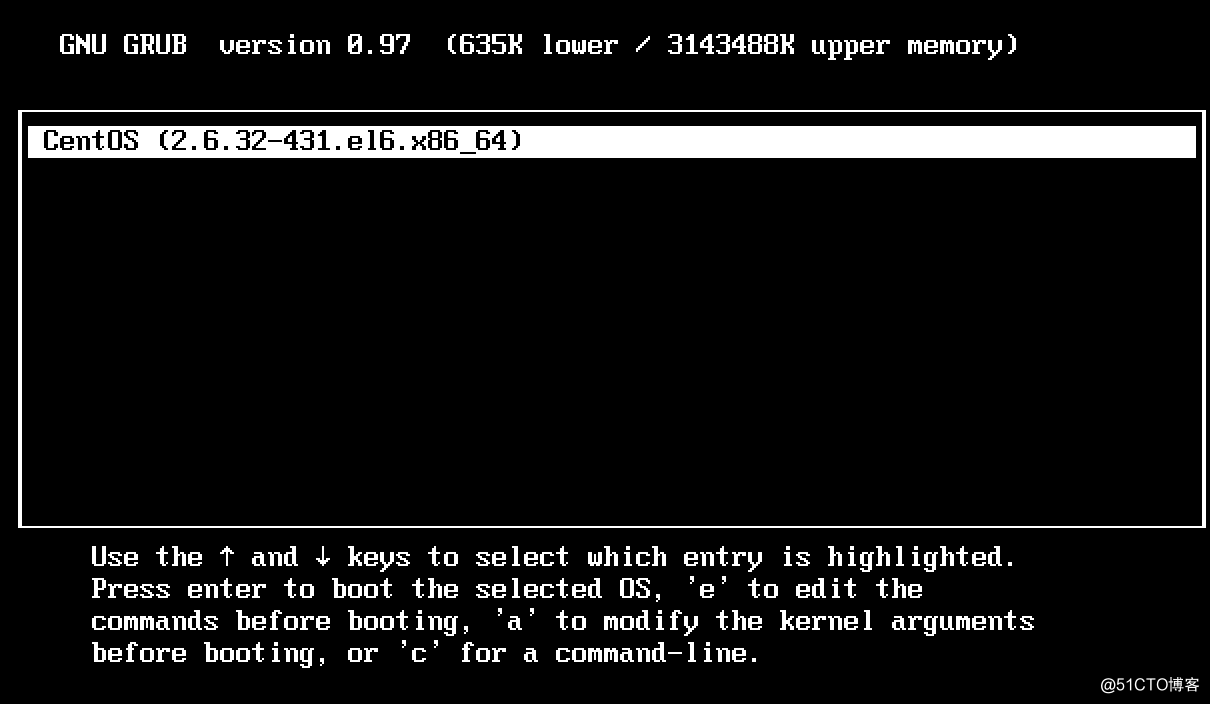
title CentOS (2.6.32-431.el6.x86_64)
root (hd0,0)
kernel /vmlinuz-2.6.32-431.el6.x86_64 ro root=/dev/mapper/vg0-LogVol01 rd_NO_LUKS KEYBOARDTYPE=pc KEYTABLE=us LANG=en_US.UTF-8 rd_NO_MD rd_LVM_LV=vg0/LogVol01 rd_LVM_LV=vg0/LogVol00 crashkernel=auto SYSFONT=latarcyrheb-sun16 rd_NO_DM rhgb quiet
initrd /initramfs-2.6.32-431.el6.x86_64.img
#自己添加
title fortest-CentOS (2.6.32-431.el6.x86_64)
root (hd0,0)
kernel /vmlinuz-2.6.32-431.el6.x86_64 ro root=/dev/mapper/vg0-LogVol01 rd_NO_LUKS KEYBOARDTYPE=pc KEYTABLE=us LANG=en_US.UTF-8 rd_NO_MD rd_LVM_LV=vg0/LogVol01 rd_LVM_LV=vg0/LogVol00 crashkernel=auto SYSFONT=latarcyrheb-sun16 rd_NO_DM rhgb quiet
initrd /initramfs-2.6.32-431.el6.x86_64.img
password --md5 $1$fQ1Hq/$otpD/NAH5fB/bCgmcqfl41 #密码必须加在上面,不然进去grub可以删除,没有意义定制 grub
实验目的,一块新硬盘能够加载内核,开机
1、准备好新硬盘
   Device Boot      Start         End      Blocks   Id  System
/dev/sdb1               1          26      208813+  83  Linux
/dev/sdb2              27         288     2104515   82  Linux swap / Solaris
/dev/sdb3             289         942     5253255   83  Linux
2、挂载新硬盘
扫描二维码关注公众号,回复:
106038 查看本文章

[root@node1 boot]# pwd
/mnt/boot
[root@node1 mnt]# mount /dev/sdb1 /mnt/boot/
3、在新硬盘下创建grub
[root@node1 mnt]# grub-install --root-directory=/mnt   /dev/sdb   #指定boot所在的目录,   安装到sdb这个盘上
Probing devices to guess BIOS drives. This may take a long time.
Installation finished. No error reported.
This is the contents of the device map /mnt/boot/grub/device.map.
Check if this is correct or not. If any of the lines is incorrect,
fix it and re-run the script `grub-install'.

(fd0)   /dev/fd0
(hd0)   /dev/sda
(hd1)   /dev/sdb
4、复制内核,ramfs
[root@node1 boot]# ls
grub  lost+found

[root@node1 grub]# cp /boot/vmlinuz-2.6.32-431.el6.x86_64  /mnt/boot/

[root@node1 boot]# mkinitrd /mnt/boot/initramfs-$(uname -r).img   $(uname -r)
5、配置文件
[root@node1 grub]# vim /mnt/boot/grub/grub.conf

[root@node1 grub]# cat grub.conf
# grub.conf generated by anaconda
#
# Note that you do not have to rerun grub after making changes to this file
# NOTICE:  You have a /boot partition.  This means that
#          all kernel and initrd paths are relative to /boot/, eg.
#          root (hd0,0)
#          kernel /vmlinuz-version ro root=/dev/mapper/vg0-LogVol01
#          initrd /initrd-[generic-]version.img
#boot=/dev/sda
default=0
timeout=5
splashimage=(hd0,0)/grub/splash.xpm.gz
hiddenmenu
title CentOS (test1)
    root (hd0,0)
# root=/dev/sda3  这块硬盘分区3是根
    kernel /vmlinuz-2.6.32-431.el6.x86_64 ro root=/dev/sda3 selinux=0 init=/bin/bash
    initrd /initramfs-2.6.32-431.el6.x86_64.img
6、挂载根,copy一个bash脚本
[root@node1 grub]# mkdir /mnt/sysroot
[root@node1 grub]# mount /dev/sdb3  /mnt/sysroot/

[root@node1 sysroot]# mkdir -pv etc bin sbin lib lib64 dev proc tmp var home root mnt media
[root@node1 sysroot]# cp /bin/bash /mnt/sysroot/bin/
[root@node1 sysroot]# ldd /bin/bash
    linux-vdso.so.1 =>  (0x00007fffd31ff000)
    libtinfo.so.5 => /lib64/libtinfo.so.5 (0x00007f33c03fb000)
    libdl.so.2 => /lib64/libdl.so.2 (0x00007f33c01f7000)
    libc.so.6 => /lib64/libc.so.6 (0x00007f33bfe62000)
    /lib64/ld-linux-x86-64.so.2 (0x00007f33c0626000)
[root@node1 sysroot]# cp  /lib64/libtinfo.so.5  /mnt/sysroot/lib64/
[root@node1 sysroot]# cp /lib64/libdl.so.2  /mnt/sysroot/lib64/
[root@node1 sysroot]# cp /lib64/libc.so.6 /mnt/sysroot/lib64/
[root@node1 sysroot]# cp /lib64/ld-linux-x86-64.so.2 /mnt/sysroot/lib64/

#测试当前
[root@node1 sysroot]# chroot /mnt/sysroot/
bash-4.1#
7、在新的虚拟机中用这块硬盘开机
bootloader修复
实验目的只破坏前面446字节,修复grub,后面分区不动
破坏本机bootloader
[root@node1 mnt]# dd if=/dev/zero of=/dev/sda bs=200 count=1
[root@node1 grub]# sync
开机状态下有多种修复方式
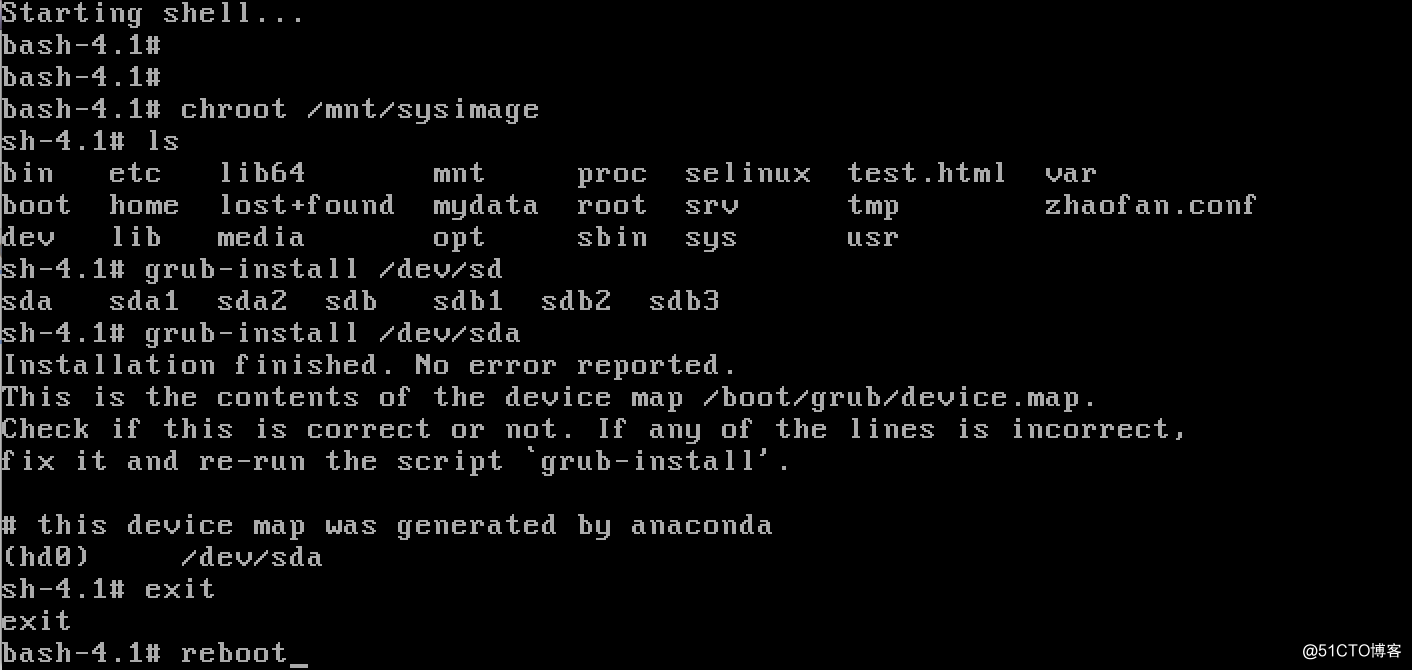
1、使用grub-install工具
[root@node1 mnt]# grub-install --root-directory=/ /dev/sda 2、 grub工具
grub> root (hd0,0)
root (hd0,0)
Filesystem type is ext2fs, partition type 0x83
grub> setup (hd0)
setup (hd0)
Checking if "/boot/grub/stage1" exists... no
Checking if "/grub/stage1" exists... yes
Checking if "/grub/stage2" exists... yes
Checking if "/grub/e2fs_stage1_5" exists... yes
Running "embed /grub/e2fs_stage1_5 (hd0)"... 27 sectors are embedded.
succeeded
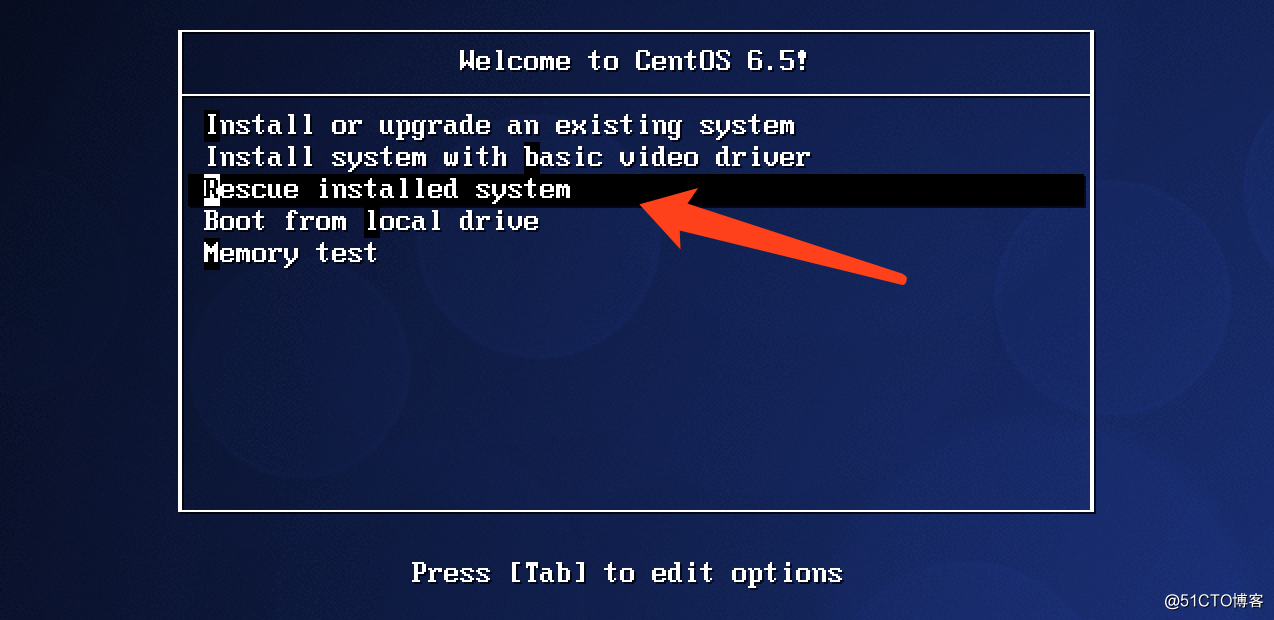
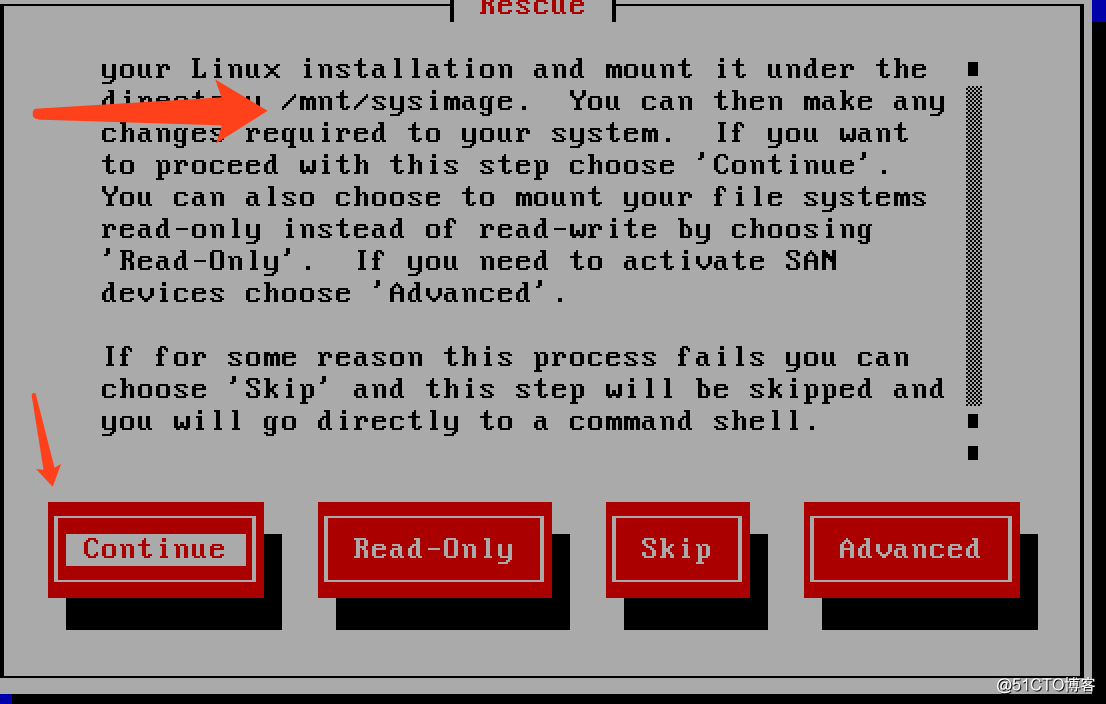
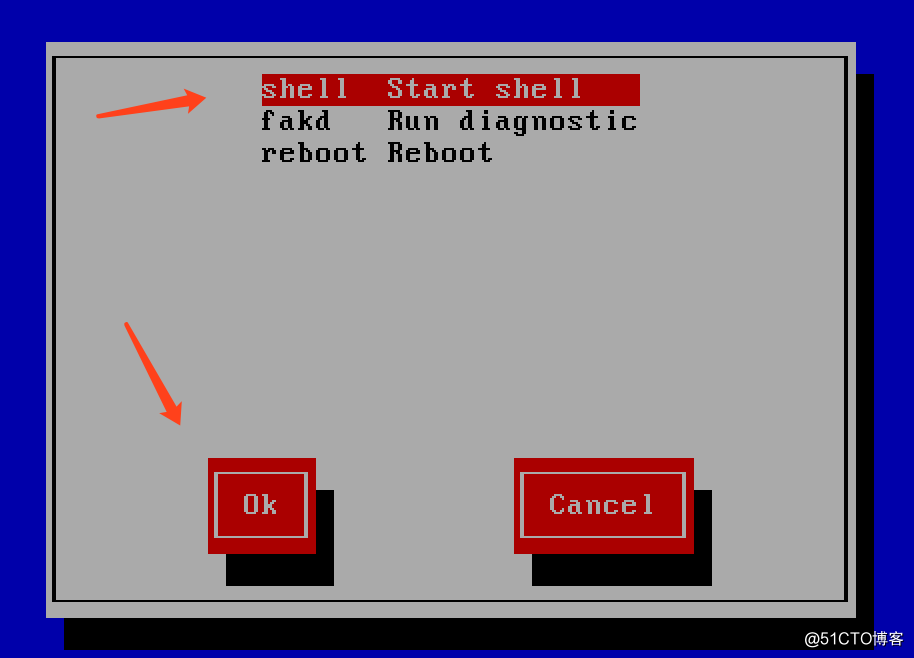
Running "install /grub/stage1 (hd0) (hd0)1+27 p (hd0,0)/grub/stage2 /grub/grub.conf"... succeeded重启状态下修复,需要光盘的营救模式
1、破坏状态下开机
2、加载光盘
3、选择营救模式