文章目录
expect详解和N个示例
expect 说明
首先,expect并不是系统自带的命令,需要安装tcl和expect命令,有外网的直接yum即可,没有外网的 参考:https://blog.csdn.net/cuichongxin/article/details/101275878
执行expect脚本方法: expect 脚本名
expect选项
- -c:执行脚本前先执行的命令,可多次使用。
- -d:debug模式,可以在运行时输出一些诊断信息,与在脚本开始处使用exp_internal 1相似。
- -D:启用交换调式器,可设一整数参数。
- -f:从文件读取命令,仅用于使用#!时。如果文件名为"-",则从stdin读取(使用"./-"从文件名为-的文件读取)。
- -i:交互式输入命令,使用"exit"或"EOF"退出输入状态。
- –:标示选项结束(如果你需要传递与expect选项相似的参数给脚本时),可放到#!行:#!/usr/bin/expect --。
- -v:显示expect版本信息。
命令(参数)说明
- set:可以设置超时,也可以设置变量
- timeout:expect超时等待时间,默认10S
- timeout -1:永不超时退出
- spawn:执行一个命令
- expect “”:匹配输出的内容
- exp_continue [-continue_timer]:继续执行下面匹配
- send “”:用于向进程发送字符串
- interact:允许用户交互,交互后不退出远程终端,如果加要把expect “root@*” {send “exit\r”}注释掉,如果不加,就直接退出
- \t:空格
- \n:换行(echo –e “\n” 查看效果)
- \r:可以理解为回车
- $argc:统计位置参数数量
- [lindex $argv 0]:脚本后第一个参数,类似于shell中$1,以此类推
- puts “”:打印字符串,类似于echo
- awk -v I="$ip":赋值变量
- expect{…}:输入多行记录
示例
1 打印内容测试
expect中打印命令是puts,类似于echo,但我用send也可以打印,并且2样并看不出明显区别,不知道结合其他情况使用会不会有冲突啥的,按需使用吧。
#expect "this"
send "this is my test\n"
#interact
send "\n"
puts "thisis my plustest"

2 查看远程主机磁盘分区(set定义变量)
#!/usr/bin/expect

set ip 目标ip
set pass 目标ip的root密码
set timeout 30 #设置30秒超时退出,可不要
spawn ssh root@$ip
expect {
        "(yes/no)" {send "yes\r"; exp_continue}# 这里是用于第一次登陆读取输入yes或no的,不是第一次登陆 可不要
        "password:" {send "$pass\r"} # password是获取内容关键字,获取到后send替代手工输入密码
}
expect "root@*"  {send "df -h\r"} # root是获取关键字,[root@control ~]$
expect "root@*"  {send "exit\r"} # 退出
expect eof # 结束,如果不加 可能send命令无法全部执行
# interact  # 按需要决定是否添加interact

3 查看远程主机磁盘分区(不用set定义变量)
这是最简单直接的,我平常执行多条命令都喜欢用这种方法,但这种实用于执行多条命令,如果只执行一条命令,这不是最简单的,执行一条命令3是最简单的
spawn ssh 目标ip
expect {
        "(yes/no)" {send "yes\r"; exp_continue}
        "password:" {send "目标iproot的密码\r"}
}
expect "root@*"  {send "df -h\r"}
expect "root@*"  {send "exit\r"}
expect eof

4 查看远程主机磁盘分区(单条命令最简单方法)
#!/bin/expect

spawn ssh ip df -h
expect {
        "(yes/no)" {send "yes\r"; exp_continue}
        "password:" {send "root的密码\r"}
}
expect eof

spawn ssh ip df -h
expect {
        "(yes/no)" {send "yes\r"; exp_continue}
        "password:" {send "root的密码\r"}
}
expect eof

5 自动ssh 登陆会话(无interact介入)
这儿的自动的意思是,接受用户输入的用户名,ip,密码,命令
#!/usr/bin/expect -f

# 接收第1个参数,作为IP
set ip [lindex $argv 0 ]
# 接收第2个参数,作为username
set username [lindex $argv 1 ]
# 接收第3个参数,作为密码
set mypassword [lindex $argv 2 ]
# 接收第4个参数,作为命令
# 还可以设置第5,第100个参数用来作为命令
set mycommand [lindex $argv 3 ]
# 设置超时时间,可以不要
set timeout 10

# 向远程服务器请求打开一个ssh会话,并等待服务器询问用户名
spawn ssh $username@$ip
    # 等待匹配输入密码界面(如果免密的可不要这步,要也不影响)
    expect "password:"
    # 输入密码,并等待键入需要运行的命令
    send "$mypassword\r"
    #"*@*" 是获取关键字[root@control ~]
    expect "*@*"
    # 输入预先定好的密码,等待运行结果
    send "$mycommand\r"
    expect "*%*"
    # 可以将命令运行结果写到磁盘中
    send "$mycommand >> /tmp/test.a\r"
    # 退出telnet会话,等待服务器的退出提示EOF(没提示退出以前,不要人为输入)
    send "exit\r"
expect eof

运行方式以及结果(缺陷 只能只有没有参数的命令,带参数的用不了,比如:df –h),如果要执行多条命令,可以稍微改一下,使用用户介入的方式,见demo6
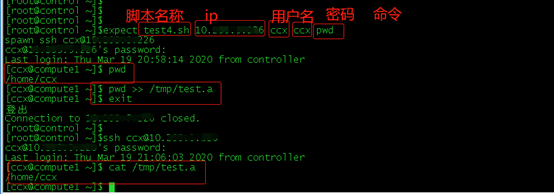
最重要的是能实现这种形式,使用环境 按需使用吧。
6 自动ssh登陆(interact介入)
interact介入简单理解为 交换模式吧,就是说自动 登陆进去以后就停留在登陆的服务器上,可以自由输入命令然后 exit 退出! 不过没啥用,写这么写命令 就为了登陆,还不如直接 ssh 上去来的痛快。 反正当 只是为了知道interact的作用把!
#!/usr/bin/expect -f

# 接收第1个参数,作为IP
set ip [lindex $argv 0 ]
# 接收第2个参数,作为username
set username [lindex $argv 1 ]
# 接收第3个参数,作为密码
set mypassword [lindex $argv 2 ]
# 设置超时时间,可以不要
set timeout 10

# 向远程服务器请求打开一个ssh会话,并等待服务器询问用户名
spawn ssh $username@$ip
    # 等待匹配输入密码界面(如果免密的可不要这步,要也不影响)
    expect "password:"
    # 输入密码,并等待键入需要运行的命令
    send "$mypassword\r"
    # interact 介入,手动输入命令。。。
    interact

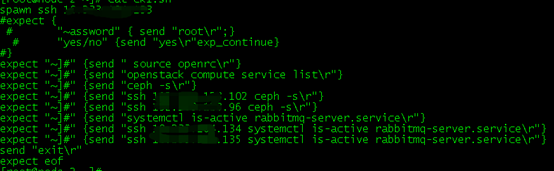
7 openstack快速一次性查看
spawn ssh ip
#expect {
 #       "~assword" { send "root\r";}
  #      "yes/no" {send "yes\r"exp_continue}
#}
# 上面4行我注释的原因是 该服务器是免密登陆的,为例节约运行时间 所以我注释掉了。
expect "~]#" {send " source openrc\r"}
expect "~]#" {send "openstack compute service list\r"}
expect "~]#" {send "ceph -s\r"}
expect "~]#" {send "ssh 0.0.0.0 ceph -s\r"}
expect "~]#" {send "ssh 0.0.0.0 ceph -s\r"}
expect "~]#" {send "systemctl is-active rabbitmq-server.service\r"}
expect "~]#" {send "ssh 0.0.0.0 systemctl is-active rabbitmq-server.service\r"}
expect "~]#" {send "ssh 0.0.0.0systemctl is-active rabbitmq-server.service\r"}
send "exit\r"
expect eof
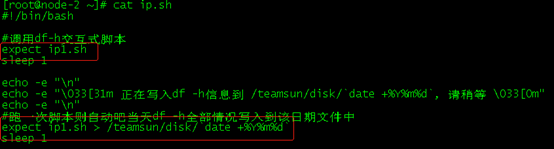
expect嵌入到shell中
平常我们使用expect脚本方式是 expect 脚本名,但我们可以把expect脚本嵌入到 shell中,这样就可以执行 sh 脚本名,然后shell中调用expect脚本即可