------------------------------简述HDFS中的接口类型-----------------------------------
HDFS中的接口类型分为三种:
1.客户端相关接口 :
(1)ClientProtocol(客户端与名字节点)
(2)ClientDataNodeProtocol(客户端与数字节点之间)
2.服务器端相关接口:
(1)DataNodeProtocol(名字与数字节点)
(2)intelDataNodeProtocol(数字节点之间)
(3)NameNodeProtocol(名字与第二个名字节点)
3.安全相关接口: RPC HTTP Scoket (简单聊下RPC流程)
-------------------------简述RPC流程,以及需要注意的点------------------------------
RPC(Remote Preduce Call Protocol): 远程过程调用协议 (下图为RPC流程示意图)

1.服务消费方(Client Caller): 将自己需要调用的接口名,方法名,参数等等传输给Client Stub
2.Client Stub: 接收到消费方的信息后对信息进行打包,找到服务器的IP后, 将信息转换为二进制编码格式进行网络传输
3.NetWork Service :  网络服务器接收到打包好的信息后提交给 Server Stub
4.Server Stub : 将接收到的信息进行解码, 传输给Server Callee
5. Server Callee : 对信息进行相关处理
6. Server Callee : 将处理后的信息传输给Server Stub
7. Server Stub : 将接收到的消息进行打包,找到服务消费端进行发送
8. Client Stub : 将接受到的信息进行解码
9. Client Caller : 消费方得到最终的结果
关于上述流程中几个问题的个人总结 :
一 . 怎么对消息进行编码和解码?
1.确定消息数据结构
a.接口名
b.方法名
c.参数(参数类型,参数值)
d.超时时间
e.状态码
f.返回值
g.request ID
2.进行序列化和反序列化
序列化: 这一步是将信息的数据结构转变为二进制字符串的过程, 也就是编码过程
反序列化: 反之 , 将二进制编码文件转变为原来的数据结构
3.通信(NIO , BIO)
消息数据结构转变为二进制后,下一步就是网络通信过程,目前常用的IO通信模型
a . BIO: 同步阻塞式IO, 就是当客户端有一个连接请求时,相应给服务端,
服务端会安排一个线程进行处理,如果连接后没有后续操作,就会造成线程的浪费,(通过设置线程池参数可对其进行相关调优)
b . NIO: 同步非阻塞式IO, 当客户端有一个连接请求时,这个连接请求会被多路复用器收集,
多路复用器进行轮询时发现IO请求,才会调用一个线程进行处理
一般基于netty,现在很多的框架都直接基于netty这个IO通信框架, 例如:HSF , Dubbo , Twitter等
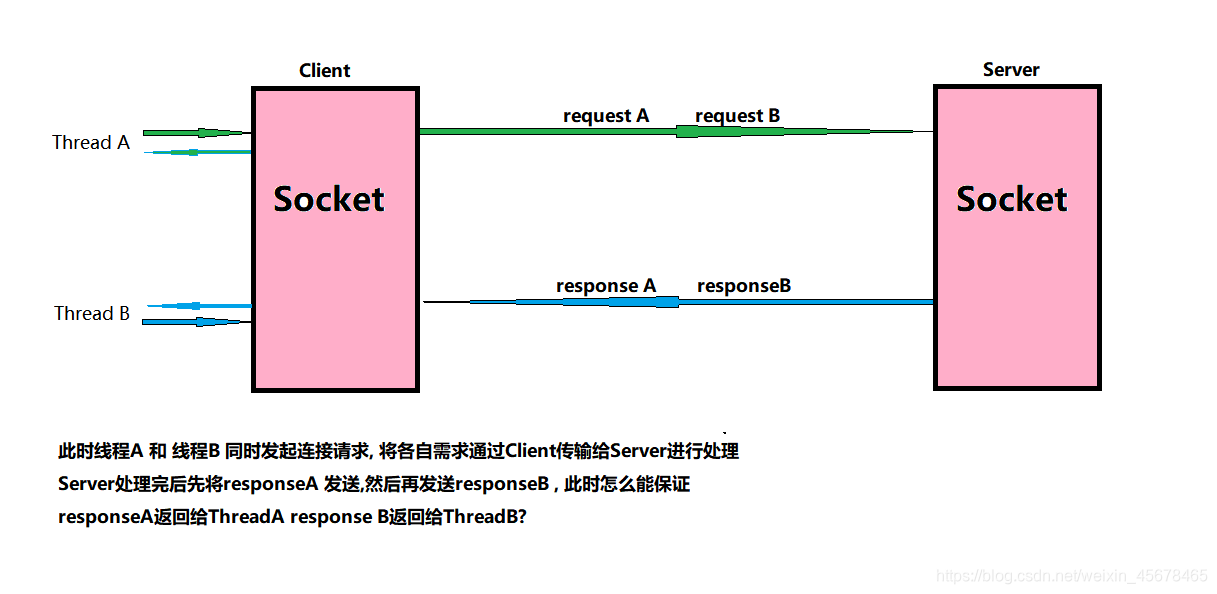
4.为什么要有request ID?
简单来说,我们通过RPC进行远程服务调用时, 会并发同时进行很多服务,在处理这些服务时,顺序是随机的, Client收到很多调用反馈回来的信息, 这时我们怎么知道哪个消息是哪个线程调用的呢?
解决办法:
首先 : 每当client线程通过 Socket时会生成一个唯一的ID(一般常用AtomicLong计数生成唯一ID)
然后 : 处理结果的回调对象callback会和requestID一起存放在ConcurrentHashMap中,当远程调writeAndFlush()发送消息后,执行callback的get方法获取返回的结果,这里会出现synchronize锁, 确保线程安全,结果稳定(过程中如果没有拿到相应数据,此时会调用callback的wait()方法 , 释放掉callback上的锁,接触锁的占用,避免线程占用资源,合理的让线程处于等待状态)
最后 : 服务端将response结果发送给客户端,消息通过Socket过程中,先对消息进行分析,通过requestID找到对应的callback对象,用synchronized解锁callback,将结果设置到callback上, 并唤醒前面处于等待的线程
public object getMessage(){
	synchronized (this) {
		while (!isOk){ //查看是否有结果
			wait();  //没结果 线程进入等待状态
			}
		}
	}
private void setMessage(Response res){
	this.res = res;
	isOk = true;
	synchronized(this){ //获取锁, 释放锁
		notifyAll(); //唤醒还在等待的线程
	}
}
二 . 如何发布自己的服务?
总结来说 就是通过zookeeper的分布式集群方式来做基础, 给众多服务提供者形成一个集群(注册中心) , 这些服务提供者进行注册后,会依赖于zookeeper的"心跳检测"功能 , 他会定时向提供者发送一个请求, 如果这个提供者长时间没有回应,那么服务中心会判定其宕机, 此时服务提供者的数量发生了变化, 一旦提供者数量发生了变化,zookeeper就会通知消费方,服务提供者的地址有变化 , 进行更新.
三 . Hadoop中RPC的源码分析
- 客户端和服务端的连接是怎样建立的?
public Writable call(Writable param, ConnectionId remoteId)
                       throws InterruptedException, IOException {
    Call call = new Call(param);       //将传入的数据封装成call对象
    Connection connection = getConnection(remoteId, call);   //获得一个连接
    connection.sendParam(call);     // 向服务端发送call对象
    boolean interrupted = false;
    synchronized (call) {
      while (!call.done) {
        try {
          call.wait(); // 等待结果的返回,在Call类的callComplete()方法里有notify()方法用于唤醒线程
        } catch (InterruptedException ie) {
          // 因中断异常而终止,设置标志interrupted为true
          interrupted = true;
        }
      }
      if (interrupted) {
        Thread.currentThread().interrupt();
      }

      if (call.error != null) {
        if (call.error instanceof RemoteException) {
          call.error.fillInStackTrace();
          throw call.error;
        } else { // 本地异常
          throw wrapException(remoteId.getAddress(), call.error);
        }
      } else {
        return call.value; //返回结果数据
      }
    }
  }

//和网络通信有关的代码:
Connection connection = getConnection(remoteId, call);   //获得一个连接
connection.sendParam(call);      // 向服务端发送call对象
下面贴出ipc.Client类中的getConnection()方法。
private Connection getConnection(ConnectionId remoteId,
                                   Call call)
                                   throws IOException, InterruptedException {
    if (!running.get()) {
      // 如果client关闭了
      throw new IOException("The client is stopped");
    }
    Connection connection;
//如果connections连接池中有对应的连接对象,就不需重新创建了;如果没有就需重新创建一个连接对象。
//但请注意,该//连接对象只是存储了remoteId的信息,其实还并没有和服务端建立连接。
    do {
      synchronized (connections) {
        connection = connections.get(remoteId);
        if (connection == null) {
          connection = new Connection(remoteId);
          connections.put(remoteId, connection);
        }
      }
    } while (!connection.addCall(call)); //将call对象放入对应连接中的calls池,就不贴出源码了
   //这句代码才是真正的完成了和服务端建立连接哦~
    connection.setupIOstreams();
    return connection;
  }
下面贴出Client.Connection类setupIOstreams()方法:
private synchronized void setupIOstreams() throws InterruptedException {
   •••
      try {
       •••
        while (true) {
          setupConnection();  //建立连接
          InputStream inStream = NetUtils.getInputStream(socket);     //获得输入流
          OutputStream outStream = NetUtils.getOutputStream(socket);  //获得输出流
          writeRpcHeader(outStream);
          •••
          this.in = new DataInputStream(new BufferedInputStream
              (new PingInputStream(inStream)));   //将输入流装饰成DataInputStream
          this.out = new DataOutputStream
          (new BufferedOutputStream(outStream));   //将输出流装饰成DataOutputStream
          writeHeader();
          // 跟新活动时间
          touch();
          //当连接建立时,启动接受线程等待服务端传回数据,注意:Connection继承了Tread
          start();
          return;
        }
      } catch (IOException e) {
        markClosed(e);
        close();
      }
    }
再有一步我们就知道客户端的连接是怎么建立的啦,下面贴出Client.Connection类中的setupConnection()方法:
private synchronized void setupConnection() throws IOException {
      short ioFailures = 0;
      short timeoutFailures = 0;
      while (true) {
        try {
          this.socket = socketFactory.createSocket(); //终于看到创建socket的方法了
          this.socket.setTcpNoDelay(tcpNoDelay);
         •••
          // 设置连接超时为20s
          NetUtils.connect(this.socket, remoteId.getAddress(), 20000);
          this.socket.setSoTimeout(pingInterval);
          return;
        } catch (SocketTimeoutException toe) {
          /* 设置最多连接重试为45次。
           * 总共有20s*45 = 15 分钟的重试时间。
           */
          handleConnectionFailure(timeoutFailures++, 45, toe);
        } catch (IOException ie) {
          handleConnectionFailure(ioFailures++, maxRetries, ie);
        }
      }
    }
- 客户端是怎样给服务端发送数据的?
public void sendParam(Call call) {
      if (shouldCloseConnection.get()) {
        return;
      }
      DataOutputBuffer d=null;
      try {
        synchronized (this.out) {
          if (LOG.isDebugEnabled())
            LOG.debug(getName() + " sending #" + call.id);
          //创建一个缓冲区
          d = new DataOutputBuffer();
          d.writeInt(call.id);
          call.param.write(d);
          byte[] data = d.getData();
          int dataLength = d.getLength();
          out.writeInt(dataLength);        //首先写出数据的长度
          out.write(data, 0, dataLength); //向服务端写数据
          out.flush();
        }
      } catch(IOException e) {
        markClosed(e);
      } finally {
        IOUtils.closeStream(d);
      }
    }
- 客户端是怎样获取服务端的返回数据的?
方法一:
  public void run() {
      •••
      while (waitForWork()) {
        receiveResponse();  //具体的处理方法
      }
      close();
     •••
}

方法二:
private void receiveResponse() {
      if (shouldCloseConnection.get()) {
        return;
      }
      touch();
      try {
        int id = in.readInt();                    // 阻塞读取id
        if (LOG.isDebugEnabled())
          LOG.debug(getName() + " got value #" + id);
          Call call = calls.get(id);    //在calls池中找到发送时的那个对象
        int state = in.readInt();     // 阻塞读取call对象的状态
        if (state == Status.SUCCESS.state) {
          Writable value = ReflectionUtils.newInstance(valueClass, conf);
          value.readFields(in);           // 读取数据
        //将读取到的值赋给call对象,同时唤醒Client等待线程,贴出setValue()代码方法三
          call.setValue(value);
          calls.remove(id);               //删除已处理的call
        } else if (state == Status.ERROR.state) {
        •••
        } else if (state == Status.FATAL.state) {
        •••
        }
      } catch (IOException e) {
        markClosed(e);
      }
}

方法三:
public synchronized void setValue(Writable value) {
      this.value = value;
      callComplete();   //具体实现
}
protected synchronized void callComplete() {
      this.done = true;
      notify();         // 唤醒client等待线程
    }
四 . Server源码分析
Call: 用于存储客户端发来的请求
Listener:监听客户管发来的请求 (Listener.Reader监听用户请求,便于Reader读取用户请求.)
Responser: 响应RPC请求类,处理完毕后,由它大宋请求给客户端
Connection: 连接类
Handlter: 请求处理类
private void initialize(Configuration conf) throws IOException {
   •••
    // 创建 rpc server
    InetSocketAddress dnSocketAddr = getServiceRpcServerAddress(conf);
    if (dnSocketAddr != null) {
      int serviceHandlerCount =
        conf.getInt(DFSConfigKeys.DFS_NAMENODE_SERVICE_HANDLER_COUNT_KEY,
                    DFSConfigKeys.DFS_NAMENODE_SERVICE_HANDLER_COUNT_DEFAULT);
      //获得serviceRpcServer
      this.serviceRpcServer = RPC.getServer(this, dnSocketAddr.getHostName(),
          dnSocketAddr.getPort(), serviceHandlerCount,
          false, conf, namesystem.getDelegationTokenSecretManager());
      this.serviceRPCAddress = this.serviceRpcServer.getListenerAddress();
      setRpcServiceServerAddress(conf);
}
//获得server
    this.server = RPC.getServer(this, socAddr.getHostName(),
        socAddr.getPort(), handlerCount, false, conf, namesystem
        .getDelegationTokenSecretManager());

   •••
    this.server.start();  //启动 RPC server   Clients只允许连接该server
    if (serviceRpcServer != null) {
      serviceRpcServer.start();  //启动 RPC serviceRpcServer 为HDFS服务的server
    }
    startTrashEmptier(conf);
  }
RPC的server对象是通过ipc.RPC类的getServer()方法获得的。下面咱们去看看ipc.RPC类中的getServer()源码吧:
public static Server getServer(final Object instance, final String bindAddress, final int port,
                                 final int numHandlers,
                                 final boolean verbose, Configuration conf,
                                 SecretManager<? extends TokenIdentifier> secretManager)
    throws IOException {
    return new Server(instance, conf, bindAddress, port, numHandlers, verbose, secretManager);
  }
这时我们发现getServer()是一个创建Server对象的工厂方法,但创建的却是RPC.Server类的对象。哈哈,现在你明白了我前面说的“RPC.Server是ipc.Server的实现类”了吧。不过RPC.Server的构造函数还是调用了ipc.Server类的构造函数的,因篇幅所限,就不贴出相关源码了。
初始化Server后,Server端就运行起来了,看看ipc.Server的start()源码吧:
/** 启动服务 */
  public synchronized void start() {
    responder.start();  //启动responder
    listener.start();   //启动listener
    handlers = new Handler[handlerCount];

    for (int i = 0; i < handlerCount; i++) {
      handlers[i] = new Handler(i);
      handlers[i].start();   //逐个启动Handler
    }
  }
分析过ipc.Client源码后,我们知道Client端的底层通信直接采用了阻塞式IO编程,当时我们曾做出猜测:Server端是不是也采用了阻塞式IO。现在我们仔细地分析一下吧,如果Server端也采用阻塞式IO,当连接进来的Client端很多时,势必会影响Server端的性能。hadoop的实现者们考虑到了这点,所以他们采用了java NIO来实现Server端,那Server端采用java NIO是怎么建立连接的呢?分析源码得知,Server端采用Listener监听客户端的连接,下面先分析一下Listener的构造函数吧:
public Listener() throws IOException {
      address = new InetSocketAddress(bindAddress, port);
      // 创建ServerSocketChannel,并设置成非阻塞式
      acceptChannel = ServerSocketChannel.open();
      acceptChannel.configureBlocking(false);

      // 将server socket绑定到本地端口
      bind(acceptChannel.socket(), address, backlogLength);
      port = acceptChannel.socket().getLocalPort();
      // 获得一个selector
      selector= Selector.open();
      readers = new Reader[readThreads];
      readPool = Executors.newFixedThreadPool(readThreads);
      //启动多个reader线程,为了防止请求多时服务端响应延时的问题
      for (int i = 0; i < readThreads; i++) {
        Selector readSelector = Selector.open();
        Reader reader = new Reader(readSelector);
        readers[i] = reader;
        readPool.execute(reader);
      }
      // 注册连接事件
      acceptChannel.register(selector, SelectionKey.OP_ACCEPT);
      this.setName("IPC Server listener on " + port);
      this.setDaemon(true);
    }
在启动Listener线程时,服务端会一直等待客户端的连接,下面贴出Server.Listener类的run()方法:
public void run() {
     •••
      while (running) {
        SelectionKey key = null;
        try {
          selector.select();
          Iterator<SelectionKey> iter = selector.selectedKeys().iterator();
          while (iter.hasNext()) {
            key = iter.next();
            iter.remove();
            try {
              if (key.isValid()) {
                if (key.isAcceptable())
                  doAccept(key);     //具体的连接方法
              }
            } catch (IOException e) {
            }
            key = null;
          }
        } catch (OutOfMemoryError e) {
       •••
    }
Server.Listener类中doAccept()方法中的关键源码:
void doAccept(SelectionKey key) throws IOException,  OutOfMemoryError {
      Connection c = null;
      ServerSocketChannel server = (ServerSocketChannel) key.channel();
      SocketChannel channel;
      while ((channel = server.accept()) != null) { //建立连接
        channel.configureBlocking(false);
        channel.socket().setTcpNoDelay(tcpNoDelay);
        Reader reader = getReader();  //从readers池中获得一个reader
        try {
          reader.startAdd(); // 激活readSelector,设置adding为true
          SelectionKey readKey = reader.registerChannel(channel);//将读事件设置成兴趣事件
          c = new Connection(readKey, channel, System.currentTimeMillis());//创建一个连接对象
          readKey.attach(c);   //将connection对象注入readKey
          synchronized (connectionList) {
            connectionList.add(numConnections, c);
            numConnections++;
          }
        •••
        } finally {
//设置adding为false,采用notify()唤醒一个reader,其实代码十三中启动的每个reader都使
//用了wait()方法等待。因篇幅有限,就不贴出源码了。
          reader.finishAdd();
        }
      }
    }
当reader被唤醒,reader接着执行doRead()方法。
下面贴出Server.Listener.Reader类中的doRead()方法和Server.Connection类中的readAndProcess()方法源码:
方法一:
 void doRead(SelectionKey key) throws InterruptedException {
      int count = 0;
      Connection c = (Connection)key.attachment();  //获得connection对象
      if (c == null) {
        return;
      }
      c.setLastContact(System.currentTimeMillis());
      try {
        count = c.readAndProcess();    // 接受并处理请求
      } catch (InterruptedException ieo) {
       •••
      }
     •••
}

方法二:
public int readAndProcess() throws IOException, InterruptedException {
      while (true) {
        •••
        if (!rpcHeaderRead) {
          if (rpcHeaderBuffer == null) {
            rpcHeaderBuffer = ByteBuffer.allocate(2);
          }
         //读取请求头
          count = channelRead(channel, rpcHeaderBuffer);
          if (count < 0 || rpcHeaderBuffer.remaining() > 0) {
            return count;
          }
        // 读取请求版本号
          int version = rpcHeaderBuffer.get(0);
          byte[] method = new byte[] {rpcHeaderBuffer.get(1)};
        •••

          data = ByteBuffer.allocate(dataLength);
        }
        // 读取请求
        count = channelRead(channel, data);

        if (data.remaining() == 0) {
         •••
          if (useSasl) {
         •••
          } else {
            processOneRpc(data.array());//处理请求
          }
        •••
          }
        }
        return count;
      }
    }
下面贴出Server.Connection类中的processOneRpc()方法和processData()方法的源码。
方法一:
 private void processOneRpc(byte[] buf) throws IOException,
        InterruptedException {
      if (headerRead) {
        processData(buf);
      } else {
        processHeader(buf);
        headerRead = true;
        if (!authorizeConnection()) {
          throw new AccessControlException("Connection from " + this
              + " for protocol " + header.getProtocol()
              + " is unauthorized for user " + user);
        }
      }
}
方法二:
    private void processData(byte[] buf) throws  IOException, InterruptedException {
      DataInputStream dis =
        new DataInputStream(new ByteArrayInputStream(buf));
      int id = dis.readInt();      // 尝试读取id
      Writable param = ReflectionUtils.newInstance(paramClass, conf);//读取参数
      param.readFields(dis);

      Call call = new Call(id, param, this);  //封装成call
      callQueue.put(call);   // 将call存入callQueue
      incRpcCount();  // 增加rpc请求的计数
    }
web service接口就是RPC中的stub组件,规定了server能够提供的服务(web service),这在server和client上是一致的,但是也是跨语言跨平台的。同时,由于web service规范中的WSDL文件的存在,现在各平台的web service框架,都可以基于WSDL文件,自动生成web service接口 。
两者差不多,只是传输的协议不同。
Reference:
-
http://www.cnblogs.com/LBSer/p/4853234.html
-
http://weixiaolu.iteye.com/blog/1504898
-
http://kyfxbl.iteye.com/blog/1745550
