2 案例2:配置git
2.1 问题
安装git版本控制软件
设置用户信息,如用户名、email等
设置默认编辑器为vim
查看用户配置
- 1
- 2
- 3
- 4
2.2 步骤
实现此案例需要按照如下步骤进行。
步骤一:安装git版本控制软件
[root@localhost ~]# yum install -y git
已安装:
  git.x86_64 0:1.8.3.1-11.el7
作为依赖被安装:
  perl-Error.noarch 1:0.17020-2.el7            perl-Git.noarch 0:1.8.3.1-11.el7
  perl-TermReadKey.x86_64 0:2.30-20.el7
完毕!
[root@localhost ~]# git –version        #查看版本
git version 1.8.3.1
- 1
- 2
- 3
- 4
- 5
- 6
- 7
- 8
- 9
步骤二:设置用户信息
Git 提供了一个叫做 git config 的工具,专门用来配置或读取相应的工作环境变量。
[root@localhost ~]# git config --global user.name "Mr.Zhang"
[root@localhost ~]# git config --global user.email [email protected]
- 1
- 2
步骤三:设置默认编译器为vim
[root@localhost ~]# git config --global core.editor vim
- 1
步骤四:查看配置
[root@localhost ~]# git config --list
user.name=Mr.Zhang
[email protected]
core.editor=vim
- 1
- 2
- 3
- 4
3 案例3:git本地操作
3.1 问题
创建devops目录
为devops创建git仓库
新建文件hello.py,并将文件初始化到仓库中
修改hello.py并将其更新到仓库
从他库中删除hello.py
- 1
- 2
- 3
- 4
- 5
3.2 方案
Git 使用 git init 命令来初始化一个 Git 仓库,Git 的很多命令都需要在 Git 的仓库中运行,所以git init是使用 Git 的第一个命令。添加文件第一步使用git add是将文件添加进暂存区,第二部git commit提交更改,实际上将暂存区的所有内容提交到仓库。
3.3 步骤
实现此案例需要按照如下步骤进行。
步骤一:创建目录初始化
此时创建了一个空仓库,可以发现当前目录下有一个隐藏的目录.git,此目录为Git来跟踪管理版本库,建议不要修改内部文件,以免Git仓库遭到破坏。
[root@localhost ~]# mkdir devops
[root@localhost ~]# cd devops/
[root@localhost devops]# git init        #通过命令把目录变成Git可以管理的仓库
初始化空的 Git 版本库于 /root/devops/.git/
[root@localhost devops]# git init devops
初始化空的 Git 版本库于 /root/devops/devops/.git/
[root@localhost devops]# ls -a
.  ..  devops  .git
- 1
- 2
- 3
- 4
- 5
- 6
- 7
- 8
步骤二:新建文件hello.py,并将文件初始化到仓库中
1)添加指定文件hello.py到暂存区
[root@localhost devops]# echo 'print("hello world!")' > hello.py
[root@localhost devops]# git add hello.py        #将文件添加到暂存区
[root@localhost devops]# git status        #查看状态
# 位于分支 master
#
# 初始提交
#
# 要提交的变更:
#   (使用 "git rm --cached <file>..." 撤出暂存区)
#
#    新文件:    hello.py
- 1
- 2
- 3
- 4
- 5
- 6
- 7
- 8
- 9
- 10
- 11
2)将暂存区文件初始化到仓库中
[root@localhost devops]# git commit -m "初始化仓库"       #把暂存区所有内容提交到分支
[master 8e6e22a] 初始化仓库
 1 file changed, 1 insertion(+)
 create mode 100644 hello.py
[root@localhost devops]# git status
# 位于分支 master
无文件要提交,干净的工作区
- 1
- 2
- 3
- 4
- 5
- 6
- 7
步骤三:修改hello.py并将其更新到仓库
[root@localhost devops]# echo 'print("done.")' >> hello.py
[root@localhost devops]# git commit -am "向hello.py添加新行"
[master 1ca03d5] 向hello.py添加新行
 1 file changed, 1 insertion(+)
- 1
- 2
- 3
- 4
步骤四:从库中删除hello.py文件
要从 Git 中移除某个文件,就必须要从已跟踪文件清单中移除
[root@localhost devops]# git ls-files         #查看版本库中文件
hello.py
niha.py
[root@localhost devops]# git rm hello.py
rm 'hello.py'
[root@localhost devops]# git commit -m '删除hello.py'
[master a37ff34] 删除hello.py
 1 file changed, 2 deletions(-)
 delete mode 100644 hello.py
- 1
- 2
- 3
- 4
- 5
- 6
- 7
- 8
- 9
4 案例4:使用自建gitlab服务器
4.1 问题
通过docker搭建gitlab服务器
新建群组devops
新建项目core_py
新建用户,他/她在devops组中是主程序员
新用户上传版本库到gitlab
熟悉git远程操作方法
- 1
- 2
- 3
- 4
- 5
- 6
4.2 步骤
实现此案例需要按照如下步骤进行。
步骤一:通过docker搭建gitlab服务器
1)从ftp://172.40.50.116/pub/docker/images/处获取gitlab_zh.tar镜像文件,导入中文版gitlab镜像
[root@localhost devops]# docker load < /path/to/gitlab_zh.tar
a94e0d5a7c40: Loading layer [==================================================>]  116.5MB/116.5MB
88888b9b1b5b: Loading layer [==================================================>]  15.87kB/15.87kB
52f389ea437e: Loading layer [==================================================>]  14.85kB/14.85kB
52a7ea2bb533: Loading layer [==================================================>]  5.632kB/5.632kB
db584c622b50: Loading layer [==================================================>]  3.072kB/3.072kB
62786ff6a243: Loading layer [==================================================>]  75.85MB/75.85MB
71bc04f4b7c7: Loading layer [==================================================>]  2.048kB/2.048kB
26e083d332d8: Loading layer [==================================================>]  2.048kB/2.048kB
2c02e58e96b8: Loading layer [==================================================>]  2.048kB/2.048kB
589c7a23de2a: Loading layer [==================================================>]  15.87kB/15.87kB
44474d2cdcd1: Loading layer [==================================================>]  1.359GB/1.359GB
41c94e16b901: Loading layer [==================================================>]  16.78MB/16.78MB
04cafa6a1534: Loading layer [==================================================>]    160MB/160MB
Loaded image: gitlab_zh:latest
- 1
- 2
- 3
- 4
- 5
- 6
- 7
- 8
- 9
- 10
- 11
- 12
- 13
- 14
- 15
2)将物理主机ssh端口改为2022后,输入如下命令起动容器:
[root@localhost devops]# docker run -d -h gitlab --name gitlab -p 443:443 -p 80:80 -p 22:22 --restart always -v /srv/gitlab/config:/etc/gitlab -v /srv/gitlab/logs:/var/log/gitlab -v /srv/gitlab/data gitlab_zh:latest
b9dc65e0def51a4d09d2a597b2b929490e972a34f3de993439d2f7cc22039b77
此时端口成功启动
- 1
- 2
- 3
步骤二:新建群组
1)在浏览器地址栏中输入启动容器ip地址即可登录GitLab的界面,第一次登录使用的用户名为root,首次登录会强制用户修改密码。密码修改成功后,输入新密码进行登录,如图-6所示:

图-6
2)进入网站后点击菜单栏-工具图标打开管理区域,创建群组,使用群组管理项目和成员,如图-7、图-8所示:

图-7

图-8
步骤三:在Gitlab主页中新建一个项目
显示如图-9所示:

图-9
步骤四:在Gitlab主页中新建一个用户
1)在Gitlab主页中新建一个用户,如图-10所示:

图-10
2)设置账号基本信息,其他均可为默认,如图-11所示:
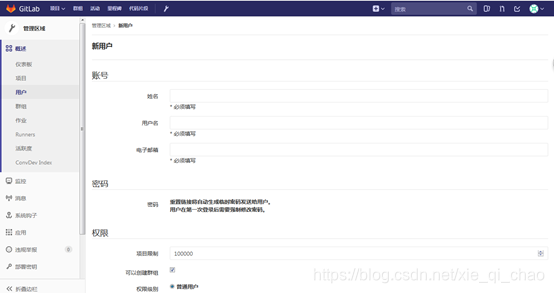
图-11
3)创建用户后,再次编辑可设置密码,如图-12所示:
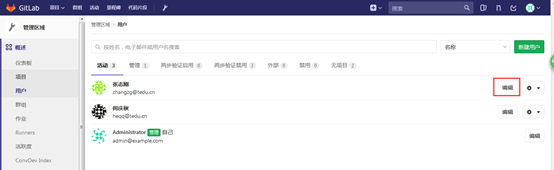
图-12
4)root用户将新用户加入组中,点击devops进入群组,设置管理权限,在群组中添加成员并设置新成员为“主程序员”,如图-13、图-14、图-15所示:

图-13

图-14

图-15
5)在终端中输入ssh-keygen命令,一路enter,可以生成缺省的rsa方式的sshkey,将/root/.ssh/id_rsa.pub中生成的rsa公钥内容拷到gitlab中,如图-16所示,进入设置页面对ssh进行配置:
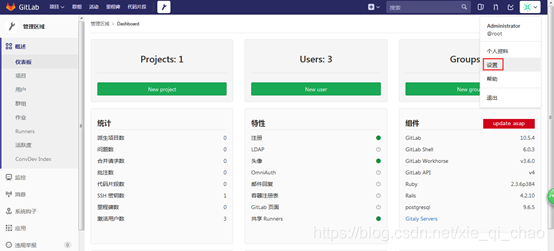
图-16
SSH是一种安全协议,在你的电脑与GitLab服务器进行通信时,我们使用SSH密钥(SSH Keys)认证的方式来保证通信安全。你可以在网络上搜索到关于SSH密钥的更多介绍;下面我们重点讲解如何创建 SSH密钥,并将密钥中的公钥添加到GitLab,以便我们通过SSH协议来访问Git仓库。
显示如图-17所示:
- 1
- 2

图-17
步骤五:简单远程操作及新用户上传版本库到gitlab
1)克隆远程库代码到本地
# git clone [email protected]:devops/core_py.git
- 1
2)创建一个文件
# cd /root/whsir/whsir
# echo "Hello" > hello.py
- 1
- 2
3)将文件添加到仓库
# git add hello.py
- 1
4)提交文件到仓库,输出信息如图-18所示:
# git commit -m "hello文件"
- 1

图-18
5)关联远程库
# git remote add origin [email protected]:root/whsir.git
- 1
6)最后推送到gitlab上,输出信息如图-19所示:
# git push origin master
- 1
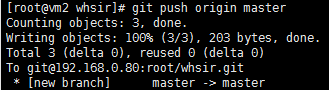
图-19
</div>
<link href="https://csdnimg.cn/release/phoenix/mdeditor/markdown_views-60ecaf1f42.css" rel="stylesheet">
<div class="more-toolbox">
<div class="left-toolbox">
<ul class="toolbox-list">
<li class="tool-item tool-active is-like "><a href="javascript:;"><svg class="icon" aria-hidden="true">
<use xlink:href="#csdnc-thumbsup"></use>
</svg><span class="name">点赞</span>
<span class="count"></span>
</a></li>
<li class="tool-item tool-active is-collection "><a href="javascript:;" data-report-click="{"mod":"popu_824"}"><svg class="icon" aria-hidden="true">
<use xlink:href="#icon-csdnc-Collection-G"></use>
</svg><span class="name">收藏</span></a></li>
<li class="tool-item tool-active is-share"><a href="javascript:;" data-report-click="{"mod":"1582594662_002"}"><svg class="icon" aria-hidden="true">
<use xlink:href="#icon-csdnc-fenxiang"></use>
</svg>分享</a></li>
<!--打赏开始-->
<!--打赏结束-->
<li class="tool-item tool-more">
<a>
<svg t="1575545411852" class="icon" viewBox="0 0 1024 1024" version="1.1" xmlns="http://www.w3.org/2000/svg" p-id="5717" xmlns:xlink="http://www.w3.org/1999/xlink" width="200" height="200"><defs><style type="text/css"></style></defs><path d="M179.176 499.222m-113.245 0a113.245 113.245 0 1 0 226.49 0 113.245 113.245 0 1 0-226.49 0Z" p-id="5718"></path><path d="M509.684 499.222m-113.245 0a113.245 113.245 0 1 0 226.49 0 113.245 113.245 0 1 0-226.49 0Z" p-id="5719"></path><path d="M846.175 499.222m-113.245 0a113.245 113.245 0 1 0 226.49 0 113.245 113.245 0 1 0-226.49 0Z" p-id="5720"></path></svg>
</a>
<ul class="more-box">
<li class="item"><a class="article-report">文章举报</a></li>
</ul>
</li>
</ul>
</div>
</div>
<div class="person-messagebox">
<div class="left-message"><a href="https://blog.csdn.net/xie_qi_chao">
<img src="https://profile.csdnimg.cn/B/F/6/3_xie_qi_chao" class="avatar_pic" username="xie_qi_chao">
<img src="https://g.csdnimg.cn/static/user-reg-year/1x/2.png" class="user-years">
</a></div>
<div class="middle-message">
<div class="title"><span class="tit"><a href="https://blog.csdn.net/xie_qi_chao" data-report-click="{"mod":"popu_379"}" target="_blank">解启超</a></span>
</div>
<div class="text"><span>发布了404 篇原创文章</span> · <span>获赞 56</span> · <span>访问量 4万+</span></div>
</div>
<div class="right-message">
<a href="https://im.csdn.net/im/main.html?userName=xie_qi_chao" target="_blank" class="btn btn-sm btn-red-hollow bt-button personal-letter">私信
</a>
<a class="btn btn-sm attented bt-button personal-watch" data-report-click="{"mod":"popu_379"}">已关注</a>
</div>
</div>
</div>
</article>

2 案例2:配置git
2.1 问题
安装git版本控制软件
设置用户信息,如用户名、email等
设置默认编辑器为vim
查看用户配置
- 1
- 2
- 3
- 4
2.2 步骤
实现此案例需要按照如下步骤进行。
步骤一:安装git版本控制软件
[root@localhost ~]# yum install -y git
已安装:
  git.x86_64 0:1.8.3.1-11.el7
作为依赖被安装:
  perl-Error.noarch 1:0.17020-2.el7            perl-Git.noarch 0:1.8.3.1-11.el7
  perl-TermReadKey.x86_64 0:2.30-20.el7
完毕!
[root@localhost ~]# git –version        #查看版本
git version 1.8.3.1
- 1
- 2
- 3
- 4
- 5
- 6
- 7
- 8
- 9
步骤二:设置用户信息
Git 提供了一个叫做 git config 的工具,专门用来配置或读取相应的工作环境变量。
[root@localhost ~]# git config --global user.name "Mr.Zhang"
[root@localhost ~]# git config --global user.email [email protected]
- 1
- 2
步骤三:设置默认编译器为vim
[root@localhost ~]# git config --global core.editor vim
- 1
步骤四:查看配置
[root@localhost ~]# git config --list
user.name=Mr.Zhang
[email protected]
core.editor=vim
- 1
- 2
- 3
- 4
3 案例3:git本地操作
3.1 问题
创建devops目录
为devops创建git仓库
新建文件hello.py,并将文件初始化到仓库中
修改hello.py并将其更新到仓库
从他库中删除hello.py
- 1
- 2
- 3
- 4
- 5
3.2 方案
Git 使用 git init 命令来初始化一个 Git 仓库,Git 的很多命令都需要在 Git 的仓库中运行,所以git init是使用 Git 的第一个命令。添加文件第一步使用git add是将文件添加进暂存区,第二部git commit提交更改,实际上将暂存区的所有内容提交到仓库。
3.3 步骤
实现此案例需要按照如下步骤进行。
步骤一:创建目录初始化
此时创建了一个空仓库,可以发现当前目录下有一个隐藏的目录.git,此目录为Git来跟踪管理版本库,建议不要修改内部文件,以免Git仓库遭到破坏。
[root@localhost ~]# mkdir devops
[root@localhost ~]# cd devops/
[root@localhost devops]# git init        #通过命令把目录变成Git可以管理的仓库
初始化空的 Git 版本库于 /root/devops/.git/
[root@localhost devops]# git init devops
初始化空的 Git 版本库于 /root/devops/devops/.git/
[root@localhost devops]# ls -a
.  ..  devops  .git
- 1
- 2
- 3
- 4
- 5
- 6
- 7
- 8
步骤二:新建文件hello.py,并将文件初始化到仓库中
1)添加指定文件hello.py到暂存区
[root@localhost devops]# echo 'print("hello world!")' > hello.py
[root@localhost devops]# git add hello.py        #将文件添加到暂存区
[root@localhost devops]# git status        #查看状态
# 位于分支 master
#
# 初始提交
#
# 要提交的变更:
#   (使用 "git rm --cached <file>..." 撤出暂存区)
#
#    新文件:    hello.py
- 1
- 2
- 3
- 4
- 5
- 6
- 7
- 8
- 9
- 10
- 11
2)将暂存区文件初始化到仓库中
[root@localhost devops]# git commit -m "初始化仓库"       #把暂存区所有内容提交到分支
[master 8e6e22a] 初始化仓库
 1 file changed, 1 insertion(+)
 create mode 100644 hello.py
[root@localhost devops]# git status
# 位于分支 master
无文件要提交,干净的工作区
- 1
- 2
- 3
- 4
- 5
- 6
- 7
步骤三:修改hello.py并将其更新到仓库
[root@localhost devops]# echo 'print("done.")' >> hello.py
[root@localhost devops]# git commit -am "向hello.py添加新行"
[master 1ca03d5] 向hello.py添加新行
 1 file changed, 1 insertion(+)
- 1
- 2
- 3
- 4
步骤四:从库中删除hello.py文件
要从 Git 中移除某个文件,就必须要从已跟踪文件清单中移除
[root@localhost devops]# git ls-files         #查看版本库中文件
hello.py
niha.py
[root@localhost devops]# git rm hello.py
rm 'hello.py'
[root@localhost devops]# git commit -m '删除hello.py'
[master a37ff34] 删除hello.py
 1 file changed, 2 deletions(-)
 delete mode 100644 hello.py
- 1
- 2
- 3
- 4
- 5
- 6
- 7
- 8
- 9
4 案例4:使用自建gitlab服务器
4.1 问题
通过docker搭建gitlab服务器
新建群组devops
新建项目core_py
新建用户,他/她在devops组中是主程序员
新用户上传版本库到gitlab
熟悉git远程操作方法
- 1
- 2
- 3
- 4
- 5
- 6
4.2 步骤
实现此案例需要按照如下步骤进行。
步骤一:通过docker搭建gitlab服务器
1)从ftp://172.40.50.116/pub/docker/images/处获取gitlab_zh.tar镜像文件,导入中文版gitlab镜像
[root@localhost devops]# docker load < /path/to/gitlab_zh.tar
a94e0d5a7c40: Loading layer [==================================================>]  116.5MB/116.5MB
88888b9b1b5b: Loading layer [==================================================>]  15.87kB/15.87kB
52f389ea437e: Loading layer [==================================================>]  14.85kB/14.85kB
52a7ea2bb533: Loading layer [==================================================>]  5.632kB/5.632kB
db584c622b50: Loading layer [==================================================>]  3.072kB/3.072kB
62786ff6a243: Loading layer [==================================================>]  75.85MB/75.85MB
71bc04f4b7c7: Loading layer [==================================================>]  2.048kB/2.048kB
26e083d332d8: Loading layer [==================================================>]  2.048kB/2.048kB
2c02e58e96b8: Loading layer [==================================================>]  2.048kB/2.048kB
589c7a23de2a: Loading layer [==================================================>]  15.87kB/15.87kB
44474d2cdcd1: Loading layer [==================================================>]  1.359GB/1.359GB
41c94e16b901: Loading layer [==================================================>]  16.78MB/16.78MB
04cafa6a1534: Loading layer [==================================================>]    160MB/160MB
Loaded image: gitlab_zh:latest
- 1
- 2
- 3
- 4
- 5
- 6
- 7
- 8
- 9
- 10
- 11
- 12
- 13
- 14
- 15
2)将物理主机ssh端口改为2022后,输入如下命令起动容器:
[root@localhost devops]# docker run -d -h gitlab --name gitlab -p 443:443 -p 80:80 -p 22:22 --restart always -v /srv/gitlab/config:/etc/gitlab -v /srv/gitlab/logs:/var/log/gitlab -v /srv/gitlab/data gitlab_zh:latest
b9dc65e0def51a4d09d2a597b2b929490e972a34f3de993439d2f7cc22039b77
此时端口成功启动
- 1
- 2
- 3
步骤二:新建群组
1)在浏览器地址栏中输入启动容器ip地址即可登录GitLab的界面,第一次登录使用的用户名为root,首次登录会强制用户修改密码。密码修改成功后,输入新密码进行登录,如图-6所示:
图-6
2)进入网站后点击菜单栏-工具图标打开管理区域,创建群组,使用群组管理项目和成员,如图-7、图-8所示:
图-7
图-8
步骤三:在Gitlab主页中新建一个项目
显示如图-9所示:
图-9
步骤四:在Gitlab主页中新建一个用户
1)在Gitlab主页中新建一个用户,如图-10所示:
图-10
2)设置账号基本信息,其他均可为默认,如图-11所示:
图-11
3)创建用户后,再次编辑可设置密码,如图-12所示:
图-12
4)root用户将新用户加入组中,点击devops进入群组,设置管理权限,在群组中添加成员并设置新成员为“主程序员”,如图-13、图-14、图-15所示:
图-13
图-14
图-15
5)在终端中输入ssh-keygen命令,一路enter,可以生成缺省的rsa方式的sshkey,将/root/.ssh/id_rsa.pub中生成的rsa公钥内容拷到gitlab中,如图-16所示,进入设置页面对ssh进行配置:
图-16
SSH是一种安全协议,在你的电脑与GitLab服务器进行通信时,我们使用SSH密钥(SSH Keys)认证的方式来保证通信安全。你可以在网络上搜索到关于SSH密钥的更多介绍;下面我们重点讲解如何创建 SSH密钥,并将密钥中的公钥添加到GitLab,以便我们通过SSH协议来访问Git仓库。
显示如图-17所示:
- 1
- 2
图-17
步骤五:简单远程操作及新用户上传版本库到gitlab
1)克隆远程库代码到本地
# git clone [email protected]:devops/core_py.git
- 1
2)创建一个文件
# cd /root/whsir/whsir
# echo "Hello" > hello.py
- 1
- 2
3)将文件添加到仓库
# git add hello.py
- 1
4)提交文件到仓库,输出信息如图-18所示:
# git commit -m "hello文件"
- 1
图-18
5)关联远程库
# git remote add origin [email protected]:root/whsir.git
- 1
6)最后推送到gitlab上,输出信息如图-19所示:
# git push origin master
- 1
图-19
</div>
<link href="https://csdnimg.cn/release/phoenix/mdeditor/markdown_views-60ecaf1f42.css" rel="stylesheet">
<div class="more-toolbox">
<div class="left-toolbox">
<ul class="toolbox-list">
<li class="tool-item tool-active is-like "><a href="javascript:;"><svg class="icon" aria-hidden="true">
<use xlink:href="#csdnc-thumbsup"></use>
</svg><span class="name">点赞</span>
<span class="count"></span>
</a></li>
<li class="tool-item tool-active is-collection "><a href="javascript:;" data-report-click="{"mod":"popu_824"}"><svg class="icon" aria-hidden="true">
<use xlink:href="#icon-csdnc-Collection-G"></use>
</svg><span class="name">收藏</span></a></li>
<li class="tool-item tool-active is-share"><a href="javascript:;" data-report-click="{"mod":"1582594662_002"}"><svg class="icon" aria-hidden="true">
<use xlink:href="#icon-csdnc-fenxiang"></use>
</svg>分享</a></li>
<!--打赏开始-->
<!--打赏结束-->
<li class="tool-item tool-more">
<a>
<svg t="1575545411852" class="icon" viewBox="0 0 1024 1024" version="1.1" xmlns="http://www.w3.org/2000/svg" p-id="5717" xmlns:xlink="http://www.w3.org/1999/xlink" width="200" height="200"><defs><style type="text/css"></style></defs><path d="M179.176 499.222m-113.245 0a113.245 113.245 0 1 0 226.49 0 113.245 113.245 0 1 0-226.49 0Z" p-id="5718"></path><path d="M509.684 499.222m-113.245 0a113.245 113.245 0 1 0 226.49 0 113.245 113.245 0 1 0-226.49 0Z" p-id="5719"></path><path d="M846.175 499.222m-113.245 0a113.245 113.245 0 1 0 226.49 0 113.245 113.245 0 1 0-226.49 0Z" p-id="5720"></path></svg>
</a>
<ul class="more-box">
<li class="item"><a class="article-report">文章举报</a></li>
</ul>
</li>
</ul>
</div>
</div>
<div class="person-messagebox">
<div class="left-message"><a href="https://blog.csdn.net/xie_qi_chao">
<img src="https://profile.csdnimg.cn/B/F/6/3_xie_qi_chao" class="avatar_pic" username="xie_qi_chao">
<img src="https://g.csdnimg.cn/static/user-reg-year/1x/2.png" class="user-years">
</a></div>
<div class="middle-message">
<div class="title"><span class="tit"><a href="https://blog.csdn.net/xie_qi_chao" data-report-click="{"mod":"popu_379"}" target="_blank">解启超</a></span>
</div>
<div class="text"><span>发布了404 篇原创文章</span> · <span>获赞 56</span> · <span>访问量 4万+</span></div>
</div>
<div class="right-message">
<a href="https://im.csdn.net/im/main.html?userName=xie_qi_chao" target="_blank" class="btn btn-sm btn-red-hollow bt-button personal-letter">私信
</a>
<a class="btn btn-sm attented bt-button personal-watch" data-report-click="{"mod":"popu_379"}">已关注</a>
</div>
</div>
</div>
</article>